
DISCLOSURE: This site contains some affiliate links to products. I may receive a commission for purchases made through these links (at no cost to you). As an Amazon Associate I earn from qualifying purchases. Thank you!
Hello Folks! Scott here with my 10 Cards featuring the Love From Lizi January 2020 “Hello Sweetie” Card Kit. Cupcakes, donuts, cookies and biscuits are featured in this kit with a bright spring palette (lots of pink!) and tons of supplies! I apologize for being tardy with this post. I did some traveling over the holidays – a little bit of a “Second Christmas” with family in Kansas – and I’m a little slow to get back into the groove…!

If you made a New Years resolution to shed a few pounds, then this kit might push you into a relapse with all the goodies sprinkled throughout – OH – and sprinkles too! As I always do with a LFL kit, I made card bases out of the five sheets of card stock included.

For my first card, I fussy cut the “row of donuts” pattern paper (discarding the pink portion) and die cut it to match the the white “sprinkles” pattern paper with a Lawn Fawn Stitched Rectangle die. I glued the background panel to the Pink card base, and framed that panel with some of the Lemon Yellow peel offs. I stamped the sentiment using Walnut Stain Distress Oxide ink, and embossed that with some clear embossing powder.
I did add some Glossy Accents to the ‘glazed’ portions of the donuts, and when that was dry, added that panel to the card base using foam tape. A few small sequins from our sequin mix pulls your focus towards the sentiment, and we have a nice pun-ny card with some truly appetizing donuts to temp you with! It doesn’t look like I’m going to be able to avoid the pink completely in this kit, but, hey… even Homer Simpson eats pink-frosted donuts!! With sprinkles!
We got two sheets of matte mirror specialty card stock along with an embossing folder this month, and I thought that gave us an opportunity to add a touch of classy shine.
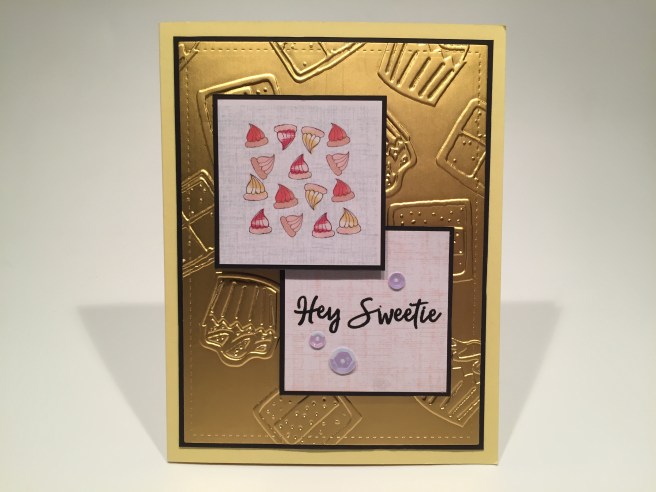
I die cut a piece of the Gold mirror card stock with a LFSRD and embossed that with the “falling sweeties” embossing folder – love how nicely that card stock takes the embossing! I matted that panel on a thin black mat and glued it directly to the Yellow card base. I fussy cut the bunch of “sweeties” (I believe Lizi called those little merengue cookies “sweeties”) from one of the pattern papers and cut a matching blank piece from another. I matted both squares to a thin black mat and stamped the sentiment on the blank one using VersaFine Onyx Black ink and then embossed that with more clear embossing powder. The two square panels are attached to the card front using foam tape – a single layer under the sentiment and a double layer under the sweeties. A few more sequins adds a touch of sparkle to the sentiment and I am surprised how the use of that mirror card stock takes this card beyond the simply playful and makes it a bit more classy!
Our stamp set this month has a couple of pun-ny sentiments and a great assortment of cookies. I had to play with the gingerbread man stamp first!

I stamped the gingerbread man twice on Neenah Classic Crest Solar White 80# card stock and colored them with my Spectrum Noir alcohol markers. I used a VersaMarker pen and White embossing powder to add the ‘icing’ highlights and then fussy cut them out and glued them to a piece of the blue ‘linen’ pattern paper. I bisected the sentiment stamp and stamped that below the cookies using VersaFine ink. I marked a 2″ band behind the gingerbread men, and fussy cut the pattern paper allowing for a bit of a border around their arms and legs.
I cut the background pattern paper to 3.75″ wide and glued that to the Pale Blue card base and trimmed the edges with some Sky Blue/ Silver pin stripe peel offs from our LFL November 2019 kit, and added more peel offs to the straight edges of the Blue pattern paper. The center panel is attached to the card front with foam tape, the “linzer” cookie (from the die-cut sheet) is attached with a spot of foam tape, and has a layer of Glossy Accents on the ‘jam’. The blue satin bow adds the final touch for a fun (almost pun-ny) valentine or thank you or love you card. All of the fine detail on the cookie stamps in this set makes them nicely dimensional as well as quick and easy to color.
Due to the “smart cookie” sentiment in this kit I kind of felt like this card was a given!
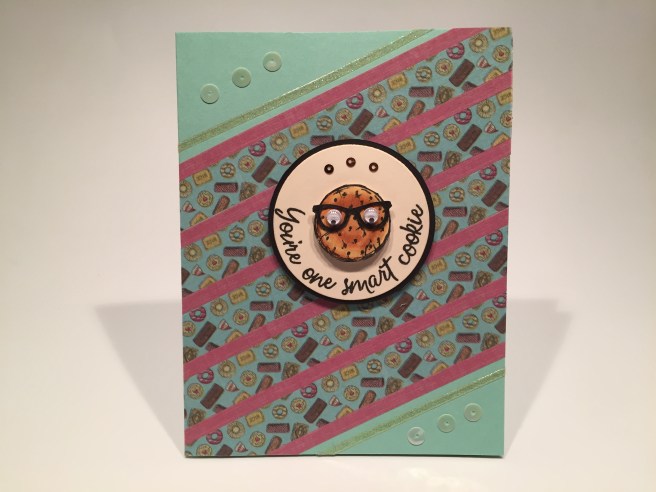
I took two of our washi tape rolls and alternated them on the Green card base for this fun striped pattern. I stamped the cookie on Neenah 80# card stock, colored it with my Spectrum Noir markers and fussy cut it out. I die-cut a piece of Ivory card stock with a Darice nesting circle die and curved the sentiment using my stamp platform to match the circle and stamped the sentiment using VersaFine Onyx Black ink. I matted that on a thin black mat and mounted it to the card front with foam tape.
I couldn’t resist putting glasses on this cookie, since I had a perfect stamp from the Simon Says Stamp Some Bunny stamp set that was featured with their March 2017 kit. Stamped and colored in black, I cut them out with a craft knife and glued them to the cookie. These google eyes fit perfectly, and make me laugh! I attached the cookie using more foam tape, and added a couple strips of the peel offs and a few sequins to finish off this fun card! I know the whole glasses/smart thing is a stereotype… but it’s always fun to anthropomorphize food items!
We had that one “chocolate” sentiment in our set, but actual chocolates were sparsely represented in this kit, so I dug around in my stash for some chocolate-y card stock.
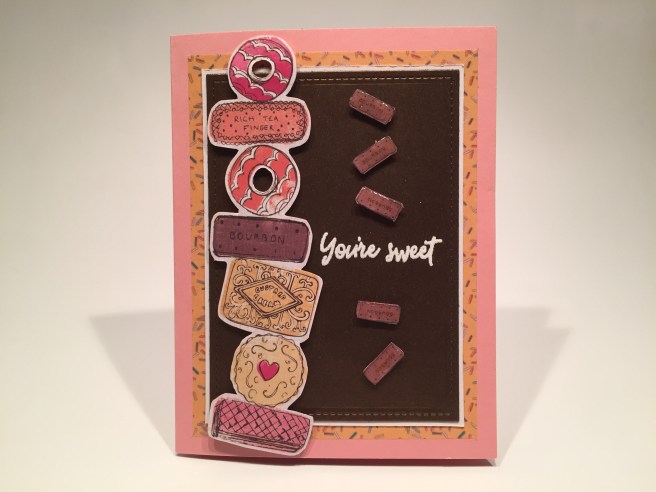
I found this Rich Copper card stock from the My Monthly Hero September 2019 Kit and it looks good enough to eat! I wanted some sprinkles for the background, but the pattern paper sprinkles thinned out towards the bottom of the page, so I used the sprinkles washi tape to create a ‘frame’ background on the pink card base. I just laid out the 4 sides of the tape frame 1/4″ from the edge of the card front and mitered the corners. I did divide this sentiment stamp and embossed the “You’re sweet” portion here using the LFL Very Vanilla embossing powder. I die-cut the ‘chocolate’ card stock with a LFSRD, matted that on a thin white mat and glued it directly on top of the washi tape frame.
I fussy cut the tower of cookies from one of the pattern papers, and fussy cut five of the small chocolate wafers from another. I added a touch of Glossy accents to the small cookies (looks more like chocolate!) and added all the pieces using foam tape. I did complete this sentiment on the inside of the card, stamping the sentiment with Walnut Stain Distress Oxide ink and embossing that with more clear embossing powder. This feels about as chocolate-y as I could get with this kit to go along with this sentiment!
I have one more sentiment from our stamp set to use, and lots of cookies to go along!
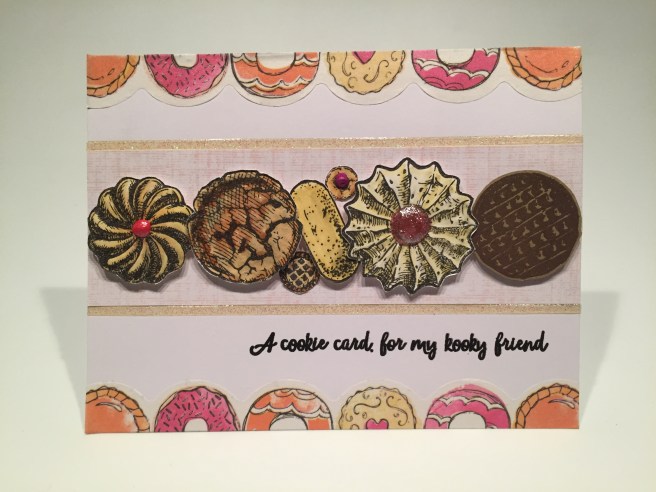
I stamped all the rest of the cookie stamps on Neenah 80# card stock, colored them all with Spectrum Noir markers and fussy cut them out. The “digestive” cookie on the far right is stamped on kraft card stock using Walnut Stain Distress Oxide ink and embossed with clear embossing powder for a little chocolate-y shine. I added some of our Nuvo Drops to the center of the biggest cookie and spots of enamel dots on two others, and some Spectrum Noir sparkle pen to the crackle cookie and tiny tart and set them aside to dry.
I cut a 1.75″ width of the ‘linen’ pattern paper and glued that to the middle of a white card base, and added peel offs to the edges. I took a strip of the shaped washi tape, cut it right down the middle and added that to the top and bottom edges of the card front. I stamped the sentiment using VersaFine ink and embossed that with clear embossing powder. Then I glued the small cookies down to the card front and attached the larger cookies using foam tape. Kudos to Lizi for giving us a good pun this month!
That actually covers all the stamps in this stamp set! Let’s take a look at our dies!

Using some E6000 spray adhesive, I covered the front of a pale Blue card base with the printed tissue paper and set that aside to dry. I die cut the frame from our matte silver specialty card stock using two LFSRDs and added a thin mat to the “Birthday wishes” die cut banner in silver too. I die cut the cupcake from Neenah 110# card stock and colored the pieces with my alcohol markers. I die-cut it a second time from more of the silver card stock and inset the sentiment on the frosting, and the base of the candle as well.
I added some sparkle pen highlights to the sweets on the background tissue and glued the frame directly to the card base. I die-cut a round piece of vellum to glue behind the cupcake, and mounted that and the banner with foam tape. The banner seemed a touch odd just sitting there below the frame, so I did add a short piece of silver cord along the top. That’s really a great cupcake die and I think that’ll get a lot of use over the years!
The “Best Wishes” die looks nice too, and I still have some ‘chocolate’ card stock!
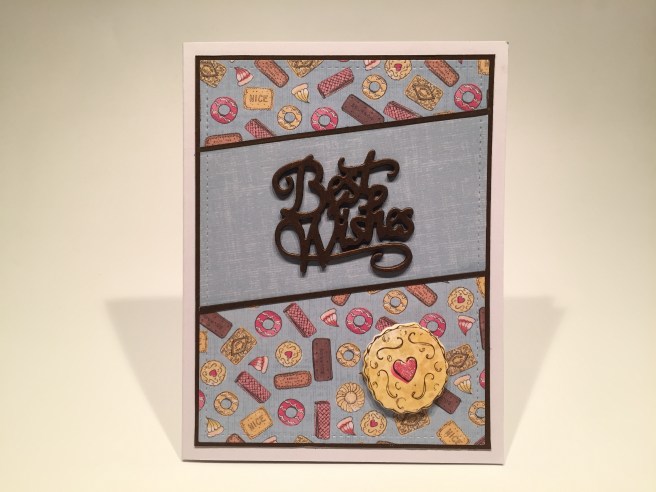
I die-cut a piece of the blue patter paper (plenty of pink on that too!) matched up with a 2″ wide piece of the blue ‘linen’ pattern paper using a LFSRD, glued them together and matted them to a thin ‘chocolate’ mat before gluing all down to a white card base. I added thin strips of the ‘chocolate’ card stock to the top and bottom of the linen strip as well. I die cut the sentiment from back card stock twice and the ‘chocolate’ card stock once and glued all three together to make this chunky sentiment.
The “linzer” cookie was removed from its clothespin, the heart enameled with the Hero Arts Glitter Lacquer pen, and some sparkle pen was added on the cookie for that special sugar effect! I glued the stacked sentiment to the middle of the panel,  and just had to cut up one more sentiment to finish this card out. On the inside, I stamped “Sweetie” (from the “Hey Sweetie” stamp) using Walnut stain Distress Oxide ink and more clear embossing powder. I think that helps justify a cookie / sweet treats card sporting a Best Wishes sentiment. Unless you might want to give this card to a friend starting a new diet! Is that mean?
I have some extra pieces from the silver frame card and the ‘chocolate’ field on the ‘You’re sweet’ card so let’s not let them go to waste!

The silver piece is from the inside of the silver frame, and the ‘chocolate’ frame is from the outside of the “You’re sweet” panel, so they fit together perfectly. I embossed the silver panel using the embossing folder, and glued that and the frame to the yellow card base. The cookie is one of the stickers glued down to a scrap of card stock and fussy cut – the heart is enameled with Glossy Accents, and some Hero Arts Prisma Glitter (from the MMH October 2019 kit) was added for a little touch of sugar sparkle.
I created this sentiment using my Silhouette software and the Sign Painter font, and printed that on a piece of photo paper to make it nice and shiny. That is a bit of a paraphrase of a Cookie Monster quote! The cookie and sentiment are attached to the card front with foam tape, and this makes quite a dear friendship card!
Though we had a couple of nice puns in our stamp set, I couldn’t resist just one more!
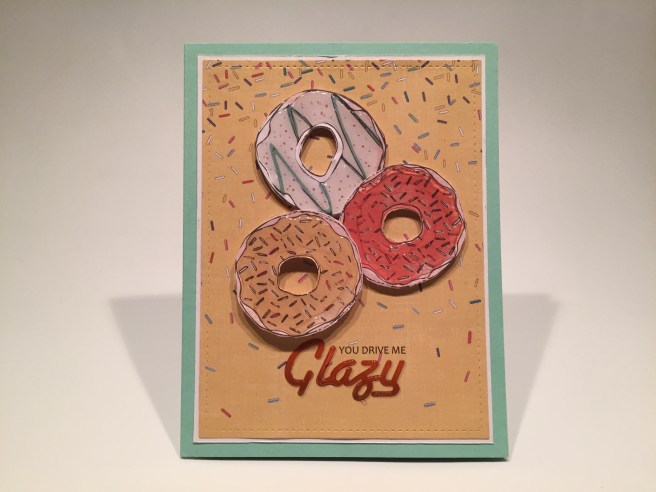
LOVE THIS PUN!! Perfect card for any loved one who has a doughnut obsession..! This card kind of turned into a referendum on different glazing mediums. I “glazed” the white donut using a Hero Arts clear lacquer pen, and the other two donuts using theNuvo Morning Dew Crystal Drops, and, of course, Glossy Accents for the sentiment. It’s always a bit of a crap-shoot when trying to “glaze” such large surfaces on a card. The Hero Arts lacquer pen worked very well and leveled out nicely but developed some light wrinkles when dry. The Nuvo Drops flowed easier but didn’t level off particularly well. All dried perfectly clear, and gave me the “glazed” effect I was going for.
I die-cut the yellow sprinkles pattern paper with a LFSRD and printed the sentiment on that using my Silhouette software and the Candara font (“you drive me”) and the Santa Fe font (Glazy). I glued that to a thin white mat and down to the last Green card base. I did take Glossy Accents to the “Glazy” portion of the sentiment and let that dry. I glued the pattern paper donuts to some scrap card stock to add some rigidity before fussy cutting all three. Those are attached to the card front with different thicknesses of foam tape. This pun never fails to bring a smile to my face!
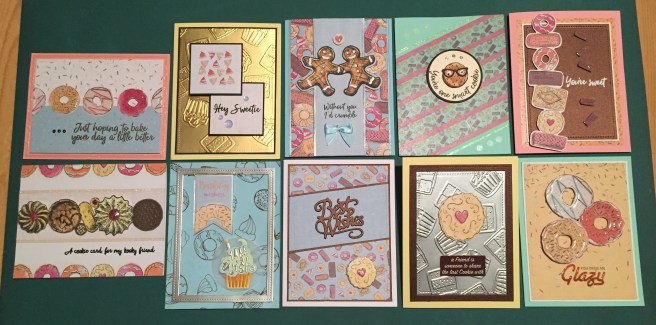
That’s my 10 Cards from the Love From Lizi January 2020 “Hey Sweetie” Card Kit. I did manage to use every single stamp in our stamp set this month. WOO-HOO! I used 10 different pieces of our pattern paper (I have SO MUCH left) a couple of the die cut sentiment pieces, one piece of tissue paper, both the silver and gold specialty card stock, the peel offs, embossing folder, a sticker, a satin bow, all four of the washi tapes, two of our three dies and even some sequins from the mix. Looks like the only thing I didn’t use at all was one of the round Gift tags . And though I didn’t use one of the clothespins (VERY chunky), I did use a decoration FROM one of the pegs! I thought the sentiments were pretty fun this month and the cookie stamps are quite nice and lend themselves to many different stamping methods!
As of posting this kit is still available at LoveFrom Lizi.com. If I have managed to inspire your imagination or titilate your sweet tooth, please use my links when you go shopping with Lizi! It is truly appreciated and helps support this page!
Thank you so much for sharing your time with me here, I’ll be back in the swing of things shortly…! Thank heavens Lizi is delaying the release of the February kit due to the Creativision trade show in Phoenix… that will help! Please share this post with others who might be interested, and don’t forget to Like me, List me, Pin me, Post me, and remember… It’s hard to be sad when you’re eating a cookie! HAPPY CRAFTING!!

Just too sweet … ; )
LikeLiked by 1 person
Argh, you’re killing me here with the cookies and donuts…and the puns! These are some seriously fun cards, and yeah..the glasses made me laugh!
LikeLike
Thanks Karen! Always much appreciated!!
LikeLike