
Hello Folks! Scott here with my 10 cards from the January 2019 My Monthly Hero Kit. Happy New Years to all! Please excuse my recent absence – I had a very busy holiday season with lots of traveling and lots of family and friends, so I actually skipped the MMH December Kit just to preserve a little bit of my own sanity! I had a blast seeing everybody, and the time off was truly rewarding! Now… back to the craft desk!! Here’s a link to my video on YouTube if you want to watch now: MMH1-19video

This month, we have a flower shop theme featuring a windowed store front and all the accouterments! As usual, we get a 6″ x 8″ clear stamp set (with a stylish bicycle as well), 21 coordinating frame cuts (including the store front and window), and a fancy Easel Die with an inner board die. We also get 10 vellum envelopes and 20 envelope seals in two patterns, a tube of Pink Glimmer lacquer, and 10 sheets of 5.5″ x 8.5″ card stock in red and pink. We don’t often get card stock in our MMH kits… looks like we’re going to be making some valentines this month! Now, you know I’m not a big fan of pink, but at least valentine cards are the perfect place to indulge in a little bit of blush! This kit reminds me of the MMH August coffee kit that had that fancy cafe die. However, the storefront in this kit has a die AND a stamp!

As I often do with a new stamp set, I did start by stamping all of the images with some VersaFine Onyx Black ink on Bristol Smooth card stock and colored them all with my Zig watercolor markers. Hero Arts always gives us high quality stamps and this set is no different. I really love that bicycle, and the store front is supremely versatile!

Next I turned to all the dies in the kit and die-cut all of my colored stamps. Most of these dies were extremely easy to line up, but I did make a die-cut template for the bicycle and the watering can… there is something so satisfying about getting a nice even border around your images when they are die-cut. Especially with intricate dies like the bicycle. If you look closely, you can see that I also stamped, colored, and fussy cut another shop awning for a little added dimension during assembly. Let’s see how all these pieces come together on a card!
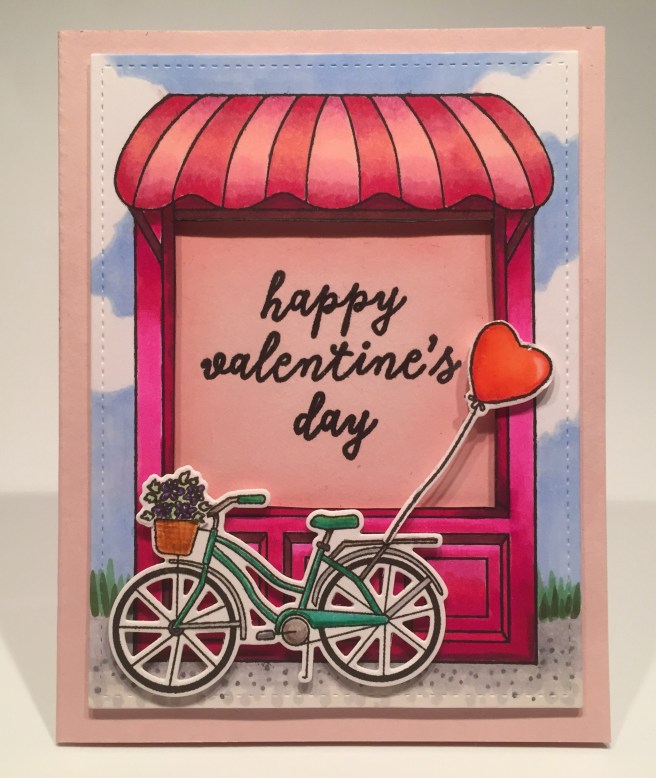
 I was really itching to put together this storefront, and was a little surprised at how large it actually is! Perfect focal point! As I did with the cafe fancy die in August, I found a ‘plant shop interior’ picture on-line, and sized it to scale with the shop before printing it out on plain paper. I glued a piece of acetate behind the window cut out, and added the second awning by gluing the top edge directly to the die cut and then adding foam squares to the bottom scallops. That gives us some great dimension on that awning as well a a place to ‘attach’ the hanging plants.
I die cut a piece of white card stock with a Lawn Fawn Stitched Rectangle die, and using the MFT Mini Cloud Edges Stencil, ink blended some clouds on the background using Broken China Distress Oxide ink and my blender brushes. I reached for my coffee stirrers once again and glued a bunch of them together to make a bit of a ‘boardwalk’ as a base for my shop. I glued the stitched rectangle with clouds to a pink card base and added the coffee stirrer ‘boardwalk’ at the bottom.
I did cover the printed picture of the interior shop with a piece of vellum that had Zyron sticker adhesive on its back in order to tone down the picture a little and make it appear more ‘in the distance’. I glued that pic down flat to the background and mounted the shop on top using foam tape strips (the bottom of the shop is glued directly to the ‘boardwalk’).
I experimented with some shop names (see “Power Plant” in the picture of the die-cuts) and finally decided to go with “Plant one on me!” which I printed and cut using my Silhouette Portrait and the Bradly Hand font. I cut that shape three times and stacked the layers together for a touch of dimension before gluing them on top of the acetate window.  That’s a nice valentine pun that actually could be a shop name! I did also stamp “happy valentine’s day” from the stamp set on the inside writing surface to round out the sentiment on the front!
Finally, I added (most) all the plants and containers on the front of the shop using foam squares and multi medium matte. Looks like a pretty busy establishment here…! This kind of reminds me of little shops on the shore in New England — places like the Cape and Block Island. That is a really great storefront stamp and die – totally versatile for creating any shop you like! I’m sure that stamp and die will get a lot of use over the years! Love it!
Now, I’m not sure what morbid sense of humor possessed me, but I noticed the little ‘bird in a cage’ stamp (and die) when I realized that I hadn’t used the heart balloons yet…

This card makes me giggle…! I used Broken China and Wilted Violet Distress Oxide inks to sponge through a Simon Says Stamp Falling Hearts Stencil on a piece of plain white card stock. After stenciling, I die cut that with an old LDRS Fancy Rectangles and Layers die. On a red card base, I traced around the metal die with an Emboss It pen and embossed that with white embossing powder. That makes a perfect mat without having to have another die..! I stamped the “be mine” sentiment and the music notes on the background with Onyx Black ink and then mounted the white panel to the card base using some fun foam cut to size. I glued the birdcage to the balloons, and attached them to the front of the card with foam squares. A little HA Crystal Clear Lacquer on one of the balloon hearts for shine, and we have a “deceptively simple” yet “fraught with complexity” Valentine card! Makes me giggle!!
The easel die included this month is 5 and 3/8″ tall so, of course, it’s just begging to be made into a shaped card. I’m sure everyone is thinking the same thing!

I wanted this to look as much like a chalkboard sign as possible so I die cut the easel from a piece of the red card stock from the kit and did a partial die-cut on some 100# black card stock from my stash. I thought I’d get a little more stability to this shaped card if I didn’t cut out the curly-q’s on the top of the back panel. I simply fussy cut the top outline on the back piece, scored a folding line and glued the front and back together at the hinge. I die cut the front “board” from the same black card stock and cut the same “board” from some plain white card stock for the inside writing surface.
I couldn’t decide which kind of a day I would be wishing for someone, so I decided to use ALL the adjectives in the stamp set and decide later! I stamped everything using HA Unicorn White Pigment ink, colored the tulips and the crate with colored pencils, and drew on the check-boxes with a white colored pencil. A little white chalk for distressing around the edges and this feels very much like a sandwich-board you would find on a sidewalk outside a cafe or bar! The check-boxes makes this sign feel very active and hand-drawn – I’ll probably check ALL of them when I use this card!! GREAT die for a uniquely shaped sign card any time of the year!
I started thinking that all the small flower stamps included in this kit would work to do another wreath card, but then I realized that I should do a heart wreath instead!

I did practice this pattern to begin with! I traced a heart die from my stash on a piece of plain paper and, starting at the bottom point, alternated between the roses stamp, then the small daisy stamp on both sides, the roses on both sides, then the small ‘ivy’ stamp twice, two more roses again followed by two more small daisies, then two more roses and ended with the ‘ivy’ stamp at the center indent. So that’s 7 roses, 4 daisies, and 3 ‘ivy’ stamps. Perfect!
I reached for a pink card base and decided to stamp this wreath directly on the card base. I used my MISTI stamp platform and simply lined up the stamps with my paper practice piece and then stamped on the card front. I did make slight adjustments here and there but got a pretty good replication of my original trial-run. I did go in with my 01 Pigma Micron pen and added some matching shapes to fill in areas that I thought were a little thin. Very pleased with this arrangement! Fills up the card nicely!
I was afraid that trying to color all the flowers on this wreath would drive me to drink, so I decided to only color the leaves on the roses and ‘ivy’ and add some white gel pen to the dots on the daisy stamp.  Just enough color to add a little interest while still preserving the ‘retro’ feel of the image. I added some dots of the Pink Glimmer lacquer along with a few pink crystals and one sequin for a little sparkle and dimension. I did add another valentine sentiment on the inside writing surface of this card and I am over-the-moon thrilled with this shaped wreath! I am going to have to try stamping this again on white card stock and actually try coloring ALL of the flower images… There’s a challenge for ya!
I do still have my bicycle cut-out from my original stamping and coloring – let’s use that!

I stamped (Onyx Black ink) and colored (Zig watercolor markers) the balloons stamp five times and fussy cut them all out to make my overflowing stacks of hearts for this Valentine. I used Broken China Distress Oxide ink and my blending brushes to create the background on some white card stock die cut with a LFSRD. I matted that on a piece of red card stock from my stash and glued those down to a pink card base.
I stamped, colored and fussy cut another wooden crate to go on the back of the bicycle, and filled that and the basket with the colored hearts. Using my Lawn Fawn Grassy Border die, I cut two colors of green card stock and sized those to fit the background with the LFSRD. The lighter green is glued flat to the background and the darker green is mounted with some foam tape.
I stamped the 3 hearts on the background using the 2 heart stamps from the kit with Onyx Black ink and HA Red Reactive ink, and added this sentiment from the HA Many Everyday Messages stamp set. I wanted some kind of active verb to go along with the notion of a bicycle – deliver, bring, distribute, transport, etc…. and when I found this “sending love” sentiment, I though it was just right. The bicycle and hearts are mounted to the card front with foam squares, and, with the addition of some Spectrum Noir Clear sparkle pen on top of the hearts, we have a fairly simple yet very attractive card! The red and green really pop without looking anything like Christmas!! LOL!
For some reason, I thought sending some bouquets soaring would make a nice Valentine.

I stamped and colored three of the rose bouquets and three of the balloon stamps in pinks, reds and purples and die cut them all before gluing them together, I grabbed some lilac card stock from my stash, distressed the edges with some Wilted Violet Distress Oxide ink, stamped the “i love you” sentiment from the stamp set using Deep Purple Archival Ink and embossed that with some clear embossing powder. I matted that to the other half of the red card stock from the easel card (cut with a LFSRD) added another mat of my lilac card stock and glued those three pieces to a red card base. 
The balloons and bouquets are mounted with some foam squares, and for a little shine, I added the HA clear lacquer to the whole balloons in front. I think it’s a very nice touch that this bouquet stamp actually has 12 roses in it. That great attention to detail is something I’ve come to expect from Hero Arts! I did add a “happy valentine’s day” stamp on the inside writing surface, and I really love the whole purple and red palette on this card! Now I don’t believe 3 dozen roses are in my budget, but this is a lovely substitute!
I promised myself I would do a straightforward valentine with the “happy valentine’s day” sentiment on the front of a card, and that storefront stamp is a good excuse to practice my red Spectrum Noir alcohol marker blending. Practice makes perfect!
I stamped the shop using VersaFine Onyx Black ink on some smooth alcohol marker card stock, and used my Bright Pink, Dark Red, and Coral markers to color the shop. It’s no coincidence that Living Coral is the Pantone Color of the Year!! I really like the awning (there’s that coral color right there) and the shadow under the awning seems right on the money too. I channeled my inner Sandy Allnock and colored the sky, clouds, grass and gravel with my alcohol markers as well, and cut that piece down with a LFSRD. I fussy cut the window opening and stamped the sentiment directly on the card front and did some light ink blending around the sentiment with Worn Lipstick Distress Oxide ink.
I mounted the shop to the card front with some foam tape and turned to the bicycle and balloons once again. I fussy cut a single balloon from the double balloon stamp and used white gel pens to camouflage the stray black outlines from the white borders of the single balloon. I die cut the green bike (using my die template again) and added the “ivy” plant in the basket, glued the balloon string to the back of the bike and mounted all with foam squares. Some more clear lacquer on the balloon for some shine, and this valentine is ready for a cyclist who really likes pink!! LOL!!! I am certainly no expert with alcohol markers, so I appreciate this large shop stamp that affords me a chance to practice!
I have now used every sentiment stamp in this kit – let’s break out some more PUNS!!
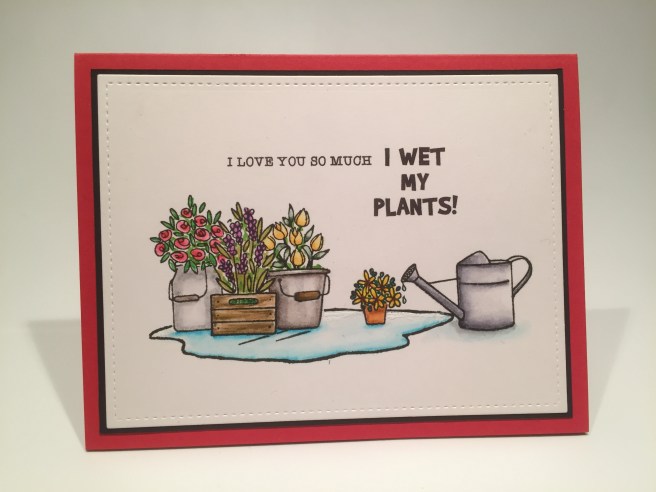
LOL! LOVE THIS!! About as much as I love YOU!!! This is my Single Layer Card for this month. Just stamping and masking on Bristol Smooth card stock and Zig marker coloring. I added the ‘frozen pond’ stamp from the MMH October kit to provide the puddle underneath the plants which really drives this sentiment home…! LOL!  I printed this sentiment directly on the card stock using my Silhouette Software (it’s free!) and the Typewriter Hand and Brady Bunch fonts. I die cut the card front with a LFSRD, matted that on a thin black mat and glued those down to a red card base. I did take the time to add the “happy valentine’s day” stamp in a landscape arrangement on the inside of this card. I love this pun so much! That watering can stamp provided the perfect opportunity! This card never fails to makes me laugh out loud!
I was also interested in trying that easel die on a card front to see how that would work, and it provided me with another opportunity for a darn near close-to-perfect pun!
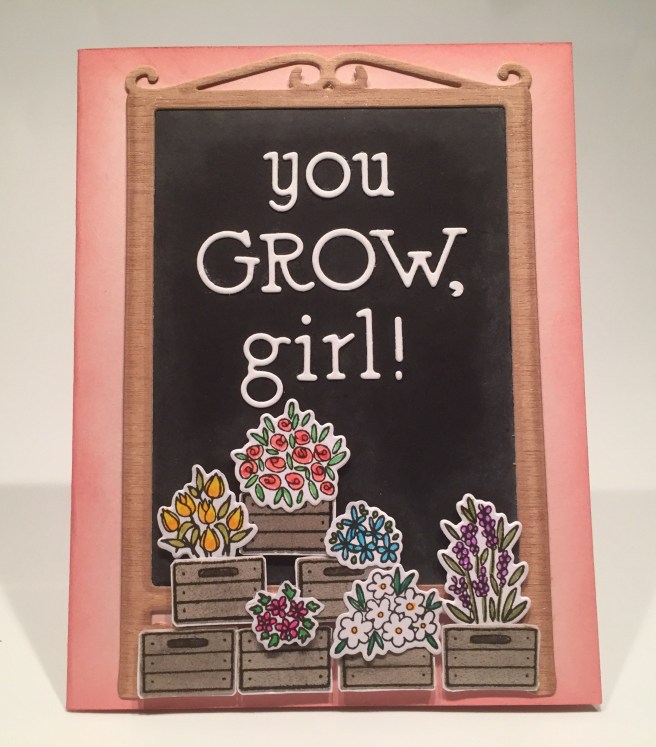
I die cut the easel with the inner board die out of some wood veneer sheets from my stash, and attached black card stock behind the easel frame. I was thrilled with how much dimension that conveyed! To continue the ‘real wood’ theme, I stamped the crates on more wood veneer sheets as well. I did fussy cut the wooden crates, attached them to some scrap white card stock and fussy cut them again with a thin white border to match the die cut flowers. I did do a tiny bit of shading on the easel with my alcohol markers, but left the crates as is.
The sentiment is die cut from thick white card stock with a die-versions “Gatsby” font die. I think this is the first time I’ve actually used this die – fits perfectly on this easel! I distressed the edges of my last pink card base with some Worn Lipstick Distress Oxide ink and glued the completed sign directly to the card base. I used foam squares to ‘stack’ the crates at the base of the easel, stamped, colored and die-cut another batch of the flowers to fill up the crates, and added some white chalk blending around the edges of the sign for a little bit of distressing. Love this pun!! Definitely a theme appropriate pun!
For my last card this month I couldn’t resist this terrific, musical, pertinent pun!

Finally, I used the die-cut watering can! On Bristol Smooth card stock, I stamped these plants using Onyx Black ink and used the plant mask I made for card #8 to make the center plant taller. I colored those with my Zig markers and turned to my Silhouette Software for this sentiment. Again, I used Typewriter Hand and Brady Bunch fonts for this oh-so-perfect valentine sentiment!
I began to reach for my LFSRDies when I remembered that I had gotten the Simon Says Stamp Frames dies during the holiday sales… the large scalloped frame is just the right size! I die cut the card front and a piece of purple card stock from my stash, and mounted those together on the last red card base. That scalloped frame goes well with the purple flowers!
I reached for my DMC light silver metallic thread to make the ‘water’ streaming out of the can – I coated the thread with multi medium matte, to help hold it’s shape, and glued the ends to the spout and, after mounting the watering can to the card front with some foam squares, I glued the other ends of the threads to the plants. 
I did add another “happy valentine’s day” stamp on the inside writing surface, and that wraps up this fun valentine! I love the dimension that the thread gives us here, and I think it provides just the right touch of sparkle on this card! And, of course, I LOVE the little double-entendre in this perfectly relevant pun!
I originally though it might be difficult to create a bunch of valentines featuring flowers and a storefront, but I embraced the challenge and ended up with 8 valentines and only 2 ‘encouragement’ cards. I did use all of the card stock included in the kit and you can bet that all these cards will go in the vellum envelopes for distribution!

I really strive to make all of my cards little works of art that tell a story or suggest a situation – I think this is a handsome set of cards that aren’t too frilly and feminine but still convey heartfelt sentiments and lots of love…! Happy Valentine’s Day, indeed!!
This kit has sold out (very quickly) but I am thrilled to announce that Hero Arts invited me to become an affiliate over the holidays! Of course I said yes, so now, when you go shopping at Hero Arts, please use my affiliate link: bit.ly/2sBmuMCHeroArts
I cannot thank you enough for making it all the way through this post – the time you share with me here is truly a blessing! Please let me know if you enjoyed my take on this kit and which card(s) you like best! Feel free to share this post with everyone you know, and remember to Like Me, List Me, Pin Me, Post me – don’t run with scissors – and, as always, Happy Crafting!!!

Hey Scott! I don’t normally follow you on the HA card kit, but I was so happy to see you were alive and well that I took a peek!! Gorgeous cards!! My favorite was ‘I wet my plants’!! And you know, I can CASE some of these without the kit! Actually, I looked through their online catalog after seeing some items on the SMS Youtube and I’m glad to know you’re an affiliate now. 🤓
LikeLiked by 1 person
Scott, another clever group of cards. Love your attention to detail, like the water drops coming from the watering can. As always, love the puns. Congratulations on Hero Arts recognizing and rewarding your talent.
LikeLiked by 1 person
Thanks Sara!!
Much appreciated!
Spread the Cheer!
Scott
LikeLike
Thanks Jeanne! Always good to hear from you! Just taking some personal time..! Good to be home!
LikeLike
Your puny cards made my day , thanks so much for sharing your art and gift of laughter .
LikeLike
I always look forward to your 10 cards one kit videos. Great cards that make me smile and laugh at the punny sayings!
LikeLike
Thanks Alice! My pleasure! Spread the Cheer!
LikeLike
Unbelievable! I just discovered your site and I find your cards to be “over the top” – such creativity and ingenuity and humor! Thank you for sharing with us. I will now view ALL your card making videos, and pull out my stashed Hero Arts kits. I had stopped my HA subscription because I do not have the creative flair to figure out what to do with all the stamps and dies. And most recently, I was getting bored with my routine approaches (logic is my forte, not the arts) . Your creations have given me a fresh look and lots of approaches to duplicate – I call it my “R&D, rob and duplicate”.
Thanks for sharing with us. I can hardly wait to get back to your videos and my craft room!
LikeLike
Thank you so much Barbara! Truly appreciated! So nice to have you on board! I’m only able to post a few times a month, but I hope I can keep you engaged and entertained!! Spread the Cheer!!
LikeLike