
Hello Folks! Scott here with my 10 Cards 1 Kit post featuring the Love From Lizi November ’18 Card Kit. Lizi calls this the “Frozen Forest” kit and it features a ton of coordinated products in a soft green and blue-grey palette. Add in some unique embellishments and we have another kit simply bursting at it’s seams with goodies!
As usual, I do take the 5 sheets of card stock that comes in the kit, cut and fold them into A2 card bases (4.25″ x 5.5″). That gave me four kraft and six white card bases. (I did squirrel away the alcohol-marker-friendly white card stock from the kit and substituted my own plain 110# white card-stock for my card bases).

I am not much of a ‘tag’ person. I admit that. There are A LOT of tags in different sizes and shapes in this kit. GREAT! I love getting tags around Christmastime ’cause I will use them on presents! However, since we had so many tags in this kit I thought I should try and use at least some of them. That’s when I noticed that the kraft tags and the glitter tags were both the same length. Now there’s something fairly unique!

The holes on these two tags even matched up perfectly! “NOEL” has always been a favorite holiday sentiment of mine so I grabbed this circular ephemera piece from our die-cut sheet to pair up with the tags. Since there were the trees on the circle, I reached for the blue-grey pattern paper with trees for my background, and cut that out with my favorite Lawn Fawn Stitched Rectangle Die. I sponged a little Faded Jeans Distress Oxide ink around the edges and glued that directly to one of the kraft card bases.
I glued the tags together and threaded a piece of the 1/8″ peach ribbon through the hole(s) and mounted the tag(s) with foam tape. More foam tape to attach the die-cut to the tag(s) and I added small dots of the Nuvo Drops to the ‘stars’ above the sentiment. I taped down a strip of the washi tape to a scrap piece of white card stock, trimmed that down and glued that directly to the card base. I did use a couple of glue dots to attach the ends of the ribbon, and this feels like a nice introduction to this kit – a simple holiday card in non-traditional colors. The ribbon actually matches the peach-y circular frame much better in real life than what this picture conveys, I and love the matching trees and both of the sentiments!
In my unboxing, I called out one of the felt snowflakes for having eight points instead of six. I felt like I should ameliorate that small peccadillo of mine and actually USE that piece on a card, so I performed some “felt surgery” with my craft knife and glue and came up with this lovely embellishment.
On a kraft card base, I stamped the snowflake strip from the stamp set using Hero arts Unicorn White pigment ink on the two sides, and added the silver ribbon next to the stamped snow. I grabbed a plain piece of the blue-grey pattern paper and cut that to 2.3/8″ x 5.1/2″. I wanted to use the ‘falling snow’ stencil from the kit but every single sample pot of ’embellishment mousse’ or ‘glimmer paste’ I had in my stash were completely dried up. I did have a pot of Ranger Texture Paste Opaque Matte so I added a bunch of Vintage Platinum Distress Glitter Dust to that and created my own “glimmer paste” to use for the stenciled falling snow on the blue panel. Worked very nicely and adds a great amount of sparkle to the snow! I must remember how versatile that texture paste is – you can basically make your own glimmer paste as needed!
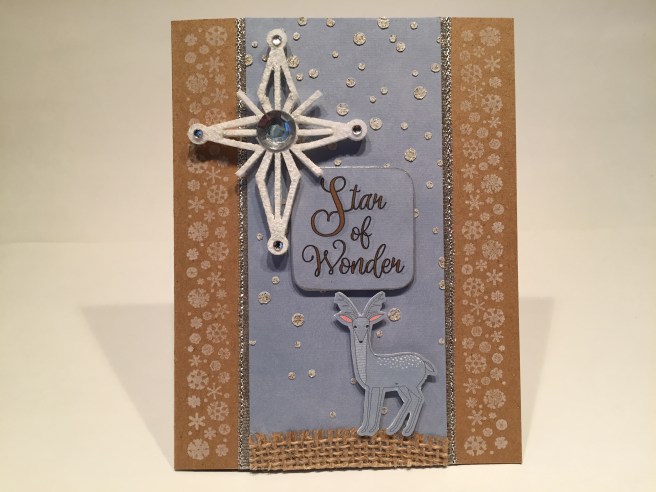
I turned to my Silhouette Software to create my sentiment here. This is the Arabella font that I printed directly on a scrap of the same blue pattern paper. I cut that out with a square nesting die and rounded the corners with my corner-chomper and ran the edges on my Delicatta Silvery Shimmer stamp pad. A little of the burlap glued to the bottom for a bit of a hill, the blue deer sticker (attached to a scrap of white card stock and fussy-cut) is foam taped to the hill along with the sentiment, and the felt star is foam taped to the card front as well. With the addition of a few gems from my stash, this card comes to life with bunches of shine and a lovely Christmas sentiment that’s off the beaten track!
One of our beautiful silver mirror acetate sentiment pieces was the simple word Love. I couldn’t help myself when I came up with this cute picture pun using the pattern papers.

I trimmed the green foliage pattern paper down to 3.75″ x 5.5″ and glued that down to a white card base and ran some of the medium peel-offs down the sides. I glued a strip of the burlap to the card front with Multi Medium Matte glue and die cut the two bunnies from one of the pattern papers with a stitched circle die and added thin mats of the silver mirror specialty paper cut with a nesting circle die behind the bunnies. I attached the rabbits with foam tape and used thin strips of foam tape to mount the acetate sentiment. (Don’t forget to peel off the protective layer on top of the sentiment!) A little silver heart brad from my stash and some sequins from the “Frozen Fondant” sequin mix adds a nice touch of sparkle and matches the silver mirror sentiment.
Naturally whenever you have two rabbits in ‘love’ there’s always a consequence!
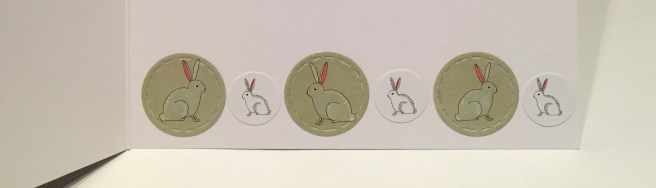
LOL!! I used a 1/2″ punch for the small bunnies and a stitched circle die for the medium bunnies and added the whole clan to the bottom of the inside of this card. A fun little visual pun that has nothing to do with the holidays and could actually be used as a valentine or even a wedding card…! Hopefully your recipient won’t be quite a prolific as rabbits but… each to their own! LOL!!
Our stamp set this month features another ‘infinity’ stamp that has a repeating pattern so you could stamp it multiple times in all directions to create a larger stamped pattern. I was intimidated with this stamp at first but it ended up being fairly easy to line up!

This is actually six stamp impressions (3 across by 2 down – about 9″ x 6″) (stamped in Broken China Distress Oxide Ink) and the seams are almost totally indistinguishable. I liked this so much I decided to feature this stamp on my next card.

I cut out the “best-stamped” section of this stamped pattern with a LFSRD, sponged a little more Broken China ink around the edges and used foam tape to mount it to a kraft card base. I stamped the “let it snow” sentiment from the stamp set using the same ink on a scrap of white card stock and added some clear embossing powder for some shine and a little contrast. I fussy-cut the sentiment and added that to the card front with more foam tape. I raided the sequin mix for all the small brushed silver sequins and added those to the larger snowflakes and used my Tsukino StarDust gel pen to add silver sparkles to all the smaller flakes. Really sparkly! I love the blue and silver on the kraft card base and the all-over pattern just makes my heart smile. All thanks to that great infinity stamp!
I was itching for something to color with this card kit and reached for the white pattern paper that featured all the animals in a tableaux in the center of a large circular wreath.
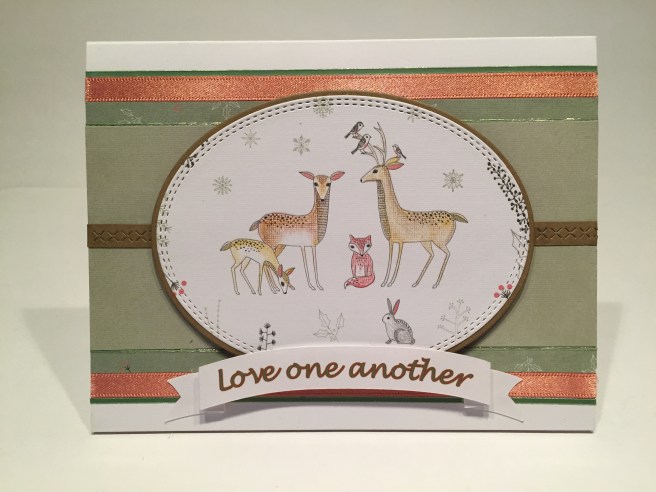
I used my colored pencils to color in all these animals (very lightly!) and loved that the pencils really brought out the texture of the pattern papers! I die-cut the tableaux and the mat with Gina K Designs Oval dies (small and large) and glued them together before working on the card base. Since the foliage and stars / snowflakes were in green on this pattern paper, I went for more green for the card front. The center plain green pattern paper is cut to 2.5″ x 5.5″ and matted on the darker green pattern paper cut to 3″ x 5.5″, and both glued directly to a white card base.
I ran the 1/4″ peach ribbon through my Xyron sticker maker and stuck two of those down to the card front on the top and bottom of the pattern papers. I used the thinnest peel-offs between the pattern papers and the widest peel-offs on the edges of the ribbon. For a final touch on the background, I cut a 1/4″ strip of kraft card stock and cut a pattern in that with an Ellen Hutson Stitching Lines die and glued that down right in the center. I went to my Silhouette Portrait to print and cut this sentiment using the Lucida Handwriting font and a folded banner shape that I had created a while ago. I was originally going to do “Love thy Neighbor” but that felt a little church-y to me so I opted for this simple variation.  The oval tableaux and the banner are attached to the card front with foam tape. Of course this is a perfect sentiment for the holidays, so I added a Merry Christmas on the inside of the card using the die we got in last year’s LFL Christmas kit cut from a scrap of kraft card stock. This card is very, very pretty. I love the added color on the animals, and this sentiment seems extra inspiring and very pertinent these days..!
I mentioned in my unboxing that an acetate card might be in our future, so, never one to disappoint, I decided to use the specialty acetate and vellum for this next card.

Both of these pieces were half-sheets of A4 paper, so I trimmed them both down to 5.5″ wide and scored them in the middle – about 4.1/8″ to make two “cards”. I threw caution to the wind and stamped all the individual snowflake stamps on the two corners of the acetate card front with VersaMark ink and embossed them in white. This is pretty thin acetate but it held it’s shape under heat admirably well! You lose a little of the details when embossing but you still get the basic shapes with no problem! I cut a piece of the blue snowflake (stars – eight points!!) pattern paper to size and ran it through my 5″ Zyron Sticker Maker to add adhesive to the front of the pattern paper and attached that to the back of the vellum for some color and to hide the writing surface inside.
I stamped and embossed the “hello Winter” sentiment on the vellum under the acetate and added the white deer sticker to the lower left corner.  I placed a piece of 1/8″ scor-tape along the top fold of the back of the vellum card and used that to glue the vellum card into the acetate card. For a little extra touch, I die-cut the stag die from the kit out of a scrap of kraft card stock and added him to the inside of the card. I also added a circle of white behind the die-cut so you couldn’t see the glue from the back. Kind of finishes out the whole family with that addition! I love the simple blue and white color scheme here, and the dimension that stamping on the acetate adds is always great. I think an acetate card like this is very unique and fun to give!
I’m still having a great time experimenting with my homemade wreath builder template, and I thought the snowflake stamps would lend themselves to a unique wreath design!
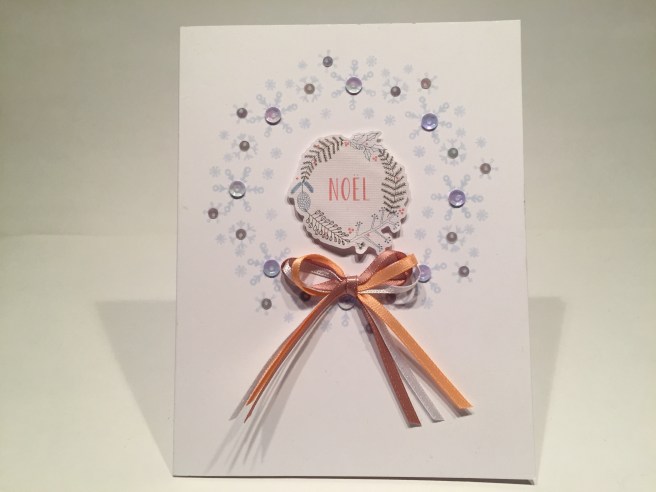
I hope you aren’t getting tired of my wreath cards…!! I thought this snow wreath came out especially well! I did practice this lay-out on some scrap card stock before I went and committed it to my card. The snowflakes are all stamped with Hero Arts Soft Sky ink directly on the white card base. I selected the two smallest iridescent sequins from the sequin mix to add to the larger snowflakes, and added the “NOEL” sticker to the center of the wreath using some foam tape. Finally I tied a nice bow using all three of the 1/8″ ribbons from the kit and attached that to the bottom of the wreath. I think that HA Sky Blue ink is actually a pretty close match to the blue-grey colors in this kit and it works very well here. Soft and almost ethereal!
When I was doing the falling snow stencil background with my homemade glimmer paste (card two), I had some paste left over, so I just grabbed a bunch of kraft card fronts and kept making falling snow backgrounds. I also took the last bits of that paste and added it to the front of one of our wood-veneer die cut trees. I fiddled around with this tree for a little while until I achieved a really nice texture – almost like tree boughs!

That was all it took! I trimmed this falling snow background down to 4″ x 5.25″ and used foam tape to mount it to my last kraft card base. I glued the tree to the card front and found a very small star gem from my stash to add to the top of the tree. I really liked this “Joy” acetate sentiment, so I attached that to my card front with thin strips of foam tape. Simple and stunning! I really like this so very much. I think that the Vintage Platinum glitter worked so well with the kraft card stock and this card is so heavily textured, it’s just begging to be touched!!
If you have been following me at all, you know that I created my first ever light-up card with my October My Monthly Hero kit. Well… I have one more Chibi Light left over so…

I had to use that last Chibi light for this lovely star die we got in our kit this month.  I knew I had a really nice ‘pine bough’ clip art in my image stash so, using my Silhouette Software, I created this tree top and printed it directly on a piece of the blue-grey pattern paper. I die-cut the star from the top of the tree and die-cut the pattern paper with a LFSRD. I cut another plain piece of 110# card stock with the same rectangle die and cut the star out of the second piece in the exact same place as the patterned paper. I glued a piece of vellum between the two card stock pieces and sponged the edges with Pumice Stone Distress Ink. I die-cut the star from the silver mirror specialty card stock and inlaid that on the vellum in the star shaped hole cut out at the top of the tree. That completes our card front.
On a plain white card base, I sponged the edges with the Faded Jeans Distress Oxide ink (when used with a light hand that ink is a pretty good match to the blue-grey colors in the kit) On the inked card base I created a simple circuit for the Chibi light. There are TONS of instruction on how to circuit these Chibi Lights, so I won’t go into that here, but the battery is towards the bottom of the card front, and the Chibi light is behind the center of the star. I white embossed the “PRESS” stamp (MFT Interactive Labels stamp set) in the appropriate spot (over the battery) on the card front, and mounted the card front to the card base with a double layer of foam tape. Look at this! I could easily get addicted to these light-up cards!
I added the “Noel” acetate sentiment with thin strips of foam tape to the card front and there you have it! My second ever light-up card! I will have to experiment with using colored vellum to see if that will change the color of these Chibi lights! I LOVE THIS!
I also did a spinner card with my recent MMH 10 cards, and that got me to thinking about the possibility of creating a spinner card that was actually powered by a pull tab instead of just a wound-up piece of thread. This one took way too much time, but I do think I’m on to something here! I have never seen a card that does this!
A white card base with a large circle die-cut straight through both layers. The white pattern paper cut with a LFSRD and the same circle die glued on top. I used a bamboo skewer to anchor the felt snowflake. With the assistance of my craft knife, I was able to thread the skewer through the middle of this snowflake, and used glue to hold it in place. I think these felt snowflakes were the perfect thing to try and make spin!
I used little pieces of paper straws to hold the skewer in place on the top and bottom and still allow freedom for the skewer to spin. On the bottom the straw is split into two pieces for above and below the pull tab. The bottom straw also needs a bottom to keep the skewer from falling all the way through. Then the mechanism is the same as if you were trying to start a fire with two sticks and a string – the skewer, and the pull-tab are the sticks, and there’s some hefty carpet thread performing duty as the string.
 I had to take this card apart and put it back together three or four times and had to keep adjusting and changing things before I could get a reliable operation – that’s why it’s a little lumpy and wrinkly..!! I used the iridescent crystals from last month’s LFL kit to decorate every rounded point on both sides of the snowflake, and found this great glittery snowflake in my stash for the centers. The sentiment is from the die-cut sheet and I matted that with some dark blue Kraft Core core-dinations Nostalgic Collection card stock and mounted that to the card front with some foam tape.
I did cut another piece of 110# card stock to be the ‘back’ of the card and provide a writing space. It’d also help protect the card if it had to go through the mail.
I will spend more time on this concept and try to finesse it a little more and make it easier to get consistent results and will come back with a how-to for you on this special Pull-Tab Spinner card as soon as I possibly can. I was so thrilled to get this one to work that I was dying to share it with you! Hope it tickles you as much as it does me!
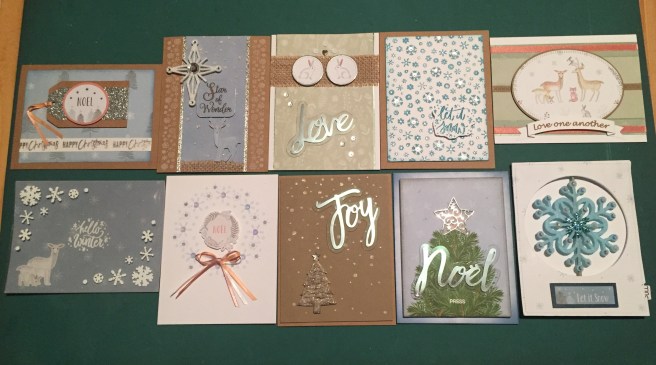
That’s my 10 Cards from the Love From Lizi November 2018 “Frozen Forest” Card Kit. I managed to use every stamp in the stamp set, and used a little bit of most everything from the kit but I didn’t get to the White Glitter specialty card stock and I didn’t use those tiny jingle bells… I have to admit I was a little crushed when I realized that the bells didn’t jingle…! Made me think of The Polar Express where the little boy can’t hear the jingle bell because he doesn’t believe in Santa Clause…! Kind of bummed me out…!!!
I had a great time creating these cards this month. Looks like I ended up with six Christmas cards, three winter/snow cards and one Love card. A pretty decent assortment of cards! Of course I have bunches of leftovers which will be happily incorporated into my stash along with the falling snow stencil and another infinity stamp set!
At posting, this kit is still available at the LFL shop, along with a good assortment of add-ons and specialty packs. If you go shopping with Lizi please use my link: http://bit.ly/LFLlink and if you don’t want to miss out on these overstuffed card kits, I would heartily recommend subscribing!
I hope you enjoy my creations this month as much as I do. If you have any comments or favorites please let me know. I appreciate every moment you spend with me here! I hope you share this with all your crafty friends and please, Like me, List me, Pin me, Post me, don’t run with skewers, and as always, Happy Crafting!

Nice kit this month, I’m in heaven without the pink! )) You are such a clever creator! Always something fun to loo forward to and great entertainment !!
LikeLike
Thank you, Katherine! Yes.. a nice break from pink!! LOL! Much appreciated!
LikeLike