
Hello Folks! Scott here with my ten cards featuring the Hero Arts My Monthly Hero September 2018 Kit. This is my fifth month with MMH, and for the first time since I started my subscription, I was a little underwhelmed with this kit at first sight.

The stamp set felt a little schizophrenic to me with the clash of the Chinese lantern plants and the maple branches and leaves… It is a full 6″ x 8″ stamp set with 18 matching frame cuts and yet another Window Fancy die and Frame. The translucent sticky tag leaf notes were very interesting – and there’s 30 of them here. To finish out this kit we got a Daniel Smith Watercolor Dot Card and 5 mini brushes. Okay… so I guess we’re water-coloring…!
I figured you can never go wrong if you start a kit with a large window fancy die… so I die cut a piece of my Strathmore 400 Series cold press watercolor paper with the die and went to town on it with those mini brushes and the DS dot watercolors… hmmmmm…..
I have to say I was not impressed at all with those mini brushes… I think they just don’t hold enough water for me, so I ended up putting some really strong pigments on this die cut. But, that’s one of the great things about watercolors… you can keep working them until your paper falls apart!! LOL!!
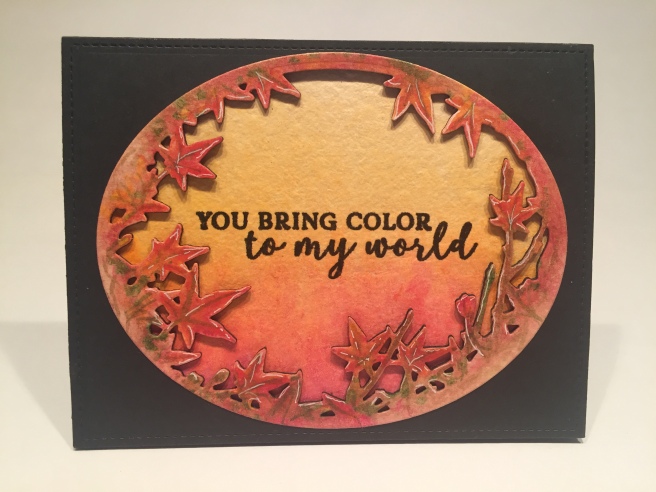
I was, however, very pleased with the background watercolor using my own brushes and LOTS of water..!! LOL!! I’ve got to remember those DS watercolors are very heavily pigmented (especially the reds!). We did need some distinction between the die cut and the background, so I die cut three pieces of black card stock with the fancy window die (and a Lawn Fawn stitched rectangle die!) and glued them all together to back the watercolor die cut. I stamped the sentiment on the background using VersaFine Onyx black ink and embossed that with some clear embossing powder. That deepens the black and adds a touch of shine!
I glued the background watercolor piece directly to a black card base and glued the stack of die cuts on top of that. I thought some very thin white highlights using my 05 white gel pen would bring a little life to this card and I ended up really liking this! I think it’s very interesting that this window fancy die can be used in virtually any orientation, and this sentiment fits perfectly in the open area. Okay… I’m feeling it a little more…!
I reached for those leaf notes next and my first thought was to take that small maple leaf die and start cutting these great big leaves down to a more manageable card size…!

I was able to line the leaf note veins up with the die very nicely but realized I’d only get one small leaf from every large leaf if I did that, and it seemed kind of wasteful – especially since I knew I wanted a ‘pile’ of leaves on the bottom of this card. So… I die-cut more leaves with no regard to the veins! I cut a piece of my standard Staples Ivory card stock with a LF stitched rectangle die and stamped the sentiment with Acorn Archival Ink and clear embossed it before I arranged the leaves around the sentiment. I used Multi Medium Matte to glue all the leaves down, and was pleased that you can’t see the glue at all! I reached for a piece of dark red Tim Holtz Kraft-Core card stock from the Nostalgic Collection and was going to trim off the leaves at the edge of the ivory card stock and make a thin mat with the red, but I liked the look of the leaves going over the ivory onto the red and just left the red mat full-sized. All is glued down to an Ivory card base and I feel like I could almost jump into this pile of leaves! Happy Autumn indeed!
You should know by now that I love me some puns, and there was one sentiment in this stamp set that I thought I could pun-i-fy up a little bit and that inspired this card.

I knew I wanted to use the bare branch stamp on some Kraft card stock so I stamped three of those with my Acorn ink and used a die template to help me place the die for the most accurate die cut. I just cut the die out of a scrap of card stock and taped that over the stamped image to help line up the die. Worked very well for these branches! I decided to go monochromatic and stamped the vase and saucer the same. I did go in with a white colored pencil to add some highlights to these images and that brought a little life to this still-life arrangement! On an Ivory card base, I used the Mummy Bauxite watercolor dot to brush a light swatch of color across the bottom to anchor my arrangement, and stamped and embossed the sentiment again in the Acorn ink on the card front. I cut a little slit in the edge of the vase and the saucer to slip the ends of the branches into and glued the saucer flat to the card front and used foam tape to mount the vase and branches. Ok… so we’re kind of pushing the pun here, but there is a branch out… yeah? Get it?? LOL! Okay… I’m an easy target! LOL!
So… we have that ‘You are vibrant’ stamp and I thought maybe I could color those Chinese lantern plant stamps in some real vibrant colors if I used my Zigg Clean Color Real Brush markers. I didn’t think the dot card colors were particularly ‘vibrant’.
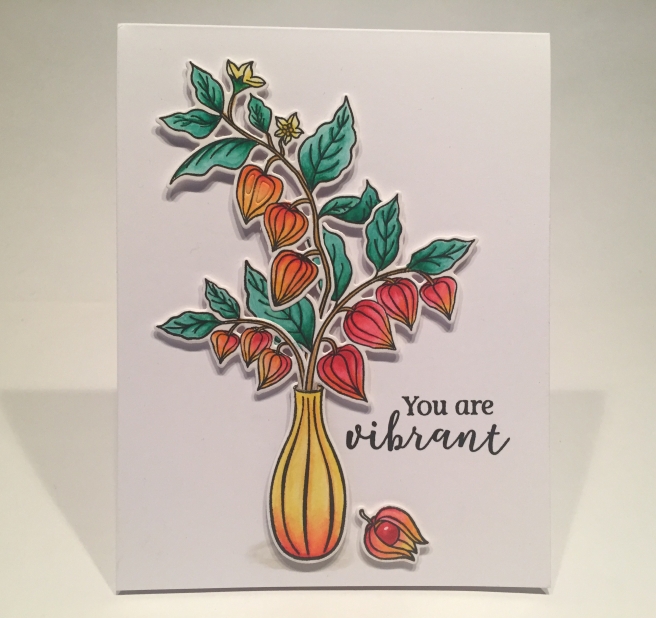
I did do some research on these plants and colored them all according to pictures I was able to access. I stamped everything with my Onyx Black ink on some Bristol smooth card stock and colored everything with my Zigg markers. I again created a die template to assist in die-cutting these branches and that bulb on the bottom. The vase was simple enough to line up the die without a template. I arranged all three of the branches together and intertwined their leave to make a pleasant arrangement and tucked them all into a slit in the top of the vase. Well! That vase and arrangement filled up the entire card!! So I just stamped the sentiment on a white card front and mounted everything with foam tape. I did add a touch of a shadow under the items with a light gray alcohol marker to help ground the arrangement. I think this is quite vibrant!! LOL!
So that was pretty successful with the lantern plant branches… let’s see what I can do with those skeleton pod stamps and that other bare branch. And that dot stamp…!?
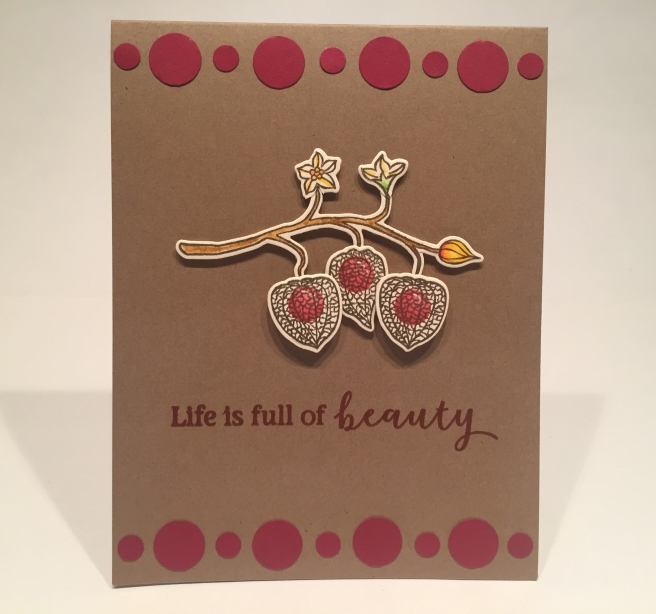
From the plant research that I did, I knew that the dot stamp was the ‘berry’ inside these skeleton pods on the lantern plants. I experimented around a bit … I even tried embossing these on black… but I lost the berry behind the embossing… Finally I arrived at this. I stamped the dot (three times) in SSS Watermelon Hybrid ink on Ivory card stock, and then stamped a darker red (Hero Arts Red Reactive ink from the July ’18 kit) on the bottom left side of the berry. Those small stamp cubes make it pretty easy to ink up only a portion of the stamp for a great shadow and unbeatable dimension. A touch of white gel pen to highlight the top right side of the berries and I think we’re ready to stamp the pod over the top. Creating some dimension on those berries makes all the difference!
I stamped the two flowers, the bud and the branch with Acorn ink on Ivory card stock, colored those with my Zigg markers, and die cut those along with the three pods. I used a die template for the branch but not the other pieces. I married up the flowers with the top branches and the 3 pods with the bottom branches and mounted them all with foam tape to a Kraft card base. I stamped the sentiment using the Red Reactive ink and embossed it with clear powder. I needed something else to help ‘frame’ this card and reached for some dark red card stock and a couple of circle punches from my stash to create this dotted border on the top and bottom of the card front. I think those dots echo the berries very nicely and finish out this design perfectly. And those berries look like they are actually inside those pods! Very cool!
That covers the lantern plant stamps… let’s move along to the maple branches next!

I stamped two branches on Bristol smooth card stock in Acorn Archival ink and went back to the DS watercolors to color the branches and leaves. Had to use my smallest brush since these images are fairly petite..! I did make another die template to assist in die-cutting the branches out. It really helps!
I cut a plain piece of white card stock with a stitched rectangle die and stamped the ‘thankful’ stamp (in Acorn) just above the center of the card and went to my Silhouette software to add the ‘I am so … for you’ (Lucida Grande font) around the stamp. I love how this came out. Once I ran the front panel through my printer, I went back and embossed the ‘thankful’ with VersaMark ink and clear embossing powder over the Acorn Archival ink. I matted the card front on a thicker orange and thinner kraft card stock and then down to a white card base. I used foam tape to mount the branches and Voila! a really lovely autumnal thank you card! I felt like had better control of the DS watercolors, and was a little more familiar with the colors by now, and am very pleased with the result!
A few months ago, Gina K. came out with a Stencil Builder Template which is a very  simple yet effective concept. Naturally, I had to make a homemade template for myself and have played around with it a little bit. You really need smallish stamps to make an effective wreath (of course Gina K. has lots of ‘wreath builder’ stamp sets available!) I haven’t used the single maple leaf stamp yet, and wreaths are certainly appropriate for the season, so I thought that perhaps the maple leaf stamp might make a good autumnal wreath!

There you go! My first wreath card! I stamped the maple leaf on Bristol smooth card stock with Acorn Archival ink four times with the stamp in one direction, and then four times with the stamp in the other direction. I thought this was much better than having the stamps all facing the same direction around the wreath. I dug out this three little dots stamp from the Simon Says Stamp ‘Kind Flowers’ stamp set to add a little detail in the larger gaps and colored everything with the DS watercolor dot card. I stamped the sentiment in Acorn ink again in the center of the wreath, and I added some Morning Dew Nuvo Crystal Drops to the dots for a touch of shine and a little dimension. After coloring everything, I die cut the front panel with a stitched rectangle die. And what does every nice wreath call for? A bow!! Instead of adding a bow to the wreath itself, I used both pieces of ribbon from the kit to ‘wrap’ a nice double-bow around the bottom of the card front and matted that on some core-dination Auburn Pearl card stock and then to a white card base. Perfect touch! As I add additional small stamps to my stash, I will play with that wreath template some more! I really like this sentiment paired up with a maple leaf wreath!
Now I’ve used the maple leaf stamp and the maple leaf die but I haven’t used them together! The bare branch stamp (card #3) seemed out of scale with the maple leaf so I reached for the other bare branch stamp (card #5) to use with the maple leaf stamp.

I stamped six of the maple leaves and one branch on Bristol smooth card stock with Acorn ink and colored them all with the DS watercolors and die cut them with the included dies (using a template for the branch but not the leaves). I die cut a plain piece of white card stock with a stitched rectangle die and went to my Silhouette software to create this sentiment using the Black Jack font and the Lucida Grande font. I printed that sentiment in brown and added a wide yellow mat and a thin core-dination Auburn Pearl mat before gluing the whole piece to a white card base. I glued the leaves to the branches (except one!) and mounted all to the card front with foam tape. Now here we have another simple seasonal mild pun to add to our batch this month. I really like how that branch stamp looks totally different on this card than it does on card #5.
I think I have just about exhausted the maple leaves in this kit now, and have two more stamps to use before I can claim to have ‘used every stamp’ in this stamp set.

This card tickles me more that it probably should…! I grabbed the simple branch with leaves stamp for this card, and stamped it directly on a plain white card base 3.5 times…! Using my stamp platform, I stamped the first three branches in Acorn ink and then masked off the leaf portion and just stamped the ‘stem’ of the branch for the fourth branch (just to get placement correct). I stamped the whole stamp on a piece of scrap card stock and, using my light table, traced the rest of the branch onto the card front with my Brown Pigma Micron pen. This might be considered a little bit of an inside joke to the stampers out there, but I love that the leaves ‘disappear’ on that last stamp! This sentiment is from Ecclesiastes 3:1 (very familiar to most!) which I created on my Silhouette software using the Black Jack and the Modern #20 fonts and printed that up in brown. Very simple coloring on the leaves using the DS watercolors (those are some TINY leaves!) and a touch of white gel pen on the naked branch for the suggestion of snow, and that’s all the coloring we need! A couple of strips cut from a dark brown piece of that Tim Holtz Kraft-Core card stock anchors the image and finishes off this card very nicely. This still makes me giggle… so simple but very effective!
I still have to use that last branch stamp with ‘berries’ on it, and while I was playing with the Chinese lantern plants, I decided I wanted to try and stamp out a bonsai tree.

LOL! Oh, YES! I am quoting Yoda on the front of this card! LOL! If this groovy bonsai tree wasn’t enough, this sentiment is!! LOL!
On a stitched rectangle die-cut panel of Bristol smooth card stock, I began by masking the left half of the saucer stamp (stamping the right side with Acorn ink) and then masking the right side of the saucer stamp (stamping the left side with Acorn ink) to make this saucer appreciably smaller for this tree. Then I stamped the berry branch 3 times for the main branches and then masked off the bottom portion of the stamp for the shorter fourth branch. This stamp was flexible enough to allow me to bend it around into different shapes using my stamp platform.
I colored in a ‘dirt’ mound in the saucer (and thickened up the bottom of the trunk) with my Brown Micron Pen, and used the watercolor dot card to color in the berries and the saucer. I realized most bonsai seem to be planted in a mossy substrate so I took my #10 white gel pen and added lots of white dots to the mound. I let the gel pen dry and then went over that with some of my green Zig markers. Very ‘mossy’! For the final touch on this tree, I added tiny leaves to the end of every empty branch (and a couple extra spots) with the tip of the green Zig marker. I drew a light shadow under the saucer with an alcohol marker, and along with the touches of green, this bonsai tree is complete!
I used my Silhouette software to print this sentiment in browns using the Lucid Grande font again, and matted the card on more of that Tim Holtz Kraft-Core dark brown card stock and glued both down to a Kraft-Core dark red card base. Of course I couldn’t leave well enough alone and had to add a real honest-to-goodness pun on the inside of this card.  ‘You are treemendous’ is the perfect compliment to the ‘Size matters not’ Yoda quote on the front, and I am still laughing…! Something about the juxtaposition of the quite formal bonsai tree contrasting with the Yoda quote, feels delightfully silly to me. This is a card I can actually see myself giving to someone! If you can’t tell, I love this card!! LOL!!
A couple of times, I was worried that I wouldn’t be able to come up with 10 unique cards using this kit, but I persevered, and ultimately, I quite enjoy every one!
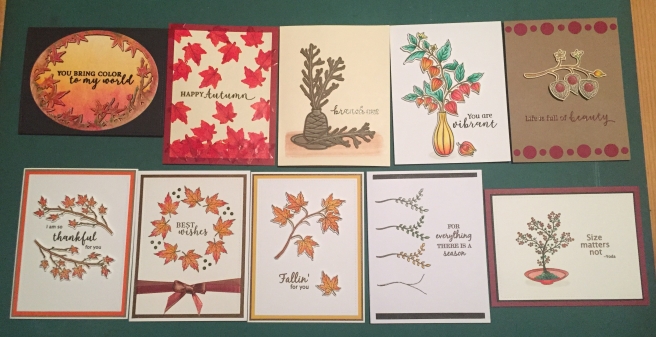
That’s my 10 cards from the MMH September 2018 Kit, and I am so pleased to say that I was able to use every single stamp in this stamp set!! WOO-HOO! LOL!!! I find it very interesting that these kits seem to inspire different styles of cards from me each month. These cards feel almost nothing like my August coffee cards… very interesting! The basic simplicity of a lot of these cards really highlights the coloring and the compositions. I think this a great variety of truly lovely cards, and I am thrilled that I was even able to work in few puns this month (minor though some be)! LOL!!
Thank you so much for sharing your time with me here. I hope I was able to provide you with some smiles and maybe a useful tip or two. Please share this post with anyone who might be interested, feel free to toss me around to your friends and crafting buds on social media, remember, don’t run with scissors, and HAPPY AUTUMNAL CRAFTING!!

I like the attention you give to each of your cards. The Chinese lantern vase looks like a lovely Laleque . Thank you for sharing your inspiration and humor.
LikeLike
Thanks Alice!
Much appreciated!
Scott
LikeLike
Glorious cards! Fascinating to see the morphing of an engineer’s type [left] brain morph with an artist’s [right] brain. That card and the simplest one – Byrds/Turn Turn Turn – are faves but all great. I’m not a kit person but yesterday morning purchased this kit, so was thrilled your video coincidentally popped up!
Clarification please? The first card “stack” is your 1) watercolored oval frame on top of 2) three die-cut black oval frames (for thickness/shadow) on top of the 3) oval background that’s been adhered to 4) black card stock that was cut with the Lawn Fawn stitched frame die?
LikeLike
Thank you so much Beth!
First card is 1) water colored oval frame on top of 2) 3 pieces of black card stock at 4.25″ x 5.5″ each with matching cuts of the window fancy die, then 3) watercolor background 4) card base. so there are actually only 5 layers on top of the card base.
I hope that helps clarify!
Scott
LikeLike