
Hello folks! Scott here with the new Love From Lizi September 2018 Super Card Kit! This month, Love From Lizi turns TWO! HAPPY BIRTHDAY LIZI! To honor this momentous occasion, Lizi has come out with this “Happy Haunting” Super Card Kit that features products manufactured especially for Love From Lizi !! This kit has already sold out but Lizi has some of the add-ons for this month still available, and will probably release this stamp set for sale in the coming months. Remember… if you go shopping at Love From Lizi, please use my link: http://bit.ly/LFLlink
 I do use the included card stock as card bases (A2 cards as usual) Sometimes the color of a card base will inspire the design of a card. This month, it’s all about Halloween here!!
One of my favorite things about the Love From Lizi Card Kits is that we usually get some unique and/or new-to-me supplies. This month was no different with the inclusion of a full-size tub of Brusho Crystal Colors in Black. I’ve never played with powdered watercolors before, so I grabbed some of my Strathmore 140# watercolor paper and started experimenting! I taped my paper to a board and added some clean water and started adding the Bruso to the wet paper… WOW! Lots of colored powders make up the black color here. I’d add more powder, and spritz more water, and after a few rounds of powder and water came up with this:

After creating this, I am going to have to re-think my ‘galaxy’ coloring methods! This background inspired my first card this month.

On a white card base (I do save the LFL Copic-friendly white card stock for alcohol marker coloring, and substitute a sheet of 110# white card stock from my stash). I did spatter some permanant white water color over that Brusho background for stars and that completed the ‘galaxy’ look. I die cut that background with a Lawn Fawn Stitched Rectangle die (surprise!) and matted that onto a piece of the Dusty Pink specialty card stock and glued those to the card front. I used one of my Darice circle dies to cut out a little ‘moon’ from the Blush specialty card stock and glued that directly to the background. I took the Witch ephemera piece from the kit, and mounted that over the moon with some foam tape, and added the pun-y sentiment from the decoupage sheet in the same way. A few drops of the Wisteria Purple Nuvo drops and some Glossy Accents on her eyes adds a little more shine to our witch,  and of course, I couldn’t resist adding another pun to the inside of this card! “Spell, yeah!” (Black Jack font) works perfectly and provides a little more of laugh when the card is opened. I really love that ‘galaxy’ background, and the clear drops on her eyes add a lot of life to this image!
Now that I have done some free-for-all ‘painting’ with the Brusho powder, I thought I would try and see how much control I could exert with this medium. I am a control freak! I figured a moon would be useful with this Halloween kit so I came up with this.
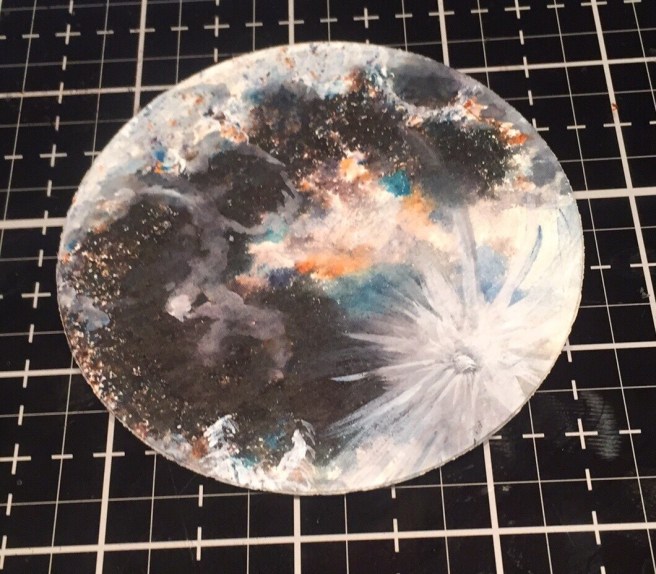
I did add some of my permanent white watercolor to this (note the Tycho Crater on the lower right) but all the colors and speckling came directly from the Brusho Powder! Now that’s my idea of using those watercolor powders to do my bidding! LOL!
If you saw my un-boxing, you know I got a big kick out of that Owl ephemera piece and decided to pair that up with this watercolor moon.

On a black card base, I again spattered some of my permanent white watercolor for a light background of stars directly on the card base. I glued the moon directly to the card front with my Ranger Multi Medium Matte glue, and cut out the thinnest stripe from the striped pattern paper that came with the kit. With the aid of a couple of folds, I fashioned a branch from that stripe for my Owl to stand upon and attached that along with my owl to the card front using foam tape. Halloween cards kind of lend themselves to puns so I am off and running already with this “Happy Owl-oween!” sentiment I printed up using my Silhouette software and the Black Jack font again. I trimmed that into a banner shape and foam taped that to the card front as well.  I did think this was the perfect opportunity to use the “trick or treat” stamp from the stamp set and added that to the inside of this card using VersaFine Onyx Black ink (I do ALL my stamping this month with this ink). I also added Glossy Accents on the owls eyes (BIG eyes here!) and again that brought so much life to this card! BEWARE!!! I am just getting started with the Halloween puns this month!!!
We got a terrific new curly-cue cobweb stencil in the kit this month and I though it would be fun to try some ‘reverse stenciling’ with this highly detailed cobweb. Basically, I’m just using the stencil as a stamp – inking up the surface and applying that to card stock. Now, the manufactured cut edges of the stencil are minutely higher (thicker?) than the body of the stencil, so if you ink your stencil and apply that directly to card stock, chances are pretty good that you will only transfer the edges of the stencil. Here are my experiments:

Clockwise from top left: 1. Hero Arts Unicorn White ink and white gel pen 2. HA Unicorn White ink and silver stardust gel pen 3. Golden Crown embossing powder (LFL) 4. Silver Dollar embossing powder (LFL) 5. Pumpkin Pie embossing powder (LFL) 6. HA Unicorn White ink with a good spray of water. For the embossed pieces, I coated the stencil with some VersaMark ink, laid that on the card stock and ran it through my die-cutting machine using an embossing mat. That really pressed the ink into the card stock and gave me really good results with all the embossing powders. And you can get a good impression from most of your water-based inks if you spritz the stencil with a good amount of water. I was just experimenting here, but I really like the subtle variations in color on cobweb #6!
I also took a little time to go ahead and assemble all four of the decoupage pieces included in the kit. YOWZA! there are some incredibly small pieces to these decoupage cut-outs – I don’t think I’ve ever trimmed foam tape this small! I like to use EK tools 3D-Dots with this layering decoupage. At 1/16″ thick, these are the thinnest, highest quality foam squares I have ever seen.

Those arms on these “Ghoul-ettes” are super thin! I think my foam squares are thicker than some of the widths I was trimming it down to!! I did persevere and got all four of our “Ghoul-ettes” assembled using all the decoupage pieces. Really fun dimension!
I thought that cobweb and the decoupage “Ghoul-ette” with a book would work well together for my next card. And maybe that book she’s reading is a cook book (or a spell book if you like). That ephemera cauldron would work nicely here too!
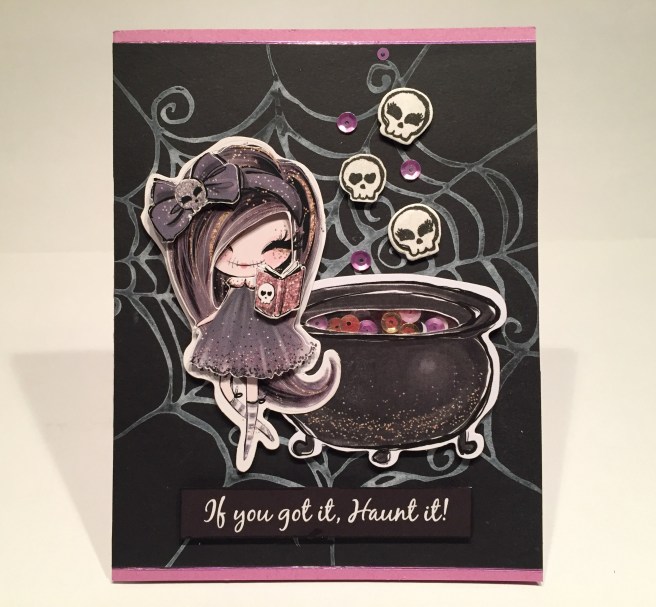
I trimmed down my white cobweb to fit (the stencil is a 6″ x 6″ stencil with a frame, so it won’t completely fill the 5.5″ length of a card front) and glued that to the Posy card base and added a couple of the thinnest Lilac peel-offs to the top and bottom edges. I did make a little mini-shaker out of the inside of the cauldron using only the smaller sequins from the Happy Haunting Sequin Mix (doesn’t shake much, but looks cool!) and glued the cauldron and the Ghoul-ette together before mounting them to the card front with foam tape. I stamped the skulls from the stamp set with VersaFine ink and used the included die to cut out the two larger skulls and just fussy-cut the smaller one. I colored the skull on the hair bow with my Stardust gel pen and used my Spectrum Noir Sparkle Glitter Brush Pen to add some shine to the skulls. I attached the skulls with some foam tape and added a few sequins as if they were all ‘bubbles’ rising from the cauldron! And, here it comes… my second pun-y sentiment for this month: “If you got it, Haunt it!” printed using my Silhouette software and the Black Jack font. I thought white text on a black background was very appropriate for a lot of these cards this month, and I love how it kind of feels like it’s white embossing! I do complete this card with the “happy halloween” stamp from the kit on the inside of the card – I think every card this month sports a sentiment on the inside! I really like pairing this Ghoul-ette up with the cauldron – it gives some context to the book she’s reading and the skull ‘bubbles’ reinforce that as well!
Okay, lets dig into some of that Love From Lizi Happy Haunting pattern paper pad now. I really liked that ‘striped’ pattern paper and thought those stripes looked a lot like birch trees. I considered cutting all the stripes away from the pattern paper and gluing them to black card stock to get a ‘night sky background’, but then thought it would be very interesting to play with a ‘reverse’ night sky with a moon poking through the trees…!
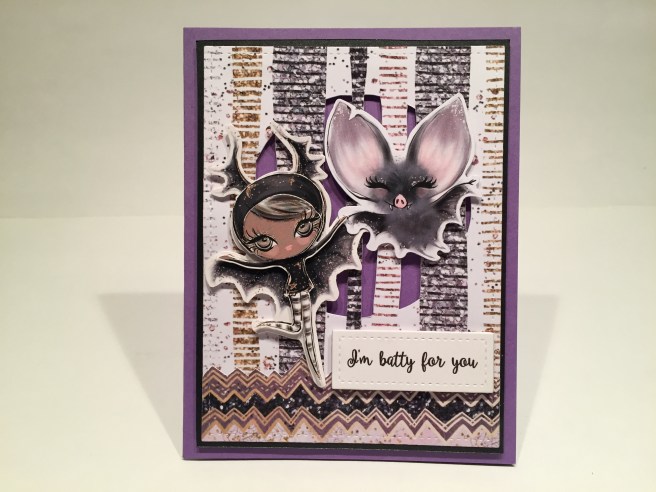
I traced a circle on the pattern paper (another circle die to the rescue!) and used my craft knife to cut the circle out while leaving the ‘trees’ intact. I then die-cut the pattern paper with a stitched rectangle die and matted it to a piece of the Black specialty card stock (with the center cut out!) and foam taped it to the Lilac card base for some added dimension behind the ‘trees’. I also took a small piece of the chevron pattern paper and fussy-cut one edge, die-cut it to size and added it to the bottom of my card front for a little suggestion of ground. I paired up the decoupage Bat Ghoul-ette with the ephemera bat and attached their ‘hands’ together as if they were dancing in the forest… I attached those to the card front with more foam tape (you can never have TOO MUCH dimension!) and printed out the “I’m batty for you” sentiment using the Ballerina Script font. I sized that sentiment to fit my smallest stitched rectangle die and glued three layers together  before foam mounting them to the card front. Another “happy halloween” stamped on the inside, some more Glossy Accents on her eyes for a little shine, and there you have it! I loved pairing these two ‘bats’ together and with the Ghoul-ette’s leg kicked up in the air, it really feels like they’re dancing through the forest!
We got some terrific wood-veneer die cuts in the kit this month – nicely sized, well detailed and darker than most veneer pieces we see, and I was eager to use the large wood-veneer skull for my next card.
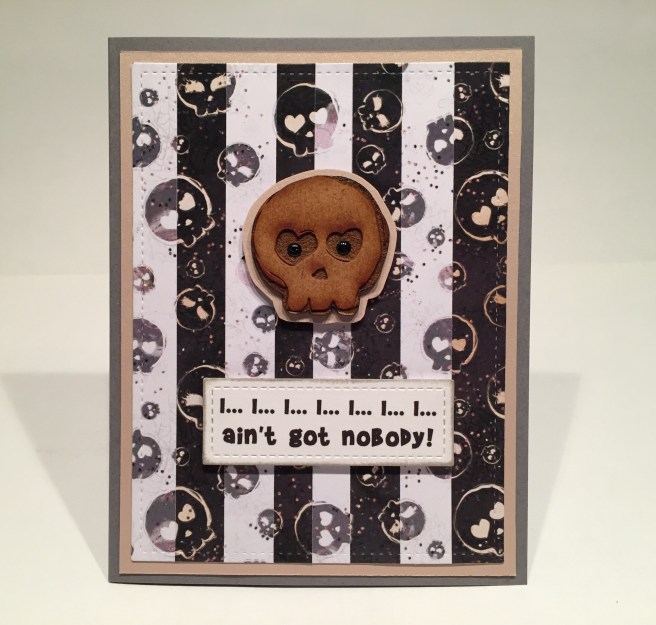 I took the white and black skull pattern paper, and noticed that it was the exact same pattern on both pieces so I stacked them on top of each other and started cutting strips. Then it was a simple process to match the patterns and create a black and white striped paper with the pattern running uninterrupted across all pieces. I LOVE that! I die cut my finished stripes with a stitched rectangle die and matted that to a piece of the Blush specialty glimmer paper before gluing them to the Dark Gray card base. I did cut a mat for the skull from more of the same glimmer card stock and added that to the card front with foam tape. And I LOVE this sentiment…!! Makes Me Laugh every time I sing it. YES… you got to sing this one! LOL!! I printed this sentiment using my favorite Brady Bunch Remastered font, die cut it with a stitched rectangle die, and foam taped it to the card front.
  Another stamp of “happy halloween” on the inside of the card and I thought that was it. But something was missing… I experimented coloring the eye sockets with a black gel pen on the smaller wooden skull but did not care for that effect. The sockets are very textured on their bottoms (probably a result of their lase-cutting) and that kind of flattened out the shine from the gel pen. AHA! Black Nuvo Drops in the eye sockets give this fellow some GREAT personality and shine and makes me laugh even harder! He looks kind of irritated! LOL!
Last year, with the LFL Thanksgiving Special Edition kit, I made a sketch file on my Silhouette Portrait for a background of ‘swirling wind’ to use for a “Sweater Weather” card. I love the fact that my Silhouette will not only cut out shapes, but that it will also draw shapes with any pen or marker that will fit in the holder. I had another great ‘witch’ sentiment that I wanted to use and I thought this would work well for a witch on her broomstick.
I ‘sketched’ the swirly lines using my white gel pen on a piece of the Graphite specialty card stock and used my largest stitched rectangle die to cut that to size and glued it to the Dark Gray card base for my card front. I mounted the decoupage witch to the card front with foam tape and printed this double-pun sentiment using the Black Jack font on some plain white card stock. I did size the sentiment so I could die cut it with a Spellbinders Deckle Rectangle die, and I went ahead cut two more layers and glued them all together for some added thickness.  I distressed the edges of that sentiment with a little Pumice Stone Distress Ink and mounted that to the card front with foam tape. A few pink sequins from the sequin mix add a little bling for a nice finishing touch. Of course, I have to continue using the “happy halloween” stamp on the inside of this card as well… I guess you could say that stamp is on a roll!! I’m SO GLAD this stamp is in this stamp set! I only have one teeny tiny “Happy Halloween to You” stamp in my stash! And I have to admit, I really enjoy this double-pun sentiment!
Okay, one more card using my Silhouette Portrait – this time using it for cutting!

I cut the “333” (Impact font) from a piece of the pattern paper and also from a piece of black card stock, and glued those together to create an offset shadow, and glued those directly to a white card base. I mounted the ephemera Devil Ghoul-ette with some foam tape on top of the numbers and added a few Nuvo Drops for some shine. I was still looking for a pop of color so I stamped the bow from the stamp set, colored that with my Zigg Clean Color Real Brush Markers and used the included die to cut it out. The white outline around the bow wasn’t working on this image so I went ahead and fussy-cut the bow right to the stamped edges and added that to her hair with a spot of foam tape. Some Stardust glitter pen on the skull and now we’ve got a nice pop of color on the front of this card.  Ok… so… what in world is a “333” sentiment mean? Well, all you have to do is open the card to reveal the joke. That’s right… this Ghoul-ette is only “half-evil” LOL! This is printed in the Ballerina Script font on the writing surface inside the card. This makes me laugh so hard. I love the nondescript numbers on the front and the final reveal when the card is opened. I think most of us would agree that we are all only half-evil..!!! Still makes me giggle just writing about it!!
I haven’t used that large “Spooky” sentiment from the stamp set yet, and I thought that since it was so large, it might make a nice background stamp.

Oh, yes!! I stamped that “Spooky” sentiment multiple times on the black card base with VersaMark ink and embossed it with Ranger Clear embossing powder for a really nice, shiny, tone-on tone look for the background on this card. I added double rows of the Lilac mirror peel-offs to opposite corners of the card front for a sort of ‘partial frame’ effect (you’ve seen me do that before) and that adds a lot of shine to this card. I stamped the bottles from the stamp set and colored them with my Zigg markers before die-cutting them out with the included die. I glued those bottles to the hands of the ephemera ghost and used foam tape to mount this image to the card front. Of course the “I’m just here for the BOOS” sentiment (Brady Bunch Remastered font) is so completely apropos, that I couldn’t resist! And when I saw the bottle stamp included with the stamp set I knew this card was in my future!!  LOL! I did take the time to finish out this card with the “happy halloween” stamp on the inside writing surface, and once again, I love the pop of color that the green bottles add to the front of this card! I guess I’m getting a little tired of all the soft pinks, lilacs and grays that comprise most of the color palette in this kit.
Okay then… let’s do some COLOR! I stamped the Ghoul-ette stamps from the kit on my Bristol smooth card stock and went at them with my Zigg watercolor markers.

I was really itching to color the devil Ghoul-ette in reds, and red, violet and yellow-green are split complimentary colors, so that’s the route I took coloring these stamps. Of course I was planning on using them all together on one card so I thought I could get away with such a radical color intervention here! LOL!

On the Posy card base, I paired the pink ‘terrazzo tile’ pattern paper and the soft pink cobweb pattern paper to make my background. I used the Lilac mirror peel-offs to lay out a bit of a perspective tile pattern on the ‘floor’. I though that was really interesting! I checked our hallways here in our building, and the terrazzo floors here have metal ‘grout lines’ between the pieces of tile so the mirror peel-offs were perfect! I think of this as my ‘disco’ floor! I trimmed the background to size (WHAT!? no stitched rectangle die???!!!) and added a thin black mat before gluing the background to the card base. Then it was a simple matter of arranging our three Ghoul-ettes on the card front. I decided to bring in the large ephemera skull to give the small Bat someplace to stand so she wouldn’t get lost in the background. Everything is mounted to the card front using foam tape and you have to open the card to see my favorite pun of the month!
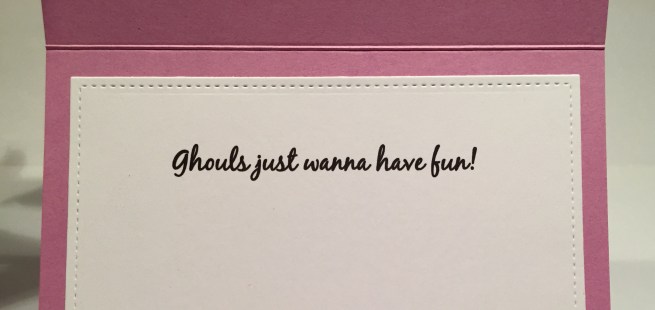
Oh, heavens this one makes me laugh and laugh and laugh…! What a delightful pun!! And I think it’s ultra perfect this month since all of our images are girls!! This is printed in the Black jack font again – I went back and forth between this font and the Ballerina Script font in an effort to emulate the font of the stamp set – I think the Ballerina font is closest to matching, but I didn’t like the lower-case ‘w’ so I used the Black Jack font for my sentiments that had a ‘w’! Makes perfect logical sense, right??!!! LOL!!!
And that brings us to my last card of the month!

Color junkie that I am, I really liked the Pumpkin Pie embossed cobweb I created earlier. That embossing powder was included with the Love From Lizi October 2017 card kit and it worked so well on this spider web. Nice glitter in that embossing powder! I dug around in my leftovers from that month and found a piece of the Burnt Orange specialty card stock that matched the embossing powder perfectly! (natch!) That inspired a little interactive card for you all!
Needless to say, this cards thrills me to no end!! This is the very same technique I used for my “Swinging Girl Card” from a couple of months ago. I didn’t fuss with the thin card stock spacers on this card and instead opted for foam tape as the spacer between the card front and the Lilac card base. I die-cut the cobweb with a stitched rectangle die and matted that on a piece of that Burnt Orange specialty card stock and then drew a line with my Emboss It pen on a scrap of black card stock and embossed that with more Pumpkin Pie embossing powder and fussy cut it out to use as my swinging web strand.  I did spend a little time coloring up the wood-veneer spider from the kit using my Spectrum Noir Alcohol Markers on her bow and then topping the bow and eyes with my orange Sakura Glaze Pen for a touch of shine. Some white gel pen for the bottom of her eyes really makes them pop and I used my Stardust gel pen on the skull in the center of the bow and a spot of red glaze pen on her lips. I think those glaze / gel pens work really well on these wood-veneer pieces and adds a little touch of shine as well.
I really didn’t want to cover up any more of that cool orange cobweb with my sentiment and thought it would be a blast to hide the sentiment behind the spider so she reveals the complete phrase only when she swings back and forth. I got the biggest kick out of that!!
I created the “CREEPIN’ IT REAL” sentiment on my Silhouette using the Taco Modern font and sized it to work with my Darice Banner die. I chose to print that on some photo paper for the extra bright colors and some really nice shine, and was pleased to get a really good match with the orange! I outlined the banner die-cut sentiment with some thin Lilac mirror peel-offs and that was the perfect touch to really highlight the sentiment. I did of course complete this card with the “happy halloween” stamp on the inside writing surface.  I love the classic orange and purple Halloween colors on this card, but I do have a little bit of a bone to pick here. Spiders have 8 legs. Bugs have 6 legs. I guess that’s being really picky… LOL!! Ultimately, it doesn’t detract from my overall enjoyment of this card! I’m just sayin’…!! LOL!
That completes my 10 Cards 1 Kit collection featuring the Love From Lizi September Super Card Kit. I did manage to use every stamp in this stamp set, I used two of the wood veneer die cuts, 5 pieces of ephemera, and 8 Ghoul-ettes! I didn’t get to any of the ribbon this month… I think I must have been so enamored with the spool that the ribbons came on that I didn’t want to disturb it!! LOL!! Even though every card here has ‘eyelashes’ somewhere, and even though this is an extremely feminine kit, as a whole, I think this collection of cards feels more Halloween-y to me than girly! I really enjoyed all the puns this month and hope you get a kick out of them too!

Thank you so much for joining me here today! Please let me know if you have any questions or comments – you can email me directly from the ‘CONTACT’ page at the top if you like! I’d appreciate it if you shared this post with any Halloween Junkies you may know or anyone else you think might be interested! Please Like Me, List Me, Pin Me, Post Me, Don’t Run with Scissors, and, as always, Happy Halloween!

Never a dull moment with Scotts creativity and humor! You always come up with the most clever cards! Lizi needs to intro some male characters and I still cannot wrap my brain around pink for Halloween! Awesome cards Scott! Remember: the wood ephemera is not to be burned! )))
LikeLike