
Hello Folks! Scott here with my first ever My Monthly Hero Kit! YES! I have chosen Hero Arts for the next chapter in my ever expanding sampling of card and craft kits. I have already done ‘A Year with Paper Pumpkin’ and ‘A Year with Simon Says Stamp’ and this month marks the beginning of my next kit series: ‘A Year with My Monthly Hero’! Why did I choose Hero Arts? Well… I was beginning to feel a little overwhelmed with pattern papers included in my kits (and my possibly unnecessary obligation to use them on my 10 cards) and was interested in taking some time to work on creating my own backgrounds for my cards. My Monthly Hero kits seem to be more focused on stamps, dies and ink pads instead of card stocks and pattern papers. So this should prove to be a fun year of trying new techniques and sharing some new creations with you! The May, 2018 My Monthly Hero kit (already sold out!) included this 6″ x 8″ Clear Stamp set featuring a bit of a ‘storybook’ theme with a large ‘build-able’ tree stamp and a great assortment of active kid silhouettes on swings and bikes and flying kites… this is a BIG stamp set with lots and lots of images and 6 sentiments. We also got 13 coordinating frame cut dies, 2 leaf dies and a ‘Window Fancy Die with Frame”. That’s a LOT of dies… and my very first ‘window fancy die’ that I think is pretty spectacular! We also received a roll of leaf patterned washi tape, 5 Ivory Skeleton Leaves, a 5.25″ x 6.5″ Tree Swirl Stencil and four 5″ x 7″ sheets of 100% Recycled Handmade Hot Press 140# Watercolor Paper. This is some really sexy, incredibly classy watercolor paper! The mounting card that the stamps and dies came on has some brief instructions for the ‘tree builder’ stamps and, of course, everything was tied together with this nice green satin ribbon. All of the card stocks I used for these cards was from my own stash and is most likely Recollections card stock from Michael’s (so I won’t be identifying every piece of paper here!) LET’S PLAY!
I do have a decent amount of shaped dies in my stash, but this is my first ‘fancy window’ die, so I die cut a white card front first thing – WOW! – truly a very stunning die! I reached for my Simon Says Stamp Hybrid Inks for blending my background here with Watermelon, Orange Slush and Lemon Zest. I have seen a number of cards from this kit very similar to this one, with the exception of the sentiment. I loved the look of the empty swing but didn’t think any of the sentiments included with the stamp set went particularly well with this image, so I reached for my Hero Arts ‘Many Everyday Messages’ stamp set for this simple ‘miss you’ sentiment embossed in white next to the empty swing. WOW! Now that works perfectly!! Love this die and adore this card!
That’s the die cut from white card stock, let’s see what it looks like cut out of black!  Excellent! I brought in the oval frame for this die cut, and trimmed away the swing for this card. This is 3 layers of black card stock glued together for a little chunky dimension on a watercolor background. I used my Zigg Clean Color Real Brush Markers to color directly on the watercolor paper and then misted the whole piece with water to soften… I did move a little of the color around with a brush (the horizontal streaks) but this is mostly natural blending. I LOVE the bright vibrant colors that the Zigg markers bring to this card – perfect compliment to the black die cut!! The sentiment (from the stamp set) is stamped in VersaFine Onyx Black ink and embossed with clear embossing powder. I found some purple card stock in my stash that matched the very top of the watercolor background and glued all the layers straight down to the card base. I really like the ‘cameo’ feel of these dies together! A beautiful card with a ‘beautiful’ sentiment.
Now lets see what we can do with some of the fun kid stamps in this kit.  I stamped this little scene using Walnut Stain Distress Oxide ink on my standard Staples Ivory card stock. I did do a little practice stamping on some scratch paper before committing to my card stock. I die cut the ivory card stock with a Lawn Fawn Stitched Rectangle die, mounted that to a dark green mat, added a strip of the washi tape on the left and glued the card front down to a Kraft card base. I thought this sentiment from the stamp set went perfectly with the girl and kite stamp combo – and I even got the little butterfly stamp to join in on the fun. This feels very ‘retro’ – almost a sepia feel if you like! Very much in line with the whole ‘storybook’ atmosphere of this stamp set!
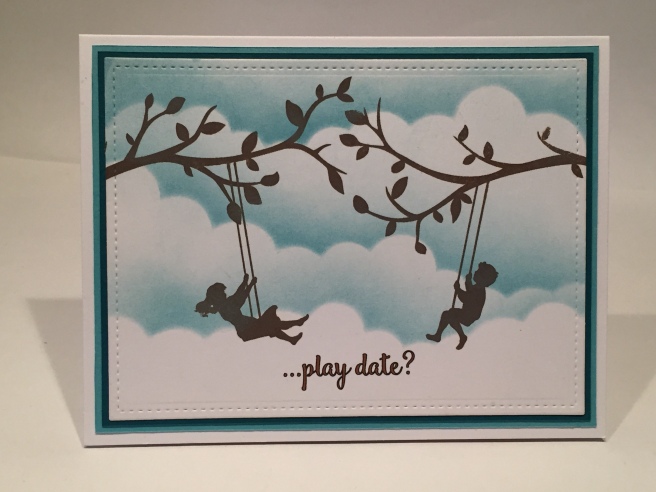 With so many ‘swing’ stamps in the set, I thought I would pair a couple of them up for a bit of an ‘invitation’ card. I used a MFT Mini Cloud Edges Stencil, some Broken China Distress Oxide ink, and my ink brushes to make the cloud background and then die cut that with my LF Stitched Rectangle die. I stamped the branches and kids with Walnut Stain Distress Oxide ink and turned to my Silhouette software to create this fun sentiment. The sentiment is printed directly on the card front using the Smoothie Shoppe Font. Two thin matching mats behind the card front frames this up nicely on a plain white card base. I like the fantastical nature of the kids swinging way up in the clouds with no ground in sight, and these two tree branch stamps go perfectly together!
 Now, someone had made a comment on one of my recent 10 card videos asking me if I would do a ‘pet sympathy’ card. I cut a plain white card stock oval with the frame die and ink blended the background with Distress Oxide inks in Broken China, Faded Jeans, and Iced Spruce. I added a couple of clouds using the MFT stencil to finish out this kind of ‘stormy’ background. I curved the border stamp from the stamp set into a gentle ‘hill’ echoing the shape of the oval and stamped that with my SSS Intense Black ink, and filled in underneath the stamp with some black card stock. I stamped the dog silhouette in Versafine Onyx Black ink for a subtle difference between him and the ground, and used the same ink to stamp the sentiment (from the kit) and highlighted that with some clear embossing powder.
  I did use my Sheer Shimmer Spritz to give some sparkle to the black card base and used some foam squares to mount the oval to the card base. (This is the only foam tape I used on this whole kit! Lots of envelope-ready flat cards!) I thought this card was pretty self-explanatory, but I did reach for my Hero Arts Sentiment stamp set to add a simple ‘with sympathy’ on the inside of the card. I love the image of this solitary dog standing on a hill – very evocative, and surprisingly sweet.
I wanted to see if I could achieve a little more detail with these tree branch stamps so I practiced coloring my stamps with my Corla Art Dual Tip Marker Pens (poor man’s Tombow Markers!) and found that I could easily separate the branches from the leaves!  I did use my Mini MISTI stamp platform to stamp all these branches. I stamped the background branches in SSS Barely Beige ink and a light and dark brown marker for the foreground branch and a light and dark green marker for the leaves. The pink and red marker worked well for the single apple stamp and I (naturally) die cut the card front with a stitched rectangle die. I stamped the sentiment from the kit in Distress Oxide Walnut stain and clear embossed that for a little shine. Thin mats in dark brown and red,
  and a thicker mat in Kraft provided a frame for the card front and all is glued down to a white card base. I did go back to my Hero Arts Many Everyday Messages stamp set for a simple ‘thanks!’ on the inside of the card which completes this sentiment very nicely. A touch of my Spectrum Noir sparkle pen adds a little shimmer to the apple, and we have a simple, whimsical thank you card.
 I think my little dog card made me a little melancholy, so I thought a regular sympathy card would be appropriate (and a little out of the box for this set!) I wanted to play a little bit with the Tree Swirl Stencil, and, ignoring the tree trunk, embossed the left and right branches on the right and left sides of my black card stock with just a little overlap in the center. I used VersaMark ink and the Love From Lizi Golden Crown embossing powder for a nice deep shiny gold. I did cut the black card front with my stitched rectangle die, and mounted that on a thin white mat before gluing all down to a black card base. I did reach for the skeleton leaves from the kit (maybe those are what pushed me to the maudlin side of things!!) and glued three of them to the top of the card front. I returned to the ‘with sympathy’ stamp and double embossed that on the card front – first with white embossing powder and then, after shifting the stamp a tiny touch to the right, the Golden Crown embossing powder. The white ‘shadow’ make the sentiment pop off the card. And those skeleton leaves are very interesting… so fine and delicate… if you turn the card a certain way, they almost disappear, and if you turn the card the other way they are very prominent. I don’t think many people will look at this stamp set and think “sentiment card” but I’m here to push boundaries and stretch the usefulness of all the kits I work on!
There are two little leaf stamps in this stamp set and two matching dies that are very small – only 3/8″ long. Hmmmmm… we could actually use those dies to put some leaves on these tree stamps! For some reason I thought of this colored glassine paper I had on hand – it’s actually a kind of food grade wax paper that is oil and water resistant, very shiny and is often used for sandwich bags or as homemade treat bags in crafting parlance. I had purchased a few rolls of assorted colors of glassine oh, so many years ago, when making some ‘Window Stars’ for Christmas one year. The glassine paper is very thin and makes a very strong crease when folded. Well… I think they make very fine leaves to add on to these build-a-tree stamps! I stamped this tree in my light and dark brown markers using the trunk
  stamp and some of the branch stamps and avoided stamping the leaves at all. The glassine paper is so thin I was able to die-cut 6 layers at a time from dark green, light green and yellow, and with two leaf dies that makes a dozen leaves with each pass. I did use my Silhouette software again for this sentiment using the Typewriter Hand font and printed that directly on the card front, and I did die cut my white card front with my stitched rectangle die – of course! Small dots of Ranger Multi Medium Matte and my sticky tool is all I used to glue down (over 100) glassine leaves to the tree branches. Okay, so maybe I’m a little obsessed, but it really didn’t take that much time to glue down all the leaves. A simple mat of my old core’dinations Auburn Pearl card stock and a Kraft card base complete this extremely colorful spring card. No kids – just a tree! And I love that glassine shine!
I do have one more ‘fancy window die’ card for you. I wanted to try coloring the trees and foliage on the window die. I did find that you could do a fancy colored background and a plain colored die, or a fancy colored die cut with a plain background, but I had a hard time making a fancy colored die go with a fancy colored background. This die cut sat around waiting to be used for quite a little while! First I embossed the die into the watercolor paper – no cutting, just embossed using my silicone embossing mat. I then used a couple green and a couple brown Zigg markers to color in the trees and foliage. Then, with a medium misting of water over the paper, the colors start to move and soften into a lovely water colored rendering. I let that dry and then completely cut out the die with the oval frame. I thought the water colored die cut was really lovely but it took me a while to figure out what kind of background would work with it. I returned to my Distress Oxide inks in Broken China and Faded Jeans for this blended background. Once again using the Silhouette software, I created this sentiment with Mona Lisa Solid font for the ‘grow’ and the Lucida Handwriting font for the ‘with me’ and printed that directly on the ink blended background. Then I stamped a bunch of branches with the SSS Barely Beige ink to frame in my sentiment. The die cut is glued to the background and the background is glued to a Kraft card base. A few extra glassine leaf die cuts adds some color and shine to the corners of the card base and here we have another card with some groovy water coloring on the fancy window die. The die appears to have two trees, so I thought the ‘grow with me’ sentiment was appropriate and could be used for many occasions! An anniversary card comes to mind…!
Now if you have been following me at all over the last year or so, I think you realize that I can’t look at all these swinging kid stamps and NOT want to make an interactive card! So here’s my interactive, simple pull-tab card that really brings this stamp set to life! Oh, my heavens, this card makes me very, very happy!!! LOL! Everything is stamped in Versafine Onyx Black ink on my Kraft card stock (cut with a stitched rectangle die!) and I die cut the swinging girl without die cutting the top of her ropes. I extended her swing ropes through a slit at the edge of the branch and attached the swing to the pull tab.! VIOLA! NOW WE’RE REALLY SWINGING!! Another Auburn Pearl mat and an Ivory card base is all that’s needed (with a little help from the recipient!) to literally bring this card to life! Click on the short clip below to see this card in action! This card gives me great joy!! LOL!
That’s my first ever 10 cards with the May 2018 My Monthly Hero Kit. But Wait! There’s more! BONUS! DING! DING! I couldn’t stop there! Recently, there has been a lot of hoopla on the web around the new Lawn Fawn release that includes the ‘Reveal Wheel’ die set and add-ons, and while they are very cute, I wanted to draw attention to the fact that I did my first spinning wheel card with the Simon Says Stamp May 2017 Card Kit and, most recently, did an actual ‘reveal wheel’ card with my Love From Lizi April 2018 Card Kit. So… I thought the little boy on a bike stamp was the perfect image to do another spinning wheel card. This time it’s all about the journey!! I did go to my Silhouette Portrait for this card. I created the spinner last May with my ‘Groovy Birthday’ card and created this oval window card front just for this card. I thought moving the image to the bottom part of the spinner wheel (instead of the top) would be interesting and would also keep the control side of the wheel on the right side of the card and give us a chance to have a bigger ‘reveal’ window for the passing scenery. I used a variety of my Distress inks to blend the colors on the wheel and used the grassy border stamp for the ground and branches for trees and the cat stamp and the squirrel stamp…!! LOL! I actually had room to stamp a couple of houses and small pines from the November 2016 Paper Pumpkin Kit. I told you I keep all that stuff!! I tried to stamp the cat and squirrel and some of the branches that were ‘closer’ with SSS Intense Black Ink and stamped the houses and trees that are ‘farther away’ with Pumice Stone Distress ink. The sentiment is actually a Susan Sontag quote printed in the Typewriter Hand font, and the black and white strip on the left is from a SSS border stamp and the dashed lines on the right are just little card stock trimmings. The arrow stamp is from the MFT Interactive Labels stamp set, stamped with VersaFine Onyx Black ink as is the bicycling boy. A thin black frame cut on my Silhouette for the opening and everything is assembled on a black card base. I do believe this little fellow is ready to roll…!!! And I just laugh and laugh…! I think this card is immense fun!
WOO-HOO! That was SO MUCH FUN! Now THAT’S my 10 Cards plus BONUS with the May 2018 My Monthly Hero Kit.!! I really enjoyed my first kit from Hero Arts and was particularly pleased at the wide variety of cards I was able to come up with.  I also got the chance to work on some groovy backgrounds for a nice change of pace! I still have some of that sexy watercolor paper from the kit left over, and the washi tape and a couple of leaves and, naturally, this stamp and die set will find a loving and useful home in my stash! I hope you enjoyed these cards as much as I did, and will let me know which are your favorite. Thanks for sharing your time with me here – I’m sorry for being so long winded! I hope I was able to give you a giggle or two and maybe provide you with a touch of inspiration…! Please remember to like me, list me, pin me, post me, share this post will all your friends… don’t run with scissors..! and … HAPPY CRAFTING!

Absolutely beautiful collection of cards! It would be hard to identify a “favorite” card, but the pet lover in me just loves the pet sympathy card. Your ink blending, ingenius use of glassine paper, and unique ability to find just the perfect sentiment make all your cards so special! Great job with this card kit!
LikeLike
Thank you SO MUCH Sandra! That really means a lot to me! Always good to hear from you! I’m looking forward to seeing what Hero Arts has in store for the next year! Spread the Cheer!! Scott
LikeLike
So, how many requests did you receive to show us the moving swing?? LoL Just charming!
Superb Job Scott, absolutely joyous indeed!
LikeLike
Thanks SO MUCH Katherine! I think just having a new kit in hand was inspiration in itself!! I’m getting SOME requests for a swing how-to but surprisingly few..!! I’ll probably end up doing a how-to for that although it is almost embarrassingly easy! Always good to hear from you! Spread the Cheer!
LikeLike
Fantastic job with the cards. I have watched several YouTube videos using the kit, and I was not impressed with the stamps and dies. You made me want the kit. I look forward to seeing your future creations using Hero Arts kits.
LikeLike
Thanks so much Sarah! It is very much appreciated! I’m looking forward to more from Hero Arts! Thank you for your support and Spread the Cheer!
LikeLike
These are such nice cards! I don’t get this kit anymore, but I love that fancy window die. My favorite card is the thinking of you. So sweet. Thanks for sharing your designs! 🤓
LikeLike
Thank YOU, Jeanne! My pleasure…! I’m looking forward to more from Hero Arts!
LikeLike
Scott, this is the last Hero Arts kit I got before cancelling my subscription. Now that YOU will be designing with these kits, I’ll probably re-subscribe because I love all your innovative, lovely cards! Your creations are fantastic, as usual. Thank you for sharing your talent.
LikeLike
Thank YOU, Eva! Always good to hear from you! I truly appreciate the support! Spread the Cheer!
LikeLike
Your cards are amazing! Love the sepia tones on the girl.. on the swing card, the dog on the hil is so clever, also the glassine leaves…that card is fantastic..also the two children in the swings..so cute…like what you have done with the fancy die and your two interactive cards are awesome..would love to see how you made them…just such fun cards…all the cards are wonderful! I have your web sight saved to my favorites.
Thanks so much for sharing your talent with all of us. 😊
LikeLike
Thank you so much Rebecca! Great to hear from you! I think just having a new kit in hand was inspiration itself! I may do a process video for the swinging card… the requests are adding up! LOL! Thanks for the kind words and support! Always appreciated! Spread the Cheer!
LikeLike
Some fantastic cards. I really, REALLY love the one on craft paper where you get the girl on swing actually swinging. Please tell me (or post a video) how you actually did that. I tried it, but it just pulls rather than swings. I think that is fantastic.
LikeLike
Lots of folks have asked for a tutorial for that card… I will try to get a video posted for that asap! Thanks!
LikeLike