
Hello Folks! Scott here with my 10 Cards from the Love From Lizi May 2018 “Totally Tropical” Card Kit. This is a very interesting kit full of masculine pattern papers, colorful card stocks, surprising embellishments, an exclusive stamp and stencil set and a great toucan die! Lizi always packs her card kits with tons of supplies and she doesn’t skimp this month! This will be a challenge to use as many items as possible on these 10 cards! You can check my previous post for a complete breakdown of all the supplies included.  I do tend to start on a new card kit by stamping and coloring all of the images in the stamp set. I stamped the flowers and leaves with my Simon Says Stamp Intense Black ink on the thin ‘copic-friendly’ card stock included in the kit and colored everything with my Spectrum Noir alcohol markers. I love the large hibiscus stamp and the Monstera deliciosa leaf stamp. Those two are my favorites in this stamp set! The images on the border stamp are almost too small to color accurately with alcohol markers, and I got a
  little bit of bleeding at the center of the hibiscus bloom (lots of ink used in the center!) but that big hibiscus stamp and the Monstera leaf stamp are large enough to fussy-cut without much fuss…!! As usual, I did make my 10 card bases from the colored card stocks included in the kit, and I dove into this kit with gusto!
 For my first card, I cut out the hibiscus and monstera leaf images and grabbed one of the Bright Red card bases. I matched up the hibiscus and white flower pattern paper (cut at a slight angle) with some of the dark green and gold shimmer specialty paper and, after attaching a length of the green and white striped ribbon behind the angled edge, used my LF Stitched Rectangle die to cut them into my card front. I mounted those to my card base with foam tape and added a gold peel-off sticker between the pattern paper and the ribbon. I used foam tape to mount the hibiscus and leaf to the top right of the card, and stamped the ‘For you…’ sentiment from the stamp set on a piece of scrap white card stock (using SSS Intense Black ink), and mounted that with foam squares to the card front. I tried to concoct a small stitched rectangle around the sentiment, but didn’t like how my stitched corners overlapped so I just cut the edges away – that’s why the sentiment has a touch of a ‘scalloped’ edge that I thought was very interesting! I added some green, red and white sequins from the sequin mix for a little extra bling, and actually glued a few tufts of the marabou boa to the center of the hibiscus – nice and fuzzy!! This card finally got me rolling with this kit and highlights those two terrific stamps. I’m sure I will get lots of use from those stamps in the years to come!
I was so enamored with the toucan die that even before I started making cards, I spent some time die-cutting and paper-piecing to see what I could come up with. I die-cut the toucan from some black and white card stock, and wanted to see if I could get a little bit of a color blend without using my alcohol markers. I reached for a tool that I have had for a while but have never used – the Tim Holtz Distress Marker Spritzer Tool. I do not have any Distress Markers, but Sharpie markers fit this tool nicely and I have lots of sharpies…! I colored the white cut-out pieces with the spritzer tool in red, orange, yellow, and teal Sharpie markers. This technique came out terrific!! To assemble the whole toucan, I cut a plain piece of paper a little smaller than the die cut and covered that with dry adhesive before attaching it to the back of the black die cut (be sure to remove the black cut-outs first!) then I could easily add the colored pieces into the spaces in the black die-cut. I will use this tool more often as I was very pleased with the results, and decided to use this piece on my next card.
  On the Warm Yellow card base, I cut the ‘spatter’ pattern paper with a Lawn Fawn Stitched Rectangle die and mounted that to my card base with foam tape. I took the dark green with gold shimmer specialty card stock and die-cut one of my Darice Border dies from that, and attached the toucan to the leafy border. I added some gold mirror peel-off stickers as a frame on the pattern paper (no mitering here – just let them go off the edge of the pattern paper), and used foam squares to mount the toucan and branch to the card front. I created this sentiment in my Silhouette software using the Noteworthy font and sized it to match one of my Stitched Circle dies on a piece of jewel yellow card stock from my stash. I did get this sentiment from fellow Design Team member Alicia (Crazy Paper Chick) who had this sentiment in a Stampin’ Up stamp set. I did a little distressing on the edges of the sentiment die-cut with my Spiced Marmalade Distress Oxide ink and mounted that to the card front with more foam squares. I was very pleased with the bright colors that the toucan brought to this card since many of the pattern papers included with this kit tended towards darker colors.
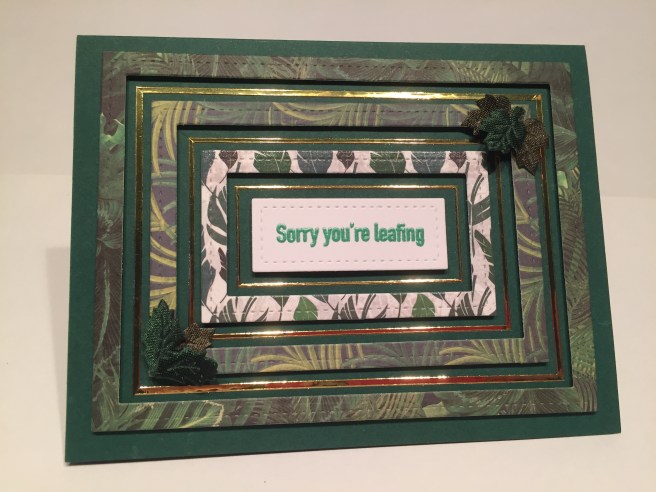 One of my goals with these card kits is to try and use every stamp in the stamp set on my 10 cards, and Lizi included a couple of pun-ny leaf sentiments in the stamp set this month, so I gathered up all the foliage pattern paper included in the kit and one of the Forest Green card bases to see if I could bring these leaf puns to life. Of the three pattern papers that featured only foliage, I noticed that they went from darker colors to lighter – with the lightest being the spot gloss leaves on white… let’s frame in this sentiment with ALL of the leafy pattern papers. I broke out all but the largest of my LF Stitched Rectangle dies and cut three frames in descending sizes from the pattern papers. The sentiment fit perfectly within the smallest rectangle die so I stamped that with VersaMark ink and embossed it with the Love From Lizi Emerald City embossing powder (from the LFL September 2017 card kit). Green seemed appropriate! The frames and the sentiment didn’t pop enough on that forest green card base, so I grabbed the gold mirror peel-off stickers and created more frames between the paper frames using the wide peel-offs on the biggest frame and the thinnest peel-offs on the smallest frame. This was fairly easy using the grid on my Tim Holtz Glass Media Mat and some careful measurements. I did miter the corners of the peel-off frames and then added the pattern paper frames using some foam tape to give them dimension. I added few leaves from the shaped leaf trim for a little texture on the card, and that wraps up this first pun from the stamp set!
 I was very drawn to the diamond pattern paper that featured gold foil on a dark grey background, and noticed that the edges of the diamonds’ lines were continuous – so that’s where I cut a big ‘v’ in the pattern paper. I spread the cut apart about 5/8″ and trimmed the pattern paper to fit on the top of the Pale Grey card base. That gap was too big to use one of the stamp set sentiments, so I grabbed my Lawn Fawn Thank You Border die and cut that out of the gold mirror specialty paper and glued that down to the right side of the gap. Here was a good excuse to use the wood veneer die cuts from the embellishment bag! I colored the flowers with my Delicata Golden Glitz ink pad, and added a center of the Nuvo Crystal Drops from the kit to all three. I added the Liquid Gold ribbon across the top with a nice bow over the arrangement of the veneer flowers and three of the gold leaf sequins. Three more plain sequins on the left side of the gap balances out this card nicely – a very sharp, extremely reflective and classy thank you card!
 Now I had the centers of all the frames I cut for card #3 staring me in the face, so I decided I needed to use all of them on the other leaf pun sentiment in the stamp set. Since these were full rectangles, I decided to cut mats from the gold mirror specialty paper – still using my LF Stitched Rectangle dies. I LOVE that stitched detail on the mirror card stock! Now I gotta have some dimension on this card so all three pattern papers are mounted on fun foam and the sentiment is up on some foam squares. As before, I stamped the Sentiment with VersaMark ink and embossed it with Lizi’s Emerald City embossing powder. I did outline the sentiment with some thin gold peel-off stickers for one more golden frame around our pun. A couple of the gold leaf sequins paired up with a regular gold sequin add a touch of texture and a little more bling! Considering that this card is very similar to the “leafing” card, I think both cards looks extremely different! And the dimension on this card is very cool – kind of comparable to a mini pyramid!
 The floral pattern papers in this kit got me thinking about doing an ‘Eclipse Card’ using the word ‘ALOHA’. Now I’ve never done one of these cards before, and this pattern paper might not have been the best choice to do this technique with, but I think I got very interesting results for my first time! I don’t have any alpha dies this size so I turned to my Silhouette Portrait to cut these letters out of the pattern paper – this is the Gill Sans Ultra Bold font. I also cut four more ‘aloha’s out of some of my grey card stock and glued them all together to make nice chunky letters. I trimmed the pattern paper down with a stitched rectangle die and cut a thin mat from the brushed gold specialty paper and glued them both down to the second Pale Grey card base. After nestling the layered letters back in their negative spaces, I realized that I needed a little more height to help read the sentiment, so I mounted all the letters up on some thin foam dots – that did the trick! I used a short piece of the string of green sequins to underline and highlight the sentiment, and finished off the edges of that with a couple of the big green sequins from the sequin mix. Now I realize that a lighter, more random pattern paper and a darker background would probably work better with this technique – I will try this some more!
 That’s right, I couldn’t resist! LOL! I adore this card! First, I was able to use that Gold Punchinella piece included with the kit and one of the green pipe cleaners for the background! I simply wove the pipe cleaner through the holes on the top and bottom of the gold and attached them down to that pattern paper that had the hibiscus silhouettes and was cut to the same width as the Punchinella. All three pieces are then glued directly to a white card base. Second, I love this sentiment!! – I hope I don’t offend anyone! LOL!! I used my Silhouette software for this sentiment – in my favorite Brady Bunch Remastered font – and sized to fit a couple of my stitched oval dies. I printed the sentiment on some white card stock and cut it’s mat from the green/gold specialty card stock. Lastly, it’s the pink hibiscus that I colored up just for Lizi since she didn’t include any pink in this kit! LOL! I stamped the flowers with VersaMark ink on a piece of the thin ‘copic friendly’ card stock and embossed them with the LFL Golden Crown embossing powder included in the kit. I then used the matching stencil and colored the flowers with a sponge dauber using the Worn Lipstick and Wilted Violet Distress Oxide inks. I like giving my stencils a little ‘stick’ so I took my Zigg two-way glue pen and covered the back of the stencil with the glue and let it dry thoroughly. That makes the back of the stencil tacky and it holds itself in place very nicely! Still, I dabbed more than I rubbed since some pieces of the stencil are very thin and fragile. Once dry, I buffed up the embossing and fussy cut the flowers out. Two of the flowers are glued directly to the background and the other three (as well as the sentiment) are mounted up with foam tape. That Punchinella and gold embossing have plenty of shine, so I used the Nuvo Drops for some colorful highlights on the sentiment. My warped sense of humor really enjoys the fancy look of this card coupled with the (somewhat) off-color sentiment! For that Special Someone!! LOL!
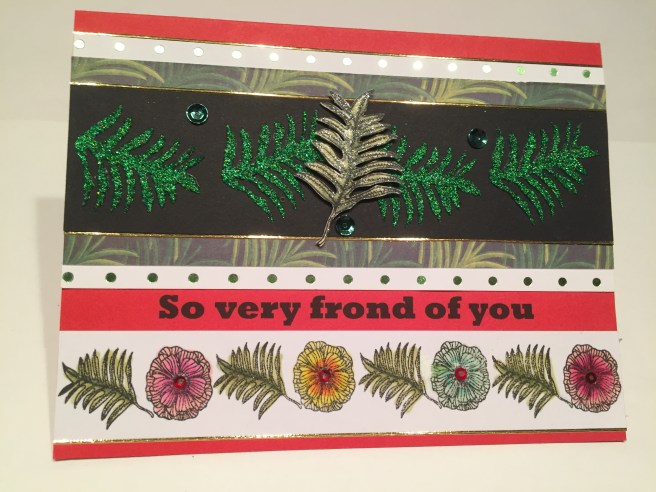 Now I haven’t used that sample of the Nuvo Glimmer Paste that came in the kit so I used the fern stencil to add that paste to some black card stock from my stash. I trimmed that piece down to 1 and 3/8″ and matted that on a piece of the fern pattern paper trimmed to 2″ and then matted to the green foil polka-dot specialty paper trimmed to 2 and 3/8″ – just enough for two rows of polka-dots to show! I trimmed down the border stamp I colored and figured out the space between the two pieces so I could use my Silhouette Software to print this fun pun for a sentiment. This is printed in the Rockwell Extra Bold font directly on the Bright Red card base. I printed the card and then glued the two pieces directly to the card base. I used some gold peel-offs on the edges of the black card stock and on the outermost edges of the border stamp and the polka-dot paper. I had a little bit of a bigger gap between the center two glitter ferns so I fussy cut the fern stamp I colored in the beginning, and using some tiny foam dots, mounted that in the middle of the glitter ferns. I covered the colored fern with my Spectrum Noir Glitter Pen and added a few green sequins from the sequin mix for the final touch of bling. That glitter paste is something truly special and I really like this terrific little pun!
 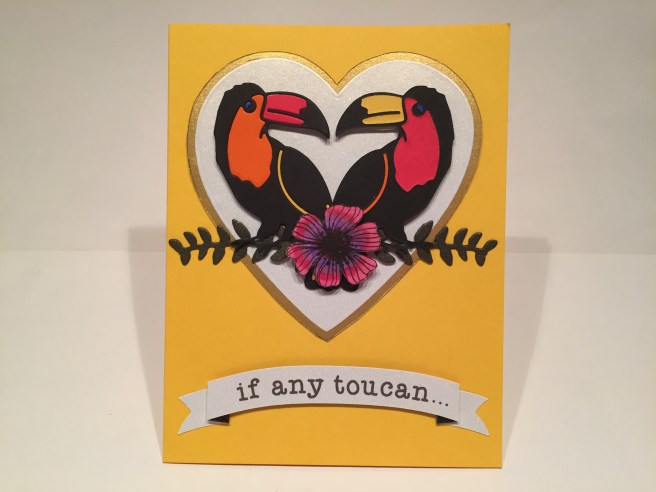 I couldn’t finish out these 10 cards without visiting that terrific toucan die once more. For this card, I did some simple paper piecing with the toucan die. I cut two from black card stock and one each from some plain red, yellow, orange and blue card stock from my stash. I flipped one toucan to the back side and pieced all the cut-outs together on some plain backing paper. When I saw that the toucans formed a heart shape when facing each other I knew exactly what to do to complete this card. I used my largest Heart Nesting die to cut the heart from the back of one of the shimmer pattern papers – yes the back of those two shimmer pattern papers is shimmer too!. I traced the edge of the die to cut the mat from the gold shimmer specialty paper and glued those two hearts together and down to the Warm Yellow card base. I cut another leaf border with my Darice Border dies from the green/gold specialty paper and glued the toucans’ feet to the branch. I did glue the branch and feet directly to the card front, but I used some foam tape to add some dimension to the bodies of the toucans. I then took my last colored stamp of the smaller hibiscus and fussy cut the extra petals away – I think this looks more like a hibiscus without those extra petals – and it’s a little bit smaller too! I mounted that flower on the center of the branch with foam tape and turned my attention to the sentiment. I created this curved folding banner on my Silhouette a couple of years ago, and brought it into service for this card. I printed this sentiment directly on the shimmer side of the shimmer pattern paper (using Typewriter Hand font) and cut the banner with my Silhouette.
 The center of the banner is mounted with foam tape and the ends are glued directly to the card front. Obviously there is more to this sentiment than what you see here, so I finished this little poem pun on the inside of the card using the same font on a piece of white card cut to size with my stitched rectangle dies. This turned out to be the brightest and most colorful card from this kit and I can only praise this toucan die and the myriad possibilities and endless options that it presents as well as bringing some terrific pops of color to my cards! I LOVE IT!
  I still have one more sentiment (‘Wild about you!’) to use from this stamp set and this is what my late-night addled mind came up with! This card went through many permutations before I arrived at this fun little interactive card. While perusing the pattern papers in this kit, I noticed that this piece of chevron paper had ‘fuzzy’ edges on the pattern instead of straight lines… well, that made me think of the pipe cleaners, so I bent the pipe cleaners into their own chevron shape to match the pattern paper, and glued them down. Originally, I was only going to use one of these pieces as a border for my card front, but when I cut it along the middle of the black chevron, I realized that this was starting to look like a mouth…
  SO I decided I COULD make a little interactive card this month! I added strips of the brown satin ribbon for a little contrast and added a couple strips of the gold shimmer specialty paper to the top and bottom. I dug out these two large googly eyes from the LFL October 2017 Card Kit to add a little personality to this creature (you never know when you’re going to need some of those extra embellishments included with these kits so I tend to hang on to all my leftovers!) I did use my smallest stitched circle die to cut the green/gold specialty paper for behind the googly eyes, and stamped that final sentiment (and a few hearts from my stash – along with the pull stamp on the tab) with Peeled Paint Distress Oxide ink and used some clear embossing powder to give it a little shine. This is a very silly card and I had a great time putting this together! I was particularly thrilled with the use of the pipe cleaners on this pattern paper, and, though I thought that I would never come up with an interactive card using this kit, I was tickled at my odd little puppet creature (who, you may surmise, obviously lives in the tropics..!!!) LOLOL!
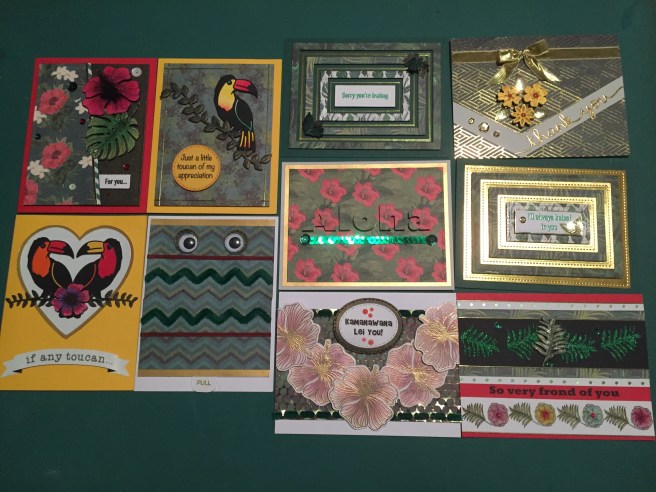 That completes my 10 cards for the Love From Lizi May 2018 ‘Totally Tropical’ card kit. At posting, Lizi still had a few of these kits available – if you want to join up, please use my link to shop at LFL.com: http://bit.ly/LFLlink . I had a good time figuring out creative ways to use some of the wacky supplies included with this kit and am pleased with the nice variety of cards I was able to come up with! I actually DID use every stamp from this stamp set here, and, naturally, I have a bunch of supplies left over that will go directly into my stash! I completely adore that Toucan die and the large hibiscus stamp and the monstera leaf stamp. There were actually a lot of things I didn’t get to do with this kit – like using the Punchinella as a stencil with the glimmer paste, or seeing what I could do with stamping these images on dark card stock, but those are all experiments for another day! Lizi has her first Blog Challenge running until May 26th, so if you’d like to enter for a chance to win a LFL gift certificate just click on this link: https://www.lovefromlizi.com/blog/post/love-from-lizi-may-2018-challenge/
On a more personal note, and to keep everyone up to date, I wanted to mention that I will be receiving the My Monthly Hero May Kit – I’m looking forward to start working with a new kit! Thank you so much for joining me here today, I hope I was able to tickle your funny-bone and provide you with a little inspiration. Please remember to share this post and all my links with your best-est buddies, don’t run with scissors, and HAPPY CRAFTING!!!
