
Hello folks! Scott here with my 10 cards from the March ’18 Love From Lizi Card Kit. I am so sorry to be so late with this posting but I got hit by a nasty bug that laid me out for a couple of weeks. OUCH! Feeling better and better every day now..! I am so late that this kit has already sold out, so this is for all the folks out there who got their hands on this kit and are looking for a little inspiration and maybe a new idea or two! Let’s get rolling! Now I don’t usually get any of the matching ‘add-ons’ that Lizi offers along with her card


kits, but the chipboard stickers caught my eye this month, so I did get the chipboard stickers and I the layered chipboard stickers as well! Not that there aren’t enough supplies in these kits as it is, but I know lots of folks who do like the chipboard add-ons and I wanted to see how they might inspire me. Uniquely, a lot of the images and icons in this kit were quite large, both on the cut-apart sheets and you can see that some of the chipboard stickers are over sized as well. The large jar with candy and the white top in the center of the chipboard sticker sheet is actually 5 and 5/8″ tall. And those lovely filigree labels / tags with the treats and cakes from one of the cut-apart sheets are 6″ long. Hmmmmmmm… I may have to work on making some 5″ x 7″ cards this month!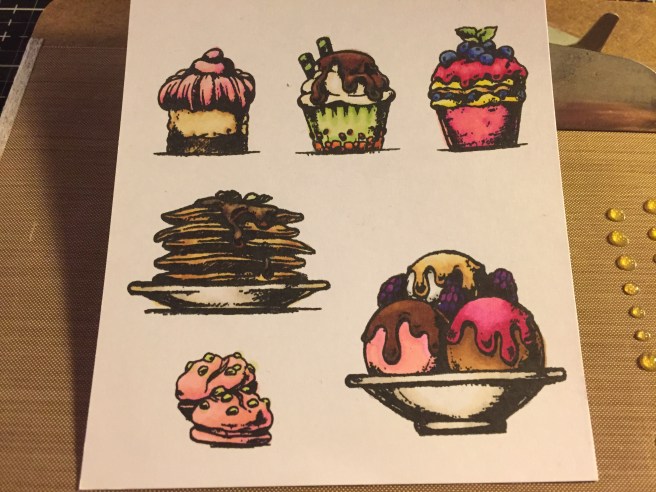 As usual, I did stamp all the images from the stamp set (with SSS Intense Black Ink) on the smooth white card-stock included in the kit. Lizi said this card stock was ‘Copic friendly’, so I colored this batch of stamps with my Spectrum Noir alcohol markers. True to her word, this is excellent card stock for coloring with alcohol markers. Of course I do try to stay within the pink/green/brown color pallet that is featured in this kit. You can also see some of the kit’s Nuvo Jewel Drops in Limoncello to the right – I’ll often dab out some drops on my craft mat to dry and be ready for use on cards. I also took the other four pieces of colored card stock from the kit and made eight 4.25″ x 5.5″ card bases.
Right out of the gate I decide to go ahead and do a 5×7 card – at least I do have some envelops that will fit! I really liked the filigree labels and the candy jar chipboard piece.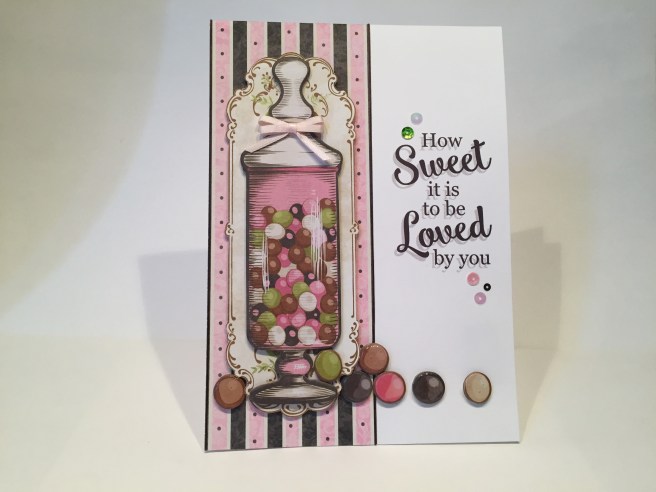 I made a 5′ x 7″ white card base using some 120# card stock from my stash, and created this sentiment with my Silhouette Portrait – I felt like this large of a card needed a large sentiment – and printed that directly to the card base. The block print is GEORGIA font, and the script words are in SMOOTHIE SHOPPE font (my, how appropriate!). I cut out a 2 and 5/8″ strip (7″ long) from the large striped pattern paper from the back of one of the 12×12 cut-apart sheets and glued that down to the left side of the card base, and ran some of the medium Chocolate Mirror peel off stickers along both sides. I fussy cut one of the filigree labels from another cut-apart sheet and mounted that up with some foam tape on the stripes. That chipboard candy jar sticker fit perfectly within that frame and I also covered a bunch of the chipboard candies with Glossy Accents to scatter around the bottom. A double-bow from the pale pink ribbon in the kit highlights the jar lid and a few sequins from the ‘Sweet Treats’ sequin mix finishes this card out nicely! This all looks great on a larger card format! I’ll have to remember that I do have that option! And there’s a sentiment that truly makes me want to sing…!
 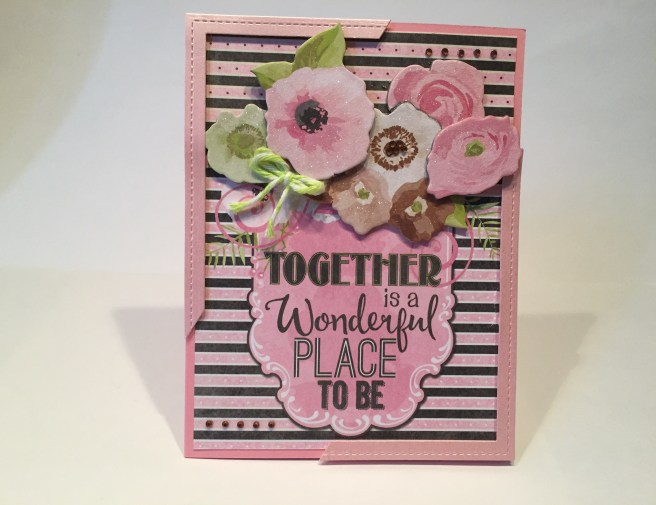 This cut-apart sentiment caught my eye, but it was only 4″ square on the sheet, so I paired it up with the striped pattern paper from the kit and used the chipboard flower stickers to hide the seam. Look closely, and you can see the dots on the pink stripes above the flowers are black, and below the flowers they are white… So, together that piece is 4″ x 5.25″ and mounted directly to the pink card base. I wanted to frame this image so I cut a frame from the soft pink pearl specialty card stock with my Lawn Fawn Stitched Rectangle dies, but I didn’t want to lose the pink card base completely, so I cut the corners off the frame (about 1.75″ from each corner) and mounted the remaining pieces to the top left and bottom right corners with foam tape. I did cover all the flowers with my Spectrum Noir Sparkle pen, added a double bow from the green and white bakers twine, and added 5 mini copper gems to the center of the white flower, and on top of the pattern paper dots on the bottom left and top right! That balances everything nicely. This is about as pink as I could get with this kit, and I do love the sentiment expressed here. Let me see what I can do with some of those Layered Chipboard Sticker add-ons!
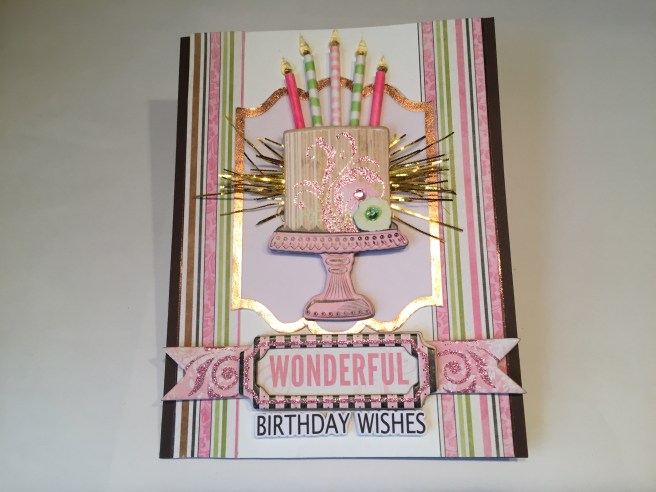 On the Chocolate Brown card base, I mounted the off-white embossed specialty card stock trimmed down to 3.75″ wide and added 3/4″ strips of the pick and green striped pattern paper to the two edges of that, as well as the skinny peel off stickers on the sides. I took one of the vellum pieces, and, after gluing that to some plain white card stock with the Xyron Sticker Maker, I cut away the copper foil frame and attached that directly to the card base. The cake is one of the layered chipboard extras and I just HAD to use the candy sticks from the kit to make candles! I cut the sticks down to various heights and colored them with my alcohol markers, and tucked them behind the top of the cake sticker. To make the candle flames, I used the Nuvo drops to make some flame shapes on my craft mat and let them dry completely, and added the mini copper gems to the card base just above the candle tops. Once the Nuvo flame shapes dried, I used some Ranger Multi Medium Matte to glue the Nuvo flames on top of the mini gems. The gems add just enough color to highlight the translucent Nuvo drop flames. I did get a bit obsessive with the gold tinsel from the embellishments bag, and attached a bunch to the back of the cake sticker and trimmed them down into a bit of a starburst coming out of the sides of the cake. The whole cake piece and the WONDERFUL layered chipboard sticker attach to the card base with a touch of foam tape here and there, and I felt the need to add BIRTHDAY WISHES to complete the sentiment. I did print and cut that with my Silhouette using the LUCIDA GRANDE font and foam taped that to the card base under the WONDERFUL banner. WOW! This card has a little bit of everything! I do like how the candles and tinsel break the boundaries of the copper foil frame, and with all the glitter on the chipboard pieces, and the gems and Nuvo drops, there’s plenty of sparkle here! There are more chipboard pieces I like, so let’s see if I can use any on an A2 card!
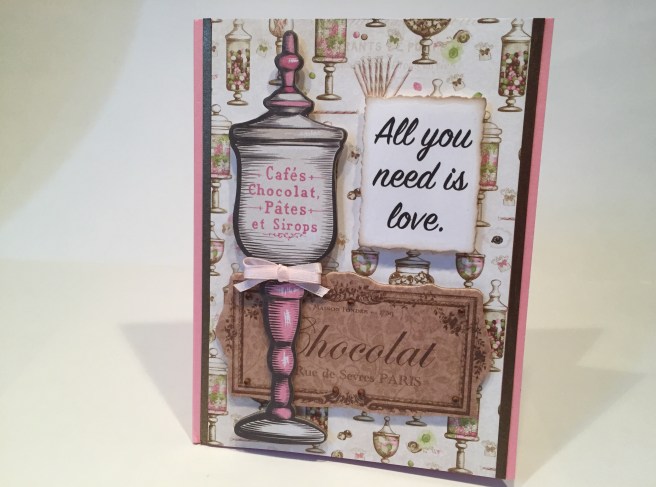 Back to the second pink card base, I cut a 3.75″ strip of the candy jar pattern paper for my background, and added two 1/8″ strips of the Bronze pearl specialty card stock on the two sides. I layered the two ‘chocolate’ chipboard stickers together and added a double pink bow to the jar.
  Here’s another sentiment of mine created on my Silhouette in the SIGN PAINTER font and cut out with a Spellbinder Deckle Rectangle die and a little distress oxide Walnut Stain ink on the edges. “All you need is love.” on the front, and “But a little chocolate now and then doesn’t hurt.” on the inside (cut with a LF stitched rectangle die). Who knew that the creator of PEANUTS was into chocolate!? I did add the layered chipboard sticker of the treat package on the inside of the card, and added some of the mini Copper Gems to highlight the Chocolate sign on the front. I like this card a lot and, though it is on a pick card base, I think it has more of a vintage feel than a pink feel. But that’s four rather pink cards right off the bat, and, though I know I can’t avoid it, let’s call the pink conquered for now and see what we can do with the stamps and other items left to use.
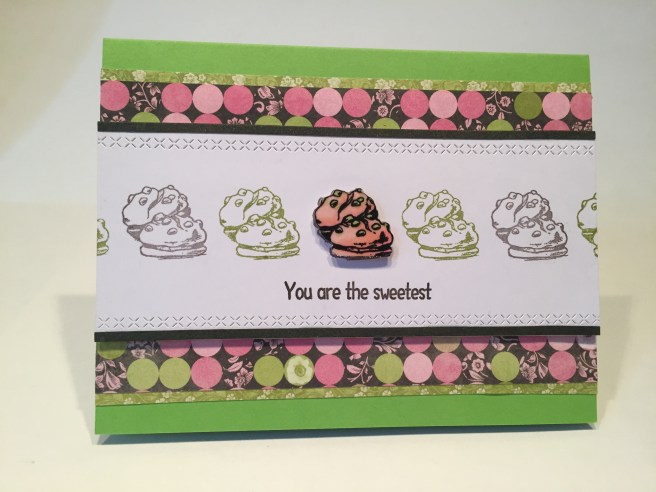 I did have to dig around in my ink pads to find colors that matched this dotted pattern paper, and found that my Stampin’ Up Early Espresso and Pear Pizzazz inks matched very well. I stamped the cookie stamp in a straight row across some of the white card stock from the kit alternating between the Espresso and the Pear. I then fussy cut my colored cookie stamp, embossed the whole stamp with clear embossing powder and foam taped that over the center cookie. I trimmed the stamped piece to 2 and 3/8″ (x 5.5″) and I added two 1/8″ strips of the Dark Green / Gold specialty paper to the edges of that and then used my Ellen Hutson Stitching Lines border dies to add the cross stitch detail on the edges. On the Apple Green card stock, I mounted a 3.25″ strip of the dotted pattern paper and added 1/8″ strips of the green pattern paper to the top and bottom. The sentiment is stamped with the Early Espresso ink, and the stamped piece is attached to the card base with foam tape. Though there is still plenty of pink here, I think the green is a nice counterpoint, and I like highlighting this cute cookie stamp all by itself!
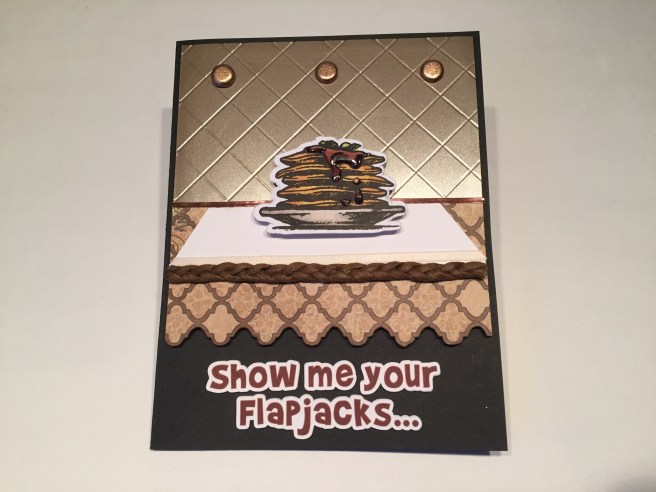 And now to the pancakes!! Here’s another card that uses a lot of the goodies from this kit! I fussy cut the Moroccan pattern paper with a decorative edge, and used my scoring board to emboss the tile pattern on the Taupe gloss specialty card stock. The Taupe piece is 2 and 3/8″ x 4″, and the pattern paper is about 1 and 7/8″ x 4″ and they are both mounted to the Black card base with foam tape. I cut a simple trapezoid ‘tabletop’ from a scrap of white card stock and trimmed that with a piece of the thin white satin ribbon from the kit. I took the paper covered wire from the kit and braided it together to make this chunky trim that frames the edge of the table. I did use tiny bits of the Nuvo drops on the ends of the braid to cover the cut wire. Three of the textured copper brads and a strip of the Chocolate Mirror peel offs between the ‘table’ and the ‘wall’ finishes out this scene very nicely.
  I fussy cut the colored pancake stamp, added Glossy Accents to the syrup (yum!), and foam mounted that on the ‘table’. I added my own sentiment (a little more pancake oriented) using my favorite BRADY BUNCH REMASTERED font on my Silhouette – cut four times and layered together for some extra chunky dimension on the front. A decidedly playful card that works beautifully with a pancake stamp! There are SO many ice cream, pancake, and cupcake puns out there that it was a little hard deciding which sentiment would work best on this card. I do like the result!
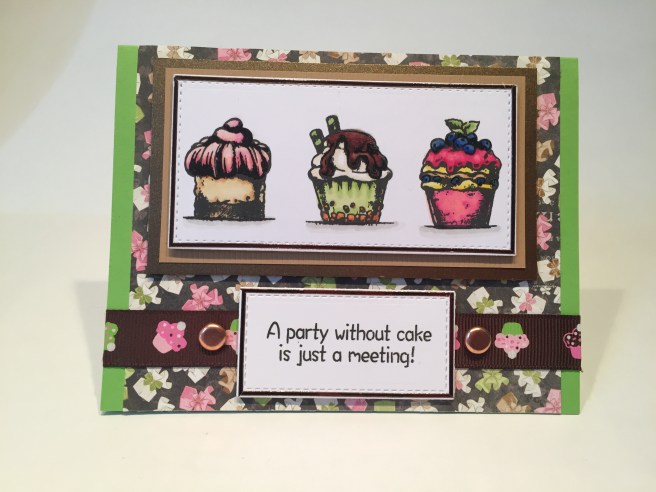 Those lovely cupcake stamps! I cut my colored cupcake stamps with a LF Stitched Rectangle die and outlined the edges with the Chocolate mirror peel offs and mounted that to a mat of the brown embossed specialty paper with foam tape. That assembly is glued directly to a mat of the Bronze Pearl specialty paper and that is foam taped to the background pattern paper (5′ x 4.25″) attached directly to the Apple Green card base. I glued a length of the brown cupcake grograin ribbon (with 2 smooth copper brads) across the bottom portion of the card and stamped the sentiment in SSS Intense Black Ink on more of the white card stock from the kit. I cut the sentiment out with another LF Stitched Rectangle die and outlined the edges of that piece with the Chocolate Mirror peel offs as well. The sentiment is attached with some foam tape for some added dimension, and, though you can’t really tell from the photo, I used my Renger Embossing pen to add some clear embossing powder to the cupcake toppings – nice shine but not quite as shiny as glossy accents. I like this sentiment a great deal and I like how the cupcakes kind of look like a framed art piece, but most of all, this card hardly feels pink to me at all! LOL!
 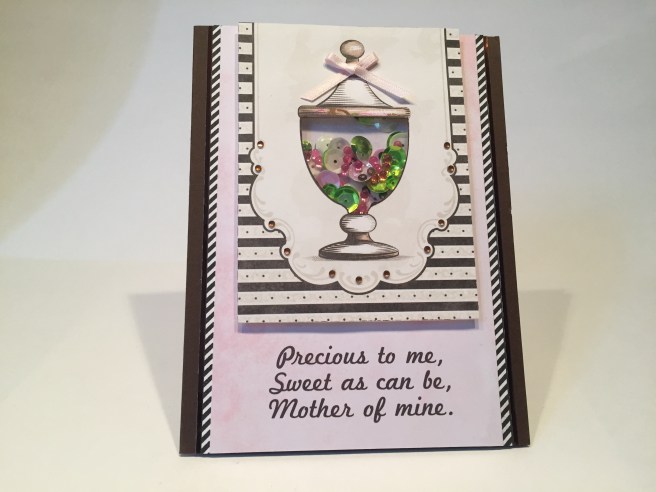 I haven’t done a shaker card in a while, and some of the candy jars on the cut-apart sheets were just begging to be shakers so I came up with this nice Mother’s Day card. On the Chocolate Brown card base, I mounted a 3.5″ x 5.5″ piece of the Pale Pink Marble specialty paper and added two 1/8″ strips of black and white diagonal stripes from my stash and more of the peel offs on the edges. The candy jar is from one of the cut-apart sheets – I simply cut out the inside of the jar to make a window for my shaker bits. I did pack the shaker window quite full with the sequin mix (I avoided the large brown sequins) and added in some Queen & Co. Tiny Bubbles Toppings to the mix, and added a simple pink bow to the top of the lid.
 The sentiment is mine, created on my Silhouette in MARKETING SCRIPT font and printed directly on the marble card stock. Inside, of course, is the ‘Happy Mother’s Day’ greeting, and with the addition of some mini copper gems at strategic points along the filigree, we have a very nice, very PALE, pink card ready for Mom!
 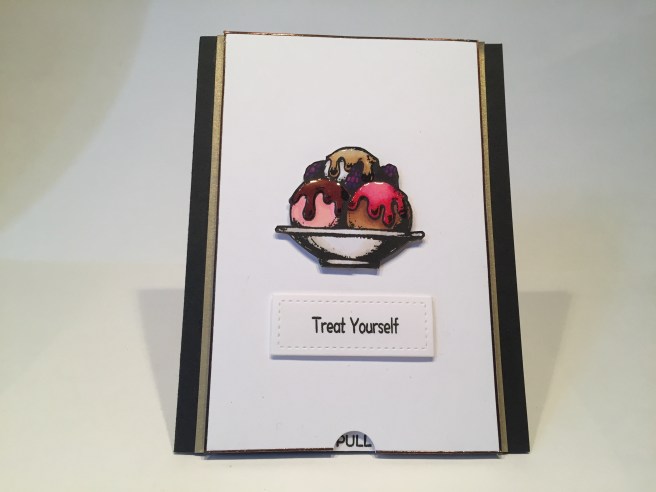 OKAY, SO SUE ME! I COULDN’T RESIST!! If three scoops of ice cream is a treat, then wouldn’t four scoops be an even better treat!? Just pull on the tab at the bottom…!
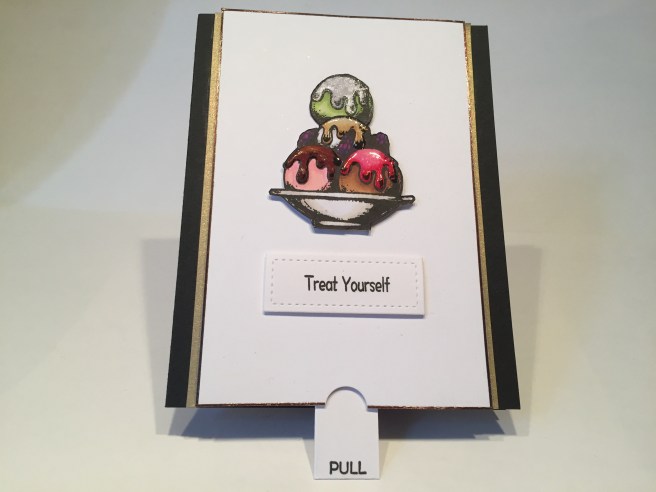 Yes… another double slider pull-tab card from me this month! My big accomplishment with this card was being able to hide the slider slit completely behind the sundae! This is a fairly simple card, as I wanted all the focus to be on the ice cream. I used the last of the smooth white card stock from the kit for my slider base, outlined that with the thin Chocolate Mirror peel offs, and added a couple of 1/8″ strips of the Antique Gold Pearl specialty paper to the edges. All is mounted to the last Black card base. I fussy cut the colored sundae stamp and used Glossy Accents on all the toppings (BIG YUM!) and then stamped the sundae again and just cut out the lower right scoop to be my added treat. I used some clear glitter on the topping of the added scoop for a little razzle-dazzle with the surprise, and stamped the sentiment with SSS Intense Black Ink and cut that out with a LF stitched Rectangle die before mounting it to the card base with foam tape. I recently posted a How-To video that shows how to make your own double slider pull-tab cards. But wait, you say, that’s only 9 cards – what could I be saving as card #10 this month? I haven’t used the hexagonal dies or the copper foiled acetate pieces yet… What’s up!?
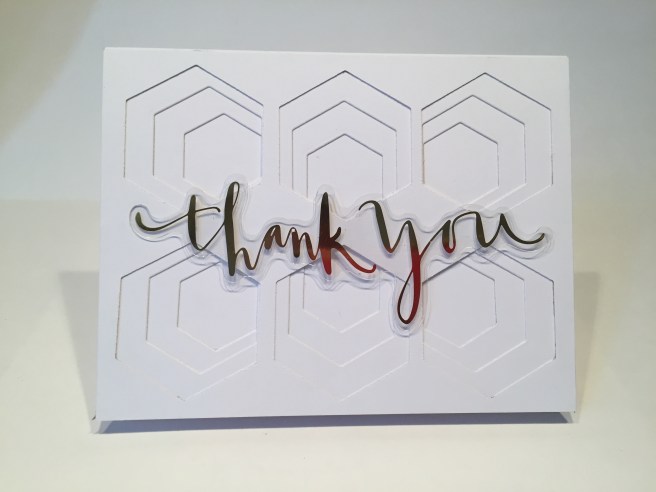 This is what’s up! Now this is much easier that it may seem, and the hexagonal dies included in this kit work perfectly on an A2 card! It will take a little time as you have to run this through your die cutter 18 times, but I simply cut three pieces of 120# white card stock (from my stash) to 4.25″ x 5.5″ and a white card base as well. The large hexagonal die spaces out perfectly – just bisect your card front down the middle in both directions – the center line is where your center hexagons line up. Add a line 1″ away from both short ends of the card. This is the center line for your other hexagons.
 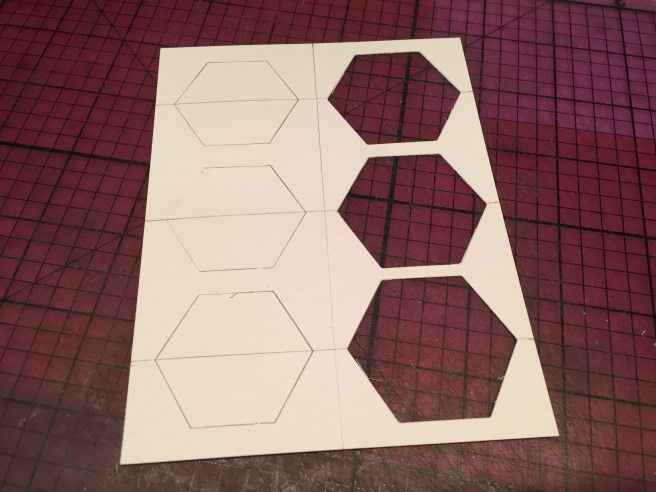 After cutting all six hexagons, use that top piece as a pattern for the placement of the next smaller hexagon on the next layer of card stock.
I did use my mini MISTI to keep the layers lined up accurately. Just line up the cutting edge of the smaller die to the previously cut edge and tape it down before removing the top pattern piece and running it through your die cutter. Then after you have the second layer cut, use that piece as a pattern for where to cut the third layer with the smallest hexagonal die – lining up the cut edges through all three layers. Glue all the layers together and add to a card base and TADA! This looks like some of those new layering dies out there that are beautiful, but cost a fortune (so much metal)! You could, of course, use different colors of card stock for the different layers but I thought white would work especially well with the acetate sentiment. I did trim some small slivers of foam tape to mount the sentiment, but, since the acetate is so thick, you don’t need a lot of foam tape to add a little bit more dimension. 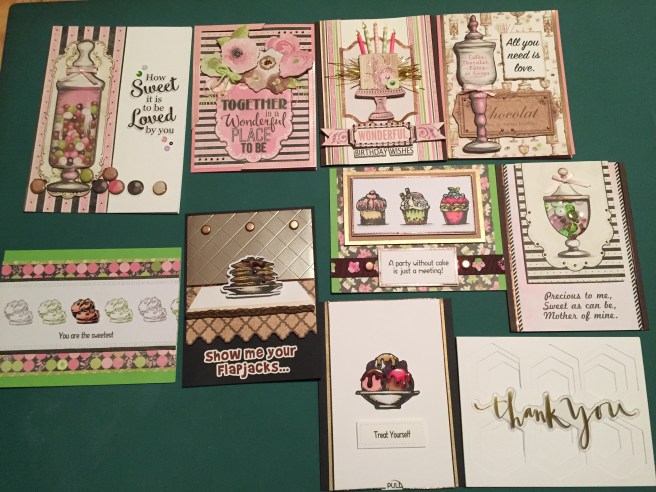 There we go! 10 cards from the Love From Lizi March 2018 card kit – a nice variety of cards and not too much pink! I managed to use all the image stamps from the stamp set, some of the ‘add-on’ chipboard stickers, but I didn’t get to the “Fueled by Cake, Coffee and Crafting” sentiment as it seems that I don’t have a single coffee themed stamp set. Not even tea! As usual, I have tons of extras from the kit – I used a little bit of everything, but I didn’t use any of the alphabet stickers, the craft labels or the buttons – and I only added a couple sheets of white card stock from my stash. I really like the stamp set in this kit – it will probably come available next month at lovefromlizi.com – the images are nicely shaded so you can color them very simply or as complex as you like and they will always look good! Thank you so much for sharing your time with me here – it is truly and dearly appreciated! Remember, don’t run with scissors, and, Happy Crafting!

Really enjoyed your YouTube. The flapjack card made me laugh out loud. You are really talented.
LikeLike
Thanks Sarah! Much appreciated! Spread the Cheer!!
LikeLike