
Hello Folks! Scott here with my 10 Cards from the Simon Says Stamp Feb. 2018 “A Colorful Crafty Life” Card Kit. This kit is loaded with supplies and features the exclusive “Crafty Friend’ clear stamp set. We are also treated to the new SSS Craft Tacky Glue, 1 water brush pen, 12 double-sided sheets of Echo Park’s “I’d Rather Be Crafting” 6″ x 6″ paper pad, and 5 Prima crafty wood veneer pieces (I received 4 different cameras and one spool). A big surprise was the “Twiggy” curved blade portable scissors, and we got a bag of Studio Katia “Cupid’s Kiss” crystals (VERY pink!). Another product I’ve never seen in a SSS card kit was two Tim Holtz Texture Fade embossing folders (‘Dot Matrix’ and ‘Gridlock’)! We also received a Daniel Smith watercolor pallet with Minnesota Pipestone Genuine, Serpentine Genuine, Quinacridone Gold, Brown Iron Oxide, Mayan Red and Cascade Green. To finish off this plethora of supplies, we got three SSS envelopes in Metallic Bronze, Metallic Orange Peel, and Mint as well as 1 sheet each of SSS 100# card stock in Slate, Banana, Burnt Orange, Audrey Blue, and a 120# white. PHEW! This is my 12th kit from SSS and this kit has more supplies than ever before. I don’t know if the price increase (subscriptions to the Card Kits went up $5.00 this month) dictates more materials but I will try my best to use as many supplies as possible on my 10 Cards.
Since I received 4 camera veneer pieces I decided I should do a camera card to begin with. There was only one sheet of pattern paper that featured only cameras, so that’s where I started. I cut a ‘corner’ of cameras from the pattern paper and matched that up with the reverse side which was the dark wood-grain pattern. I actually tried adding Glossy Accents to all of the camera lenses, but there were so many that it started pulling focus from my veneer pieces, so instead, I fussy cut another batch of cameras and foam taped them directly over the the de-glossied cameras – that’s much nicer – nice dimension without pulling too much focus! (I did add some glitter from my Spectrum Noir Sparkle Pen to the lenses ) I colored the two wood veneer cameras with my Tsukiniko Delicata metallic inks in Gold and Copper and attached those directly to the card front. I could not resist the punny (on my first card no less!) “Snappy Birthday” sentiment I created and cut with my Silhouette Portrait (4 layers glued together) using the Brady Bunch Remastered font and a couple of starburst ‘flashes’ I created. The whole brown/camera panel is cut to size with a Lawn Fawn Stitched Rectangle Die and foam taped to the white card base. For a touch more shine, I added some brown peel off pin-stripe stickers (from a Love From Lizi card kit) to the top and left sides of the card base and the edges between the two pattern papers. If you know someone into photography, this would be a perfect HB card!
This stamp set had 2 border stamps – a dashed line and a wide diagonal stripe – I think Simon Says Stamp likes border stamps or they are just an easy filler for a stamp set – out of the past 12 months of kits, 7 of them have assorted border stamps for a total of 14 different border stamps this year. I thought it would be fun to try to use all of them on one card. I skipped the 2 heart border stamps (hearts were sideways) the Happy Birthday border stamp (wrong sentiment!) and the plain stripe border stamp (boring!), but I managed to use 10 different border stamps on this card, and one of the sentiments from 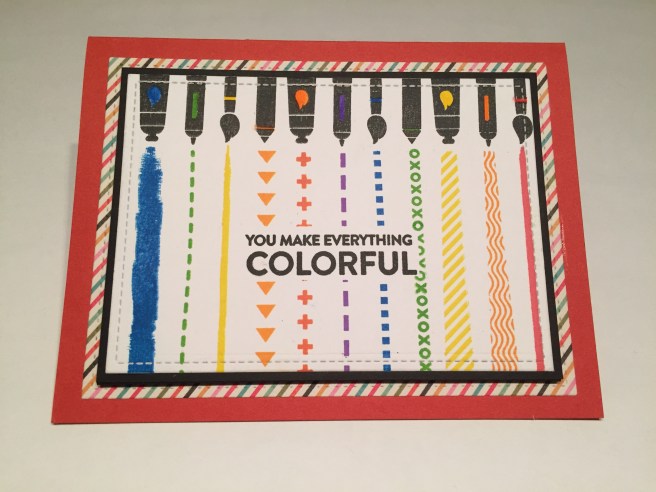 the stamp set. I stamped the brush, pencil, marker and paint tube across the top of a plain piece of white card stock with SSS Intense Black Ink, and stamped the ‘colorful’ sentiment in the middle with the same ink. I masked off the sentiment and gathered all my border stamps together to use as the ‘drawings’ coming out of these implements. The blue brush stroke and square box borders are stamped in Manganese Blue Ranger Archival Ink, and the dashed line in the center is stamped in Deep Purple Archival Ink. The green, yellow, orange and red borders were stamped in Simon Says Stamp Hybrid inks from the Fresh Fruit ink cube set that came with the April ’17 SSS card kit. I did use the thin ‘brush stroke’ border stamp (from the Oct ’17 kit) twice as there are eleven implements..! For the yellow and orange stamps on the right side, I used washi tape to mask out a thin-to-thick space to stamp the diagonal stripe stamp (from this month) and the wave stamp from the July ’17 kit. I think I like that orange wave stamp the best here… I will have to remember how nice that looks! I trimmed the white card stock down with a Stitched Rectangle die, and mounted that to a black mat from my stash, and used some black fun foam to mouth that to the striped pattern paper (cut with another Stitched Rectangle die) and glued that all down to the Burnt Orange card base with the SSS Craft Tacky Glue. I did use this glue as much as possible with these cards, and I have to say that it is a very good glue… a touch thick, perhaps, but it glued the card stock to the fun foam with no problems whatsoever, and dried quickly and quite firmly! I did use my Zigg Clean Color Real Brush Markers to color in available white spots on the tool stamps to match the colors coming out of them, but added no further shine or sparkles, thinking that the rainbow stamping gave this card all the punch it needed! “You Make Everything Colorful” is not my favorite sentiment, but it works nicely here!
The largest sentiment in this stamp set was “Sending You a Handcrafted Hello From So Very Far Away”. Again, the sentiments in this kit didn’t thrill me, I think everyone who receives a card from me KNOWS that they are handmade, so this feels a little like tooting your own horn, but I do TRY to use all the stamps in a stamp set with my 10 Cards 1 Kit postings. (I could not bring myself to use any of the strictly ‘crafty’ sentiments: ‘Crafters Gonna Craft’, ‘New Stamps = Love’, ‘Hello, Crafty Friend’, ‘I’d Rather be Crafting’, or the ‘Handmade by someone super crafty named: _____”) Maybe you could cut away the ‘super crafty’ line to just get “Handmade By”. Nonetheless, I WILL use the other four sentiments!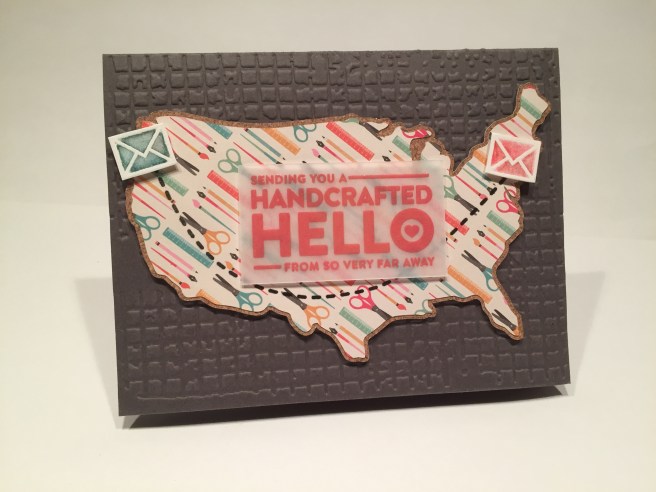 I stamped this sentiment on some vellum with the Fired Brick Distress Oxide ink and clear embossed that with my Ranger clear embossing powder. I used the ‘Gridlock’ embossing folder from Tim Holtz on the Slate card base and loved how easy that folder worked on the front of a card – perfectly sized and small enough to go through my Cuttlebug without having to fold the card in half – in other words, the folder is under 6″ wide! I LOVE THAT! I found a USA map shape on line and used my Silhouette Portrait to cut that crafty pattern paper (nice angle!) and a mat from the cork pattern paper. I stamped the dashed line border stamp with SSS Intense Black Ink in a curve on the map (from NYC to Oregon) and clear embossed that as well. The envelope stamp is white embossed on the included watercolor paper two times, colored in with the Daniel Smith watercolor pallet, and fussy cut to be the terminals for the ends of the dotted line. The map is foam taped up on the card base, the envelopes are foam taped up on the map, and the vellum sentiment is foam taped to the map as well. (I hid the foam tape behind the H, E, L, L, and O!) I thought the Fired Brick ink matched the pattern paper very well, and I really like the simplified yet recognizable USA shape as my focal point. I think all the embossing on this card provides plenty of shine so no further embellishments needed.
Finally I get to a couple of the sentiments that have nothing to do with ‘crafts’ – The ‘THANKS’ (in typewriter keys) and ‘HUGS ENCLOSED’ stamps. There was one piece of pattern paper that had a nice typewriter pattern on one side, and a typewriter key pattern on the other side so here we go with a bit of a writing theme for the next card.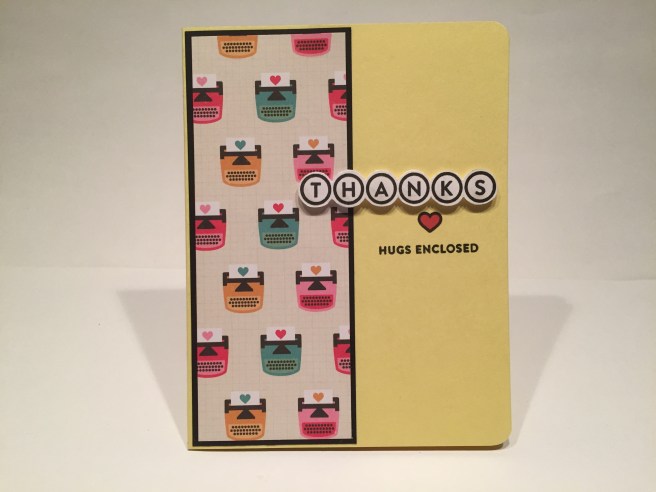 Very straightforward, simple Thank You card! I cut the typewriter pattern paper to 2″ x 5.1/4″ and matted that on black card stock (from my stash) cut at 2.1/8″ x 5.3/8″ and glued that all down to the left side of the Banana card base. I stamped the THANKS sentiment in SSS Intense Black Ink, fussy cut that out and mounted that with foam squares to the card base. Since the typing paper in the typewriters had hearts on them, I thought that gave me the opportunity to use the heart stamps (solid and outline) from the stamp set. Then I realized that the HUGS ENCLOSED stamp would work perfectly here as well (it was a little small to be used as the solo sentiment on card). I know lots of writers I could use this card for, and I think they would get a kick out of the ‘retro’ notion of typewriters!
Working with that THANKS stamp reminded me that I had an image file from Sillhouette called ‘Circle Distressed Alphabet’ and I thought I could use that to come up with my own ‘typewriter sentiment’ for another card – I do still have 4″ of that pattern paper to use! Here we have a fun Valentine card in the same typewriter vein. I cut a 2.5″ strip of the pattern paper for the center panel, cut the reverse down to two strips of 3/8″ and glued them down to the Slate card base that I had embossed with the Matrix embossing folder. I sized the ‘Circle Distressed Alphabet’ letters down to 3/8″, printed and cut them on my Silhouette, and used my 1/2″ circle punch to make white mats for each letter.
  Those are mounted to the card front with foam squares. I cut two thin strips of matte black card stock to cover the seams between the pattern papers, and added an old heart brad beneath the sentiment. I did continue the sentiment on the inside of the card, with ‘Happy Valentine’s Day’ in Typewriter Hand font. I think this is the first time I’ve used that circle alphabet and I like it very much as typewriter keys! I realize Valentines has just passed, but I think this is a very masculine card any guy would be happy to give.
I wanted to play with the Daniel Smith watercolors, and knew I wanted to use one of my favorite ‘art’ sentiments kit, so I looked around on line for an interesting ‘sketchy’ image of the earth to watercolor, and this is what I came up with! I stamped all the art implements with Versa Mark ink down the two sides of the Audrey Blue card base, printed out the earth image on the watercolor paper from the kit, and used the DSmith watercolor pallet to color the globe. I fussy cut the globe and mounted it to the card front with foam tape. The sentiment is printed and cut 4 times on my Silhouette, and those are all glued together to make a nice chunky sentiment without having to use foam tape. I actually broke into the Studio Katia ‘Cupids Kiss’ crystals and dug out some of the clear crystals to add a touch of sparkle to this card. I really like all the blues on this card and I LOVE THIS SENTIMENT!
I did get a spool of thread wood veneer die-cut along with my cameras, and there were a couple of pattern papers with a sewing theme, AND I have been watching some videos of people sewing and doing cross stitch on cards so I had to give it a whirl myself.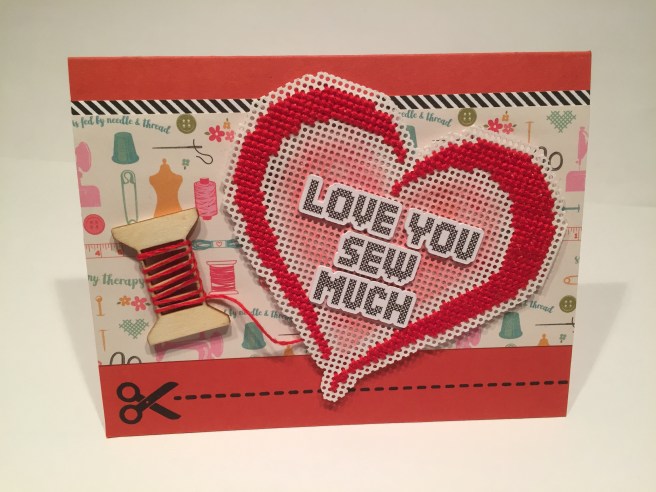 I happened to have some Perforated Paper in my stash (Mill Hill, 14-count) and found a nice cross stitch pattern for this heart on line, so I stitched this up using 3 strands of DMC Floss 666 Bright Red.
  This pattern sized down well for a standard card! I cut the sewing pattern paper to a 2.75″ strip, stamped the diagonal stripe border stamp with SSS Intense Black ink on some scrap white card stock, trimmed that down and glued it to the back of the pattern paper leaving a touch more than 1/8″ exposed on the top. I stamped the scissor and the the dashed line border along the bottom of the Burnt Orange card base (still using Intense Black ink), and glued the pattern papers directly to the card front. Naturally, I went to dafont.com to look for a cross-stitch font and found the ‘Simple Stitch’ font – Perfect! It’s a heart… It’s a valentine… It’s a PUN! I printed and cut the sentiment on my Silhouette (4 layers glued together again) and gave a light wash of the Mayan Red DSmith watercolor to the middle of the stitched heart. I glued the sentiment down to the perforated paper, and attached the whole heart to the card with foam tape – I was able to hide some of the foam tape behind the sentiment! I wrapped and glued the thread coming from behind the heart around the veneer spool and mounted the spool up with some foam tape as well. I love this! I will definitely play with some more stitching on my cards now – maybe in a larger format though. LOL!! Since this card was all about the cross stitching, I didn’t add any sparkles, gems or sequins to distract from the art!
I couldn’t quite figure out what to do with the circle stamp that had the envelope in the middle. I figured it would make a nice stamp on an envelope flap – maybe along with ‘HUGS ENCLOSED’ but it wasn’t speaking to me. I stamped it a few times to see how it stamped, and started doodling on one of the stamped images and came up with this. There’s some SNAIL MAIL for ya! LOL!! I think this little guy is so cute! (Of course the googly eyes help a lot!) I am just really taken with the kind of stark nature of this card and how it really pulls your eye to our little snail friend! Here we’re on the Audrey Blue card base sponged with a little Faded Jeans Distress Oxide ink along the bottom, a piece of the orange polka-dot pattern paper cut with a simple Stitched Hillside die and sponged with a touch of Walnut Stain Distress Oxide ink. The hillside is actually glued flat to the card base but that sponging makes it look like it’s dimensional. A couple of clouds stamps from the SSS July ’17 card kit (Sea You Soon stamp set) in Avery Elle Pure White ink and lightly brushed with my Ink Duster brushes to soften them up a little. I stamped the circle letter stamp using a my Signme Aquarelle Brushes (cheap alternative to TomBow) and got a nice almost wooden texture. I drew ‘Sluggo’ here on some Bristol smooth card stock with a Pigma Micron 08 pen, and colored him with my Zigg Real Brush Markers. I fussy cut both pieces (taking care to remember the googly eyes) and attached both to the card front with foam tape.
  Of course, I rarely (if never) do a card without a sentiment on the front, so is there something inside? Of course there is! We all of us miss someone’s Birthday every now and then, so what better to blame a belated birthday greeting on than SNAIL MAIL! I created this sentiment with my Silhouette software using the Brady Bunch Remastered font and printed that up on some scrap white card stock and cut it out with a stitched rectangle die before gluing it down to the inside of the Audrey Blue card base I think ‘Sluggo’ is worthy of continued use!!
While doing a little research for this kit, I found a terrific quote from Albert Einstein and immediately knew that I wanted to use it on one of my cards from this kit.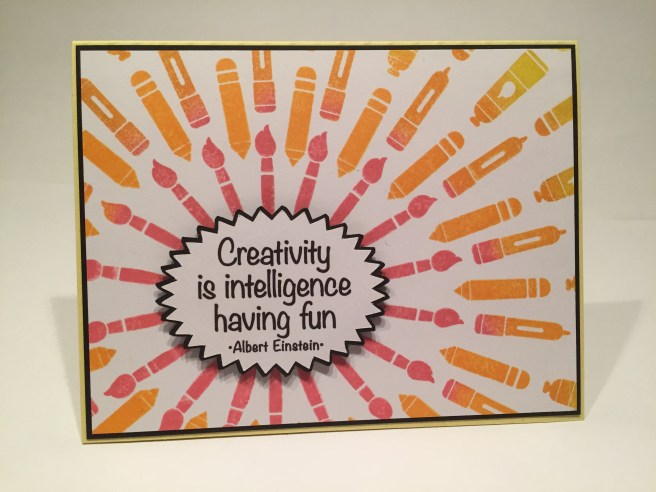 I pulled out my ‘Gentleman Crafter’s Handy Guides for Pattern Stamping’ and used the Oval grid with eighteen sections to stamp my radiating lines of the brush, marker, and pencil stamps on some plain white card stock. I used the SSS Hybrid inks again and did a little ink blending right on the stamps. I did set the center of the oval off to the lower left quadrant of the card stock for some added interest. After stamping the initial 18 lines, I realized there was room for more, so I rotated my card stock to add another 18 rays between the first 18 and removed the paint brush and added the paint tube stamp, turned them in the opposite direction and stamped another set radiating out between the original rays. After completing the stamping, I trimmed the card stock down to 4″ x 5.25″ and matted that on a piece of black card stock from my stash cut to 4.1/8″ x 5.3/8″ and glued those both directly to the Banana card base. I created the sentiment sunburst in my Silhouette Portrait using the Noteworthy font and cut that and a black mat out and glued them together. I mounted that to the card front with foam tape and WOW! Lots of bang for the buck here – If you don’t have them, I highly recommend those pattern stamping guides… so many options and so many uses for creating interesting patterns with your stamps. LOVE this card and I simply ADORE this sentiment! I think this is a great booster for any crafter or artist who needs some encouragement sent their way!
Which brings us to the final card for this kit. I still haven’t used the artist painting palette stamp so enough talk about crafts – let’s make some ART! I’ve hardly used much of the Daniel Smith watercolor pallet included with this kit, so I was itching to do a watercolor background. I’ve already used pieces from the watercolor paper from the kit, so I broke out my Strathmore cold press 140# watercolor paper and painted this background.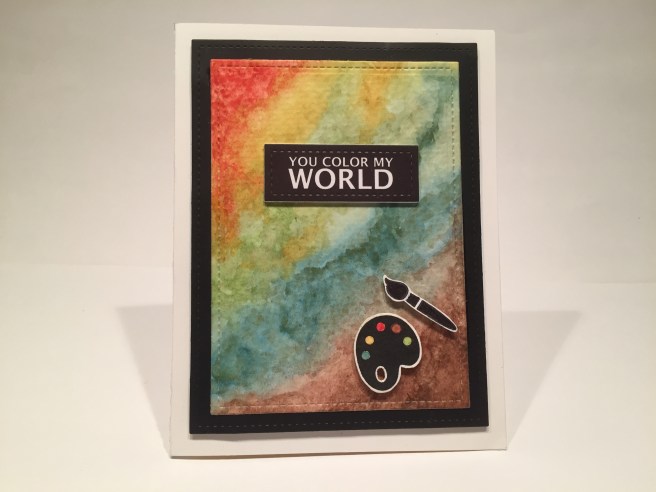 I LOVE IT! There are many layers of watercolor here – I completely used up the Pipestone and Serpentine paints from the palette, as well as most of the Gold and Green, but I was thrilled and very proud of the background I created here. Sometimes the secret is in knowing when to stop fussing with it! I cut the watercolor background and black mat with my Stitched Rectangle dies, glued them together and foam taped them to the last white card base. I stamped the artist palette and the brush in SSS Intense Black ink, colored the spots on the pallet with the DSmith watercolors, and fussy cut them both out. I tried to imitate the sentiments from the stamp set for the ‘You Color My World’ sentiment using the Lucida Grande font and I sized it to fit within my smallest Stitched Rectangle die. I did cut four of them (three from plain white) and glued them all together – I am becoming more enamored of this technique – it gives you great dimension without having to fuss with foam tape! And this may be the first sentiment I’ve created that imitates the ‘white embossing on black card stock’ look. I Like It! Needless to say, I love this card a lot and I feel like this sentiment is very useful. These DSmith watercolors are some of the best on the market and his dot palettes are a great way to experiment with his colors without breaking the bank!
 That concludes my 10 Cards 1 Kit post for the Simon Says Stamp February 2018 ‘A Colorful Crafty Life’ card kit. A lovely batch of cards that are usable for many occasions.
This kit marks the end of my one year as a Simon Says Stamp Card Kit subscriber. When I started doing card kits (two years ago), I decided to do one single brand for a whole year (covering all the holidays) before I moved on to another company. I have enjoyed my year with Simon Says Stamp very much and have created some truly great, fun cards.  Here’s a summary of my thoughts (if I may!) on the Simon Says Stamp Card Kits. PROS: 1. First off, the quality of the products included in ALL of their kits is superlative – the SSS card stock is very high quality and their stamps sets are unimpeachable. Of course I didn’t LOVE every kit that came out this past year, but I was determined to take the good with the bad and see what I could create. As a subscriber, you can skip a month if you don’t care for the offerings, but that wasn’t an option for me in my exploration of available card kits out on the market. CONS: 1. I felt like the quantity of products included with the kits varied wildly month to month – the number of card stock papers fluctuated from 3 to 6, and some kits were overstuffed with product while others seemed rather light. 2. They appear to really like PINK over at Simon Says Stamp – if your kit doesn’t have any pink card stock, you can trust that there will be plenty of pink in the pattern papers and/or accessories. 3. Shipping is $6.99 per kit in America and you do not have the option of adding product from their store to be included with your monthly kit – thus avoiding additional shipping charges. 4. The monthly cost of the subscription kits went up this month by $5.00 with NO NOTICE given to their subscribers. After 11 months of being charged $31.94, I was surprised to find my charge for the February kit was $36.98. I sent a note to service@simonsaysstamp.com asking if the increase was only for this month (extra supplies) or was a permanent increase – I NEVER received a reply, and only after looking at the subscription prices on the website did I discover that it was indeed a price increase. This really irritated me and kind of soured my (otherwise fun) year with SSS. If I have given permission to charge my account a certain amount every month, I feel like it is only GOOD BUSINESS to alert me when that price goes up. I’m sure there is some fine print in their contract somewhere that says they are allowed to change their prices without notice, but that lack of notification felt a little underhanded to me. It’s not like they don’t have my email address! I’m sorry to end this post on a bit of a downer, but this really irked me. Thank you so much for sharing your time with me here – I hope I was able to provide you with a little inspiration and a couple of laughs! Stay tuned for the announcement of my next Card Kit subscription – I might take the month of March off, but will be continuing as part of the design team at Love From Lizi. Thank you so much for your encouragement and support and, Happy Crafting!!!

Always, as you know, LOVE your creative mind, such fun! I will be excited to see whom you next choose for a kit. You did them well Scott! Fantastic job!
LikeLike
Thank you SO MUCH Kathy!!!
LikeLike
I sure know what you mean about the kits! I didn’t realize the price had gone up until this month. I’d decided that rather then take a kit I didn’t know what I’d do with, I skipped the February card kit. Now this month it looks like a good amount of product. I’ve been thinking of dropping them and picked up Love from Lizi but sometimes I feel her stamp sets are hard to work with. I know you get a ton of product in her kits.
I’ve really enjoyed looking at all the cards you create. I do so hope that you’ll continue to post even if you do go with a different company. Thanks for sharing!
Lynn
Sent from Mail for Windows 10
LikeLike
Thank you so much Lynn!!! YES..! I will continue my 10 Card 1 Kit videos with whichever company I join…!
LikeLike
I liked your Einstein quote card. How did you use the grid sheet for this card? Did you use a light box?
LikeLike
You are correct Sherri! I did use a light box for stamping the oval!
LikeLike