
 Hello folks! Scott here with my 10 cards from the Love From Lizi February Card Kit. This kit has sold out now, but I hope I can provide a little inspiration for those of you who have already bought this kit and are eagerly awaiting delivery! As usual I like to dig into the stamp set to begin with, and though there aren’t any stamps to color in this set, there are a lot of solid balloon shapes with decorations and text. This kit was screaming Happy Birthday to me so I set out to make a bunch of birthday cards!
For my first card this month, I thought it would be fun to do a bit of a pattern using the stamps, and creating a sentiment built in to the middle of the card. On a piece of 4″ x 5.25″ white card stock from my stash, and using my Tim Holtz Stamp Platform, I stamped the ‘Happy” balloon, the ‘Birthday’ balloon and the plain balloon 16 times in a simple grid pattern using Tim Holtz Distress Oxide inks in Broken China, Cracked Pistachio, Fossilized Amber, and Fired Brick. I reserved the center four spaces for the “Happy 50 Birthday” sentiment and embossed the ’50’ with VersaMark ink and Ranger White Embossing powder. I mounted the stamped piece to a mat of black card stock cut to 4.125″ x 5.375″ and foam taped the pieces to the Mint card base. I tied six little bows from plain white twine (from my stash) for the center balloons and added the small blue sequins from the sequin mix to add a just a touch of sparkle and to keep the shiny embossing company! The text on these balloon stamps is very fine so a LIGHT hand is called for when inking them up – that text and those patterns will fill up with ink if you’re not careful..! A very colorful birthday card, and right off the bat, I’ve used five of the stamps from the stamp set already! We’re off to a great start!
One of the 12″ x 12″ cut apart card stocks in the kit had this great HB sentiment with a bunch of candles. Never one to go the simple route, I cut the HB sentiment off, and fussy cut all the candles and flames. The black background showed off these candles much better than the off-white background they were printed on, and I added a touch of playfulness by mounting the candles on slight angles instead of perfectly straight up and down. I used my Zigg 2-Way glue pen to draw little highlights in the center of the flames and, once that dried, used the Nuvo Gilding flakes from the kit to add a touch of gold to the flames. Everything is foam taped onto a Black mat (from the kit) cut at 4″ x 5.25″. I added two corners of the wide gold glitter peel off stickers from the kit to the black mat and the thin ones around the sentiment, and realized that the flames needed a touch more bling so they weren’t overpowered by the peel offs – gold Stickles to the rescue – right in the center of the gold gilding – they matched the sparkle almost perfectly, and helped draw your eye to the flames! I mounted everything directly to the pink card base (almost hid that pink completely..!) and I think this birthday card is quite eye-catching! Sometimes I think I’m a little too literal in my thinking, but when I’m looking for ideas, the stamps and sentiments in a kit will usually provide some inspiration. One of the balloon stamps had the sentiment ‘Flying by to say HI!” so, being faithful to that sentiment, here’s my flying balloon card…! On a piece of Bristol Smooth card stock cut with the largest Lawn Fawn Stitched Rectangle die, I used my Ink Duster blending brush and some TH Distress Oxide ink in Broken China, along with a new My Favorite Things Cloud Stencil to ink the puffy clouds for the background. (LOVE THAT!!) I stamped the balloon with Ranger Archival Ink in Manganese Blue, fussy cut it out, and covered that with a good layer of Glossy Accents. I dug up some blue and white bakers twine from my stash (not a perfect match, but close enough!) to use as the string on the balloon – just a simple knot around the neck and some extra for trailing in the wind. The balloon is mounted with foam tape and the string is glued down with my Multi Medium Matte, and everything is mounted directly to one of the white card bases. Still, something was needed to bring this card all together, and sequins and sparkly bits didn’t seem copacetic in the sky… but wait! I dug out my ‘Sea You Soon’ stamp set from Simon Says Stamp and I remembered how much I liked these three little flying bird stamps – I stamped those in Distress Oxide Walnut Stain ink and WOW! Almost a “tromp l’oeil” effect! It added so much depth and perspective to this card. Once again, sometimes the simplest of cards have the greatest impact. I like this card more and more every time I look at it!
 Here’s another example of my being literal! This ‘gift’ stamp has the sentiment ‘It’s a Special Day’ so I figured I could use that stamp to highlight a particular DAY for someone’s birthday! I fiddled around with some monthly calendars for a bit but came to the realization that all you need is a box and a date to specify someone’s actual birth day! And to make that day “special” why not show a list of famous people born on that very day! (If you Wikipedia a specific date, they will have a list of people who share that birthday!) On my Silhouette, I added the (partial) list of people born on April 18th, and added my calendar box and date (in Lucida Grande font) to the center of the list, and cut out the whole piece measuring 4″ x 5.25″. I also cut the date box away from the background as well, and mounted that on a small mat from the striped ombre pattern paper. I cut an oval frame using my stitched oval dies from the glitter card stock specialty paper (and a piece of black fun foam) to make a stylized ‘circle that date’ frame for the gift stamp (stamped in Ranger Archival Vermillion ink (pigment inks work pretty good with these stamps!)) I mounted the date box to the background with some foam tape and attached all directly to the second pink card base. A thin strip of the glitter peel offs (between the years and the names) and a few gold sequins with the Nuvo Crystal Drops in the centers adds a nice touch of bling and keeps the glitter paper oval in check! I believe this is the MOST PINK I get with this entire card kit (glad that’s over! LOL!). I really like the idea of pointing out how ‘special’ a birthday is by showing who you share your birthday with! I will use this idea again!
 I’m still trying to use all the stamps in the kit, so let’s put the “It’s Your Birthday” hat stamp on one of the balloons! I also have that great stamp booklet to dig into as well, so I stamped the hat in Fired Brick Distress Oxide and the balloon in Broken China Distress Oxide (masking the bottom edge of the hat) on the right half of one of the white card bases, added the balloon string stamped in Walnut Stain Distress Oxide ink, and added the stripe and polka-dot pattern paper to the left side. I picked the “Enjoy every moment” sticker from the booklet, and removed the sticky with my EK Tools powder tool and mounted that to the pattern paper with some foam tape for a touch of dimension. A medium strip of the peel offs next to the pattern paper and an assortment of sequins, gems and enamel drops to add a little sparkle. I did add a ‘Happy Birthday’ to the inside of this card using the die from the kit and the black ‘matte mirror’ specialty paper. I really enjoy the ‘balloon with a hat’ image and I LOVE the gold foil on these stickers!
 I really liked the “simply amazing’ sticker from the booklet, and decided to try a gold and white card. I stuck the sticker down to some of the black card stock from the kit, and fussy cut a mat around it. I cut apart the “YOU ARE” off of a different sticker, matted that on black and used that to complete this sentiment. Since the ‘amazing’ sticker had some chevrons on it, this was my opportunity to use the gold mirror chevron pieces from the kit. I added some of the ‘liquid gold’ ribbon on the left side of the card base, added some of the thin black satin ribbon to the center of the gold ribbon, and used a couple of peel off strips on either side of that. I did run the ribbon(s) through my Xyron sticker maker to apply adhesive to their back sides before sticking them down to the white card base. I added the chevron mirror pieces to the top, and the three chevron stickers from the booklet to the bottom (that’s what I call really sticking with a theme!!). A few gold sequins from the sequin mix help give focus to the sentiment, and here we have a very sharp, highly reflective Birthday card. And yes, I did add another die-cut Happy Birthday sentiment on the inside of the card cut from the gold glitter paper. More glitz!!
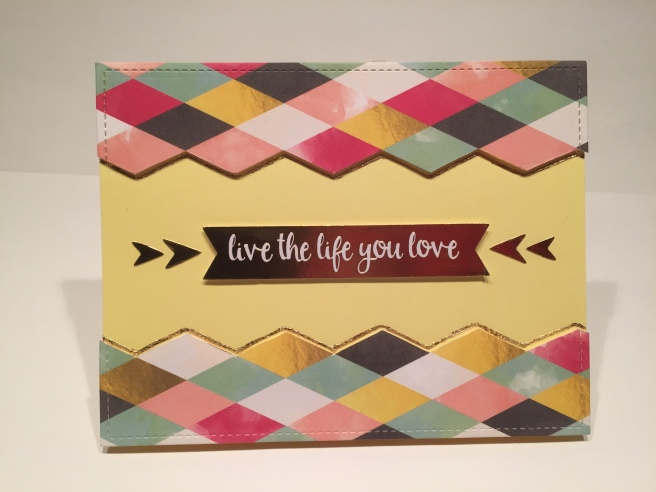 Some of the stickers from the sticker booklet didn’t have white borders on them at all, and I was drawn to this ‘live the life you love’ sticker. Since that sticker had fish-tail ends, I decided to use the harlequin diamonds pattern paper and fussy cut two pieces to frame out this card. I did cut the outside edges of the patter paper pieces with my LF Stitched Rectangle die, and to bring in a little extra gold to match the foil sticker, I used my Zigg 2-way glue pen to trace the fussy cut edges of the pattern paper onto the card and, once dried, used the gilding flakes to foil the glue lines. The pattern paper and the sentiment banner are foam tape mounted to the yellow card base and that brings this whole card together, especially when I added the gold foil arrow stickers to either side of the sentiment. I did add a die-cut Happy Birthday to the inside of the card using the glitter specialty paper, and we have a very unique, colorful Birthday card suitable for any guy on your list! The foiling on the stickers is really nice and provides all the glitz needed!
Now my obsession with using all the stamps in this stamp set started to set in and I was wondering how I was going to use all the numbers in the stamp set. Just stamp them randomly for a background? Make a pattern with them? I don’t know anybody celebrating their 9,876,543,210th birthday..! Then I remembered those new “Turnabout Stamps” that Concord and 9th came out with this last year. HMMMMMM…!! Could I create my own ‘turnabout stamp’ using the numbers from the stamp set??? After much trial and error (obsessive? ME?) I finally came up with a layout that worked splendidly!  This is all done on a 5.5″ square piece of card stock and it uses all 10 of the number stamps! I stamped the first pass in Wilted Violet Distress Oxide ink, and turned the page 1/4 turn to the right (clockwise) to stamp the second pass in Fired Brick.
 Another 1/4 turn clockwise for stamping the third pass in Cracked Pistachio.
 And the last 1/4 rotate clockwise for the final stamping in Spiced Marmalade!
 SUCCESS!! I am so jazzed that this came out so nicely!! This arrangement gives an apparently random look that is, nonetheless fairly regimented and reproducible! Though the complete pattern is only a touch over 4″ square (square cards anyone?!), I figure there are a lot of uses for a pattern like this. Like in this next card for instance..!
 I used my ‘turnabout’ stamping as background paper for this Happy Birthday card. I paired that up with the polka dot pattern paper from the kit, the ‘A Very Happy Birthday to You’ balloon stamp and the Happy Birthday banner from the color-able sticker sheet. I stamped the balloon in SSS Hybrid ink Orange Slush and fussy cut it out. I found that the hybrid inks worked very well with these balloon stamps – just keep a light hand when inking them up! I matted both pattern papers with the black card stock from the kit – each layer is 1/4″ smaller than the layer previous – the back piece is mounted directly to the mint card base, the numbers layer is mounted on foam tape, and the banner and balloon are mounted on foam tape as well. I colored the banner with my colored pencils and used my Zigg Clean Color Real Brush markers to color in the sentiment (boy that’s some tiny coloring!!). I tied a piece of Spellbinders Lumberjack Days Collection Jean Cord to the neck of the balloon and straight down to the edge of the top layer. Since the banner had stars on it (some of them in glitter) I used the banner die from the kit to cut some stars out of the glitter specialty paper and added those around the edges. That’s enough sparkle for this very colorful, Happy Birthday card. And 11 stamps used! LOL!!
 Okay, enough with the color! Let’s go monochromatic!! In honor of all the chalkboard cut-aparts that came in the kit, I fount this great quote from Elizabeth Taylor. Perfect sentiment for one of the big wood-veneer gems in the kit!. Now, I don’t have glorious handwriting, so I usually turn to my Sillhouette for sentiments such as this, but I was a little concerned with matching up the sketch function of my Silhouette with one of the chalkboard pieces from the pattern paper, so I simply went ahead and created my own chalkboard label on the black card stock in the kit. I used my Signo Broad white gel pen in the sketch mode of my Silhouette Portrait, to draw the label and the sentiment (in Typewriter Hand font) and then cut it out. I also cut a mat for the label (hard to see in this pic) from the black matte mirror specialty paper. I then outlined the mat with my Zigg 2-way Glue pen, let that dry and added the Nuvo gilding flakes to the glue line. The label and it’s mat are mounted with foam tape on a card base made from the black matte mirror specialty paper (I couldn’t resist!)
 The diamond veneer piece is foam mounted to the card base as well, and simply covered with – get this – gold Stickles!! SO PERFECT!! A small bow made from the ‘liquid gold’ ribbon in the kit adorns the top of the label, and here’s a card I think most woman the world over would love! I do go on to complete the sentiment on the inside of the card, actually using one of the chalkboard cut-outs from the kit and the Happy Birthday die cut out of some white glitter card stock from my stash. A perfect little addition to complete this stunning card. I am very impressed with this Happy Birthday die – it is very accurate and cuts perfectly no matter what material I used. This one is for all the ladies out there!!
Now we get to the last card from this kit – and I have to beg your forgiveness – or at least your indulgence – because, yes, I did it, I made another 2-way pull-tab slider card for you!! This mechanism has caught a lot of attention since the first of the year, and I figured what the heck! Third Time’s a Charm! Right!?
After all, a rising balloon makes perfect sense!!! So, once again, this uses the ‘double slider card’ mechanism to raise the green heart up from behind the other balloons. These balloon are stamped in the SSS hybrid inks in Watermelon, Orange Slush, Lemon Zest and Key Lime. The orange, red and yellow balloons are all glued together and mounted with foam tape to provide a little ‘garage’ to park the green balloon. A tug on the pull tab raises the green balloon that has the ‘4’ stamp embossed with white embossing powder and I added the ‘th’ with my white gel pen. This is all created on top of the small heart ‘chalkboard’ pattern paper, and my white twine is tied to the necks of the balloons and gathered together at the center and attached behind the notch. The pull-tab has another piece of white twine attached that reveals itself as the balloon is revealed. I LOVE THIS CARD! When I saw that this stamp set featured balloons, I knew I would do another slider card! This is yet another way to use this trick to actually make something appear! I promise to work on a how-to video that shows how to make these 2-way pull-tab slider cards. As soon as I get caught up with my Card Kits…! SO…. That’s my 10 Cards for the Love From Lizi February 2018 Card Kit… 9 Birthday Cards and 1 Flying Balloon card. A very colorful, clean, and eye-catching collection of cards! And, by golly, I used EVERY stamp in the stamp set! WOO-HOO!! LOL!!! Mission accomplished! Speaking of ‘every stamp’ – here’s a BONUS GIFT for all you folks that purchased this stamp kit – if you would like to receive my pattern for the homemade ‘turnabout’ numbers stamp grouping, go to the CONTACT page at the top of this post, and send me an email asking for the ‘turnabout stamp pattern’. If you are a follower of my blog and send me an email message, I will respond with a PDF file that shows the layout of the 10 number stamps so you can do your own turnabout stamping! SCORE!! And Remember! If you go shopping at Love From Lizi, please use my link: http://bit.ly/LFLlink
Thank you so much for sharing your time with me. I appreciate all your support and encouragement. Don’t forget to request that pattern, and Happy Crafting!!

I’d love to have the turnabout number pattern, or whatever it’s called. It’s a very cool look! After I saw your unboxing, I did use your link to order my own kit. My first Love from Lizi♡ Enjoy watching your jovial videos…they make me smile. Keep ’em coming! Joan jcreichert88@gmail.com
LikeLike
Hey Scott! I would really love the PDF to make your turnabout card! I had already made a screenshot and wondered how long it would take me to get it right, but you are a lifesaver! Thank you so much for doing this and for making & sharing such great cards. I really love this months kit! 🤓
LikeLike
Jeanne! Send me a message on the Contact page and I’ll send you the template! (need your email)
LikeLike
Great variety of fabulous cards. Your laugh is the best and makes me laugh with you…lol😄
LikeLike
Hi Scott. Once again, you have not only shared a very entertaining video, but you’ve created so many cards I would love to CASE and send. You are SO creative!
I had to stop the video to go looking for lists of famous people’s birthdays so I could use that idea for my husband. I also just bought that interactive MFT stamp set, so will use your sliding balloon card idea.
I could go on about each card…they are really clever! Thank you!
LikeLike