
Hello folks! Scott here with a little bit of an extra for you today. I received the Love From Lizi Special Edition Thanksgiving Kit – the ‘Happy Harvest’ card kit recently, and this card kit is actually currently available at LoveFromLizi.com!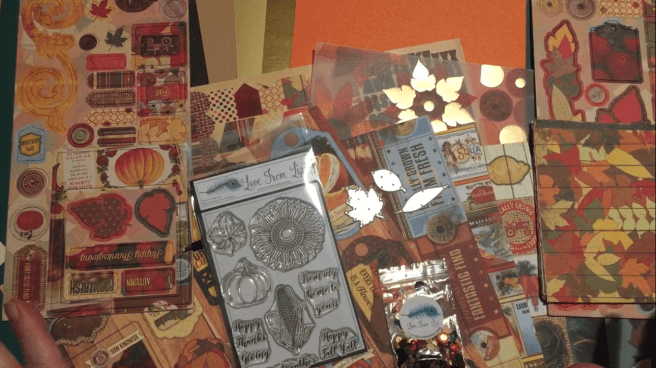 I believe this is Lizi’s first kit to come in a 12″x 12″ box and zip-lock bag, and is jam-packed with 12″x 12″ pattern papers, stickers, vellum images and cut-out sheets along with 6″x 6″ pattern pages, chip-board stickers and 5 specialty card stocks including a green cardboard with gold glimmer, a brushed gold mirror sheet and a linen textured gold card stock as well. A ‘Happy Harvest’ sequin mix, three leaf dies and an exclusive stamp set complete the set. Be sure to check out my video for a complete piece-by-piece un-boxing for this kit. I don’t generally make or send ‘autumn’ or Thanksgiving cards but after completing this batch of ten cards, I just might have to this year!!
I usually LOVE the vellum images Lizi includes in many of her kits, and the vellum in this kit was no exception – so that’s where I went to begin my 10 cards for this kit. Thank You  cards are always in season, and I adored this bunch of carrots and sentiment on the vellum sheet. I ran the vellum piece through my Zyron sticker maker and adhered that to a piece of my old stand-by card stock – Staples Ivory card stock. A strip of that green/gold cardboard topped with a couple of retro fruit advertisements from the patter papers provides a background for the vellum which is foam-taped to the orange shimmer specialty card stock. (LOVE that card stock!) I die-cut two of the short leaves from the linen textured gold card stock to add a bit of dimension, and finished it off with a few sequins. Since there is such a plethora of images in this kit, I decided to do something to the insides
 of each of my cards this month. I found the perfect compliment to this card on the 12″x 12″ cut-out sheet and I think it adds a lovely touch mounted on more of my Ivory card stock. See how closely that Ivory card stock matches the banner on this cut-out – I find myself constantly reaching for this card stock for so many cards – I recommend it as a budget ‘use it for anything’ card stock to have on hand in anyone’s stash! Having rarely used chip-board stickers on any of my card kits, I was very interested in seeing what I could create with the chip-board stickers included in this kit. There was a lovely line of leaves that drew my attention right away and inspired me to make this card. This is on that great Kraft
 embossed card stock included in the kit (There is a piece of this card stock in the November subscription card kit as well)! I trimmed the scallops off the burlap scallop sticker from the sticker sheet to make the strip down the left side of the card, and created this sentiment on my Silhouette using the Staples Ivory card stock (with the ‘Marguaritas’ font) and cut six pieces to glue together to try and approach the thickness of the chip-board pieces. Two more chip-board leaves and a few sequins from the mix finish off this card with a little touch of sparkle. I did add liquid glue to the backs of the chip-board stickers since they didn’t want to stick very well to that specialty card base. I absolutely LOVE this sentiment and adore this card – though autumnal in theme, this sentiment elevates this card beyond a simple Fall Card. Since I wanted to save the two gold specialty card stocks and the green/gold cardboard, that only left me with the Kraft and Orange shimmer card stocks for card bases, so I did bring in some card bases from my stash. This is on a core’dinations Auburn Pearl card stock from my stash. (I also used 1.5 sheets of Kraft card stock and a half sheet of the Staples Ivory card stock for a total of 6 card bases from my stash.)
 I used the maple leaf die from the kit to die-cut the center leaf from the brushed gold mirror card stock and used my Lawn Fawn ‘Quinn’s Capital Abc’s‘ to die-cut the letters from the linen textured gold card stock. I added some veining to the leaf with my Embossing Stylus Set and foam taped all the die cuts to some more of that Ivory card stock from my stash. I used one of the Ellen Hutson Stiching Lines die to add the cross-stitch detail on the edges, and glued that to a mat of the burlap pattern paper and foam taped that to a mat of the ivory polka-dot pattern paper. The Auburn Pearl card stock adds a lovely shimmer to this card, and I really like the simple rebus puzzle sentiment demonstrated here. Another card not necessarily autumnal themed..! Okay… it’s time to stop fiddling with all the groovy cardstocks and pattern papers and dig into the stamps from Lizi’s exclusive stamp set. Finally, I get a chance to color something! I start with the
 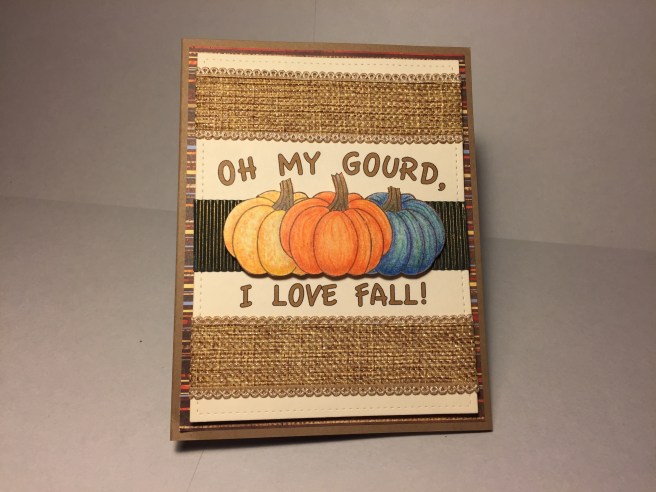 pumpkin stamp and with some simple masking, stamp three pumpkins in a row using my Tim Holtz Oxide Distress ink in Walnut Stain on my ivory card stock, and colored the pumpkins with my (vintage) Prismacolor colored pencils. I cut the pumpkins out (creating a little variety by cutting the stems at different lengths) and mounted them with foam tape to a strip of that green / gold cardboard from the kit – BOY! that makes those colored pumpkins pop! I used a Lawn Fawn Stitched Rectangle die to cut out a background piece from my Ivory card stock – wrapped a couple short pieces of burlap glitter ribbon (from the LFL August 2017 card kit) around the top and bottom, and foam taped that whole piece on a mat made from the striped pattern paper in the kit and mounted everything to one of my Kraft card bases. Those stripes have touches of blue, orange and ivory that match the pumpkins perfectly! I created this sentiment on my Silhouette Portrait and printed it directly on the Ivory card stock in the ‘Casual’ font – Love this pun – and yes, a pumpkin is a gourd! I tried to highlight that fact by coloring the pumpkins in different colors. I did take advantage of the ‘Fall’ sentiment
  to use one of the stamp set sentiments on the inside of the card, along with a small sticker from the sticker sheet. The burlap ribbon adds plenty of sparkle to this card – no need for sequins here – and I have to admit, I am really over the moon for these pumpkins!! No more strictly orange pumpkins for me!! Ok – That’s one sentiment from the stamp set – let’s see what we can do with the others. I really like the ‘Sweater Weather’ sentiment in the kit but don’t find any pattern paper or images that seem to go along with that sentiment… If you have followed me at all, you know I rely on my Silhouette Portrait machine a great deal – from creating and cutting sentiments to cutting whole shapes to use on my cards. One thing I haven’t done with my
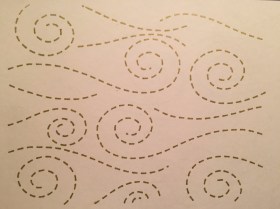 Silhouette for any of my card kit videos is use it to sketch with… Yes, you can use your Silhouette to draw with! I spent a bit of time coming up with this pattern to use with my Silhouette but am completely thrilled with the result – and now I can draw with any pen (color) I have that will fit in the carrier! This is actually drawn with a Sharpie metallic gold extra fine tip marker which, I am pleasantly surprised, does fit in my Silhouette!
  I used a piece of the blue pattern paper (die-cut with a Lawn Fawn stitched Rectangle die) to draw the swirly windy dashed lines in gold and framed that with a thin frame of the brushed gold mirror card stock. I embossed the sentiment in gold on a piece of the polka- dot pattern paper and die-cut it with a Darice Banner die, distressed the edges with some Walnut Stain Oxide ink, and mounted it on foam tape to the front of the card. I die-cut all three of the leaf dies from assorted pieces of pattern paper and added veins with a simple brush marker. I attached the leaves with thin foam dots and made sure some of them went ‘off the edge’ of the card. Everything is mounted to the other half of my core’dinations Auburn Pearl card stock for the base, and a generous sprinkle of sequins complete the windy effect. I don’t know if it’s the blue pattern paper, or the gold wind swirls or the ‘randomness’ of the leaves, but I have a definite soft spot for this card!
 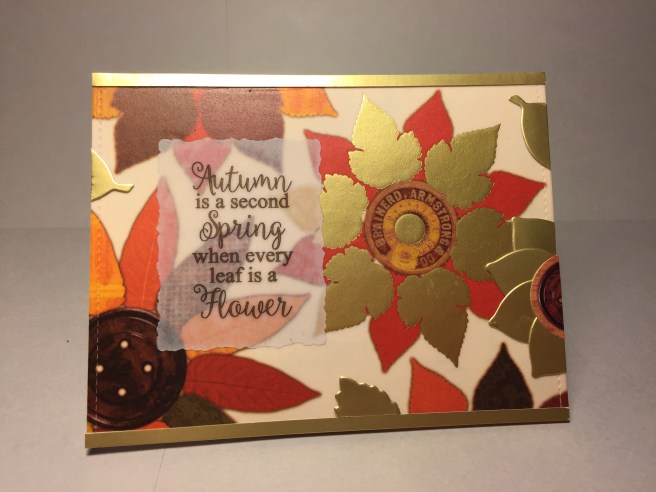 There was this great sentiment on a couple of the cut-out pattern paper images but I had a hard time seeing the sentiment printed on the patterns, so I decided to re-create this sentiment to go on top of this GREAT vellum piece featuring flowers made out of leaves. I did run the foiled vellum piece through my Zyron sticker maker and attached it to the front of my Ivory card-base. The foiled vellum piece was a touch narrower that the card base so I added a couple strips of the brushed gold card stock to the top and bottom. I did the sentiment on my Silhouette using the ‘Ballerina Script font and a simple Times New Roman font. I printed the sentiment on a piece of vellum because I still wanted to see the leaf flowers through the sentiment – one layer of vellum obscured the sentiment too much, but two layers highlighted the sentiment enough while still letting the background show through. Again, the sentiment is run through my sticker maker and attached directly to the card front. This card seemed a little flat at this point, so I die cut more of the rounded leaf die from the gold mirror card stock and added another ‘flower’ on the right and a couple of leaf pieces in the open areas of the pattern. I also used a piece of a spool-top sticker for the center of my flower. The added pieces filled out his pattern nicely, and, due to the beautiful gold foiling, sequins seemed like overkill. I really like this sentiment and the fact that it matched this vellum piece so perfectly. There were so many vellum pieces that I liked, I had to continue on with the ‘leaf frame’ vellum piece.
 Yes, again with my Zyron sticker maker and I attached the vellum to more of my Ivory card stock before I fussy cut the center out. I trimmed the Ivory card stock down to 4″x 5.25″, filled the shaker with lots of the sequin mix and added a die-cut maple leaf cut from a piece of core’dinations Glitter Silk card stock in brown. I did double up my foam tape around the leaf frame to provide enough height for the shaker bits. The polka-dot pattern paper provides the background for the shaker, and I used a strip of the linen textured gold card stock to transition from the vellum to the card stock. Happy Fall Y’all is another sentiment from the stamp set, and I stamped that in Stampin’ Up Chocolate Chip ink before doing some clear embossing on the top. There was a long border sticker of that great striped pattern paper on the sticker sheet, so I trimmed two pieces into banners to throw focus on the sentiment. Everything is mounted to my Kraft card base, and I can’t think of a ‘happier’ card than a shaker card! Great shaker action here as well!
 Back to the chip-board pieces! I figured I had to do a true Happy Thanksgiving card with this kit, and there was a lovely chip-board sticker that worked perfectly. I used a piece of the pattern paper covered with seasonal words for my background, added strips of the pumpkin vellum piece to the top and bottom and framed them out with some LFL peel offs in Chocolate Brown (from the August ’17 card kit). I guess I couldn’t do 10 cards without some peel off stickers somewhere! A thicker piece of the peel off stickers goes behind the chip-board sentiment, one of the chip-board flourishes is added below the sentiment and glittered up with my Spectrum Noir Sparkle Pen, and all is glued down to my Kraft card base. The shine from the peel offs, the foiling on the vellum strips and
 the touch of glitter on the flourish told me no sequins were needed on this card, but I did take special delight in adding a cut-out from the kit to the inside of the card. ‘Lettuce Celebrate’ is a terrific pun and totally appropriate for this Happy Thanksgiving card (note the added chocolate peel off ‘underlining’ the cut-out)! There are still a couple of the stamps I haven’t used yet, so before I get completely lost in the land of pattern papers and chip-board stickers, let’s do some coloring! I stamped the sunflower stamp (on Bristol smooth card stock in Versafine Onyx Black ink) and colored it with my Spectrum Noir Alcohol Markers. I added some dots of Sakura Glaze pens in black, orange and clear
 to the center of the flower which adds some nice texture and shine without having to resort to glitter. This stamp is large enough to be the solitary focal point on a card, so, after fussy cutting the sunflower, I simply die-cut some of the green pattern paper with the medium leaf die from the kit to provide an anchor for the sunflower. The brushed gold mirror card stock piece is actually the center cut out (Stitched Rectangle die, again) of the frame on the ‘Sweater Weather’ card (waste not, want not!). The golden yellow mat and sentiment are some leftover pieces from a Recollections Jewel Tone card stock pack (which has since been discontinued), but it compliments this card perfectly. I found this lovely quote from Helen Keller that I printed in American Typewriter font on my Silhouette and die cut with a small stitched rectangle die and glued to a mat of that Glitter Silk card stock in orange. The sentiment and sunflower are mounted with foam tape but everything else is glued directly down to the orange shimmer card base. Since sunflowers literally keep their ‘face to the sunshine’ I thought this quote made a perfect sentiment for a lovely sunflower card. This is certainly not just an autumn card at all! Now I get to use the ear of corn stamp! This stamp is the unique stand-out of this set!
 I stamped and colored these ears on Bristol Smooth card stock with VersaFine Black Onyx ink and colored them with my Spectrum Noir alcohol markers. I knew I wanted to use this ‘rows of corn’ pattern paper with this stamp, so I created the pun-ny sentiment on my Silhouette (Typewriter Hand font) and printed it directly on the pattern paper. In order to kind of drive home the -maize- part of the pun, I did color two ears as Indian ear corn, and that provided the right pop of color this card needed. Two more strips of that striped pattern paper down the sides correspond with the blue and red on the ears of corn. Everything is attached flat to the embossed Kraft card base with the center ear of corn attached with foam tape. I thought sequins would distract from the earthy, harvest feel of this card, so I avoided anything shiny or sparkly, and like the pumpkin stamp before, I may never color a simple yellow ear of corn ever again!! Between the pumpkins and the sunflower and the ear of corn stamps in this stamp set, I know I will get a lot of use out of them over the years. And can we talk about left-overs..! I still have masses of pattern paper, chip-board stickers, card stickers, a few vellum pieces and good-sized chunks of the specialty paper that will go directly into my stash! I am surprised at how much I enjoyed this kit, and am thrilled at the truly beautiful cards inspired by all the supplies included. If you have any questions at all please leave a comment or you can go to the Contact page and email me directly. I hope you enjoyed this sojourn into Autumn and the Special Edition Thanks Giving ‘Happy Harvest’ card kit from Love From Lizi, and remember, this kit is still available at LoveFromLizi.com! Happy Crafting!

Another fantastic set of instructions for your wonderful cards. Thank you. And please consider doing some of the Hero Arts monthly kits in the future.
P.S. How did you make that swirly, stitched background design to sketch on your silhouette?
LikeLike
Big Thank You, Eve!! I just made a ‘cutting line’ on my Silhouette in one of the swirly shapes and then turned the solid swirly line into a dashed line. Then I simply copied and pasted that same dashed line to fill in the space – flipped some other directions, scaled some down, cut the swirly part from the curved line for others. When you send the file to ‘cut’ just choose ‘sketch’ instead, and the Silhouette will draw instead of cut on those lines… Hope this helps!! Thanks for the encouragement!! Scott
LikeLike
Thank you, Scott! I’m going to try this, too. I look forward to your posts and want to thank you again for generously sharing your ideas.
LikeLike