
Hello Folks! Scott here with my 10 Cards 1 Kit post for the Simon Says Stamp September 2017 “Best Birthday” Card kit. This Card Kit comes with the “Best Ever” clear stamp set,

a custom paper pack (8 double sided 6″x6″ sheets) inspired by the Doodlebug Fairy Tale collection, custom Doodlebug Sprinkles epoxy sticker assortment, 2 Jillibean Soup “Small Heart” shaker tags, 2 Jillibean Soup “Balloon” shaker tags, 1 Jillibean Soup “Small Heart” shaped shaker, 1 Jillibean Soup “Balloon” shaped shaker, and 5 sheets of Simon Says Stamp cardstocks in Audrey Blue, Doll Pink, Lavender, Cotton Candy, and 120# White. I found it a little odd that we got 4 tags but only 2 shaped shakers, and even odder that we got no sequins, no rhinestones, NO shaker bits of any kind? In contrast to other SSS Card Kits I have received, this kit feels rather light on supplies. But, I do seem to constantly run out of birthday cards, so I eagerly dug in did my best to come up with a nice variety from the supplies provided. We did get 5 sheets of cardstock, which I cut down and folded into 10 card bases.

As usual, I started with the stamps on a piece of white cardstock (die cut with the Lawn Fawn Stitched Rectangle die) from my stash. I stamped the cloud with my SSS Intense Black Ink, cut a mask for the cloud from 1″ Post-it tape, and then stamped the rainbow stamp coming out of the top of the cloud. I colored the rainbow and cloud with my Zigg Clean Color Real Brush Markers, blending the rainbow to lighter shades on the left. After coloring, I stamped the other sentiments (I do really like that script-y ‘happy birthday’ sentiment), but this still felt a little bare to me. I remembered that I had received the SSS ‘Magical Birthday’ stamp set as a freebie on one of my first SSS orders, and it did have that great ‘wishing you a’ stamp that finished out the sentiments very nicely. I did cut the ‘FROSTING YUM.’ away from the cake sentiment and moved it into the inside of the card for a bit of a finale. I used my EK Tools Powder Tool to neutralize the sticky on the epoxy sticker, and used a spot of foam tape to give the cupcake a little more dimension. I mounted the white cardstock using foam tape on the star pattern paper and mounted that on the Audrey Blue card base. A lot of these sentiments were quite small but the ‘FROSTING YUM.” font was extremely small. I may have to break down and get a Versafine Onyx Black ink pad to help stamp these small sentiments a bit more legibly…!
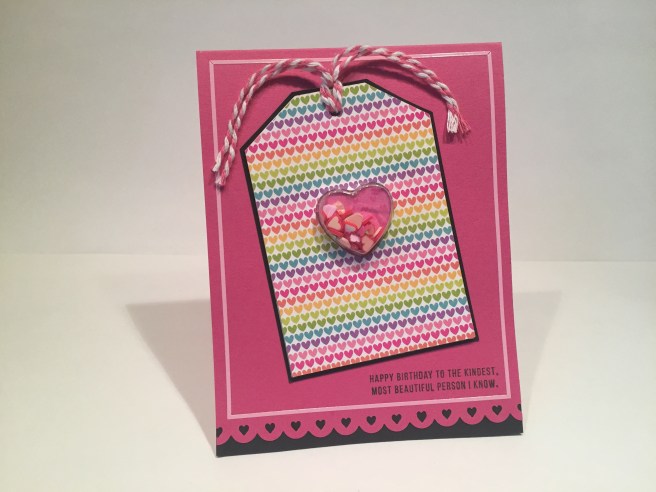
I have seen these style of plastic shaker containers around for a while and wanted to try one for myself, so I reached for the ‘Small Heart’ shaker tag and shaped shaker for this card. I covered the tag with that great rainbow heart pattern paper, used one of my American Crafts Border Punches on the bottom edge of the Doll Pink card Base, and used some black cardstock from my stash to mat behind both. When I saw the original reveal of this kit, and realized that there were no shaker bits included, I happily purchased some Queen & Co. ‘Toppings’ to use with this kit. I had been pining for these ‘Fimo Fun’ Toppings ever since I saw them a number of months ago, and here was the perfect opportunity to add them to my stash. The heart shaker is full of red and pink hearts from this topping set – they really look like little polymer ‘Millefiori’ slices and I thought they worked perfectly as the shaker bits for this card. I do like the repetition of heart shapes throughout this card – definitely a theme going on here…! I used some of my pink peel off stickers from the Love From Lizi July Card Kit to form a frame around the card, and used some pink and white bakers twine (from the same LFL July Card Kit) tied in the hole on the top of the tag. Another one of the (tiny) stamp set sentiments in the bottom corner and we have another card completed. Though I am getting a little tired of all the pink in my card kits this season, I do really like this ‘Doll Pink’ cardstock.
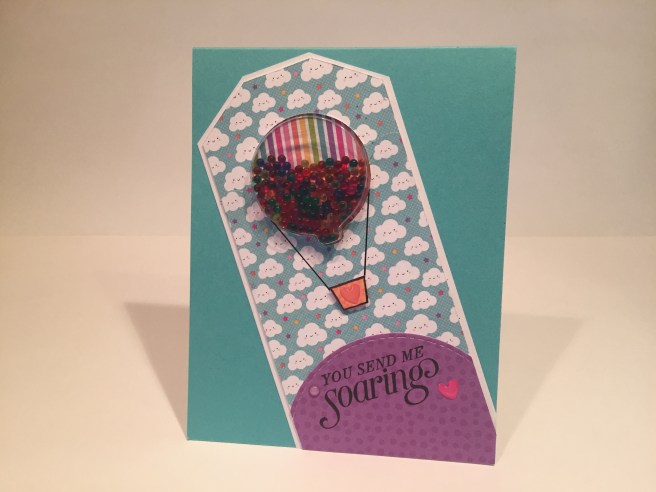
Now on to the ‘Balloon’ shaker tag and shaped shaker. I thought this looked more like a hot-air balloon, so I covered the tag with the smiling clouds pattern paper, added a purple pattern paper hill and matted that all on top of a piece of scrap white cardstock. I used that terrific rainbow stripe pattern paper behind the balloon, and filled the shaker with Queen & Co. ‘Tiny Bubbles’ Toppings in all six rainbow colors (yes, I also bought this set along with the Fimo Fun set!) – these almost look like little candies inside the balloon! I cut a crude little ‘gondola’ out of the orange pattern paper, outlined that with my Pigma Micron Pen 03 and drew a couple of straight lines to suggest the rigging. The “You Send Me Soaring” sentiment is from the Stampin’ Up ‘Sky is the Limit’ Sale-A-Bration stamp set from 2016. A few of the epoxy stickers from the kit and another shaker card is air-born!

Back to the stamps… I really think stripes and polka-dots work great together, so I used the big polka-dot pattern paper to cover 2/3 of the Cotton Candy card base (more pink!) and die cut a circle through the front of the card so that great rainbow heart gets seen both on the front and on the inside of this card. I cut a frame for the window out of a scrap of white cardstock with my stitched circle dies (because my stash of pink cardstock is almost nonexistent!) and colored it with my Spectrum Noir BP1 (bright pink) alcohol marker. I used that same marker to color the heart along with LV1 (lavender), IB2 (ice blue), LG3 (light green), CT4 (citrus), OR2 (orange), and DR2 (dark red), and then covered the whole heart with my Spectrum Noir clear sparkle pen. I took great pleasure in  figuring out where to stamp the ‘best birthday ever’ sentiment over the heart where you can’t see it until you open up the card. The simple ‘Happy Birthday’ sentiment is stamped on the outside of the card, and with a few epoxy ‘sprinkles’ and one pink peel off sticker, we have a very cute (albeit very pink) card with a little bit of a surprise inside.
Just a couple of colored rainbows, and I’m already itching to see how else I can color and use these stamps beyond the simple obvious rainbow approach.

Here, I’ve stamped the rainbow stamp 5 times in a row, overlapping both ends at the width of the rainbow. I really like the Gothic arch effect where the stamps overlap. I colored the stamps with colored pencils, letting the overlapped ends blend naturally. Lots of color achieved here without using the rainbow motif. I fussy cut the rainbows out, and used foam tape to mount them on some of the purple pattern paper with the scalloped edges punched with my American Crafts Border Punches. I stamped the heart border along the top of the pattern paper using Archival Ink Deep Purple, and the ‘best friend’ stamp (in SSS Intense Black ink) over one of the arches. I stamped the ‘sending lots of color your way’ on a scrap of white cardstock and added a thin strip of the rainbow stripes pattern paper to the bottom. I used foam tape to mount the ‘color’ sentiment at the bottom of the rainbows, and everything is attached to the Lavender card base. Three of the epoxy dots from the included stickers – blue, green, purple, add a little sparkle and shine, and just happen to match the three central arches. Now, this could be used as a birthday card, but I avoided a birthday sentiment so I can use this card for other occasions – that’s three Birthday cards and two love / friendship cards so far…
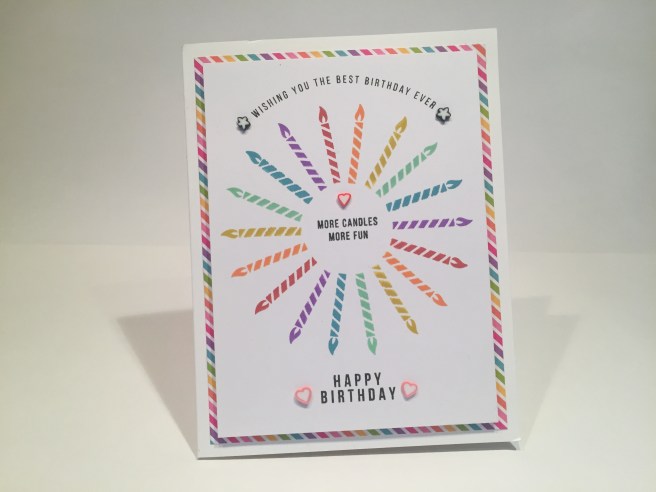
And now I’m having some fun with the small candle stamp. I am not and have never been a great stamper, and have used stamp platforms to assist me for most all of my stamping. I am proud to say that the candles here were all hand-stamped – no stamp platform used! I did find The Gentleman Crafter’s handy guides for pattern stamping on-line and used the circular grid with eighteen sections on top of my light board to stamp the candles in a radial circle. I used the Tim Holtz distress oxide inks in Wilted Violet, Broken China, Cracked Pistachio, Fossilized Amber, Spiced Marmalade, and Fired Brick. I did do a practice run on some plain paper which helped me figure out how to line the stamps up to get a nice even circle in the center. Though the distress oxide inks are not a PERFECT match, I thought they were close enough to suffice. I do not have a lot of stamp pads in my stash, so I found it a little difficult to perfectly match the pattern papers in this kit with the ink pads that I own. I did stamp the sentiments in SSS Intense Black ink and mounted the white cardstock with foam tape on the rainbow stripe pattern paper (my favorite!). I did cut out the center of this rainbow mat to conserve some of that paper for other uses. Everything is mounted on the 120# white card base, and I added a few Fimo Fun Toppings for accents. That candle stamp is a great stamp, and I can see many uses for it in the future. I do love this card, and the juxtaposition of what is a basically a simple card, with a little more complex pattern of stamping! Maybe this will encourage me to embrace the chaos and try a little more hand-stamping with other cards!
I still have the two shaker tags left, and, even without the ‘shaped shakers’, I figured I can use them make more shaker cards. I decided to embrace the PINK and made this card.
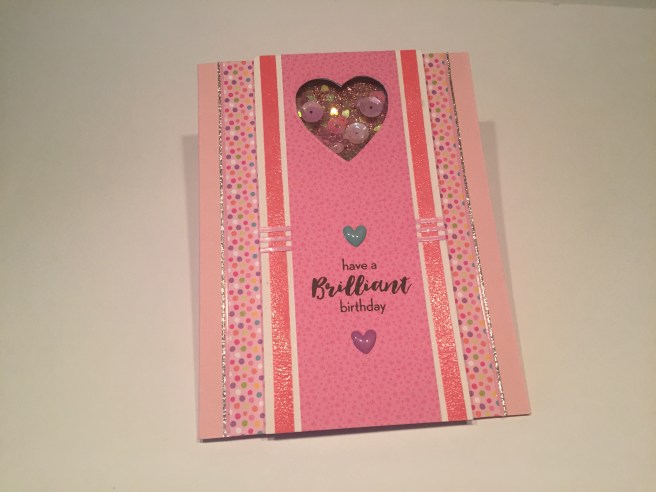
I opened up the shaker tag and cut off the tag ends to make a full size panel down the front of this card. Once again, displaying my affinity for stripes with polka dots, I used the solid stripe stamp from the set to stamp and clear emboss a couple vertical stripes on the sides of the shaker tag using Worn Lipstick distress oxide ink. I covered the center of the heart shaker tag with the pink-on-pink pattern paper and mounted that on foam tape to the pink polka dot pattern paper. I decided that the heart opening was a little small for this arrangement, so I enlarged the window a little bit with one of my heart dies. I backed the shaker window with some core’dinations Glitter Silk cardstock in pink, and filled the window with whatever pink sequins I could find. I did add some Martha Stewart heart shaped glitter in Sugar Plum (discontinued) and some of the clear Tiny Bubble toppings to finish filling out the shaker. The sentiment is from the Paper Pumpkin July 2016 “What a Gem’ kit, and after adding a couple of the epoxy hearts from the set, I finished out the sparkle on this card with the Love From Lizi pink and silver glitter peel off stickers. The three horizontal stripes of pink peel offs in the center were useful in camouflaging the fold line in the center of the shaker tag. I think the abundant use of sparkling, shining, and glittery accents reinforces the ‘Brilliant’ sentiment!
Even though I am not a huge pink fan, I did like that card a lot and, since I still had one Doll Pink card base to use, decided to make one more perfectly pink card.

This card is pretty self-explanatory. I stamped the ‘HAPPY BIRTHDAY” border stamp on a scrap of white cardstock, added more of that pink polka dot pattern paper on top, and mounted those flat on the Doll Pink card base. The circle die cut is actually the piece I cut out of the window card (#4) stamped with the ‘best friend’ sentiment (curved a little more than natural to fit). I liked the two sizes of polka dots together and I did have that pink frosted cupcake sticker to use as well, so I mounted the sticker to the die cut with a spot of foam tape and used more foam tape to attach the die cut to the card. I outlined the pattern paper assemblage with more LFL pink peel off stickers (I’m addicted!), stamped the ‘birthdays are for…’ sentiment on the card base (I did not use the ‘frosting yum.’ portion) and added 3 epoxy dots (polka dots!) from the sticker sheet for some added shine. Surprisingly, I didn’t turn into a big pink blob of quivering cytoplasm after completing two VERY pink cards in a row…!!
I have now used all the stamps in the ‘Best Ever’ stamp set except for the little smiley faces. Now, I’m not much for putting cute little smiley faces on things, but I did come up with an idea that would justify the use of one of these faces.

I used my stitched sun die to make an ‘epoxy’ sticker that would match the cloud and rainbow stickers from the Doodlebug Sprinkles collection. I did have to cut the sun down quite a bit to make it more size appropriate to use here, but after stamping one of the smiley faces on it (with a little touch of blush) and covering it with Glossy Accents, I think it looks like it could have come with this set! I used the + and = stamps from the SSS August Card Kit to complete the equation (stamped in SSS Key Lime and Orange Slush Hybrid inks from the SSS April Kit) and clear embossed them to match the shine of the stickers. The stickers are mounted flat to a scrap of white cardstock edged with the Ellen Hutson Stitching Lines die and foam taped up on the ‘confetti’ pattern paper with little strips of that great rainbow stripe pattern paper top and bottom, and all mounted to the Lavender card base to finish it off. I added little raindrops with the tip of my Spectrum Noir alcohol marker in AB1 (a new color – Aqua Blue) under the cloud, and topped them all with a tiny spot of Glossy Accents. I think this is great fun, and just needed an appropriate sentiment to complete. I found this quote which seemed very appropriate. I created this sentiment in my Silhouette software in the ‘Times’ font and printed it directly on my cardstock then trimmed it down with a Lawn Fawn Stitched Rectangle die. This perfect sentiment ties everything together and makes this card one of my favorites!
I have now used all the stamps in the ‘Best Ever’ stamp set, and I still have the ‘Balloon’ shaker tag and a 120# white card base to use, so I got this wild idea to abandon the whole colorful rainbow theme of this set to make a monochromatic card.

And here’s my Silver and White Christmas Card!! I outlined the tag and the right edge of the card base with my Love From Lizi Silver Glitter peel off stickers, (ADDICTED, I said!). I had to make some homemade silver glitter paper (I actually did not have ANY silver glitter paper in my stash – lots of silver papers but nothing with glitter!!) to die cut the branches with a Darice Border die, (I used the branches to cover up the crease on the tag) and to make the little ornament topper to cover the balloon nipple. I used Sheer Shimmer Spritz on the tag and the scrap of grey cardstock on the back of the ornament shaker to add some more glitter, and used more of the LFL peel off stickers to add a little pattern to the grey backing of the shaker window. I did outline the ornament with my Sakura Stardust pen, and I used some silver cord from my stash for the hanger and bow, a silver grommet in the tag hole and a tassel I made from DMC silver metallic thread, and some old silver rhinestones for the shaker bits. The sentiment is from the Paper Pumpkin November 2016 ‘Wonderful Winterland’ kit, stamped with VersaMark ink and embossed with Ranger silver embossing powder. I did try stamping the sentiment with my Delicata Silvery Shimmer stamp pad, and also tried it with the WOW! Cloud 9 glitter embossing powder (from the SSS August kit) but I think the Silver embossing was the easiest to read. I love this card a lot – I think I was a little overdosed with all the rainbows and colorful papers in this kit and I found it extremely satisfying to do a simple silver and white card.
I do like this ‘Best Ever’ stamp set quite a bit even though it doesn’t give us a lot of images. While in the midst of making these cards, someone at work celebrated a birthday and I was able to come up with a quick and easy gift card using this stamp set.
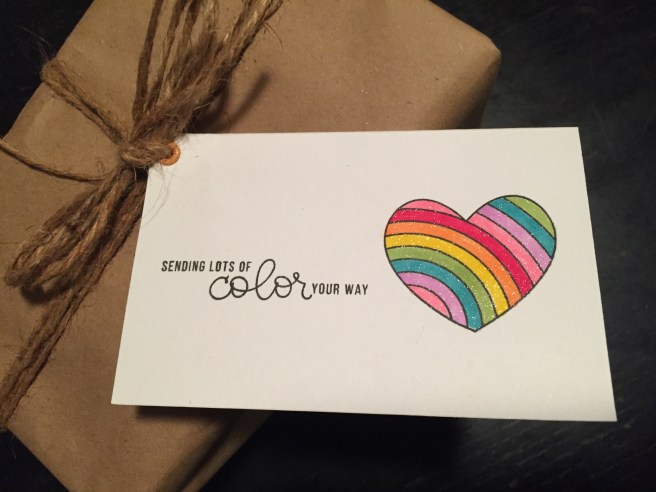
The package is actually a set of inexpensive alcohol markers for my colleague who recently discovered the joys of coloring, so the sentiment was extra perfect!
So that makes 6 Birthday Cards, 3 friendship/love cards, 1 Christmas card and a gift card for this month’s kit. I really did enjoy all the bright colors in this kit, and I hope I was able to provide a little inspiration for you and your card making adventures, whether you bought this kit or not. Thank you for all your support and Happy Crafting!!

I love all your cards, Scott. But of course, I love rainbows and so this stamp set was a “given” that I would really like it. I was impressed that you made a tassel with the silver thread. How did you do that? It is so decorative on your Christmas card.
LikeLike
Thanks Pam
I have a short tassel tying demo on this YouTube video: https://www.youtube.com/watch?v=cOEO5euP76E
The silver tassel is tied the same way, just quite a bit smaller…!! I hope that helps, and thanks for your comments and support!!!
Scott
LikeLike
Loved your purple card with the solid rainbow. Clever use of rainbows. Also liked your card with the cloud + sun= rainbows. Also thanks for sharing your template find. Thanks for sharing. Keep those cards coming. Just post anytime love your style.
LikeLike
Trudie! Great to hear from you! Thanks for taking the time and for the encouragement and support! Means a lot! Thanks!!!
LikeLike