
Hello Folks! Scott here with my first 10C1K post as a new Design Team Member for Love From Lizi! This is a Super -Card Kit by any definition, with bonus supplies included so we can all celebrate the First Birthday of LoveFromLizi.com on September 2nd.

This kit is overflowing with lovely cardstocks, specialty cardstocks, three styles of 8″x8″ pattern paper with a watercolor theme, and, of course, tons of embellishments, some new Love From Lizi embossing powder, a new stamp set deisgned by Lizi herself, and more..! PHEW! As usual, I turn to the stamp set to get started with my Kit.

I wanted to try the Love From Lizi “Emerald City” embossing powder first, so I stamped the wreath with the included VersaMark ink cube, and embossed it with the new Love From Lizi brand powder. Really, really, nice embossing powder – super-smooth and super-shiny. I stamped the sentiment in Stampin ‘Up ‘Night of Navy‘ ink in the center of the wreath. I was originally going to cut all these images out, but, as I was using my Tim Holtz Stamp Platform to stamp with, I ended up stamping the flower image (with Ranger Archival Ink Deep Purple) nicely placed in the four corners of the white cardstock. I colored the flower stamps with three of the Chameleon pens we have received in the LFL kits – the grey from July, the green from August, and the purple from this kit. This arrangement looked so nice, I decided NOT to cut everything out. I threaded the organza/satin/glitter ribbon behind the wreath and added the three organza ribbon roses to the wreath. I used a blue sequin from the Peacock Pride sequin mix at the center of each flower and topped those off with a small dot of the Nuvo Crystal Drops. I mounted this to the purple card base, and with a few silver stars from the sequin mix trailing down the middle of the card, and, of course, the silver glitter peel offs for outlining, and my first card is complete – I really like the purple / green combination with just a touch of blue.

I was eager to see what I could do with the sheet of lace included with the kit, as well as the Nuvo Gilding Flakes, so I coated the lace with my Zigg 2-way glue pen and let it dry before taking the silver Gilding flakes to it… I had to use an old toothbrush to clear the flakes from the open areas of the lace, but, surprisingly, it worked and gave the lace an almost metallic look! I stamped and embossed the sentiment on a piece of the blue specialty paper – this took me a few tries… first I tried embossing in silver, but I didn’t think that showed up very well.. I tried embossing with the Emerald City green, but I didn’t think that showed up very well either, so I ended up using white embossing powder – not only did this pop, but the white really points up that the lace is silver…! I did emboss the satin rose leaf with the Emerald City embossing powder using the leaf stamp from the LFL July Kit. I die-cut the sentiment with a Nestabilities Deckled Rectangles die, and mounted that on top of a scrap piece of cardstock with the edges covered with the silver glitter peel offs. That really shows off the deckled edges of this die. I used that gorgeous opalescent pattern paper and wrapped the lace, the organza/satin/glitter ribbon, the cool grey velvet ribbon and the square rhinestone ribbon buckle around on the left, defined the edges of the lace with more peel offs, and mounted the sentiment on the right side with foam tape. I glued everything down on top of the dark blue cardstock and, WOW! – you can make some truly beautiful cards with this kit – this one feels very fancy, very high-end to me… a $10 card if I ever saw one! LOL!!

If you have followed me at all, you know I am a little image-obsessed, so I looked around for some ‘girl’ images to compliment the feminine sentiment in this kit, and ran across the Mona Lisa – any more iconic you cannot get!! I paired that up with one of the canvas-textured pattern papers (get it?!) and embossed the sentiment on a scrap of my own Kraft cardstock in the Emerald City green, and matted both on a small black mat (from my stash), and added the graphite specialty paper as a ‘frame’ around the artwork. These were all mounted to the canvas pattern paper with foam tape, and then glued to the kraft card base along with one of the kraft envelopes from the kit. Notice the ‘monogram’ on the envelope… yes… there is something inside…

Need she say more?? LOL! This card tickles me to no end…! The letter is just a scrap of ‘parchment’ paper and I wrote the ‘letter’ with a Pigma Micron pen 02. I love the whole idea of a ‘card within a card’ and think this is a little bit of giggle heaven!

I actually had this great graphic in my image stash and was so amazed at how well the colors matched this canvas-textured pattern paper, that I had to use her. I stamped the sentiment on a scrap of watercolor paper (to compliment the canvas-texture) with Ranger Archival Deep Purple ink, and cut it and the purple specialty paper out with a stitched oval die. I glued those together, and used foam tape to mount it to the pattern paper. I printed and cut 4 of the girl images on my Silhouette, and glued them together to make a pseudo-chipboard piece, and used foam tape to attach it to the card. The pattern paper is glued to the purple card base and trimmed with more silver peel offs and a few silver stars from the sequin mix. I love the combination of the sentiment and the image on this card – a GREAT encouragement card for young and old alike!
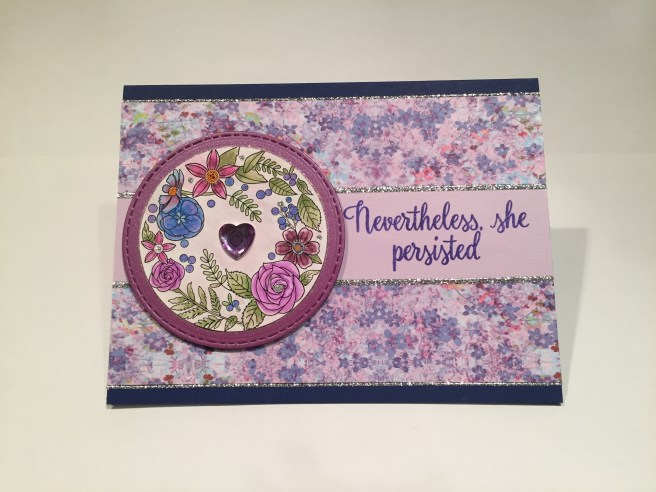
I wanted to color something, so I reached for the sheet of color-able stickers in the kit, and colored one with my Zigg Clean Color Real Brush Markers, in colors to compliment this floral pattern paper. I mounted the sticker to the purple specialty paper, added a light purple heart gem in the center, cut that out with a stitched circle die and used foam tape to mount it to the card. The sentiment is stamped with the Archival deep purple ink again on a scrap of light purple cardstock (from my stash), mounted to the pattern paper which is glued to the dark blue card base and, YES, ONCE AGAIN, trimmed out with the silver glitter peel offs.!! (I’m currently looking to see if there are any 12-step programs that will address my peel off addiction!) I’m usually not one for flowers – but I wanted to highlight this terrific sentiment, and I thought the stickers complimented this pattern paper very well – kind of blending together to focus on the sentiment. At this point, I have used every stamp in the stamp set and am ready to move on to the terrific peacock die!
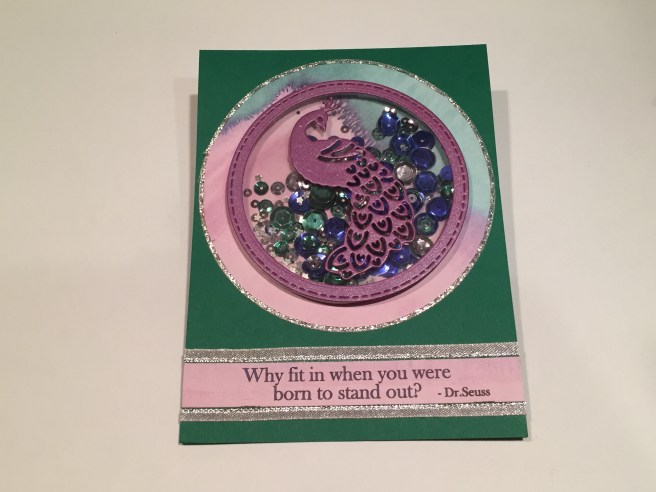
This is a GREAT die – lovely and intricate and it cuts “like buttah”! Of course I went for a shaker card! The peacock and the frame are both cut from the purple specialty paper – acetate glued behind the frame and the peacock glued on top. Foam strips around the frame and attached to a circle of this lovely pattern paper with plenty of the ‘Peacock Pride’ sequin mix for the shake. I used another piece of that organza/satin/glitter ribbon across the bottom and added my Dr. Seuss quote printed on the same pattern paper in Century Schoolbook font. This peacock die is extraordinary – it has amazing detail while still being a fairly small die. LOVE this shaker card!

Now, I want to try some die-cut inlay with that peacock die, so I cut the peacock out of the Blue specialty glimmer paper, used the purple specialty paper for the feather inlays and some of the LFL gold mirror specialty paper from her July kit for the ‘eyes’ on the feathers as well as the peacock’s eye. Though it was a little fussy and keeping track of those tiny little pieces drove me a little nuts, the end result is well worth the headache! Such a beautiful die! The peacock is mounted on the mint specialty paper and that on the graphite specialty paper and those foam taped to the pattern paper background (all cut with the Lawn Fawn Stitched Rectangle dies). I love this sentiment I printed and cut on my Silhouette – the script words are Sign Painter font and the block letters are Britannic Bold font – and I did print five of them and glued them all together for more of a ‘chipboard’ look. The sentiment is mounted over the dark grey velvet ribbon with foam tape, and the sequins are a combination of the kit mix and some from my stash. There’s a touch of the Spectrum Noir Sparkle Pen on the sentiment, and all is on the mint card base. I really like this sentiment and I think it works perfectly with this die!
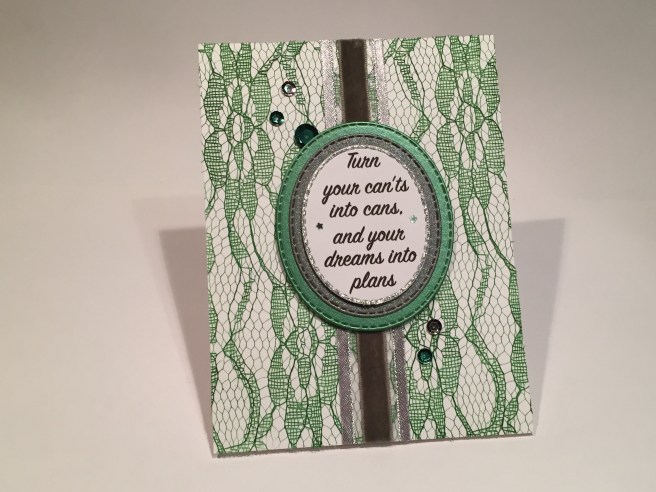
The lace still fascinates me so I wanted to see if I could color it with an alcohol marker – I used the green Chameleon Pen from the August kit and it colored the lace beautifully. Now… how to attach the lace to a card front. I laid the slightly oversize piece of lace face down on a piece of newspaper and used my Aileens Super Tacky Spray Glue to give it a light coat of adhesive. I immediately moved the lace to the card base and VOILA! it stuck down perfectly – there is no sticky on the top… no edges wrapped around the sides of the card… I was pleasantly surprised that the spray adhesive worked so well, and I think it looks terrific on the white card base, as well as adding a great texture to the card. I adjusted the “She turned her can’ts into cans…” sentiment to be “Turn your can’ts into cans and your dreams into plans” in the Sign Painter font on a piece of scrap white cardstock and cut it and the green and graphite specialty paper with the Stitched Oval dies again. I love pairing up the organza/satin/glitter ribbon with the velvet ribbon for some added plush, and, with the addition of a few sequins, we have a unique ‘lace’ card! I would be interested in trying this with some different patterns of lace as well!!

I was jonesing for a little whimsy by now, and I hadn’t satisfied my coloring demon yet, so I found this cute image and had to pair it with this fun sentiment. Traced onto some white cardstock with a pigma micron pen and colored with my Zigg Clean Color Real Brush Markers, I printed the sentiment in… yes, you guessed it, my font of the year: Brady Bunch Remastered! A dot of the Nuvo Crystal Drops to top off the tail feathers is a nice simple highlight for this design. You can’t really see it here, but I did cover his tail with the Spectrum Noir Sparkle pen – very glittery in real life! This is my ‘clean and simple’ card for this kit – a simple mat of the dark green specialty paper and a kraft card base make for a totally whimsical card that stays true to the ‘encouragement’ (and peacock) themes in this kit.
And now… for the final card this month… I was interested in trying something unique with the peacock die, and seeing if I could fashion a different way of using it. I came up with the idea of cutting off the tail and adding my own…

Of course, once I got this on a card, I needed a lot more ‘feathers’ to fill in the space. I made a little teardrop pattern and traced and cut all the ‘feathers’ from that great shimmer pattern paper, and here’s the result:

This came out better than I imagined! I printed the sentiment directly on the purple watercolor pattern paper (in Bradley Hand font) using my Silhouette, and affixed the trimmed die-cut and ‘feathers’ with little spots of foam tape – I have some EK Tools 3D dots that are only 1/16″ thick – just thick enough for a little lift but thin enough to be able to trim them down to size easily. I added tiny dots of the Nuvo Crystal Drops to help disguise the trimmed tail of the die cut, and all over between and around the tail. Mounted on the dark green card base, and trimmed with more peel offs, I consider this card to be the best of both worlds: stunning yet whimsical. I love the range of colors I got from the pattern papers, and I am liking those Nuvo Crystal Drops more and more every time I use them.
That wraps up my first ‘official’ 10C1K post as a new member of the Love From Lizi Design Team. I hope I was able to share some usable ideas with you, and possibly inspire you to think a little outside the box with this month’s kit! Be sure and tune in on Saturday, September 2nd for a Love From Lizi Birthday Hop on YouTube with chances to win terrific prizes including a one-year subscription to the Love From Lizi Card Kits!
