
Hello Folks! Scott here with yet another new Spellbinders release in the Classic Mouse Collection – it’s that time of year for a Wedding! Another completely adorable set highlighting a very celebratory moment! Again, you DO NOT need the original Steamboat Willie Duo die set – everything you need is included in this collection!

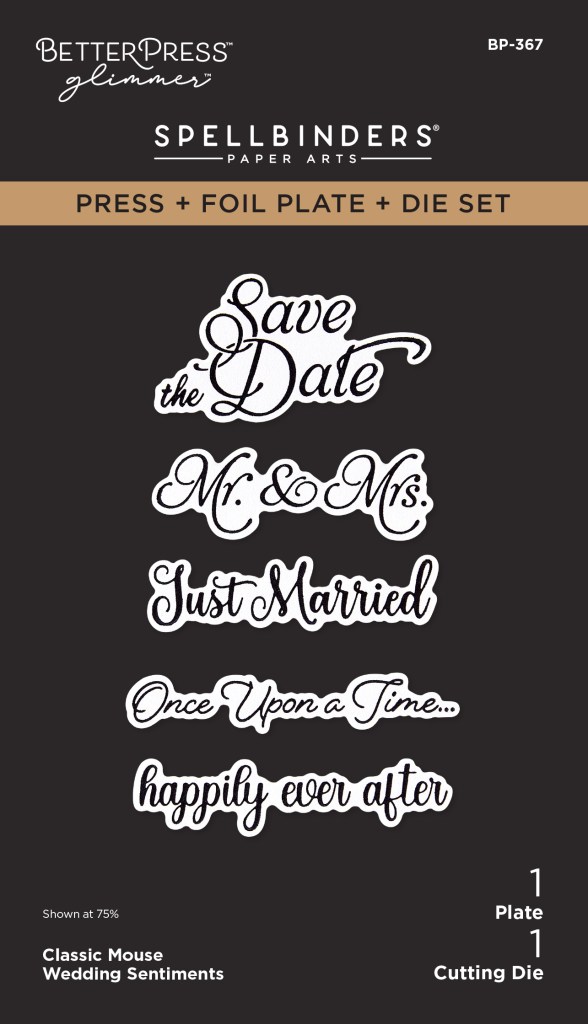
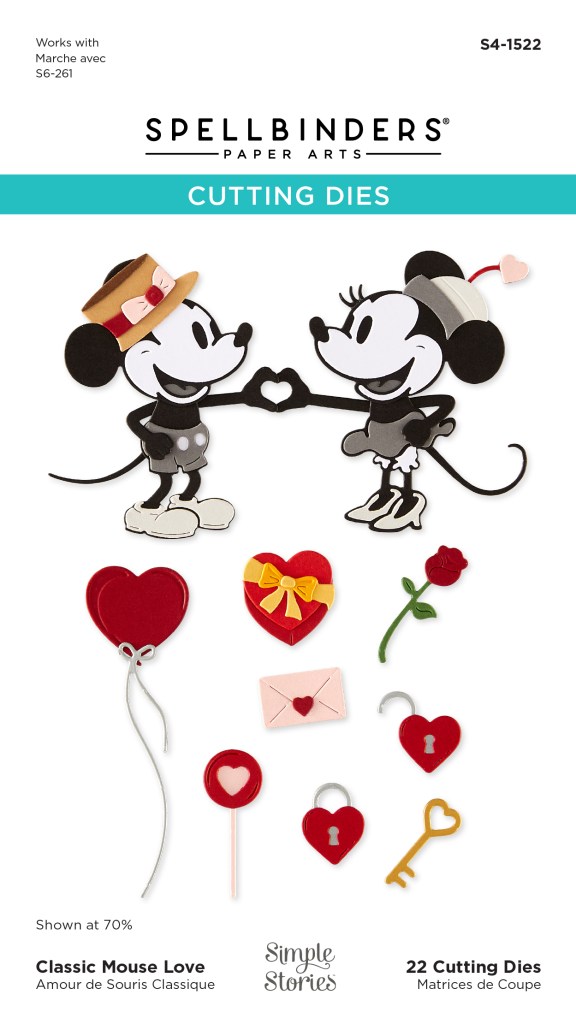
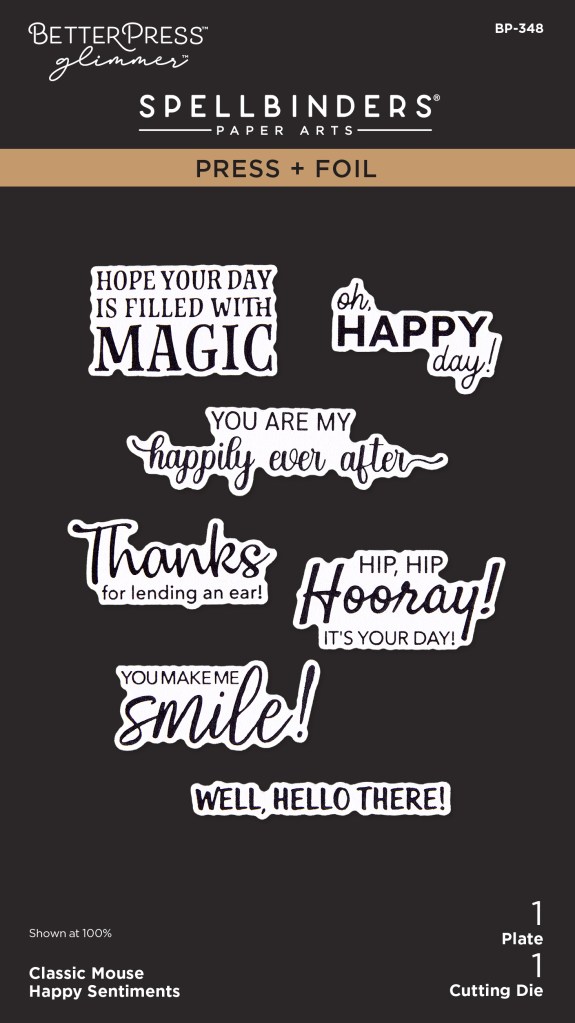
Bride and Groom all decked out! And they have a new set of arms that lets them hold hands!! I love that you can make the Bride’s dress full (as shown) or short! Also, a perfect group of sentiments that you can PaperPress with inks or Glimmer Press with foils! AND the die to cut all the sentiments is included! Love that “Once upon a time…” sentiment.
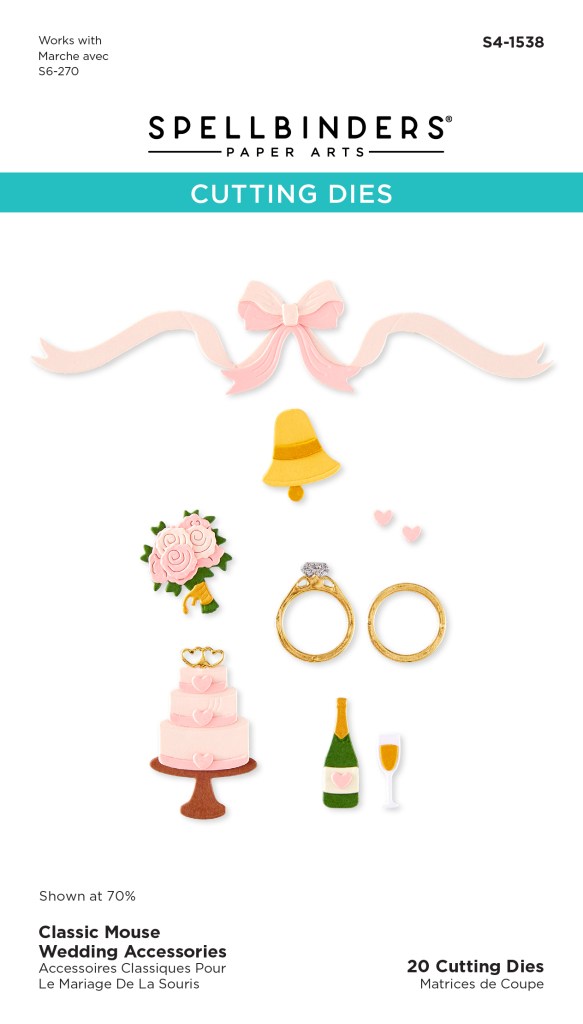

And we get accessories!! Cakes and rings and bows and bells! The little bouquet will actually fit into the Bride’s hand if you like! And there’s a terrific background Press + Foil plate of our Classic Mouse pair – so infatuated… so detailed!
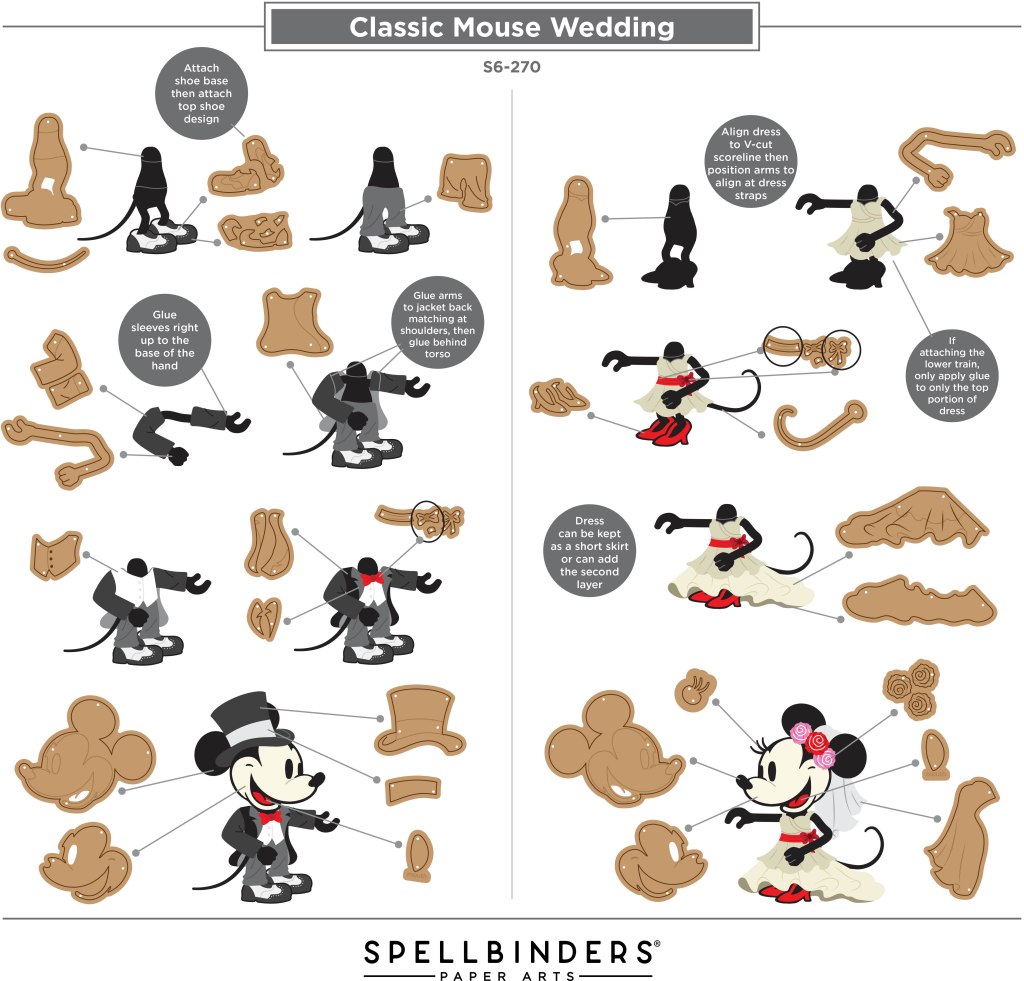
Fortunately, there is an assembly guide over at spellbinderspaperarts.com for our wedding couple. Fairly straight forward assembly, but note that for the Groom, his sleeves get glued to his arms, then his arms are glued to the jacket back before gluing to the Groom body – and remember, shoes and pants first! Our Bride doesn’t even have sleeves!!
Though I don’t know of anyone with wedding plans in their future, you never know…!!!
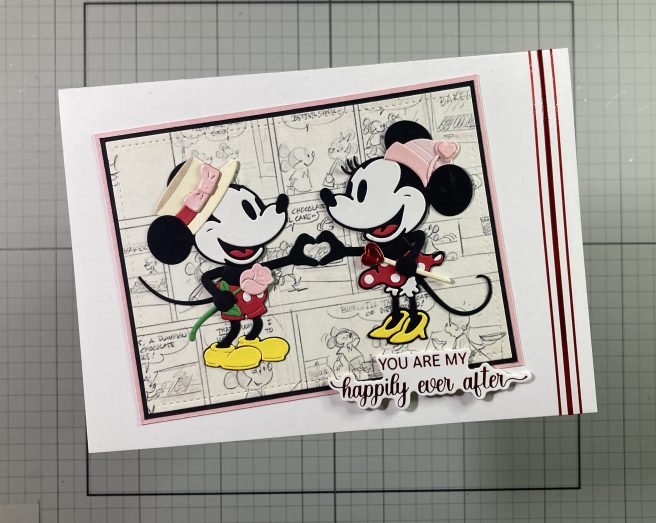
Downright delightful! Especially if the intended couple are Disney fans!! And I know LOTS of weddings take place in the Happiest and or Most Magical Places in the world! Wouldn’t those couples be absolutely thrilled with a card like this? Whenever I get die sets with lots of small pieces I gravitate right to my scrap card stock stash. Our Groom is done up in a Grey Tux with an Antique Ivory vest and Glossy Black lapels. Our Bride features a white gown with glittery shoes, belt/bow and headband holding a Vellum veil – I also did the back side of her dress in vellum – very classic!
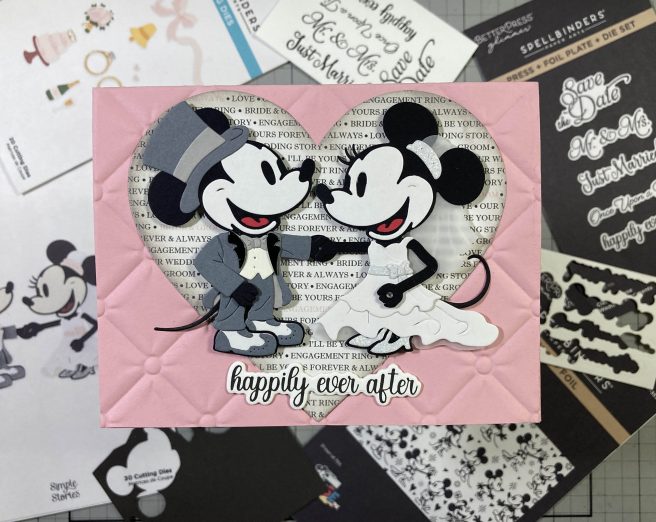
I embossed the front of a Pink A2 Card base with the Spellbinders Tufted 3D Embossing folder, and I found this old pattern paper (Echo Park) in my stash – from the Simon Says Stamp June 2017 Card Kit. I die-cut that with the largest Heart die in the HA Nesting Hearts Infinity dies set and ink blended some Hickory Smoke Distress Oxide ink around the edges. I used the BetterPress to ink the sentiments on a panel of Cotton card stock using VersaFine Onyx Black ink and then die-cut all the sentiments with the matching die. I did cut another blank of the sentiments and stacked and glued them together for a touch of dimension and strength.
I glued the pattern paper heart flat to the front of the embossed card base and added the couple using foam tape – I did glue the tips of their tails flat! I glued the sentiment flat to the card front. I debated whether to give our Bride the bouquet featured in the Accessories set, but I wanted to make this card using only the main die set. So (at Joel’s suggestion) I settled on giving her a diamond ring with the addition of a small gem to her finger – perfect touch! When I look at this picture it feels like the heart is die-cut into the card front and the pattern paper is behind… total optical illusion! Cool!
I really liked the “Save the Date” sentiment in the Classic Mouse Sentiments set and thought someone could actually do all of their wedding stationary to the Classic Mouse theme with this collection!
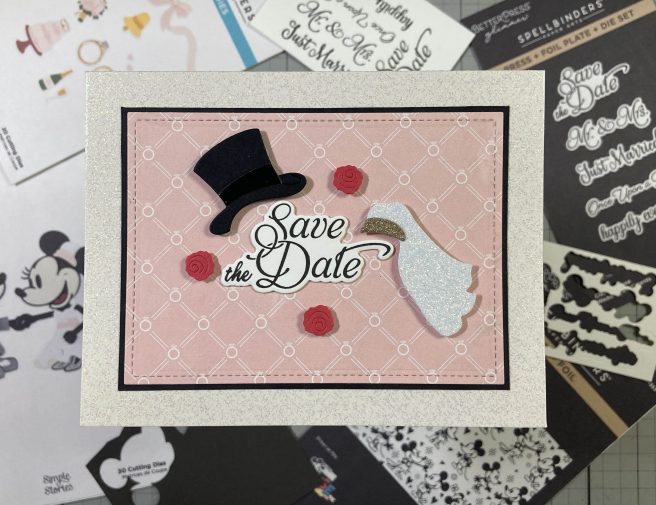
Terrific invitation and very simple to assemble! The pic doesn’t really show it, but the top hat has a Glossy Black band and the veil is in Golden Glitter and White Glitter. AND, believe it or not, this pattern paper came from the same SSS 6/17 kit – and it is “tufted” just like the embossing folder on the first card! I HAD to use that! I die-cut the pattern paper to 4.5″ x 3.25″ with a Lawn Fawn Stitched Rectangle die, added a thin Black mat and glued those to a glittery White card base. Looks like I’m breaking out all the sparkles for this collection! I glued the sentiment flat to the card front and added the die cuts with foam tape. You could easily add the invitation and reply card inside!
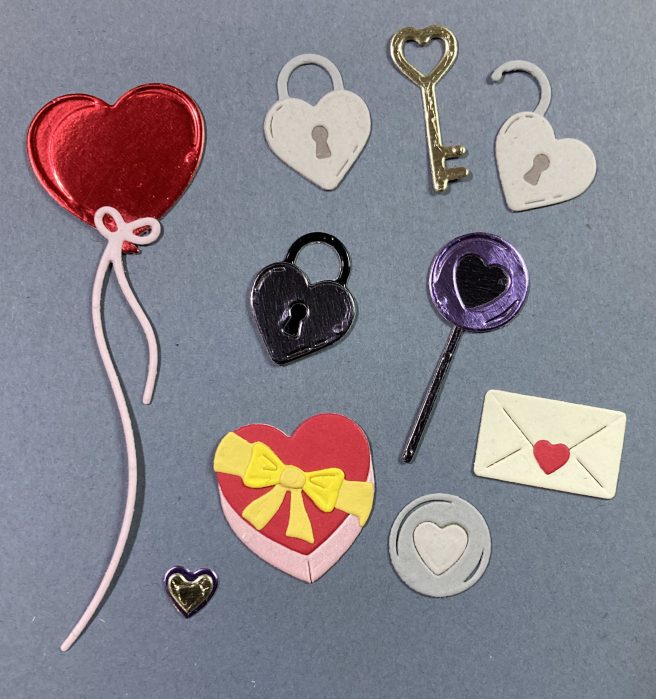
Of course, I can’t ignore the Wedding Accessories… (though I have to admit I’ve had my fill of tiny die-cuts this month)!
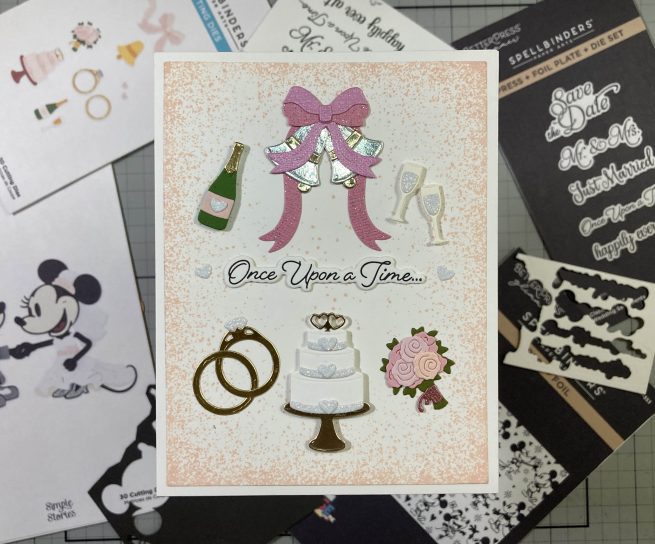
Throwing caution to the wind, I decided to use ALL the die-cuts from the Wedding Accessories on one card! This actually began with me fiddling around with the bow and ribbons and trying to figure out how to use them on a portrait card instead of a landscape card! I trimmed the trailing ribbons shorter and glued them to the bow so they were hanging downward instead of straight across. Then I figured the bells would go nice in all this ribbon, so I slipped two Silver and Champagne Gold bells between the ribbons. Everything else is straight-forward according to the dies – I have to admit my favorite die in this set is the open double-heart “pick” in the top of the cake – the cake die even cuts a little hole to slip the “pick” into! Silver, Gold, Champagne Gold, White Glitter, Pink Glitter – there’s plenty of shine for this vignette!
I stamped the Concord & 9th Splatter Texture Stamp around the perimeter of an A2 White panel with Tattered Rose Distress oxide ink and added more splatters across the center. I trimmed that panel to 4″ x 5.25″ and glued that to a White card base. The bells & bow, intertwined rings and bouquet are glued flat to the card front and the cake, champagne and glasses are attached with thin foam tape. The sentiment is glued flat to the center and highlighted with the two remaining glitter hearts on the ends. I love that sentiment so much! And I used every accessory die on one card!
The Happiest Place Press + Foil plate thrilled me when I saw it – so cute and so detailed – I thought it would make perfect backgrounds for the whole Classic Mouse Collection!
Using my BetterPress, I stamped the plate on a panel of Pebble BetterPress Cotton card stock (some of that comes with the BetterPress system) using VersaFine Onyx Black ink. Terrific, practically perfect print! However… that background is so adorable and so detailed, that it literally overshadows almost anything placed on top – I tried the Classic Mice, I tried sentiments from this collection, I tried ribbons and bows, wedding cake, etc… all I could see was the background! (I can only imagine what a focus-puller a foiled background would be!) When all else fails bring out the big sentiments!!
This background plate is easily divided into three strips – they are still oriented in a landscape fashion but you can get three strips out of one plate. Instead of cutting my background apart, I just covered up the center strip with a 1.25″ strip of White card stock trimmed with a thin Black mat on the top and bottom. I cut the background to 5.25″ x 4″ and added a thin Black mat behind and glued those to a White card base. The sentiment is an OLD Darice die from my stash (I don’t know if I’ve ever even used this die!) cut from Champagne Gold card stock and glued to two more layers of thick White card stock. Perfect sentiment for this joyous background! A big bold die-cut Thank You sentiment would work with this background if you want to keep your thank you cards on theme!
I am always up for more items in the Classic Mouse Collection – one of my favorites of all time! If you’ve been bitten by this collection or if I have whetted your appetite for these cute critters and you’d like to get some of this collection for yourself, please use my links below – I make a small commission (at no cost to you) when you use these links to shop at Spellbinders. That helps keep this page up and running and keeps more inspiration coming your way! Thank You!!!
Classic Mouse Wedding Collection
Classic Mouse Wedding Etched dies
Classic Mouse Wedding Sentiments Press + Foil Plate & Die set
Classic Mouse Wedding Accessories Etched Dies:
Happiest Place Press + Foil Plate
Thank you for sharing some clicks with me today… I hope you enjoyed another mid-month diversion as I keep exploring the Simple Stories Classic Mouse collection! If you enjoyed this post, please click the Like Star at the bottom of the page, and if you wish to be notified when a new post comes out, just click the Follow Me at the top of the page. Don’t hesitate to send me a note if you have any comments or questions! Please take a moment to Like Me, List Me, Pin Me, Post Me, basically, just share this post with all your crafty friends – especially any Disney Fans planning a wedding! Remember… Don’t run with scissors! And as always, I send You and Yours Love and Light, and Happy Crafting!!
DISCLOSURE: This site contains some affiliate links to products. I may receive a commission for purchases made through these links (at no cost to you). As an Amazon Associate I earn from qualifying purchases. Thank you!


