NEW Spellbinders • “Checkmate Collection” • May 2026

Hello Folks! Scott here with a NEW collection from Spellbinders that caught my eye – the Checkmate Collection. Not only did I think these Chess and Checkers dies were so clever and unique but paired up with an embossing folder and layering stencils, I thought this collection might be perfect for masculine cards!

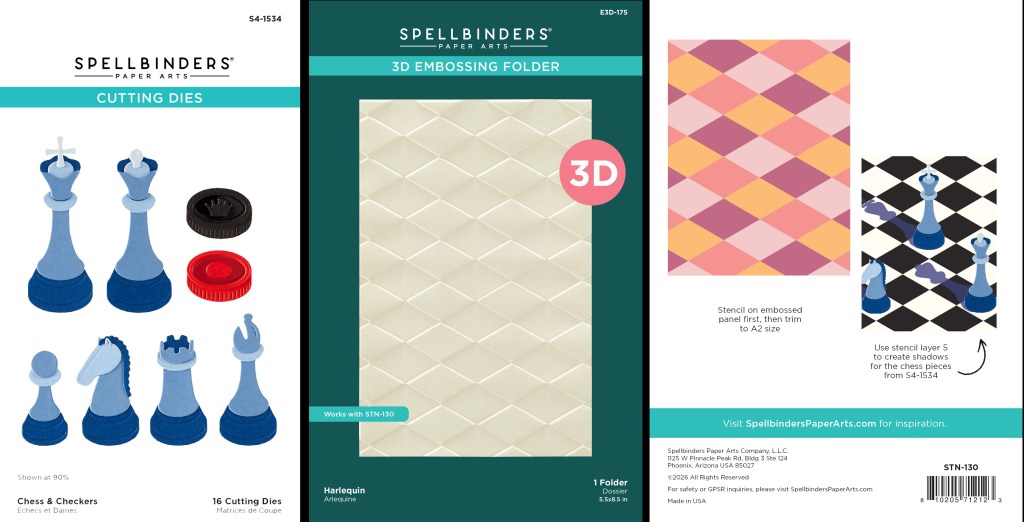
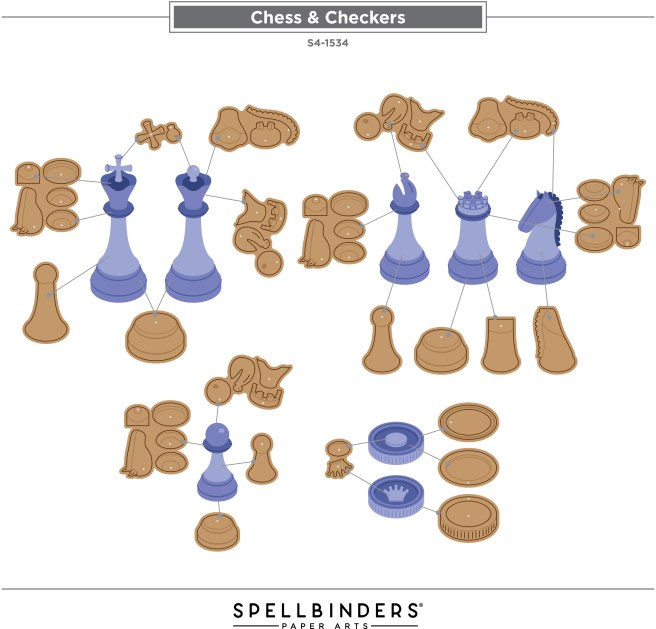
The Chess and Checkers Die Set creates all the needed Chess pieces as well as Checkers! The Harlequin 3D Embossing Folder is terrific all alone, but really shines when paired with the Layered Harlequin stencils and the nifty shadow stencil for all the chess pieces!

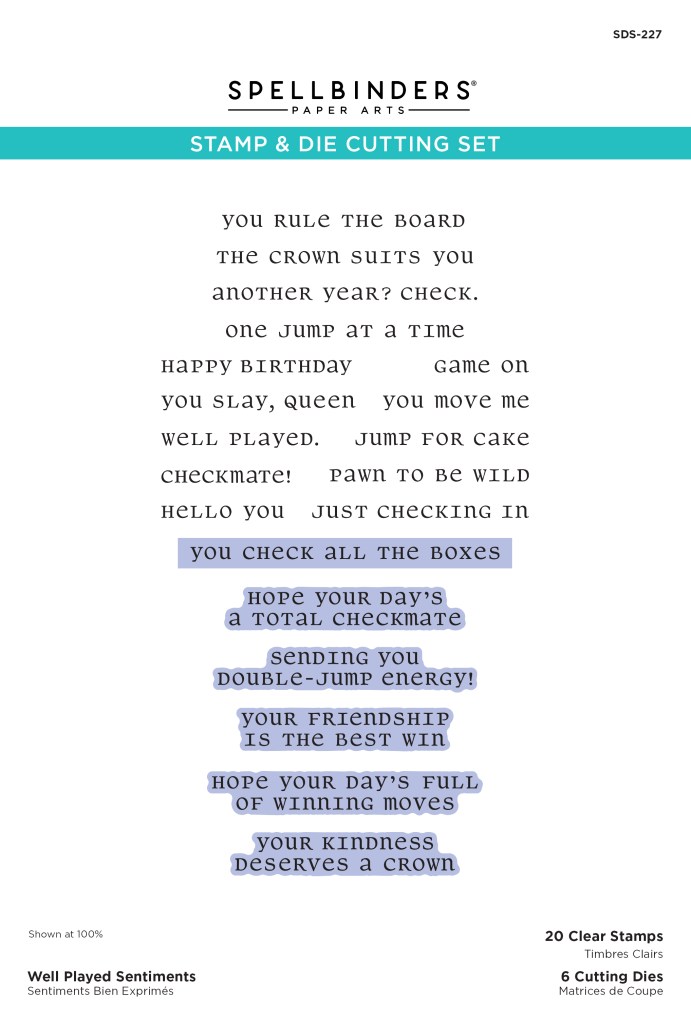
There is also the Well Played Sentiments Stamp and Die Set that adds to the fun of this collection. 20 sentiments and the blue highlights are the 6 cutting dies included with this set. The top die will cut all the single-line sentiments above it. Some perfectly appropriate sentiments here as well as a few good puns!

Fortunately, Spellbinders has a terrific assembly guide available on-line to assist you in assembling all the chess pieces. I love the classic rendering of all the chess pieces – has anyone ever played a game of flat chess?

I wanted to put together all the chess pieces to start with, but I thought I’d stick to the classic Black/White colors, and instead of having to think of different shades of Black and While for the pieces, I decided to grab some Pearlescent card stocks out of my stash – I thought they would show off the layering and give us a sense of shine on the pieces.

The picture doesn’t show it, but both the Black and White pieces have a great amount of pearlescent shine that shows off the details delightfully! And you just gotta love those shadow stencils! I’ve never been a big chess player but I quickly became a little obsessed with creating an accurate representation of a chess game for this first card.

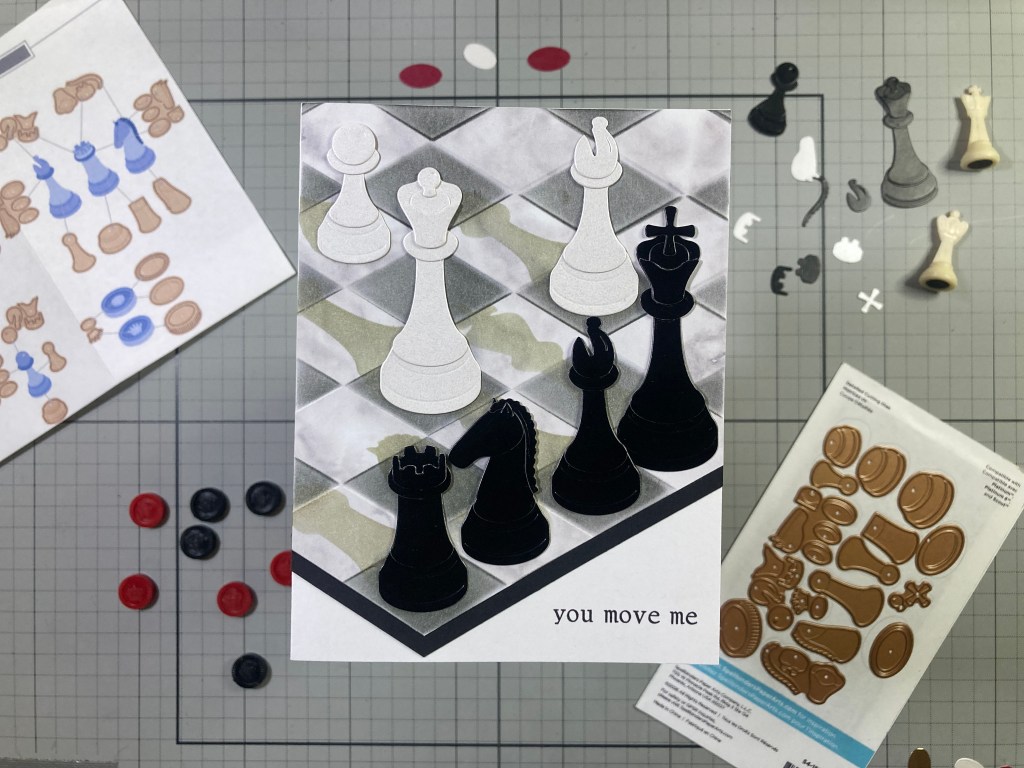
I found an old 6″ x 6″ piece of Grey Marble pattern paper (Simply Marbleous from Stampin’Up!) and embossed it with the Harlequin Embossing folder. I used the Layered Harlequin Stencil (2 of them) to ink blend Hero Hues Licorice Reactive ink into the recessed diamonds. I picked a black corner at the bottom of the embossed/inked panel and trimmed away the two sides to make this “corner of the board”. I added a 3/8″ Black mat along the “board” edges and trimmed the whole panel to 4.25″ wide. A fancy marble chessboard! Standard chessboards are 8 spaces by 8 spaces, and the most spaces you can get in a line with this embossing folder is (almost) 7, so no way can we show a whole board on an A2 card. HA!

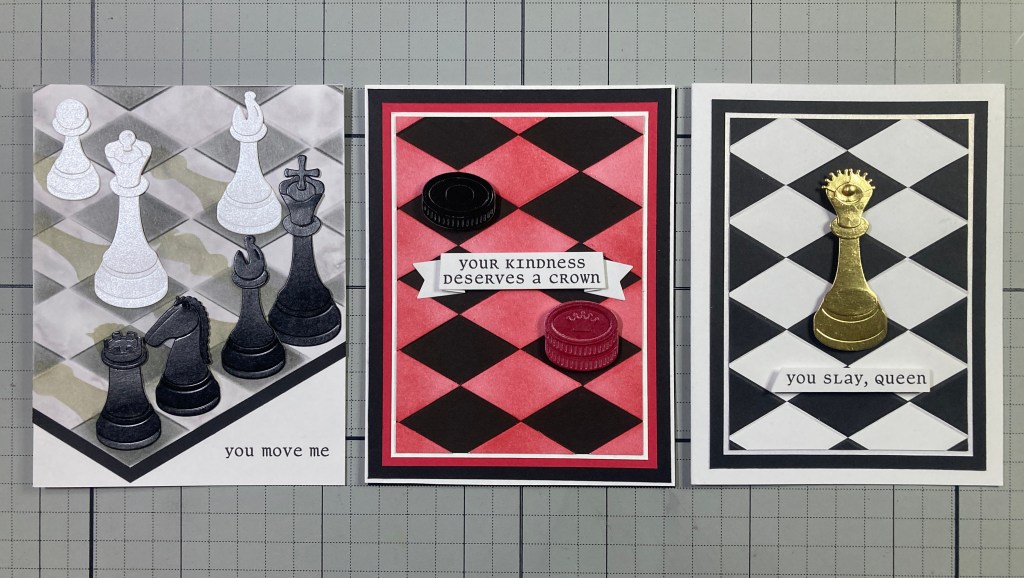
I decided where to place my chess pieces – I wanted to show off all the pieces – and I had to consider where their shadows fell as well. This is not a likely scenario for a real game, but I kind of like seeing all the Black pieces lined up in a row! I used the shadow stencil from the stencil set and ink blended Concord & 9th Dove ink through the stencils for all the pieces. I found that if you keep the shadow stencil straight up and down the shadows should fall right in place. I glued the “chessboard” panel on an A2 White card base and trimmed off the top to match. I glued the chess pieces in place and stamped the sentiment in the open corner – a nice little pun perfect for a Black and White Valentine! Looks like we caught somebody right in the middle of a game!

I like that card so much, I figured I’d go for broke with even more Black & White… what if we cut the embossing apart? I’m not sure what possessed me, but I embossed an A2 panel of Black card stock and an A2 panel of White card stock in the exact same place on the embossing folder. Then I sliced up the white panel into individual diamonds just following the embossed lines. I did take care to keep everything in order and everything facing up the same way. Then I took the recessed White diamonds and glued them into the recesses on the Black embossed panel. That was fun!

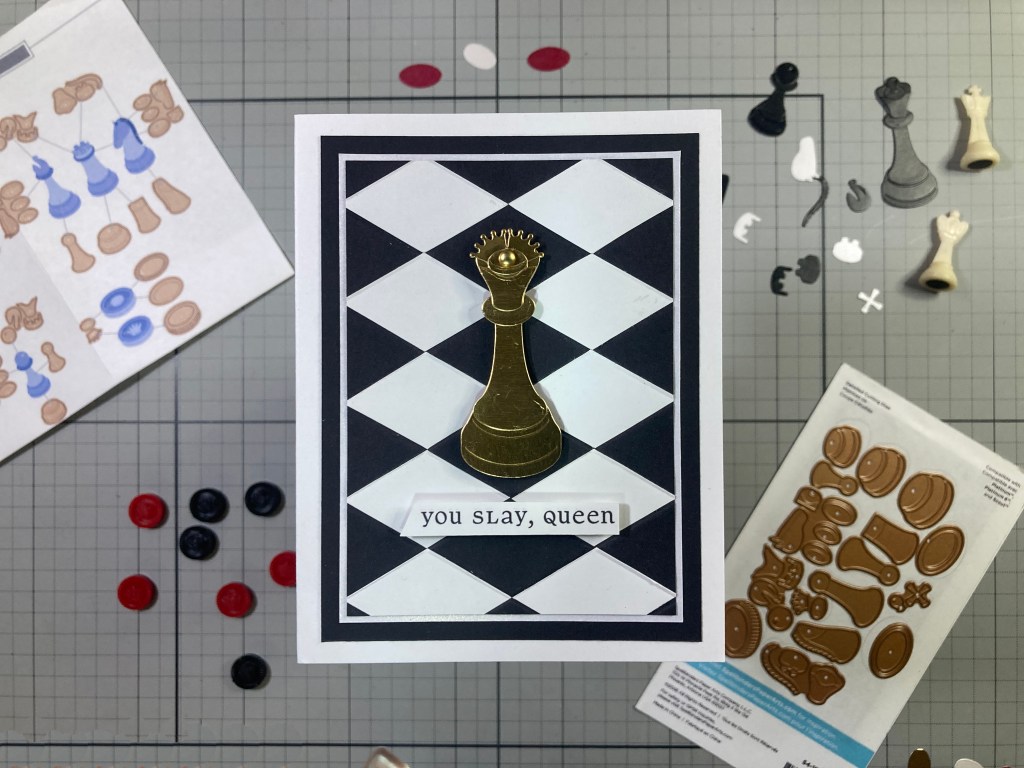
I couldn’t resist this sentiment! And of course one must have a Gold Queen! I assembled her using Tim Holtz Metallic Gold kraft card stock and added two Gold crowns (from the checkers dies) around the back of her crown, and added a Brushed Metallic Gold dot in the center. Fancy! I trimmed my paper-pieced background to 3.25″ x 4.5″ and added a thin White Glimmer mat (1/16″) and a thicker (3.75″ x 5″) Back mat behind before gluing all down to an A2 White card base. I stamped the sentiment on a scrap of White card stock and cut it out with a rakish angle on one side. I did double-up that card stock for a little added strength. I mounted the Queen and the sentiment with foam tape. This makes me smile! And you don’t have to be a chess nerd to appreciate it!

After paper-piecing that background together, I realized that I had another set of embossed White diamonds just waiting. Of course I had to emboss another A2 panel of Black card stock so I could paper piece the White diamonds on all the raised embossings. But wait… I was going to do a Checkers card next…

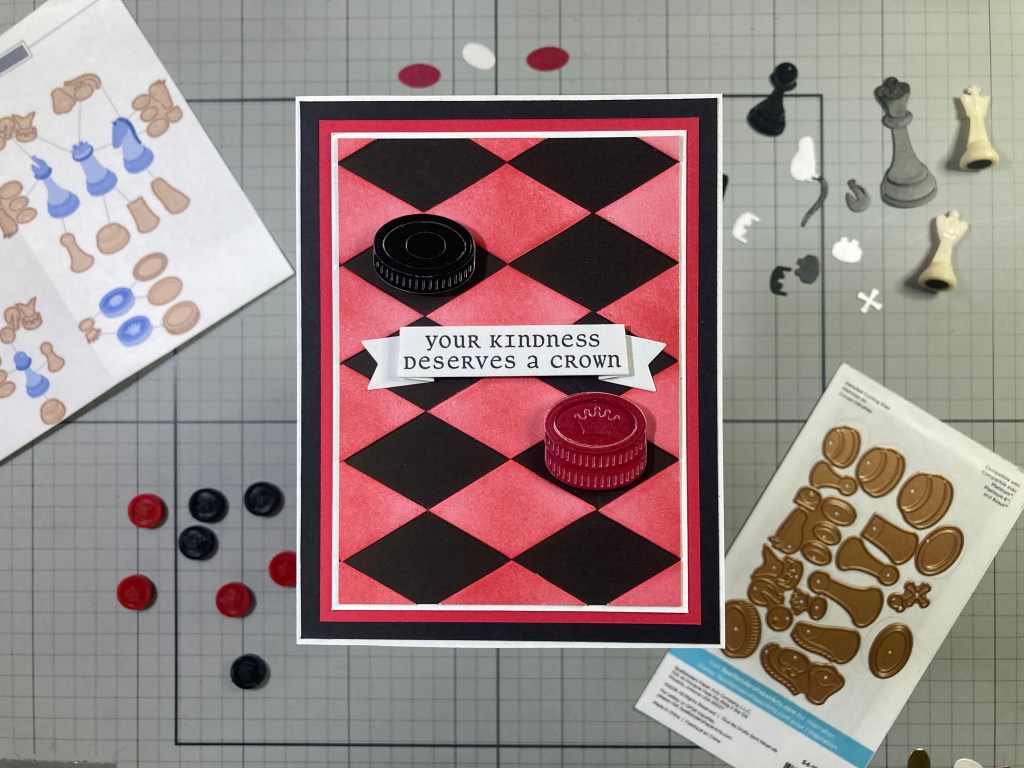
While I was trying to stay true to my search for classic accuracy, I realized that classic Checker Boards are Red and Black. Now, I could use the stencils to ink in the White diamonds, but if I just use normal dye ink, the black won’t show any of the ink so I can just go crazy all over the whole panel and not worry about getting Hero Hues Cherry Core ink on the Black diamonds! That was fun! I assembled the checkers with more Pearlescent card stocks and stacked up the two red checkers for our “crowned” checker. Now, Checkers are played only on the Black squares, so I took that into mind as I trimmed the background panel to 3.375″ x 4.625″ (a bit larger than the last card so I was able to preserve the whole width of the Black diamonds). A thin White mat (1/16″), thicker Red mat (1/8″), and thicker still Black mat (3/16″) are stacked behind the background and all are glued to a White card base.

I stamped the sentiment on a scrap of White card stock and die-cut it with a Lawn Fawn Everyday Sentiment Banners die and folded the ends back and forth for some dimension. I used foam tape to attach the checkers to their respective Black squares, and attached the sentiment with foam tape in the center and glued the ends down flat. Now, there are only four sentiments in the Well Played Sentiment Stamps that I would say are specifically for Checkers games, but a lot of the sentiments work just as well for checkers as for chess!

Of course my anal-retentive ways focused my mind on these very straight forward classic representations of chess and checkers, but you can’t go wrong embracing a classic design in Black and White (and Red)!

The great thing about this collection is how much versatility it offers! You can make your Chess and Checker pieces any color of the rainbow, and that holds true for the Layered Harlequin Stencils as well. And of course you can use that Harlequin Embossing folder (and stencils) for a wide assortment of different cards – no chess or checkers needed!

If I’ve managed to catch your eye with this great new collection from Spellbinders, and you’d like to grab some of these sets for yourself, please use my links listed below! I do get a small commission (at no cost to you) when you use my links and that helps keep the wheels in my ol’ noggin going round and round and sharing with you what inspiration these new products spark!

Chess and Checkers Cutting Dies: https://www.anrdoezrs.net/click-101337132-15861759?url=https%3A%2F%2Fspellbinderspaperarts.com%2Fcollections%2Fcheckmate-collection%2Fproducts%2Fchess-checkers-etched-dies

Harlequin 3D Embossing Folder: https://www.kqzyfj.com/click-101337132-15861759?url=https%3A%2F%2Fspellbinderspaperarts.com%2Fcollections%2Fcheckmate-collection%2Fproducts%2Fharlequin-3d-embossing-folder

Layered Harlequin Stencils: https://www.tkqlhce.com/click-101337132-15861759?url=https%3A%2F%2Fspellbinderspaperarts.com%2Fcollections%2Fcheckmate-collection%2Fproducts%2Flayered-harlequin-stencil

Well Played Sentiments Stamp and Die Cutting Set: https://www.kqzyfj.com/click-101337132-15861759?url=https%3A%2F%2Fspellbinderspaperarts.com%2Fcollections%2Fcheckmate-collection%2Fproducts%2Fwell-played-sentiments-clear-stamp-die-set

Checkmate I Want It All! Bundle: https://www.anrdoezrs.net/click-101337132-15861759?url=https%3A%2F%2Fspellbinderspaperarts.com%2Fcollections%2Fcheckmate-collection%2Fproducts%2Fcheckmate-i-want-it-all-bundle

For all your other crafting needs: Spellbinders NEW Products

Thank you very much for spending a little time with me here today. Your attention is always appreciated and it thrills me on a daily basis! If you enjoyed this post, please click the Like Star at the bottom of the page, and if you wish to be notified when a new post comes out, just click the Follow Me button at the top of the page. And don’t hesitate to send me a note if you have any questions, comments or just to say Hi!. Please take a moment to Like Me, List Me, Pin Me, Post Me, share this post with all your crafty friends – especially any Chess or Checkers Fans! And remember… Don’t run with scissors! As always, I send You and Yours Love and Light and Happy Crafting!!

DISCLOSURE: This site contains some affiliate links to products. I may receive a commission for purchases made through these links (at no cost to you). As an Amazon Associate I earn from qualifying purchases. Thank you!

NEW Spellbinders • “Classic Mouse Graduation” • April 2026 Release

Hello Folks! Scott here with a NEW release in Spellbinders’ Classic Mouse Collection! We have the Classic Mouse Graduation Die Set and the Classic Mouse Graduation Sentiments Press + Foil Plate + Die set. Just in time for all those spring Graduations!

So far, in addition to the original Steamboat Willie Duo Die Set, the Classic Mouse Collection has released Christmas add-ons, and a Love collection (Valentine), and now we get to see our Classic Mouse Graduate! What sets this collection apart from the other add-ons is this die set is all inclusive – it does NOT require having the Steamboat Willie Duo die set like the Christmas and Love accessories dies required. There is one body and head and then you can select whether to make the mouse a boy or a girl graduate.

The mouse dies are complimented with this Press + Foil Plate + Die set. The Graduation Tassel is the perfect image to give to a Press + Foil Plate – the detail in that tassel is incredibly fine! And I do love the fact that apparently, many people are making their Foil Plates and their BetterPress Plates interchangeable. That saves us consumers money and was just the incentive I needed to jump on the BetterPress bandwagon!

My only conundrum with this new release was wrapped up in my own school colors – Black and Gold for High School and Black and Yellow at College. I also did a search for graduation pictures and the vast majority of graduation gowns are Black! There are a few Blues, Greens and Reds, but most everybody’s gown is Black. So how does a black robe look on a Black mouse body…? Hmmmm…! I decided to embrace the “Classic Mouse” theme and made my first graduate Mouse in shades of Grey!

There is an assembly guide available at Spellbinders for some helpful guidelines in putting your graduates together.

I do prefer to skip the “mouth” die and die-cut the tongue with the head die to paper-piece it into place. Also, remember that all of the dies are designed to leave a thin black outline around everything. Also, the front of the robe die also cuts that piece in half right where the zipper would go… I did find it much easier to line the gown up to the body (and the debossed guideline) by taping the two halves together. AND… make sure you get the tails between the robe layers!

I do have a nephew that is graduating from High School next year… and he goes to my old Alma Mater! So Black and Gold it is! The lining on my actual graduation gown was black, but I felt that making the lining Gold would be a great way to add some color and dimension to this robe, while still staying true to the school colors! That would work for adding any school colors to these graduates! There are also two new hands with this die set that has the left hand reaching out to accept a diploma. With a little finesse, you can get the fingers to “wrap” around the diploma! I love the tennis shoes too, but I do think you should start the assembly with the shoes lest they get in the way of the robe.

I used card stocks from my paper scraps to die-cut all the mouse parts and glued the mouse together. I used my Glimmer Hot Foil System from Spellbinders, Gold Foil and Hero Arts Pitch Black card Stock to foil the sentiment and the graduation tassel. I die-cut them both with their matching dies. I die-cut the year from Pitch Black and Goldenrod card stocks and glued them together. I die-cut two more blanks for the sentiment and the background of the numbers and stacked them up for more dimension.

I cut a piece of plain Ivory card stock to 4″ x 5.25″ and partially die-cut (just the right side) the tassel on the right side of the card stock. Then I glued the die cut tassel to the matching cut edge on the ivory card stock. I cut a piece of plain Black card stock to 4 & 1/8″ X 5 & 3/8″ and glued that behind the Ivory before gluing both to an A2 White card base. (I did have to trim off a bit of the tassel on the bottom right). I wanted a little grounding for our mouse so I used the plate die (from the MMH September 2018 kit) and and did a top/bottom partial die-cut to give me the medium Grey ellipse under the graduate. I glued the sentiment and year in place and added our graduate with foam tape. I do glue the tip of his tail down to keep it from getting caught on anything.

I die-cut the graduation cap charm from some Tim Holtz Champagne Metallic card stock and I die-cut the ring on top of the charm a second time and used that partial ring to attach the charm to the tassel. Gold and Black flat sequins adds some festive sparkle and highlights the sentiment. I did add a gold-foiled and die cut “You Did It!” to the inside of this card. Now, I’m way ahead of the game, and I am all set for the nephew’s graduation NEXT year!

If you have any pearlescent card stocks in your stash I think they are perfectly suited to a cap and gown for graduation!

Since I have a colored robe here, I figured we could do a regular Black and White mouse. Again, I used card stock scraps for all the die-cutting. I did use Gina K. Wild Dandelion card stock for the background. I used my BetterPress System and BetterPress Black ink to emboss the sentiments on the background. Unfortunately, I got the “Congrats grad!” sentiment just a little bit crooked, so I re-did that sentiment, and the “bravo!” and the “so proud of you” sentiments on the same card stock used for the stole and tassel, and die-cut them all out with their matching dies. At least the “Class of” sentiment came out straight!

I stenciled the sunburst (lightly) behind our mouse with the Sun Stencil from the MMH February 2024 Premium Kit and Fossilized Amber Distress oxide ink. That gives a little highlight to our graduate! I die-cut the background panel to 5″ x 3.75″ with a Lawn Fawn Stitched Rectangle die and added a (5.25″ x 4″) black mat and glued those to an A2 White card base. I glued the die cut sentiments flat (over their pressed sentiments) and glued the year in place.

I added the mouse in place using foam tape, and I added the die cut “so proud of you” sentiment on the inside of the card. I die-cut a Black banner using the Lawn Fawn Everyday Sentiment Banners die set, trimmed it to length, and glued the sentiment on top. Love using pearlescent card stock on the cap and gown! No Bling Needed!

The Classic Mouse Graduation Sentiments Press + Foil + Die Set is terrifically useful for graduation cards all by itself! No graduating mice needed!

The tassel die is so detailed and works great with the BetterPress plates. I used a Porcelain BetterPress Cotton Card Panel to press (stamp) the tassel four times using Ranger Archival Inks in Deep Purple, Manganese Blue, Monarch Orange, and Vermillion. Any pigment ink you have will work with the BetterPress plates… you don’t have to use the BetterPress inks. I trimmed the pressed (stamped) panel to 3.75″ x 5″ with a HA Rectangle Infinity Die, added a thin Black mat and glued those to a White card base.

The sentiments are Glimmer foiled with Gold on Pitch Black card stock and die-cut with their matching dies. The year is die-cut from Pitch Black and Gold Metallic card stocks and glued together. The sentiments and date are glued flat to the card front and I added an assortment of clear star glitter pieces for some graduation sparkle! I actually intended this to be a 2026 graduation card, but I guess I was too focused on getting the date glued down straight and square, and forgot to pay attention to whether the numbers were right side up or upside down! Hopefully, one of my nieces or nephews will be graduating in 2029!?! HA!

As you know, I am not the greatest fan of die-cutting, but this Classic Mouse Series has me totally captivated… and the simple fact that this is a stand alone set makes it a terrific addition to this line! No extras needed!!

This is a great trio of graduation cards…! The cap and gown for the mice are flat out adorable, the tassel Press + Foil die is amazing all by itself, and I love the numbers with their shadow dies – those should prove quite useful over the years! If you’d like to grab these all inclusive sets for yourself, please use the links below! I do make a small commission from whatever you buy through my links at Spellbinders, and that helps keep the wheels churning and the inspiration coming! It is (as always) supremely appreciated!

Classic Mouse Graduation Die Set: https://www.dpbolvw.net/click-101337132-15861759?url=https%3A%2F%2Fspellbinderspaperarts.com%2Fcollections%2Fclassic-mouse-graduation%2Fproducts%2Fclassic-mouse-graduation-etched-dies

Classic Mouse Graduation Sentiments Press + Foil + Die Set: https://www.anrdoezrs.net/click-101337132-15861759?url=https%3A%2F%2Fspellbinderspaperarts.com%2Fcollections%2Fclassic-mouse-graduation%2Fproducts%2Fclassic-mouse-graduation-sentiments-press-foil-plate-die-set

Classic Mouse Graduation I Want It All Bundle: https://www.tkqlhce.com/click-101337132-15861759?url=https%3A%2F%2Fspellbinderspaperarts.com%2Fproducts%2Fclassic-mouse-graduation-i-want-it-all-bundle%3F_pos%3D7%26_sid%3D4a11b9d4f%26_ss%3Dr

Thank you so much for sharing some time with me today… I hope you enjoyed another mid-month diversion as I keep exploring the Simple Stories Classic Mouse collection! If you enjoyed this post, please click the Like Star at the bottom of the page, and if you wish to be notified when a new post comes out, just click the Follow Me at the top of the page. And don’t hesitate to send me a note if you have any comments or questions. Please take a moment to Like Me, List Me, Pin Me, Post Me, basically, just share this post with all your crafty friends – especially any Disney Fans! And remember… Don’t run with scissors! As always, I send You and Yours Love and Light, and Happy Crafting!!

DISCLOSURE: This site contains some affiliate links to products. I may receive a commission for purchases made through these links (at no cost to you). As an Amazon Associate I earn from qualifying purchases. Thank you!