
Hello Folks! Scott here with my new 10 Cards from 1 Kit post featuring the Gina K. Designs Christmas in July Card Kit from her July 2025 release. August is certainly not too early to start thinking about your Christmas cards for this year!

Christms in July Card Kit includes:
Let Your Light Shine 6 X 8 Stamp Set
Let Your Light Shine Die Set
Let Your Light Shine Stencil
O Christmas Tree Stamp Set
O Christmas Tree Die Set
Layered Mistletoe Stencil
Layered Mistletoe Die Set
FREE GIFT!! 2 oz Starlight Sparkle Gel
As usual, a big batch of goodies in the kit and I’ve always loved Gina K Glitz Glitter Gels – perfect for the holidays!
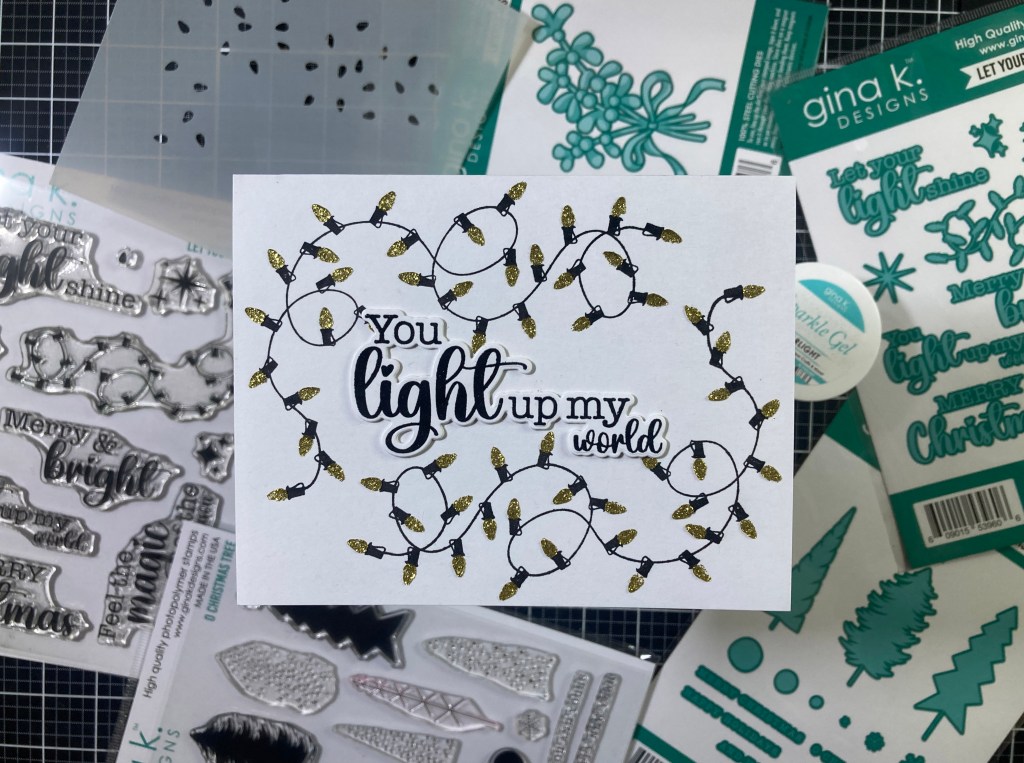
Naturally I started out with the string of Christmas lights, but, without even thinking about it, I stamped the string in VersaFine Onyx Black ink. Well that doesn’t look right… OHHH… yesss… let’s stamp that string in GREEN!

On an A2 White card base I stamped the string of lights on the bottom right and top left corners (just flipping the card around on my MISTI) using Concord & 9th Clover ink. I was careful to leave room for the light bulbs around the edges and between the strings. Using the stencil, I colored the bulbs with C&9th Poppy, Buttercup, Oceanside, and Eggplant inks. There are two strings of lights here, so I did have to stencil twice. Then, I used the stencil to spread the Starlight Sparkle Gel over the light bulbs – letting one string dry before stenciling the Sparkle Gel over the other string. Though it doesn’t show up in the photo, that gel is super sparkly!
I stamped the sentiment with VersaMark ink and embossed it with HA Red embossing powder. I die-cut it out with the matching die and cut two more blanks at the same time. I glued those three layers together for some dimension, and glued that right to the card front. I cannot say how tickled I was when those light strings come together! Down and out, absolutely adorable! Though it is a tad fiddly, those little light bulbs are extremely cheery!
Of course I wasn’t going to let my Black stamped strings go to waste…
These light bulbs are stenciled with Gina K. Designs Gold Glitz glitter gel – even more reflective than the Starlight Sparkle Gel! Again, I did have to wait for one string to dry before stenciling the second string. The sentiment is stamped with VersaFine Onyx Black ink and embossed with Clear embossing powder, die-cut along with two blanks and glued together and then down to the card front. I like that this sentiment isn’t necessarily a Christmas greeting – though it could be used for the holidays, it doesn’t have to be! Those little light strings are freakin’ adorable!
Beyond the lovely, big sentiments and the light string, there’s also an assortment of sparkling star stamps in this set…
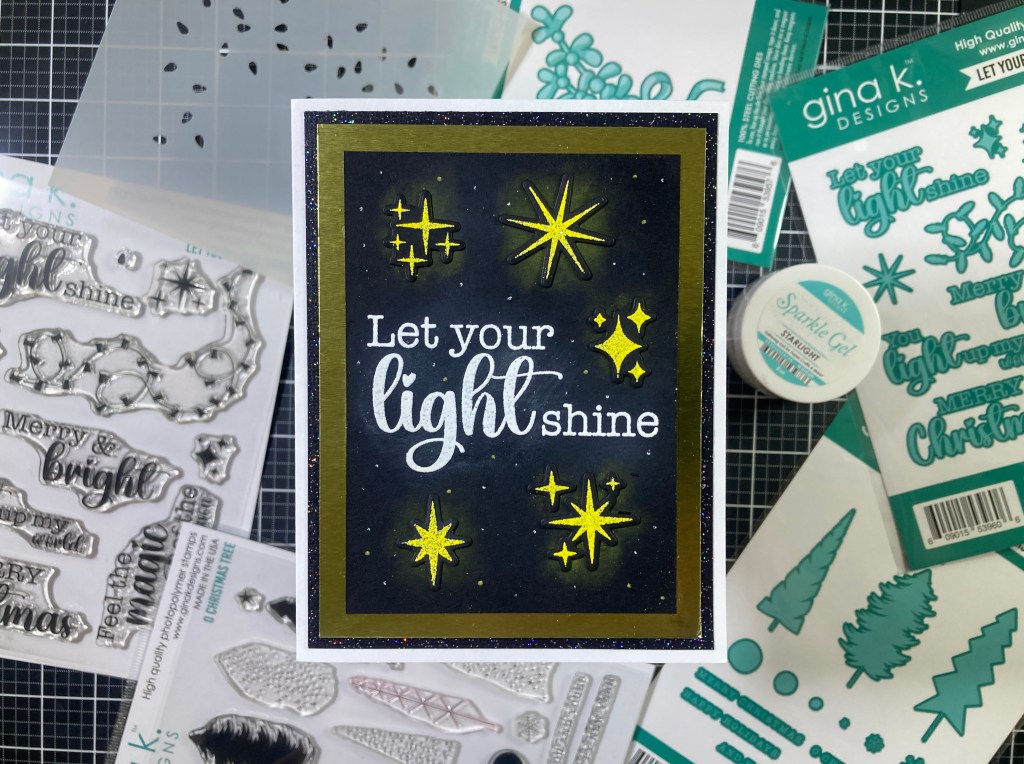
I actually began this card by stamping all the stars onto Pitch Black card stock with VersaMark ink and embossing them with HA Yellow Prisma embossing powder (from the MMH December 2020 kit). There’s some great sparkle in that embossing powder that doesn’t really read in the pic. I stamped the sentiment directly on the card front with HA Unicorn White pigment ink and embossed that with White embossing powder. I added some shine around the stars and the sentiment with my Pebbles Chalk palette, added more stars with a White gel pen, and trimmed that panel to 3.25″ x 4.5″. Everything seemed a little flat, and the Pebbles chalk “glow” did dim down the yellow embossing powder a bit…
SO… I stamped all the stars again on Pitch Black card stock using VersaMark ink and embossed them with the same embossing powder and then die-cut them all with their matching dies. Note that the bottom right cluster of four stars has two dies – one stamp – but two dies. Now when I placed the die-cut stars over the stamped stars it gave me a nice black outline around the stars before you get the “glow” around them – perfect little touch of focus!
I cut a panel of TH Yellow Metallic card stock to 3.75″ x 5″ and glued the stamped panel on top. Then I added a thin mat of Black Tie Glitter card stock (4′ x 5.25″) and glued them all down to an A2 White card base. And here we have another “not necessarily a holiday card” from this Christmas kit. I do like that this kit has a couple of non-holiday sentiments!
Okay… I guess it’s time to embrace the Christmas of it all, and let’s try die-cutting that string of lights too!
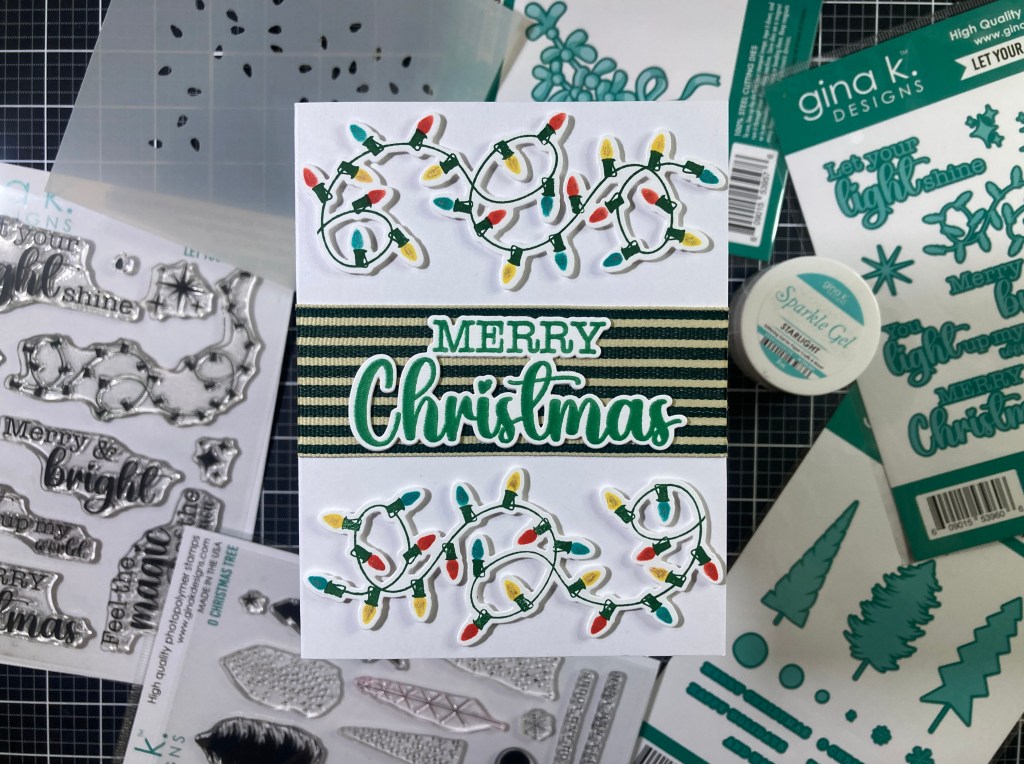
I do believe Gina suggested die-cutting the string before stenciling the light bulbs, so that’s what I did. I stamped the string of lights twice using C&9th Evergreen ink and die-cut them out with the matching die. Then I stenciled the light bulbs with C&9th Poppy, Buttercup, and Oceanside inks. Instead of using the Sparkle Gel again, I chose to “color” in all the bulbs with a GellyRoll Stardust Sparkle gel pen – a little more obvious on top of the colors, but a good amount of shine!
I stamped the sentiment on White card stock with VersaMark ink and embossed that with Love From Lizi Emerald City embossing powder. I have to admit that is one of my favorite embossing powders of all time – so beautifully smooth and it has an almost neon sheen! I die-cut the sentiment (and two blanks) with the matching die and glued them together for a little dimension.
I was digging around in my stash for some Christmas-y pattern paper when I thought of ribbon! I have some nice ribbons in my stash that don’t get used very often, so I took a piece of this striped 1.5″ ribbon and covered the back with Scor-tape and burnished that down to the ribbon. I removed the tape liner and adhered the ribbon to the center of the card front. I trimmed the edges and ran a little bead of liquid glue along the cut edges to prevent fraying. I glued the sentiment on top of the ribbon, trimmed off the ends of the light strings (at the third loop) and added both of the light strings to the card front with thin foam tape. Merry Christmas indeed!
Let’s take a look at the Layered Mistletoe stencil. I decided to keep to the C&9th palette of inks that I’ve already started.

The Mistletoe is stenciled with Clover and Evergreen inks for the leaves, Poppy and Cranberry inks for the berries and Aqua Sky and Oceanside for the bow. That makes for a fun, rather stylized image – I die-cut the stencil with the matching die and set that aside. I stamped the sentiment (this one is from the O Christmas Tree stamp set) with VersaFine Onyx Black ink and embossed it with Clear embossing powder, and die-cut it (and two blanks) with the matching die, and glued all three pieces together.
For the background, I grabbed an old Stampendous Flourishes metal stencil and spread the Starlight Sparkle Gel through the stencil directly onto an A2 White card base. Though I could have sworn the stencil was clean (it LOOKED clean!) the Sparkle Gel activated some leftover inks on the stencil (on the edges??) and tinted the gel just a little bit. Actually that works quite beautifully – and it doesn’t interfere with the Sparkle Gel at all!
I die-cut another mistletoe and sentiment layer from Pitch Black card stock, and glued those to the inked mistletoe and sentiment – offsetting those a little for a bit of dark shadow definition. I did cut off the “AND” from the sentiment before adding the shadow. I glued those both to the card front and let the Starlight Sparkle Gel add all the celebratory shine!
I am aware that Mistletoe actually sports white berries, and is generally hung upside-down to encourage a holiday kiss.

OKAY! WOW! On a panel of plain Black card stock I used HA Unicorn White ink to stencil layers one and three of the Layered Mistletoe Stencil – that covers all the leaves, berries and bow. I did flip the bow around before stenciling to make it “hang” in the right direction – and I didn’t stencil through the extended ends of the ribbons so there was no overlap to worry about. I let the White ink dry throughly before adding the colors. I did use HA Key Lime Fizz and Green Apple Reactive inks for the leaves (letting each layer dry before adding the next) and decided to stick with Unicorn White ink for the berries and bow. The layers of the Unicorn White ink blended together beautifully and created some lovely dimension to the berries and bow.
I trimmed the stamped panel to 3.75″ x 5″ with a Lawn Fawn Stitched Rectangle die, added a thin White mat and a thin black mat, and glued them to a White card base. I stamped the sentiment (again, from the O Christmas Tree set) on a scrap of Black card stock with Unicorn White ink and embossed it with White embossing powder and die-cut it out with the matching die. I glued that (no extra layers!) directly to the card front. I did add a tiny touch of highlights on the berries with a White gel pen, and I am completely thrilled with this Mistletoe! It is actually quite striking, and at least we’ve got it hanging in the right direction! Love it!!
Time to dive into the O Christmas Tree stamp set and die set… This stamp set probably spoke to me the least in this whole kit… I don’t know if it was the extreme tree and branch varieties or the simple graphics that gave me pause…

On a panel of White card stock I stamped this tree (probably my favorite of the three) in the center with C&9th Clover ink, scooted the card stock over 3/4″ to the right and stamped the tree again (2nd Gen Stamping). Then I returned the card stock to its original position and stamped the center tree again with Clover ink, scooted the card stock 3/4″ to the left and stamped the tree again. This gives me a dark center tree and two lighter trees all with the same ink pad! I did exactly the same with the tree branches stamp using C&9th Eggplant ink. (I had a design teacher in school who liked to repeat that there is no true black in nature, and I think this Eggplant ink is a greta “natural” alternative to black.
Once the trees were dry, I stamped the baubles, the star and the sentiment(s) with VersaMark ink and embossed them all with Ranger Gold embossing powder. I die-cut that panel to 3.25″ x 4.5″ with a LFSRdie, added a thin mat of TH Green Metallic card stock behind, and glued them both to an A2 White card base. Very graphic, and very Holiday!
I believe Gina made a card with all three of the trees and I wanted to see what I could do using all three trees as well…
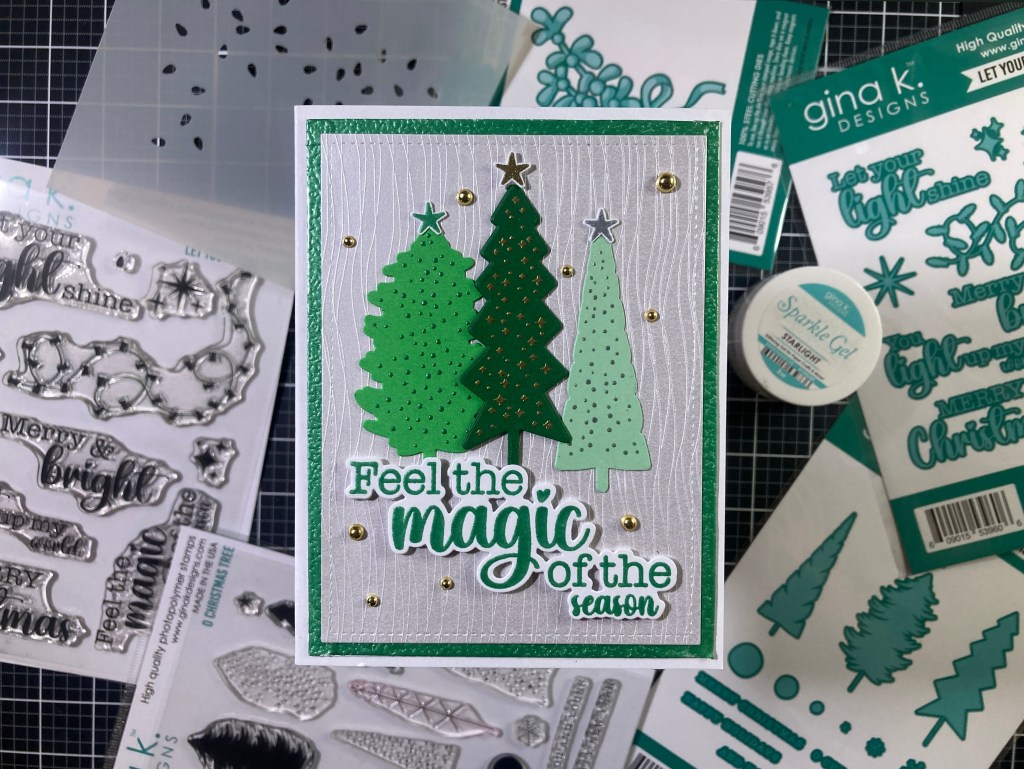
How about just using the tree dies? I die-cut the three trees using the Altenew Green Meadows Cardstock set (Minty Green, Just Green and Hunter Green) and stamped their corresponding bauble stamps with VersaMark ink and embossed the Minty Green tree with Ranger Silver embossing powder, the Just Green tree with LFL Emerald City embossing powder, and the Hunter Green tree with Ranger Gold embossing powder. I stamped three of the stars and embossed them to match the trees. I fussy cut the stars out leaving a super-thin white border and glued the Silver and Green stars to the tops of their trees.
I found this perfectly lovely soft Silver Textured card stock in my stash and die-cut it to 3.75″ x 5″ with a LFSRdie. I took a piece of 4″ x 5.25″ card stock and embossed the edges with Scor-tape and the Emerald City embossing powder. I glued the two pieces together and down to a White card base. I stamped the sentiment with VersaMark ink and embossed it with Emerald City embossing powder, die-cut it out (and 1 blank) with the matching die and glued them together. I added another die-cut tree to the backs of all the trees just for a little rigidity, and glued them to the card front. I added the Gold star and the sentiment with thin pieces of foam tape. For a final touch, I added a sprinkling of Gold enamel dots around the background. I think the die-cut trees harken to a retro graphic approach and feel kind of pop-art-y..!
Aside from the tiny baubles meant to decorate the trees, this stamp set also features some larger bauble stamps as well.
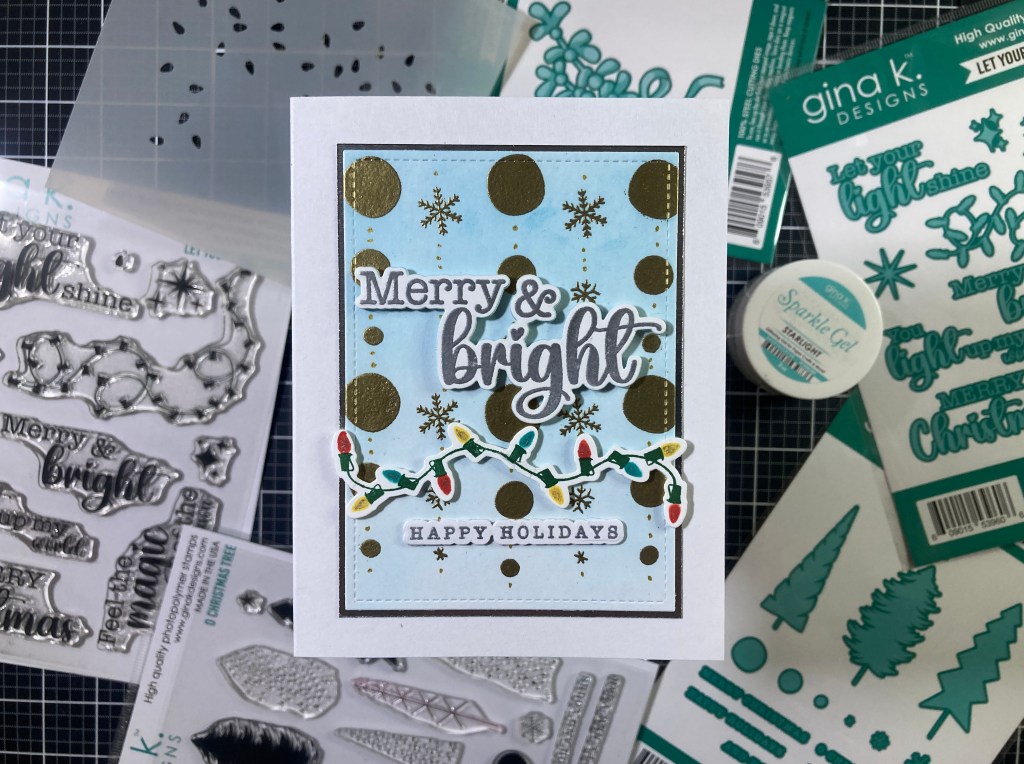
Those bauble stamps make for a delightful holiday background. I stamped the three circles and three snowflakes on a panel of White card stock with VersaMark ink and embossed them all with Ranger Gold embossing powder. Then I ink blended some HA Splash Reactive ink on the embossed panel fading it out towards the bottom. I added little dots connecting the baubles with a Gold gel pen and tried to keep the whole background a little loose and carefree. I die-cut the panel with to 3.25″ x 4.5″ with a LFSRdie, and added a thin mat of TH Silver Metallic card stock and glued those to a White card base.
I stamped both sentiments with VersaMark ink and embossed them both with Ranger Silver embossing powder and die-cut them out (along with 2 blanks each) with their matching dies, stacked and glued them together. I added the big sentiment to the card front with thin foam tape, and the sub-sentiment directly to the card front. The string of lights is the left-over lights from card number 4 (Merry Christmas) “invisibly” joined together and mounted to the card front with thin foam tape. This card brings BOTH stamp sets together for a very shiny Holiday card!
Out of all the tiny bauble stamps for the trees in the O Christmas Tree set, I really like the star baubles the best…
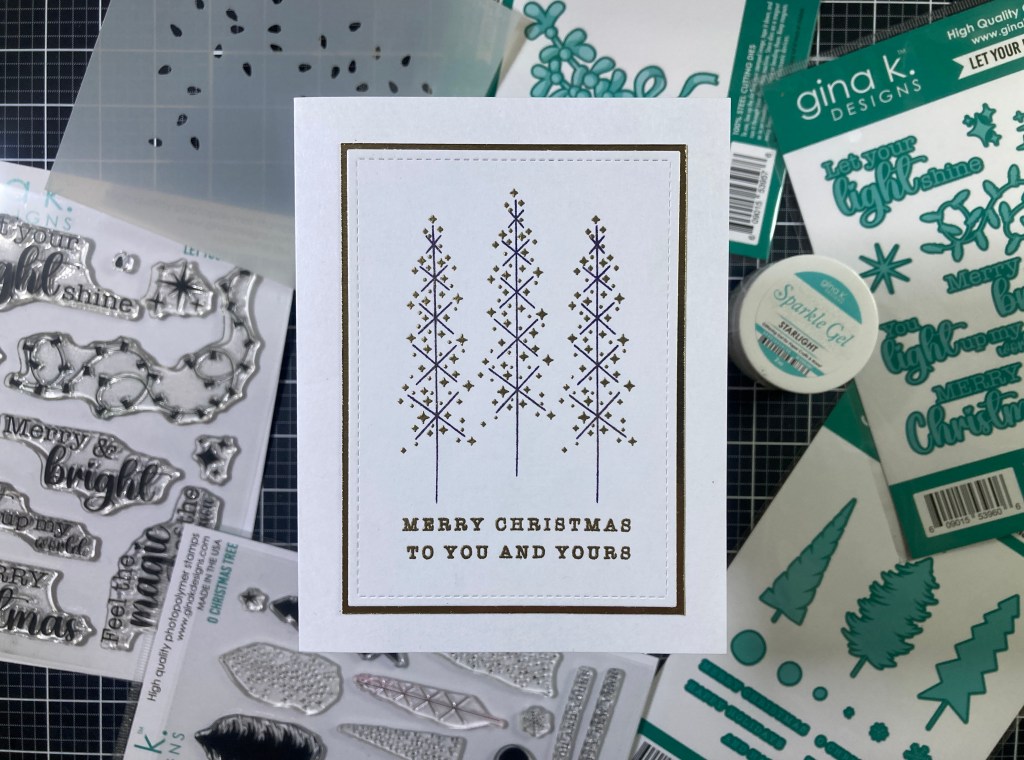
With the addition of the highly graphic “branches”, those star baubles become quite contemporary and rather industrial! I stamped the “branches” on a panel of White card stock using the C&9th Eggplant ink. They are 3/4″ apart from each other, and the center tree is 1/4″ higher than the side trees. I stamped the Star Baubles on top of the tree skeletons with VersaMark ink and embossed them with Ranger Gold embossing powder. You can line up that bauble stamp so none of the stars actually touches the “branches” – I really love that!
I stamped the sentiments with VersaMark ink and embossed them with Ranger Gold embossing powder. I trimmed the panel to 3.25″ x 4.5″ with a LFSRdie and added a thin TH Gold Metallic card stock mat behind, and glued those to an A2 White card base. I love how modern and industrial this card is – like something you might see at Rockefeller Center when it’s all done up for the Holidays! Plenty of shine here too!
There you have it! All 10 of my cards using the Gina K. Designs Christmas in July Card Kit! I’m a little surprised at how much fun I had playing with all the different parts of this kit!
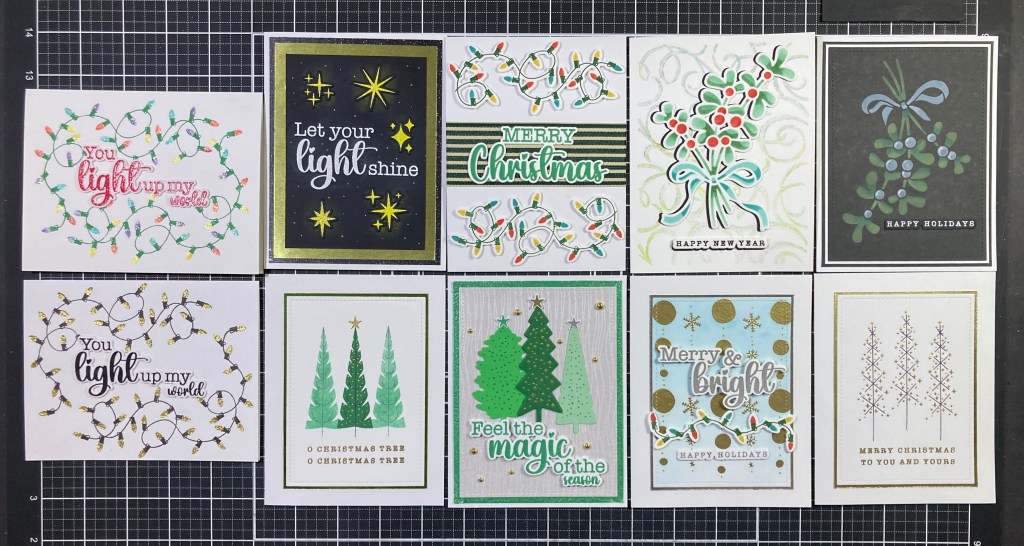
The String of Lights tickles my fancy every time I look at them… I love the fact that some of the sentiments have nothing to do with the holidays… I really LOVE the upside-down mistletoe on the black with appropriately white berries and I actually love how versatile the O Christmas Tree stamp set turned out to be…! I used bunches of embossing powder this month… I believe every card has SOME embossing… and a number of cards have Glitz or Sparkle gel! There’s lots of shine and sparkles this month – perfect for the Holidays (or ANY occasion). Let me know which card(s) are your favorites!
This kit has already sold out at Gina K. Designs which is so often the case with her Card Kits. Though you don’t have to subscribe to receive the Gina K. Designs Card Kits you do need to order early whenever they come out! Looks like the August Release party is scheduled for Tuesday, August 26th…! Don’t forget to tune in! NOTE: Due to rising tariffs, the Gina K. Designs Card Kit will increase in price by $10 this release… That is still an incredible bargain… but if you want to combat rising prices in the craft industry (and everywhere else!) don’t forget send a letter or call your representative or congressman and make your feelings known! We can combat rising prices collectively!
Thank you so very much for sharing your time with me here today. Your attention and encouragement mean so very much to me! Let me know if you have any questions or any comments! If you enjoyed this post please click the “Like” star at the bottom of this page, and if you would like to be notified of new posts click the Follow Me button at the top of this page. I would kindly appreciate it if you would take a few moments to Like Me, List Me, Pin me, Post Me, Share me with all your crafty friends, and remember… don’t run with scissors!! As always, I send You and Yours Love and Light and Happy Crafting!

Thank you. I have missed you and thought somehow you were annoyed with me and didn’t care to send your cards anymore. ❤️
Sent from Yahoo Mail for iPhone
LikeLike
Thank you so much dear heart!
How could I ever be annoyed with YOU!?
I just forgot to update your new email on my subscriber page…
You know I always look forward to your thoughts!
XXOO
Scott
LikeLike
I really loved these cards. You are so talented. I miss your artistry with the Love From Lizi kits.
LikeLike