
Hello Folks! Scott here with our next batch of cards created with the new Hero Studio Card Kit of the Month for October 2024. This month we’re celebrating the holidays with a Christmas themed kit – It’s never too early to start working on our Holiday Cards!

• Clear Stamp Set, 6″ x 8″
• 16 Coordinating Dies
• Hole Punch Die
• Tree Window Die
• Holiday Treats Words Cling Stamp, 6″ x 6″
• Washi Sticker Pack, 22 pieces
• Embossing & Watermark Ink Cube
• 5 Sheets Each of Kraft, White & Red Cardstock, 5.5″ x 8.5″
• Gold Embossing Powder, 0.5 oz
• White Embossing Powder, 0.5 oz
• Peppermint Clay Embellishments
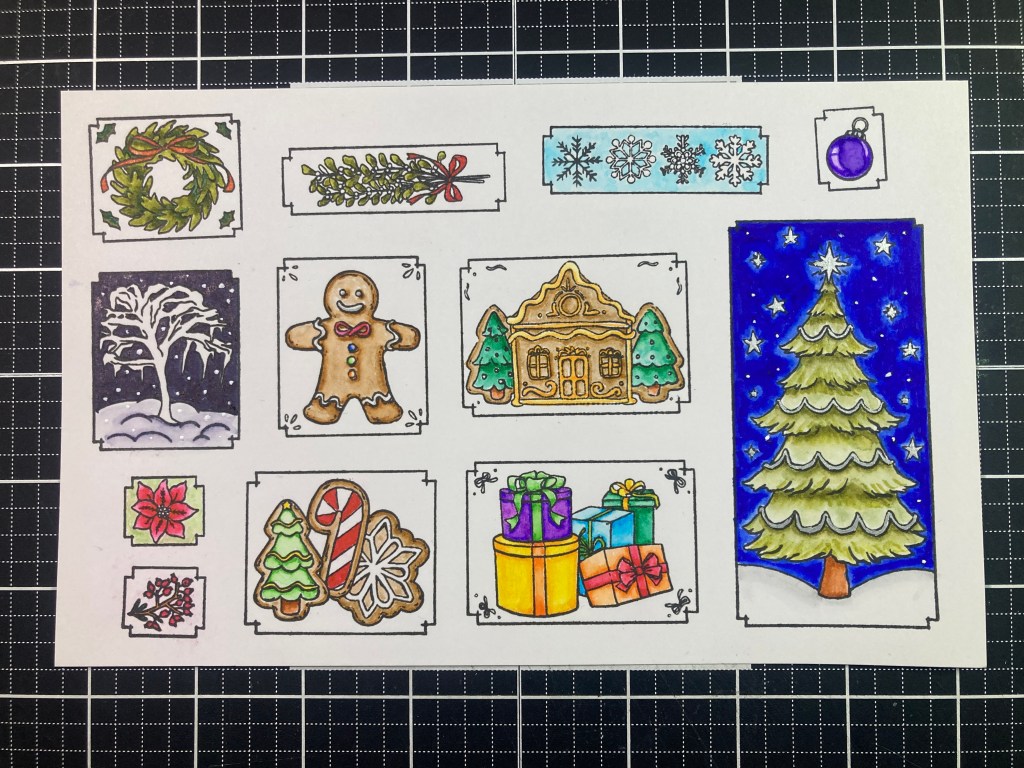
Truly a great batch of goodies this month, but what stands out to me is the stamp set featuring a lot of images that we can actually color! Since the launch of the Hero Studio line in June , all of our Card Kits have mainly featured silhouette stamps. Finally we have a chance to do some coloring! I stamped out three sets of our 12 images using VersaFine Onyx Black ink, and colored everything using three different mediums…!
I stamped this on 80# Neenah Classic Crest Solar White card stock and reached for my Ohuhu Alcohol markers for coloring. The Neenah card stock is my preferred paper for alcohol markers. This is a shot of the markers I used to color this first set of images.


I am getting more used to these alcohol markers, and they certainly make quick work of coloring these images, but for the first time I’m realizing that most of these images – except for the tree – are fairly small… I could have spent more time on the tree background, but I kind of liked the subtle texture of the markers overlapping. I did use a white gel pen to color in the snowflakes image and a Gold uni-ball Signo gel pen for the garland on the tree.

For the next round I stamped everything on Bristol Smooth card stock so I could use my Zig Clean Color Real Brush markers. Bristol Smooth card stock is my absolutely required paper for coloring with Zig watercolor markers (or any brand of watercolor markers)!
The Zig markers take a little more time, but I’m very used to them and they give me great control. I’m especially pleased with the ornament on the top right! This time I used a Silver uni-ball Signo gel pen for the garland on the tree AND the stars on the background.
I stamped this set on Stonehenge White card stock and used my old Prismacolor colored pencils for the coloring. The Stonehenge White is a lovely cotton paper that works especially well with colored pencils.


The little bits of texture on that card stock really grabs hold of the colored pencils and adds some perfect texture – especially to the cookies! I really like the big tree here, and I didn’t color the background figuring I’d use the Tree Window Die on this version. I did go back to the Gold gel pen for the garland on the tree. Though these are all pretty small images, a sharp point on a colored pencil gives you great results!

I found this whole coloring process very therapeutic, and now I have more than enough images to create my 10 cards with. Since I colored them first, I die-cut all the images from the alcohol marker coloring (on top) first. Of course I reached for the big tree to start with!
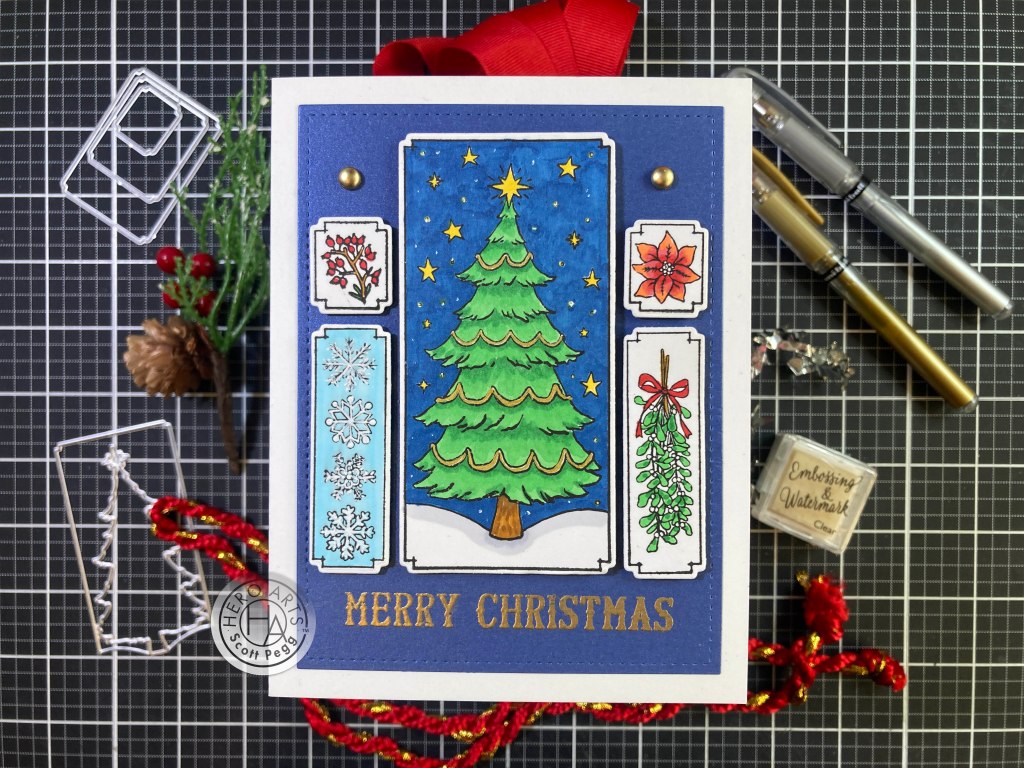
Now the info card in the kit has a number of different arrangements you can create with these tiled images… but there must be hundreds of combinations available. My regimented, symmetrical, graphic nature led me to this arrangement featuring the big tree right in the center. All the images die-cut beautifully with their matching dies.
I stamped the sentiment using the Embossing and Watermark ink and the Gold Embossing powder on a panel of Dark Blue Pearlescent card stock die-cut to 3.75″ x 5″ with a Lawn Fawn Stitched Rectangle die. That card stock is a really close match to the background of the tree. I glued that to an A2 White card base and added the die cut images with thin foam tape. A couple of Gold Metallic dots adds a little bling and matches the garland on the tree. Straight to the point!
Now I’m kind of obsessing over using up all twelve images from this first round of coloring…!

I die-cut a panel of the Red card stock included in the kit to 3.75″ x 5″ with a LFSRdie, added a thin black mat behind that, and glued both to a White card base. I stamped the sentiment using the Embossing and Watermark ink and White Embossing powder. I do like the big, classic font for these sentiments!

I attached the images to the card front with thin foam tape – thinking that this is a kind of a tree-shaped arrangement..! I added the Peppermint Clay embellishments at the corners, and stamped the extra sentiment on the inside of the card. Again… no beating around the bush here..!
Of course I am working my way through all the sentiments in the stamp set as well as all the images… I guess there’s only one thing to do here…!

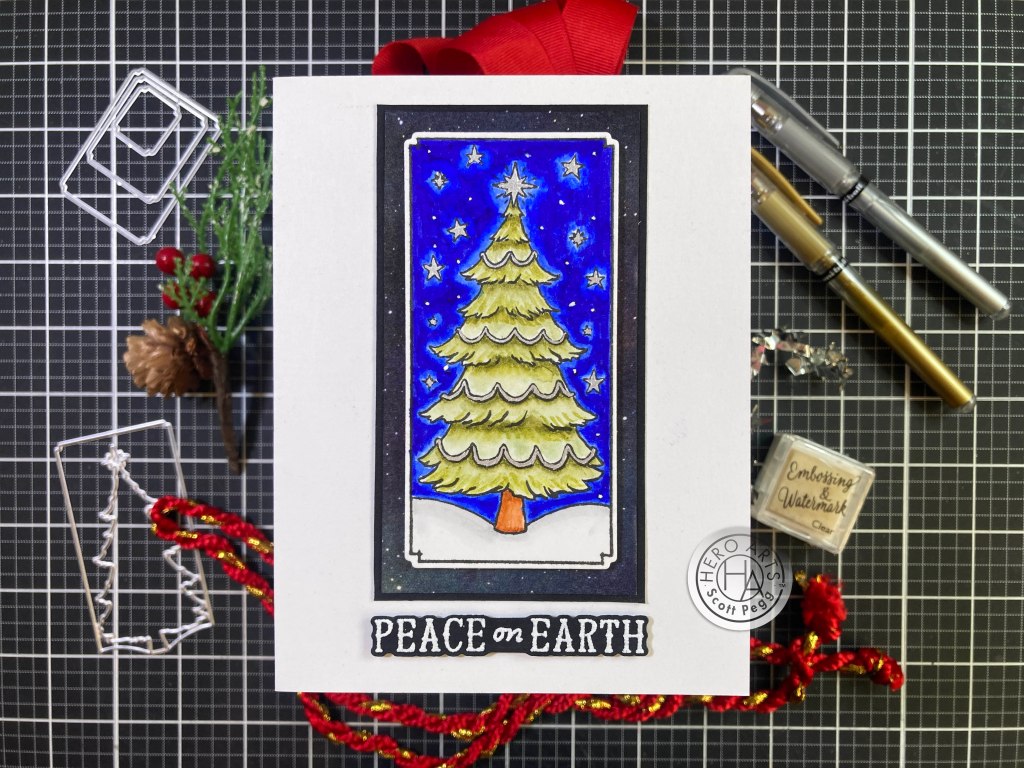
A nice little vignette giving perfect context to this sentiment! I used the largest open-frame die-cut in the kit, and with some partial die-cutting abbreviated that die to only 3″ long using some Hero Hues Arctic card stock. I stamped the sentiment on that panel with VersaFine Onyx Black ink and embossed it with Clear embossing powder. I added a thin dark blue mat behind the stamped panel and glued both to a White A2 card base.
I added the die cut colored tree plaque with thin foam tape and grabbed the small Snowflake Sequins (from the My Monthly Hero November 2022 kit) to add a spray of silver snowflakes across the front of this card. Mmmmm, Chilly!
For some unconscious reason, while I was coloring these 12 images, I added grey backgrounds behind the cookie stamps… I did add a bit of a halo around the presents, but, other than the tree and the cookies, didn’t color any other backgrounds. After I die cut the cookies, all of a sudden, those backgrounds started looking like cookie sheets!

To begin with, I added thin Black mats behind all the cookie die cuts. I figured out my arrangement, and, using a Hero Arts Rectangle Infinity die, I cut a panel of White card stock to 3.5″ x 4.75″. I printed the second half of the sentiment at the bottom of that panel using my Silhouette software and the Dream State font. Then I stamped the large part of the sentiment (masking off the “to be jolly”) with Onyx Black ink and embossed that with Clear embossing powder. Lastly, I fussy-cut some 1/4″ notches into the four corners and glued that panel to a 3.75″ x 5″ Black mat, and glued both of those to a White card base.
I glued the two left “cookie sheets” directly to the card front and mounted the gingerbread man with some thin foam tape. I did stamp the “Happy Holidays” sentiment on the inside of the card and added four Peppermint Clay embellishments to the four corners. I couldn’t resist adulterating this sentiment stamp for this yummy cookie card! I promise I’ll use that sentiment in its entirety before we’re done!

Now I’ve used all twelve images in our stamp set! That was quick! Let me see what our Washi Sticker Pack inspires..!

There’s that sentiment in all its glory! I did like the Gingerbread House sheet of Washi Stickers – it seems to have the most similar items represented – more cookies and treats! I cut that sheet to 4″ x 5.25″ and added it to the front of an A2 Kraft card base (from the kit). I ink blended some Vintage Photo Distress Oxide ink around the edges, helping to blend the Washi Sticker into the card stock. I stuck the Gingerbread Man Washi Sticker to a scrap of White card stock and fussy cut him out. I added him to the card front with foam tape. I thought we need a little more color on this card, so I fussy cut a couple of the Ivy leaves and Berries from their Washi Sticker, and added them to the top right corner.

I stamped the sentiment on a scrap of Ivory card stock with Onyx Black ink, embossed that with Clear Embossing powder, die-cut it out with the matching die, and ink blended a little on the edges. I added that to the card front with foam tape. I die-cut some Ivory card stock with a LFSRdie and ink blended Vintage Photo around the edges. I stamped the “fa las” with Onyx Black ink and couldn’t resist finishing the phrase with a few more “las” – just masked off the “fa” for the second line. That feels complete!
Let’s move on to the Zig marker colored images now… and I haven’t used the Holiday Treats Words Cling Stamp yet! And I think we are due for a little pun!

About the only way you can use the stamps in this set without their “frames” is to fussy-cut them out. That’s what I did to the Zig-colored cookie images. I also colored their cut edges with a black marker. I stamped the Cling stamp on a piece of the Kraft card stock with Unicorn White ink, let that dry, then shifted the card stock half a millimeter down and to the left, and stamped again with Vintage Photo Distress Oxide ink. That adds a lot of interest and dimension to the background stamp. It’s subtle, but it definitely reads! Once dry, I die-cut the background to 3.75″ x 5″ with a LFSRdie and ink blended Vintage Photo around the edges before gluing that to a thin Dark Brown mat and down to a White card base. I printed this pun-y sentiment on a piece of the Kraft card stock using my Silhouette software and the Helvetica Neue font. I die-cut that with a random stitched square die from my stash (1 and 3/8″) and blended more Vintage Photo ink on the edges before matting that on a thin White mat.
The gingerbread house with trees is glued flat to the card front and everything else is mounted with foam tape. I did add the “Happy Holidays” sentiment on the inside of the card using the Vintage Photo ink and a little clear enamel dot. The whole card feels like Gingerbread!

The Cling “Treats Words” stamp is pretty specific for a background. As long as you’re featuring treats, it works perfectly. I do imagine it could work in a few other instances… I like making a habit of creating holiday Thank You cards too!

While I was fussy-cutting the cookies out, I went ahead and cut out the gifts as well (and colored their edges black). I stamped the Cling stamp on a panel of White card stock using Fruit Punch and Green Apple Reactive inks for a holiday stripe effect and splattered both inks (watered down) on top for a little more texture and softening. When that dried, I die-cut it to 3.75″ x 5″ with a LFSRdie and added a thin Red mat and a thin Black mat before gluing it all down to a White card base.
We have seven open-frame dies in this kit to cut out the 12 images – the Snowy Tree die and the Candy Cane die actually fit together for a nice matted pair. I believe the Candy Cane die is cut from Black and the Snowy Tree die is cut from White and glued together before being glued to the card front. I stamped the sentiment (from the MMH January 2020 kit) on a scrap of White card stock with Fruit Punch ink and embossed it with clear embossing powder. I trimmed that to size with a Banner die and matted that to a thin Black mat. I mounted the gifts and the sentiment with foam tape. Somehow the coloring on the background stamp takes the focus away from the specific words… at least a little bit! Seems we always get something rather special over the holidays that usually deserves a nice Thank you card!
That Tree stamp in our set seems to be my favorite… big enough to actually have some fun coloring it!
We’re still die-cutting the Zig marker colored images. To make the large frame around our tree die cut, I took a scrap of White card stock and covered it with some old Altenew Galaxy Washi Tape and trimmed it down to 2.25″ x 4.25″ and added a thin black mat behind. I stamped the sentiment on Pitch Black card stock using the Embossing and Watermark ink and embossed that with the White embossing powder before die-cutting it out with the matching die. I glued the matted panel flat to the card front, and added the Tree and sentiment using foam tape. This tree has a good amount of shine from the Silver Gel pen on the garland and the stars, and I really like the die cut sentiment on the White card.
I believe that covers all the large sentiments in our stamp set, but I haven’t used the Tree Window die yet…

This is my colored pencil version of the tree. I die cut it with the full open frame die to begin with, then used the Tree Window die to cut out the background. If done properly, that would leave a thin edge of card stock around the edge of the cut out – unfortunately, I didn’t get a perfect die cut, so I just trimmed away the thin edges of the die cut leaving me with just the tree and the snowbanks. I took the Window die and a panel of White card stock and die-cut the Window in the upper center of the panel. I trimmed the panel to 3.75″ x 5″ with a LFSRdie and glued the colored tree on top. Since the edges of my die cut tree weren’t the prettiest, I took some peel-off stickers from my stash to make a frame around the opening – thin Green Glitter peel-offs first and then a thick matte Gold around that. That cleaned up the edges nicely!
I stamped the sentiment at the bottom of the panel with the Embossing ink and embossed it with the Gold embossing powder – matches the Gold peel-off frame quite well! I took another panel of White card stock die-cut to 3.75″ x 5″ with a LFSRdie and covered that with more Altenew Galaxy Washi tape. I covered the back of the tree panel with foam tape and mounted that to the galaxy background. It would be quite easy to add some acetate behind the tree and turn this into a shaker card, but I was very pleased with the dimension alone. I glued the window panel to a White card base and called it done… the Gold tree garland, the Gold peel-off frame and embossed sentiment all match extremely well and give this card a certain royal luster perfect for the holidays!
I admit this was one of my first “out-of-the-box” ideas for this kit… and my coloring of the purple ornament clinched it!

This card makes me smile! I did try laying this out on a regular A2 sized card, but decided to go with a 4Bar card size – commonly used for Invitations and Thank You cards – it is 3.5″ wide by 4 and 7/8″ tall. I added a black mat behind the die cut ornament, and printed this sentiment using my Silhouette software and the Times New Roman font. Though I was going for an extremely minimal card here, I thought just the ornament and sentiment were a little lonely on this card front, so I decided to add some die-cut stitching on the sides. I trimmed the printed panel to 3.5″ x 4 and 7/8″ and used one of the Ellen Hutson Stitching Lines dies on the two long sides. Just the right touch! I glued the panel to a White card base and added the matted ornament with foam tape. You know how much I like using song lyrics for my sentiments, and I think this diminutive card with a slightly pun-y sentiment is absolutely adorable!

It seemed Hero Arts was making something of a deal about the included Hole Punch Die – probably one of the smallest dies I have ever seen! I gather that this implies that you can add a hole to any of these images and instantly turn them into a tag – the included “to:” and “from:” sentiments further add to this notion. Okay… I can do tags…!
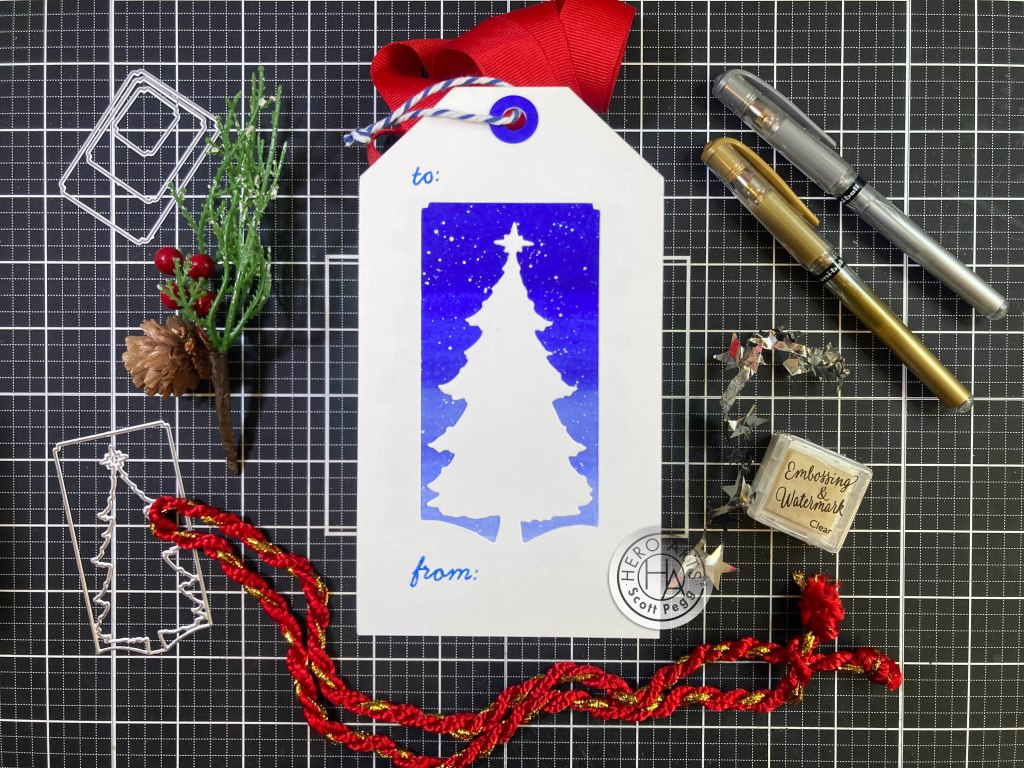
Of course I hadn’t used the Tree Window Die all alone yet… a simple and very effective use of that die – millions of possible combinations! But the Hole Punch Die seemed terrifically small for this standard 3″ x 5.5″ tag. I took two white tags and die-cut the tree into one and stamped the sentiments using Blue Hawaii Reactive ink and embossed those with Clear embossing powder.
I did a simple alcohol marker gradient on the second tag followed by some stars spattered with Dr. Ph. Martins bleed-proof white watercolor, and then glued the two tags together. I made the hole reinforcement with a scrap of white card stock colored with the darkest alcohol marker and punched out with a 1/2″ hole punch and a regular hole punch for the inside. I glued that on top of the hole and added a little Blue and White bakers twine for attaching. This simple use of the window die would work as beautifully on a card as on a tag!

Thus I felt obliged to actually make a tag using the included Hole Punch Die. I happened to have an extra Black and White mat (in reverse) from card number seven so I die-cut the colored pencil wreath, used the Hole Punch die on the black and white mat, and glued the wreath on top.
That only left me to stamp the sentiments on the back with Onyx Black ink, and add some Red and White bakers twine through the hole. Perfect little gift tag. And, YES, a lot of our stamped images would make great gift tags!

With the tags, I have now used every single stamp in this stamp set! WOO-HOO! I do have a good amount of colored images left over and ready to go, but I do feel like I have had my coloring mojo satisfied at least for a little while!

This is a lively and colorful batch of cards! I did use a bit of everything in this kit including the Cling stamp, a few of the Washi Stickers, embossing powders, embellishments and card stocks. I did feel a little constrained by the nature of these stamps – the framing on all the images is almost impossible to mask out, so you’re kind of left with just a variety of rectangles to create your designs with. Unless you want to start fussy-cutting everything!
Thank heavens for that truly versatile Tree Window Die! Though of course, that is still a rectangular shape..! Perhaps I was blinded to the versatility of this kit by my simple need to color! (and my rigidly symmetrical, graphic design bent!) Still… I enjoyed creating these cards (and tags!) very much!
This kit is still available at Hero Arts! If you’re looking for some holiday inspiration this year, now is the time to grab a kit for yourself before they all sell out! If you do go shopping at Hero Arts, please use my links listed below! Doing so helps support this page and all of CardCut-ups at no cost to you! THANKS!!!
Hero Studio Card Kit of the Month October 2024: https://heroarts.com/products/ck1024-october-card-kit-of-the-month?sca_ref=6639489.ubrhdU2VDFY73qx
Hero Arts: https://heroarts.com?sca_ref=6639489.ubrhdU2VDFY73qx
Thank you so very much for sharing some of your time with me today. It is appreciated more than you realize! Your encouragement and support really helps keep me motivated!! If you enjoyed this post, please click the LIKE Star at the bottom of this post, let me know which cards are your favorites, send me a comment or a question, and consider sharing this with all your friends on your Pinterest, FaceBook and Instagram pages. Remember… don’t run with scissors…! and, as always, I send you and yours Love and Light and Happy Crafting!
DISCLOSURE: This site contains some affiliate links to products. I may receive a commission for purchases made through these links (at no cost to you). Thank you!

What a delightful collection of cards. Love the cookie cards.
LikeLiked by 1 person
Thanks Judy! Always a treat to hear from you!!
Happy Holidays!
Scott
LikeLike
Hi Scott — I wanted to share my Halloween/International Chef card that I made for this year. I was inspired by your use of the HA kitchen kit from a year or two ago. Hope you like it and enjoy seeing it! Thanks for all you inspiration!
I particularly love how you come up with such cute puns!
Delina Aberle dmaberle@earthlink.net (mailto:dmaberle@earthlink.net)
LikeLiked by 1 person
Once again, “AWESOME.” I continue to collect stamp and die sets and watch you, Jennifer McGuire and Gina K.
So do you stamp and color your sets before you plan your cards?
LikeLike
Thanks so much Sue!
Yes… I do tend to color first and plan second… ideas may be floating around, but usually plan things out after coloring…!! Happy Holidays!!
LikeLike