
Hello Folks! Scott here with my 10 cards created using the My Monthly Hero Classic and Premium Kits for May 2024. Happy Birthday to Hero Arts! It’s their big 5-0 this month, and Hero Arts has pulled out all the stops to give us a celebratory kit fill with all sorts of fun extras!

CLASSIC KIT INCLUDES
• Floral Cake Clear Stamp Set, 4″ x 6″
• 11 Coordinating Dies
• 6 Sheets Luxe White Watercolor Paper, 5.5″ x 8.5″
• Contour Ink Pad
• Flat Water Flow Brush
• Watercolor Palette
• Watercolor Swatch Cards
Plus Special (50th Anniversary) Gifts:
• Message Clear Stamp Set, 3” x 4”
• 3 Coordinating Dies
• Yay Fancy Die
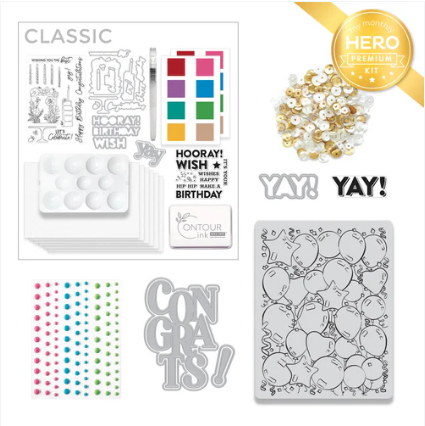
PREMIUM KIT INCLUDES everything in the Classic Kit AND:
• Balloon Background Cling Stamp, 4.6″ x 5.8″
• Champagne Sequins
• Birthday Enamel Dots
Plus Special (50th Anniversary) Gifts: • Yay! Clear Stamp & Coordinating Die • Congrats Fancy Die
There is also an added surprise (though I didn’t receive one) of a Limited Edition Tone-on-Tone Blue Metallic Spray! We truly get so many goodies this month and, of course, Birthday Cards are always extremely useful! That big CONGRATS! die is particularly eye-catching! But we’ll have to wait till I get to the Premium Kit… As usual, my first five cards will be done using just the Classic Kit supplies… OH, and if your Birthday is this month… HAPPY BIRTHDAY!
Apparently, they are encouraging us to do some no-line water-coloring this month, so that’s right where I’ll start!

I am certainly no expert when it comes to no-line coloring… especially with watercolors…but, I’m very pleased with this! I used the watercolor paper, the water brush and the Watercolor Palette to create our background. There is much more color on that watercolor palette than one might think! And I am quite pleased with the Flat Water Flow brush! I have gobs of water flow brushes in my stash but this is the first flat water flow brush I own! Once I was happy with my background, I die-cut the panel with a Lawn Fawn Stitched Rectangle die (5″x3.75″) and glued that flat to a White A2 card base.
I stamped the cake, plate, and candle on more watercolor paper using the Contour ink. I stamped them all three times before I could really discern the outlines. I did use regular small brushes to paint everything… For some reason, I decided to do a pink cake (I know, right!!) but a lighter, even white cake base would make coloring all the florals much easier – I did have to paint many layers for the flowers to show up on the pink. One secret I did learn about no-line coloring is to do your final detailing with colored pencils… it’s easy to add some shading and definition with pencils and not lose the no-line coloring effect.
I die-cut all three stamps with their matching dies, glued the cake to the plate and the candle behind the cake. I also stamped and colored the small strawberry and flower cluster the same as the others, die-cut them out and added them to the cake with thin foam tape for a bit more dimension. I added thin foam tape behind the whole cake assemblage and added that to the front of the card.
I stamped the two sentiments with VersaFine Onyx Black ink and embossed them both with Clear embossing powder. I die-cut them out with their matching dies – you know I love me some sentiment dies! I added two blank die-cuts behind the yay! sentiment for a little dimension and glued that to the card front. I mounted the HB sentiment with foam tape. I don’t think I’ve ever done a no-line coloring project with images quite this small… I think the technique is probably easier with larger images… but I am quite pleased with how this first card came out. Very colorful!
Well, that one took me more time than I thought it would…! Let’s try something a little simpler for my next card.

On a panel of Bristol Smooth Card Stock, I stamped the birthday candles using the Gina K Wreath Builder template along with Gina K Designs Obsidian Amalgam ink. I do like the consistency of the Wreath Builder template – always seems to work for me! I colored the candles with my Zig Clean Color Real Brush Markers and die-cut the panel with a HA Infinity rectangle die (4″ x 5.25″). I stamped the sentiment(s) with VersaFine Onyx Black ink and embossed them with Clear embossing powder. I mounted the stamped panel on a mat of Black Tie Glitter card stock and glued those to a White A2 card base.

I die cut the YAY die from the same Black Tie Glitter card stock, and, die cut 6 more from a rainbow of thin card stock and glued them all together – that adds a fun pop of color behind the YAY. I die-cut the YAY shadow from 40# vellum, glued the stacked YAY on top and then down to the card front. I added a touch of glitter to the candle flames, and I think the halo of candles sets off the YAY die beautifully!
I do like the big bold sentiments included in our 3″x4″ Message Clear Stamp set “extra” this month. Most of my Happy Birthday sentiments in my stash are much smaller!

A fun background and those big sentiments are all you need for a lively Birthday greeting! I reached for my favorite party stencil – an old Stampendous Flourishes metal stencil. I used Lemon Drop and Fruit Punch Reactive inks through that stencil on a panel of White card stock and got a nice orange tone where the colors meet. I die-cut that with a HA Infinity Rectangle die (5″ x 3.75″) and glued it to a 5.25″ x 4″ specialty Gold card stock mat and down to a White card base.
I arranged the sentiments on the front and ombre stamped them with Purple Galaxy on the bottom and Blue Hawaii Reactive ink on the top. Because the Reactive Inks stay wet for a bit, I embossed the sentiments with some Clear embossing powder. For a final touch, I stamped the star from the same stamp set with VersaMark ink and embossed that with some HA Gold Embossing powder. Lots of shine for a card with no sequins!
I knew I would have to attempt that cake stamp again but this time, I wanted to just stamp it in black and color it!

On Bristol Smooth card stock and using Gina K. Amalgam ink, I stamped the cake plate, masked the top edge and then stamped the cake, masked the top of the cake and stamped the candles. Fairly easy to accomplish, and, especially with the outlines, makes for a very cohesive image. I colored everything with my Zig markers and was able to die cut the whole image using (very careful) partial die-cutting, I did have to fussy-cut a little around the candles, but it is mostly die cut! OOPS! So much for a White cake frosting…!!!
I ran across the perfect embossing folder for a birthday card – a Sizzix 3-D Textured Impressions Happy Birthday Embossing folder. I embossed a 3.75″ x 5″ panel of white card stock with the folder, glued that to a 4″x5.25″ plain black mat, and glued those to an A2 Kraft card base. I stamped the sentiment using VersaFine Onyx Black ink, embossed that with clear embossing powder, and die-cut it with the matching die (love those sentiment dies!). I attached the cake to the card front with thin foam tape, added another die-cut layer to the sentiment, and added that to the card front with foam tape as well.
I like this more than the no-line colored cake… I do think larger images work better with no-line coloring. I like this card a lot and that embossed background really sets this whole card apart!
We also have the “piece of cake” stamp and I have to admit, with all those layers, my mind immediately went to…

A rainbow cake!! Okay, we might be missing a layer, but still…! On another panel of the watercolor paper in the kit, I used the flat water brush and the watercolor palette to paint another yellow/orange/red background. (I guess I think those are party colors!!) Once that was dry I stamped the candles all over the background using Soft Granite ink – echoing the diagonal nature of the watercoloring. When that was dry, I die-cut the panel with a LFSRdie (4.5″ x 3.25″) and matted that to a Glossy Black mat and then to a White card base.
I stamped the cake on a scrap of Bristol Smooth card stock (masking off the candle) and colored it with my Zig markers. I was trying to get some dimension around the icing when I came up with the idea to use some texture paste and “ice” the cake myself. I added a touch of grey ink to a small dab of texture paste and applied it with a toothpick. You can kind of see the texture in the picture, but it’s much more obvious in real life…! I thought that was fun and added a touch of Sparkle pen to the icing as well. Finally, some White gel pen adds a little crumb texture to the layers. I cut the cake panel to 1.25″ x 2.5″ and added another glossy black mat behind that and mounted them to the card front with foam tape.
I stamped, embossed and die-cut the sentiment same as before, added two blank die-cut layers behind that, and glued the sentiment directly to the card front. Loving me some of that Rainbow Layer Cake!
That’s my five cards using the Classic kit… I almost used all the stamps in the classic sets just on these cards alone! But now we get to dig into the Premium Kit goodies and I can’t wait to use the big CONGRATS! die!
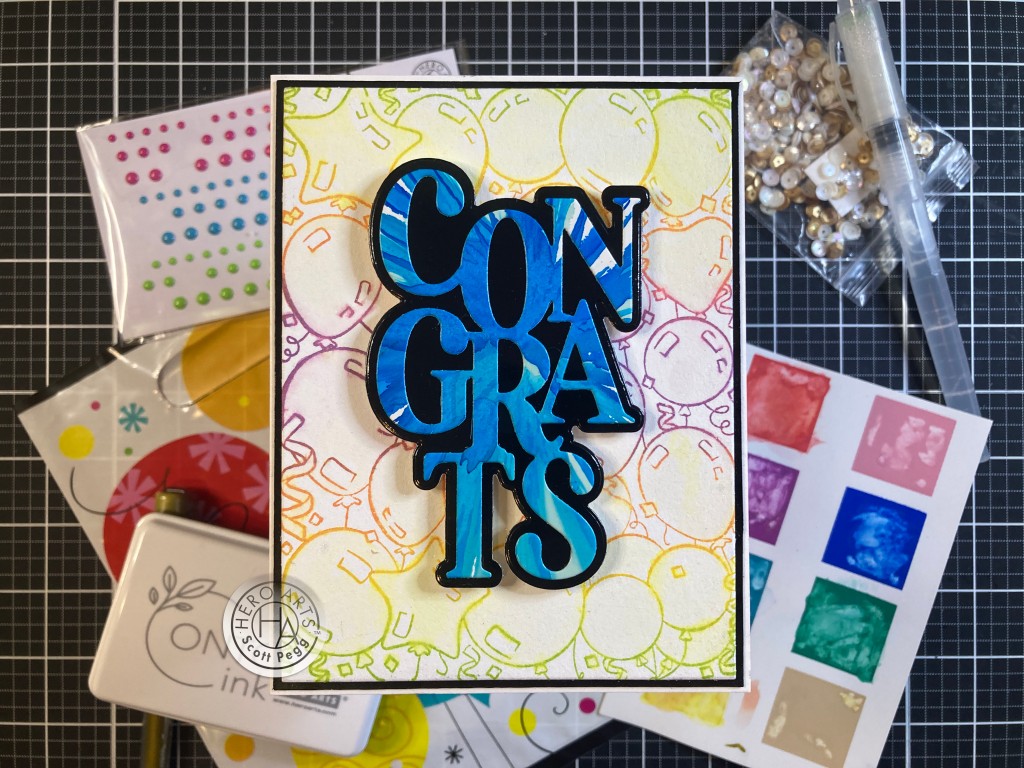
This card started with an Alcohol Ink background in blues that I happened to have on hand. It worked beautifully for the big CONGRATS die. I die-cut the shadow with glossy Black card stock and glued them together. Now we have the big Balloon cling stamp to use but I didn’t want to compete with the bright alcohol ink die cut. I reached for the Butterfly Garden Palette Reactive Ink Pad (from the MMH February ’23 Kit) for a fun gradient stamping. I stamped that on a panel of the watercolor card stock and, since the palette ink pad is reactive, lightly brushed water over the stamping to spread the colors out just a little. Not enough to lose the outlines, but enough to spread a little color. For a final touch I sprayed the whole background with some Sheer Shimmer Craft spray for some added sparkle.
I trimmed the background to 4″ x 5.25″ and added a thin mat of glossy Black card stock and glued those to a White A2 card base. I added the die-cut sentiment with thick foam tape. Though I do think the Congrats die can be used for more than just Birthdays, the Balloon background certainly suggests a Birthday party! Love that Congrats Die!
Of course we have to color all those balloons at some point… Lets make the balloons the focus and the die a highlight…!

So… wanting to get as much bang for my buck as possible with coloring all these balloons, I reached for my Yasutomo Pearlescent watercolors (very inexpensive!) and some Pitch Black card stock. I stamped the balloons using HA Unicorn White ink and embossed the stamping with White embossing powder. I colored all the balloons with the Yasutomo watercolors leaving their “highlights” blank. I knew I wanted a plain white die-cut on top, so I reached for my Dr. Ph. Martin’s Bleed Proof White watercolor for all the balloon highlights. Lastly I used a Karin Deco Brush Metallic Gold marker (from the MMH May 2020 kit) for all the ribbons and confetti. I trimmed the painted panel to 4″ x 5.25″ and glued that to a White card base.
I die cut the CONGRATS die – along with the exclamation point twice from the included watercolor card stock and glued both layers together and then flat down on the card front. A Spectrum Noir Sparkle pen adds some glitter to the sentiment. The Pearlescent watercolors (and sparkle pen) add a lot of shine to this card and I like how all the white highlights play off the stark white sentiment.
Time to spend some time and really color these balloons… let’s go back to our watercolor swatch card for this go round!

I stamped the cling stamp using Gina K. Amalgam ink on Bristol Smooth card stock hoping that Bristol card stock would help spread the watercolors around instead of sucking them up. All the balloons are water-colored using the swatch card and the confetti is colored again with the Karin metallic pen. I trimmed the painted panel to 4.25″ x 5.5″, sprayed all with the Sheer Shimmer Craft spray, and glued that to a white card base.
I stamped the two large sentiments in an ombre using the Butterfly Garden Palette ink pad – Thistle and Taffy for the bottom sentiment, and Creamsicle and Taffy for the top sentiment. The palette ink pads make creating an ombre effect quite easy on large sentiments like this. Again I embossed them both with clear embossing powder and die-cut them (with an extra ‘blank’) using their matching dies. I stamped the “it’s your” sentiment on a scrap of Pitch Black card stock using Unicorn White ink and embossed that with clear embossing powder. I die-cut that with a Lawn Fawn Everyday Sentiment Banners die and mounted it to the center of the card front with foam tape. I glued the double die cut sentiments together (for a little strength) and mounted them to the card front with foam tape. A fun sprinkle of the Enamel dots finishes out this extremely colorful card. HOORAY indeed!!
That card used some of the enamel dots in our kit… but we also got a huge batch of Champagne Sequins… a HUGE batch!

This may be the first no-frame shaker card I’ve ever done…! Using the Butterfly Garden Palette ink pad, I stamped eight YAY! stamps in every ombre that ink pad afforded. That effect is easy to achieve on these large stamps if you mark the side of the palette ink pad where the colors change. I die-cut all the YAY!s with the matching die and glued them down to a Pitch Black A2 card panel. I also added a good sprinkling of the enamel dots filling in some of the spaces around the YAY! die cuts.
I took apart the plastic packaging that held the Premium Kit contents and cut out a piece of that about 4.75″ x 6″. Then, using 1/4″ Scor-Tape, I glued the bottom of the acetate to the back of the black panel. Working around and trimming the corners I attached the two sides of the acetate to the back of card front as well. I left the top open for adding the sequins.
I die-cut the large yay die and the big exclamation point from some Champagne Metallic card stock, and die-cut the shadow from some Pitch Black card stock. I glued the sentiment to the shadow and glued everything down on top of the acetate. I like how the exclamation point nestles in there under the A and next to the Y! Now all that’s left is to add as many sequins as you like (or that the plastic will hold…!!), fold over the top flap and glue it to the back of the card panel. Then the whole card panel gets glued to an A2 White card base. Ta-Da! A no-frame shaker card! I really like this! Lots of shaker action with the sequins, and I believe the card is thinner than most “foam tape dam” shaker cards! YAY!
This idea came to me while I was coloring the rainbow layer cake and is appropriate for my last card of the month…

I stamped the cake, candle and confetti with Gina K. Amalgam ink on a scrap of Bristol Smooth card stock using judicious amounts of masking and drawing in the missing lines with a Black Pigma Micron 02 pen (matched the line thickness of the stamps nicely) I colored all with my Zig markers again… making this in honor of Joel’s favorite Yellow Cake with Chocolate Frosting. I happened to have enough of the card stock scrap to fussy cut the cake and create a ground for our scene… is it a plate…? is it a table…? is it the product of a fevered and delusional mind…? Probably!
I found this great pattern paper in my stash for the background – I die-cut a panel of that with a LFSRdie (5″ x 3.75″) and glued that to a thin Pitch Black mat and down to a White A2 card base. The cake “plate” seemed a bit forlorn floating on the background all alone, so I die-cut a scrap of white card stock using the same LFSRdie. I glued that behind the plate and down to the bottom edge of the card front – the stitching matches perfectly!
I turned to my trusty Silhouette software for the sentiment. I used the Hiragino Sans W9 font (which is a MacOS font) in three layers (black, white and black) to echo the WISH and YAY! sentiment stamps. I cut the sentiment with my Silhouette Portrait and cut 4 matching blanks to glue all together and down to the card front.

I was showing this card to Joel and he said it’s nice but I’m not sure what you would use this for… I told him to open the card… Of course there’s a perfect birthday reason for a card like this! Who hasn’t been a few days late for someone’s celebration?! Naturally, I printed this on the inside of the card base before I glued anything to the top. This makes me giggle… the gold stripes on the background are very festive and I even added some sparkle to the cake with a sparkle pen.
I think that’s a fun way to wrap up our cards this month! This was certainly an enjoyable and extremely useful kit! Happy 50th to Hero Arts! Birthday cards for EVERYONE!!! I do think I used just about everything in the kit on my cards this month – I did use every image stamp in the kit – I missed a couple of the smaller sentiments but that’s it!

Both the Premium and the Classic Kits are still available at Hero Arts! Im sure stock is running low so if you need a great Birthday Card kit with lots of terrific extras I’d grab one while you still can! If you do go shopping at Hero Arts please use my links below! That really helps support CardCutups and keeps the crafty goodness coming your way!
My Monthly Hero May 2024 Classic Kit: http://shrsl.com/4jnz3
My Monthly Hero May 2024 Premium Kit: http://shrsl.com/4jnz8
It appears that this Birthday is also a farewell to the original My Monthly Hero moniker. We are witnessing the birth of the new Hero Studio! A whole suite of subscriptions designed to cater to your specific interests and bank books!

Hero Studio now offers us six original options each month! You can subscribe to the Card Kit of the Month, Layering Stencils of the Month, Cling Stamp of the Month, Clear Set + Dies of the Month, Fancy Dies of the Month, or The Whole Studio (all five in one)! Subscription prices range from $15 to $46 (or $120 for The Whole Studio) so you can create a subscription just for you! Apparently, current MMH subscribers will be upgraded to the Hero Studio Card Kit of the Month and new kits will still launch on the First Monday of every month.
I know I’m looking forward to seeing what Hero Arts has in store for us. Click HERE for more information at Hero Arts!
Thank you so much for sharing your time with me here today. I am sorry this is a little tardy but I have been SO busy this spring! I believe things will slow down a little bit as summer kicks in. I hope you know that your support and encouragement is ALWAYS noticed and is so gratefully appreciated. YOU are the reason I do this! Please take a moment to click the little “Like” star at the end of this post, and share this on your Facebook and Pinterest pages. And let me know what card(s) are your favorite this month. As always, I wish you and yours Love and Light and Happy Crafting!
DISCLOSURE: This site contains some affiliate links to products. I may receive a commission for purchases made through these links (at no cost to you). As an Amazon Associate I earn from qualifying purchases. Thank you!
