
Hello Folks! Scott here with my 10 Cards 1 Kit post using the My Monthly Hero August 2023 Classic and Premium Kits. This month’s kit was inspired by a trip to Yosemite National Park and celebrates all the natural beauty of The Golden State – California!

CLASSIC KIT INCLUDES:
• Clear Stamp Set, 4″ x 6″
• 4 Park Scene Fancy Dies
• 1 Sheet each of Papaya, Canary, Palm, Kiwi, Woodland and Mist Cardstock, 5.5″ x 8.5″
• Brass Embossing Powder, 0.5 oz.
• Gold EarthSafe Glitter, 0.5 oz.
PREMIUM KIT INCLUDES
• Everything in the Classic Kit AND…
• Poppy Clear Stamp Set, 3″ x 4″
• 7 Poppy Coordinating Frame Cuts
• 4 Sheets of Cactus Hero Transfers, 6″ x 8″
• Spring Green & Gold Two-Tone Spray, 2 oz. (Color may be substituted)

This is quite a huge variety of products in this kit… fancy dies, two stamp sets, new Rub-ons, and embellishments… (I do wonder how Gold Glitter (even if it is “EarthSafe”) and Brass Embossing powder come into play for a Nature themed kit). Once again, I will make my first five cards trying to stick to just the supplies in the Classic Kit… unless we want to make a card featuring JUST the sentiments then we’ve only got the Park Scene Fancy Dies.

This card came together as it was happening. Thinking I might do some water coloring, I grabbed some HA Watercolor paper, and took the Granite Cliff die to the upper third of a 4.25″ x 5.5″ panel of that watercolor paper. I had the notion that these cliffs would be in the upper half of a card front, but was given a little pause when I realized that the details in the cliff die only go down about an inch and a quarter.
That’s what gave me the idea to do some inlay die-cutting with all four dies on one panel. I die-cut the Meadow die just below the Cliff details, and die-cut the Mountain die from the top piece leftover from the Granite Cliff die cut. Then I snuck as much of the Tree die into the Meadow as I could, and die-cut the trees from the Meadow piece. I ink blended HA Soft Granite on the Cliff die cut, HA Grape Slush Reactive ink on the Mountain piece, HA Green Apple Reactive ink on the Meadow piece (lightly), and HA Green Apple Reactive ink on the Trees (much heavier). I stamped the sentiment using HA Unicorn Pigment ink and embossed that with some White embossing powder.
I ink blended some HA Splash Reactive ink on the top of a 4″ x 5.25″ panel of the same watercolor card stock, and glued the four blended die-cuts down on the top of that – trimming all the edges to match as I went along. I added a little color to the “flowers” on the top of the Meadow die cut using some colored Gel pens, and noticed that there’s a few vertical detail cuts just right of center on the Cliff piece – is that a bit of a waterfall (Yosemite Falls?) in those die-cut details? I highlighted the Falls with a White Gel pen and was quite surprised at how much depth that simple waterfall created on this assemblage… it does feel like we’re coming over a hill with the cliffs of Yosemite in the distance!
Of course the mountains aren’t quite as huge as this in real life, but I figured the sentiment justified the big mountains. Now we have an inlaid die-cut scene using all the Park Scene Fancy dies. Almost a one-layer card!
Let’s get back to my original intention to watercolor these dies… and can we use them in a landscape orientation?
I did a little Yosemite research and found this picture that is so obviously the inspiration for these dies… I had to see if I could possibly bring a little more reality to our park scene – enough that someone would recognize it as Yosemite!
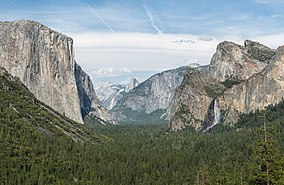
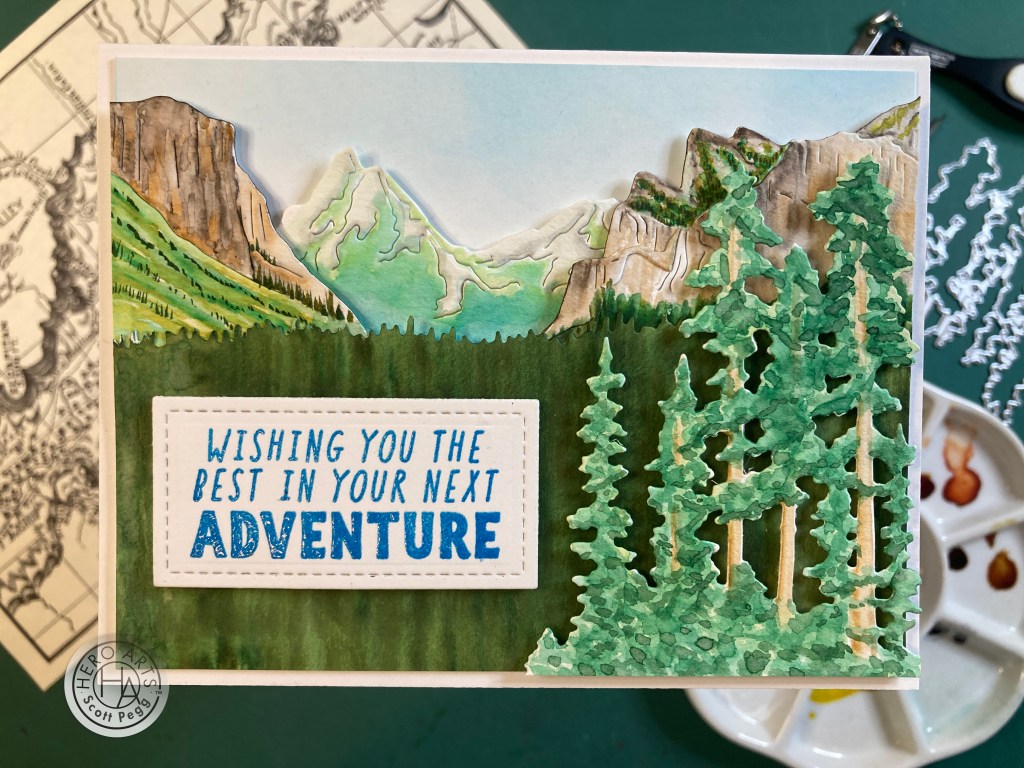
That’s looking more and more like Yosemite! Again, I die-cut everything from HA Watercolor card stock, and used my Zig Clean Color Real Brush Markers to watercolor everything. The Cliff die is simply cut apart in the center and spread out. The Meadow die is extended to 5.25″ wide with partial die-cutting (and I lopped off the random “flowers” on the top edge). The mountains are cut normally and we’re just using the right half of the Tree die.
Another light ink blending of Splash Reactive ink on a 4″ x 5.25″ panel of plain card stock then glued to a White A2 card base for the sky. The Mountains are then attached using thin foam tape, the Meadow is glued directly to the Cliffs and then those and the trees are mounted with foam tape as well. The sentiment is stamped on a scrap of White card stock using Splash Reactive ink and then embossed with Clear embossing powder, die-cut with a Lawn Fawn Stitched Rectangle die (partial die-cutting to get the correct size), and mounted with foam tape. The landscape orientation really expands the view here, (and also gives you a little more room for those big sentiments)! I think anyone familiar with Yosemite would recognize this scene…! Definitely fussy but completely worth it!
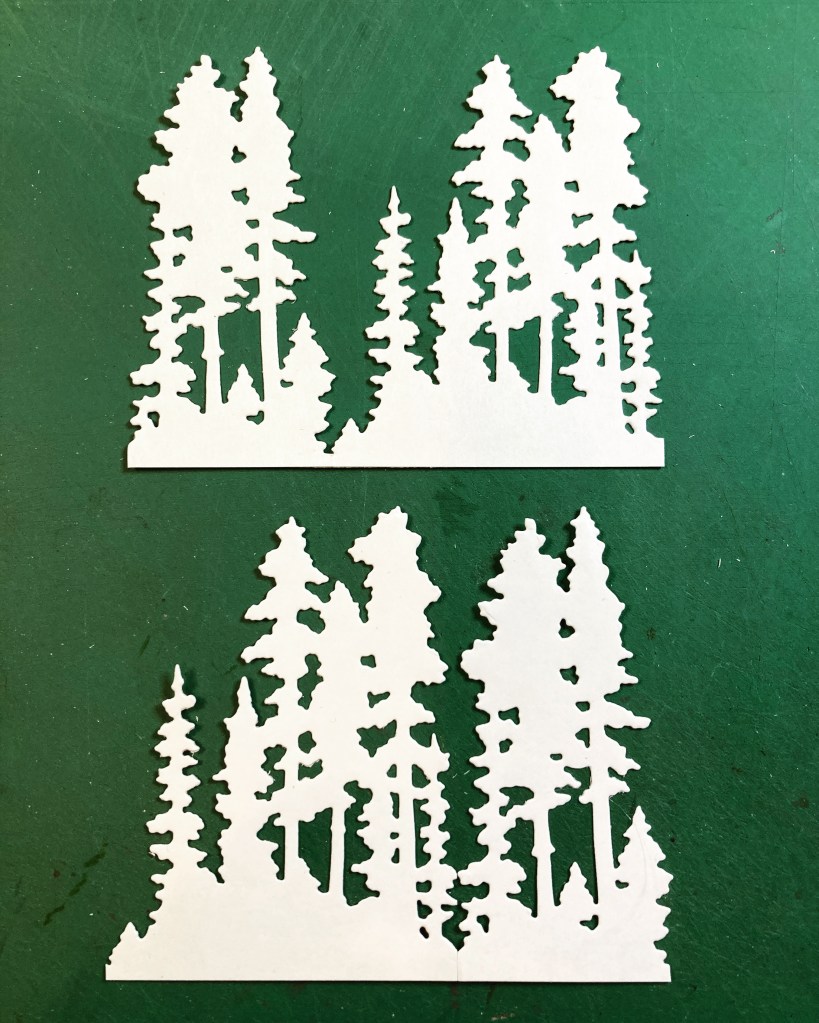
I did paint the other half of the Tree die for that card, but ended up cutting it away to make room for the sentiment.

Those leftover trees make a great focal point on this card! I die-cut a piece of the Palm card stock in the kit to 4.5″ x 3.25″ with a Lawn Fawn Stitched Rectangle die and ink blended Root Beer Reactive ink on the bottom edge and Blue Raspberry Reactive ink on the top. I stamped the sentiment using HA Embossing and Watermark ink and embossed that with the Brass Embossing powder. For the mat, I cut a scrap of White card stock to 4.75″ x 3.5″, inked the edges with Embossing and Watermark ink, and embossed the Brass Embossing powder all the way around. Perfect match!
I glued both to a White A2 card base, trimmed the trees to fit, and attached them with foam tape. I was going to stamp the “Get Well Soon” sentiment on the inside, but decided this sentiment didn’t have to be of such limited scope! I really like these watercolor tress and I wasn’t going to let these leftovers go to waste!
I don’t think I have anything quite like that Tree die in my stash – I have a variety of mountains and cliff dies, but no detailed tree clusters or forests!
I was fiddling around with that Tree die when I realized you could divide the die cut apart at the lowest point, turning the trees into two clusters, then move the left piece to the right side, and with a tiny trim, create a whole different look – more of a single cluster of trees… maybe effective enough to create a second layer of apparently different trees in your forest! Or maybe just to use on a big 5″ x 7″ or Slim-line card!
Of course when I was playing with the Tree die I realized how easily you could make it longer with partial die-cutting!
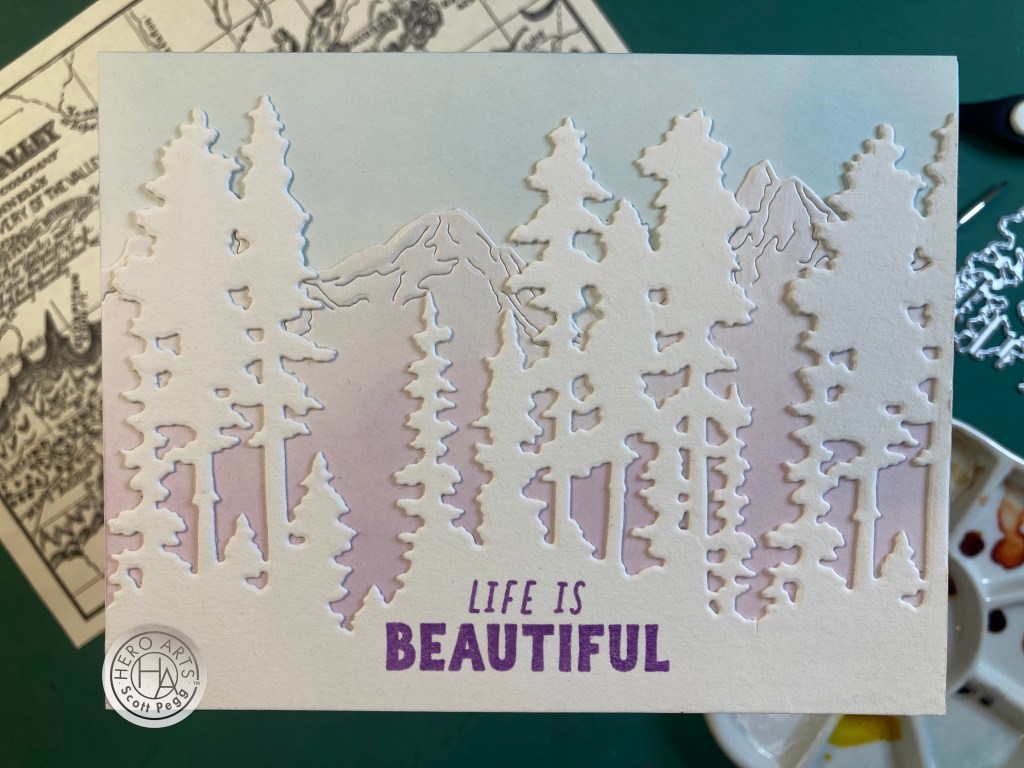
You can see the tiniest little crease to the right of “Beautiful” where I did the partial die-cutting – again using the HA watercolor card stock. I really like having the right end of this tree die cut off in the middle of that trunk. The Mountains are also extended with partial die-cutting (from plain White card stock). The original die has the big mountain to the left of the smaller mountain. I ink blended HA Soft Sky ink on a White A2 card base, ink blended HA Thistle Reactive ink on the mountains and glued them to the card base.
I stamped the sentiment using Thistle Reactive ink and embossed it with clear embossing powder. I glued the trees directly on top – there’s plenty of dimension already because they’re cut from the HA watercolor card stock. This is a very different, soft wintery scene up in the mountains… somewhere… I really like these landscape cards! Nice to know how adaptable these Park Scene Fancy dies are! I’m always trying to stretch our kit supplies to their fullest potential, and really try to create something new for you.
Enough with that tree die already! I thought the Meadow die was a little plain (kind of just a ‘grassy border’) so I started digging around in my embossing folder stash to see if I had any “nature” themes that might work with the Meadow die… I came across this old Darice wildflower embossing folder (it’s small – 5.5″ x 1.25″) and that gave me this idea.

I dug out some old core’dinations Chalk Core card stock from my stash – these are black card stock sheets with colored cores (I used yellow) – perfect for embossing and sanding…! The pack I have is only 4″ x 6″, so that will dictate the size of my card front! I die-cut the Cliff die from the top third of the Chalk Core card stock -you can actually see the yellow core in the cuts…! I embossed the folder on the bottom edge and lightly sanded it to bring out the core color. I stamped the sentiment using HA Unicorn White Pigment ink and embossed that with White Embossing powder.
I cut a piece of White card stock to 4″ x 5.5″ and ink blended the sky with HA Red Reactive ink, HA Purple Galaxy and HA Licorice Reactive ink. I spattered some stars in the Sky using a watered-down White India ink and when that was dry, glued it to a White A2 card base. I glued the black panel on top and Taa-Daa! I’m very pleased with this night time scene – It was good to remember that I have that Chalk core card stock and how interesting die-cuts appear on that card stock – you could easily lose the details of the die if you just use plain black card stock.
That feels like a really good exploration of those Park Scene Fancy Dies. Let’s break into the Premium Kit supplies now!

That Spring Green & Gold Two-Tone Spray is quite lovely! That’s a great green, and the soft shimmers of gold really bring that color to life! I did spray a couple of watercolor card stock panels with the spray… I wasn’t trying to get perfect coverage, but I wasn’t shooting for a splotchy look either – just a nice all over tonal gradation!
I stamped the Poppy on more watercolor card stock using Intense Black ink, colored it with my TomBow watercolor markers and die-cut it with the matching die. I do believe California Poppies are classically yellow. I cut one panel of the Green/Gold card stock to 3.75″ x 5″ and embossed it with the Spellbinders Leafy 3D Embossing folder. The gold really highlights the dimension on those leaves – perfect touch! I glued that panel to an A2 White card base.
I die-cut another panel of the Green/Gold with a LFSRdie using partial die-cutting to give me a 2.25″ x 3″ panel – that matches the height of this Poppy! I stamped the sentiment with Unicorn White ink, embossed it with White Embossing powder, and added a white mat to the backside. I attached that to the card front with foam tape and used the same for the Poppy. Some gold pearls adds a little more bling, and I did add some gold to the poppy centers with a Gold Gel pen. I don’t think I’ve ever made a simple “Good Luck” card before… but Green is a lucky color!
It appears that the Hero Arts community is going a little crazy for Multi-Media cards these days… there’s even a new FaceBook Group: Mixed Media with Hero Arts for all the fans. I thought I’d jump on the bandwagon with this next card.
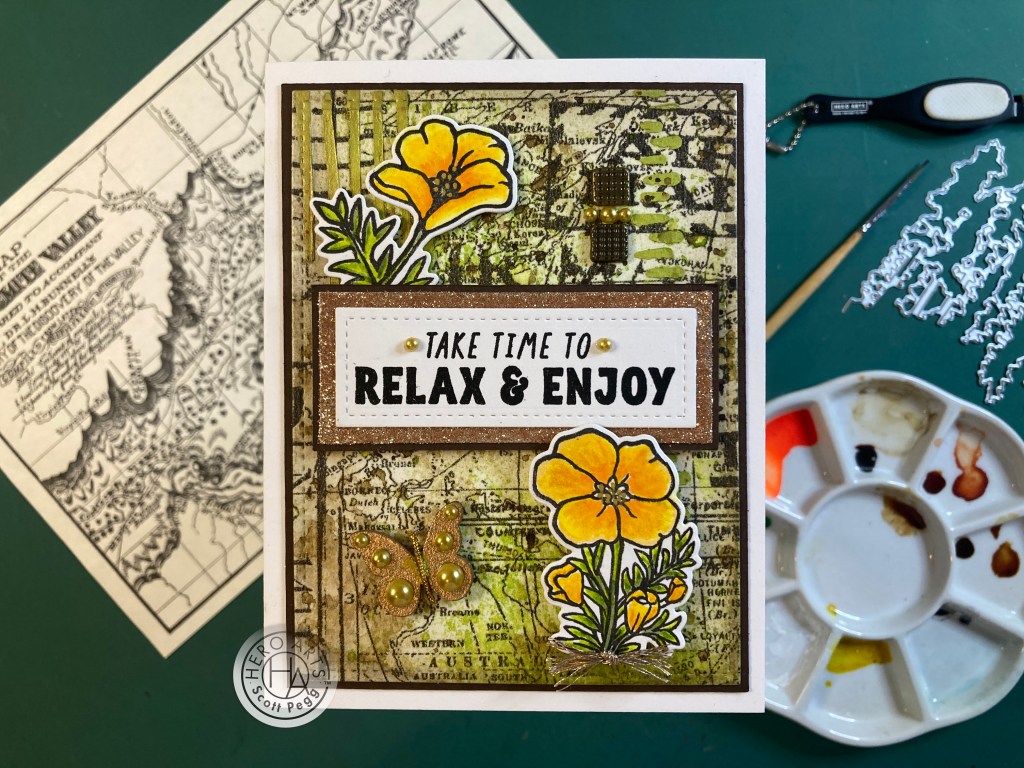
One of my favorite ways to tackle a mixed-media project is to find a good background, and one of my favorite all-purpose multi-media backgrounds is Tim Holtz Tissue Wrap – this pattern is “Postale”. I ran a 4.25″ x 5.5″ panel of plain Beige card stock through a Xyron Sticker Maker to cover one side with adhesive. Then it’s easy to lay the adhesive side on the back of the Tissue Wrap – you can see through to right to where you want to glue it – and attach the tissue and card stock together with no wrinkles.
I grabbed the Doodle Stencil from the MMH April ’23 Kit and some Novo Citrus Green Embellishment Mousse (perfect match to the Spring Green Spray) to add the dashes on the right and the lines on the top left to the background. I lightly spritzed the spray (to get more of a splatter) on the background and added some brown watercolor washes and splashes as well. I die-cut the background with a LFSRdie to 3.75″ x 5″, added a thin mat of the Woodland card stock and glued those down to a White card base.
I stamped, colored and cut the Poppies just like the Poppy on the last card, and stamped the sentiment on a scrap of White card stock with Intense Black ink and embossed that with Clear embossing powder. Again, using partial die-cutting, I cut the sentiment out with a LFSRdie to 3″ x 1″. I cut a scrap of white card stock to 3.25″ x 1.25″ and glued the Gold glitter to the edges with Scor-tape. I glued the sentiment, the glitter mat and another thin Woodland mask together and added those to the card front with foam tape. I added the die-cut Poppies with foam tape as well.
Two square brads go on the top right, a wooden butterfly embossed with the Brass Embossing powder down left and a good spattering of Gold pearls adds more texture and shine (and multi-media!) to this card. I added a bit of Gold cord for the body of the butterfly, and glued a small spray of Gold thread to the bottom of the lower Poppies – they felt a little unmoored just floating there…! Lots of Gold and tons of shine on this card. This my salute to the new Mixed Media with Hero Arts Face Book page!
Now we can play with the Cactus rub-ons! These are truly adorable – and we get a wide variety as well!

I guess I was yearning for a little more simplicity after that Multi-Media card! I die-cut the Papaya, Canary and Woodland card stock with a Spellbinder “Add a Stripe of Color” die, and arranged those on the left of a panel of White card stock cut to 4 1/8″ x 5 3/8″. I stamped the sentiment with Root Beer Reactive ink and embossed it with Clear Embossing powder. I added the barrel cactus rub-on over the sentiment and decide that it needed an anchor. So I cut away the “stones” on the bottom right cactus (on the rub-on sheet) using my craft knife, and added them to the bottom of the barrel cactus! That’s one of the fun things with rub-ons… you can use any parts you like most anywhere!
There are so many different cacti on these rub-on sheets… and so many sheets! You could make a TON of cactus cards with all these rub-ons, and heaven knows there are bunches of cactus puns out there!

This one tickles my fancy! I lined up these five cacti rub-ons across the center of a 4″ x 5.25″ panel of White card stock and printed the sentiment on that using my Silhouette Software and the Ball Paaji 2 Extra Bold font. I glued that panel to a Palm card base and added a White panel on the inside for a place to write your message. This one is dedicated to YOU! If you are reading this post then you are AWESOME PEOPLE as far as I’m concerned!
I think I’ve given this kit a pretty good run-through by now… but I did have one more idea for using that Tree die…!
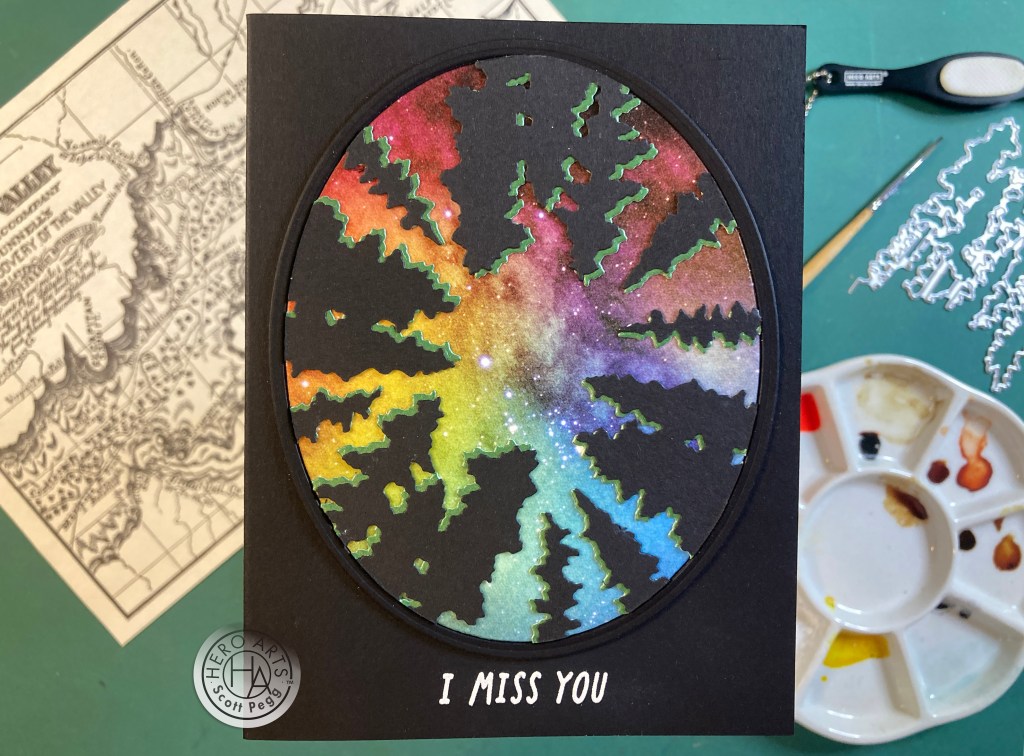
When I was fiddling with the Tree die-cuts I started cutting them apart and arranging them in a circle to see if I could create the illusion of looking up through the trees. Almost makes me dizzy looking at this! I die-cut two of the Tree dies from thin Black card stock and two from some Pearlescent Green card stock from my stash. I cut all of those trees apart and added the Green behind the Black as a bit of a “shadow”. Note that the trees at 6:00 and 8:00 are from the negative part of the die cut!
I covered a panel of White card stock with some Altenew Watercolor Nebula Wide Washi Tape and die-cut that with a Nesting Infinity Oval die. I arranged the trees around the oval, glued them down, and trimmed the edges to match. I cut two oval frames from Pitch Black card stock using two of the Oval dies and glued them together.
I stamped the sentiment on a Pitch Black card base with Unicorn White pigment ink and embossed that with White Embossing powder. I glued the oval to the card base and glued the frame around the oval. I like the slight difference between the Black card stocks on this card, and I think the oval frame provides a great finishing touch! Another night time card enhanced with that beautifully colorful washi tape!
And there you have it…! 10 cards using the My Monthly Hero August 2023 Classic and Premium Kits. I did find this month’s kit a bit of a challenge…! I tend to get my kits a little earlier than regular subscribers, but well after the Design Team has gotten their kits. Since you get to see all the sneak peeks and design inspiration from the Design Team when the kits are released, I try my hardest to go beyond those initial inspirations to give you some other ideas and introduce possible new ways of thinking about and creating with your kits. This kit made my brain hurt (a little)!

Regardless of my personal struggles, we actually have a wide variety of cards this month. I really enjoyed trying to make those Park Scene Fancy Dies look as much like Yosemite as I could… and I enjoyed expanding those “portrait’ dies to fit on a “landscape” card. Though Multi-Media may not be my go-to technique, I had fun making my multi-media card and of course, those cacti rub-ons are totally charming!
While I did use a little bit of everything in this kit, I didn’t quite use all the stamps and dies this month (there are 13+ sentiments on the Classic stamp set!) I thought I was doing good just to find a useable spot for the Gold (earth-safe!) glitter!
Both the Classic and Premium Kits are still available at Hero Arts. If I managed to catch your eye or your imagination (or you’re just a California/Yosemite Junkie) and you’d like to grab a kit for yourself, please use my links below. It is always supremely appreciated and it truly helps to support this page. THANK YOU!!
My Monthly Hero Classic Kit August 2023: http://shrsl.com/474tz
My Monthly Hero Premium Kit August 2023: https://shrsl.com/46q2s
My Monthly Hero Premium Supplies August 2023: http://shrsl.com/474v2 Note that the full August release has an option to purchase JUST the Premium Elements from this month’s kit (the poppy stamps and dies, the Two-Tone Spray and the Cacti rub-ons!) which is actually cheaper than the Classic Kit – so if you just like the Premium supplies you don’t HAVE to purchase the Classic supplies as well. I LOVE THAT and haven’t noticed that option before!).
Hero Arts August Release: http://shrsl.com/474uj
Thank you so very much for sharing your time with me here. I do think you are all AWESOME PEOPLE! Please take a moment to let me know what cards are your favorites and remember to Like me, List me, Pin me Post me, Share me with all your crafty friends (and enemies!) Don’t run with scissors… and I send you and yours Love and Light and Happy Crafting!
DISCLOSURE: This site contains some affiliate links to products. I may receive a commission for purchases made through these links (at no cost to you). As an Amazon Associate I earn from qualifying purchases. Thank you!

Thank you for another great set of cards and an entertaining video. I like your wonderful adaptations of the kit elements.
LikeLiked by 1 person
Oh, wow! I’m sitting here on vacation in a cabin in South Dakota as I check out your cards. After spending a few days in the Badlands I am now exploring the Black Hills area. (I live in Wisconsin.) Looking at your first 5 cards is almost like looking at my vacation photos! (The cacti even come into play as I jabbed my finger on one while rockhounding.) All of the cards are gorgeous, the first 2 are incredible, and are my favorites! Well done!
LikeLiked by 1 person