
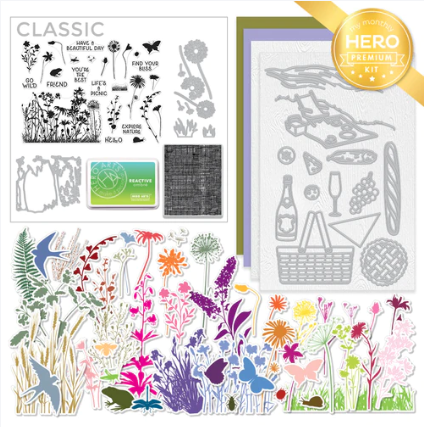
Hello folks! Scott here with my 10 cards (15!) inspired by the My Monthly Hero July 2023 Classic and Premium kits! This month, Hero Arts is inviting us out for a picnic by the river. Featuring a wildflower silhouette stamp set and an amazing collection of dies, this kit will certainly help keep your summer grooving along!

CLASSIC KIT INCLUDES:
• Clear Stamp Set, 6″ x 8″
• Dandelion Fancy Dies, 8 Pieces
• Parklands Window Fancy Die
• Linen Cling Stamp, 3″ x 4″
• Blue to Green Reactive Ombré Ink Pad
PREMIUM KIT INCLUDES
• Everything in the Classic Kit AND…
• 11 Picnic Fancy Dies
• 2 Picnic Scenic Detail Fancy Dies
• Wildflower Ephemera Pack, 45 Pieces
• 2 Sheets of White Woodgrain Paper, 5.5″ x 8.5″
• 1 Sheet each of Pesto and Passion Flower Cardstock, 5.5″ x 8.5″
I do believe this is the first MMH Kit (Premium) to include a batch of ephemera mostly modeled after the silhouette stamps. We will get to those later… as usual, I’ll make my first five cards using just the items in the Classic Kit. Let’s start with that cluster of silhouetted wildflowers and that Ombre Ink Pad.
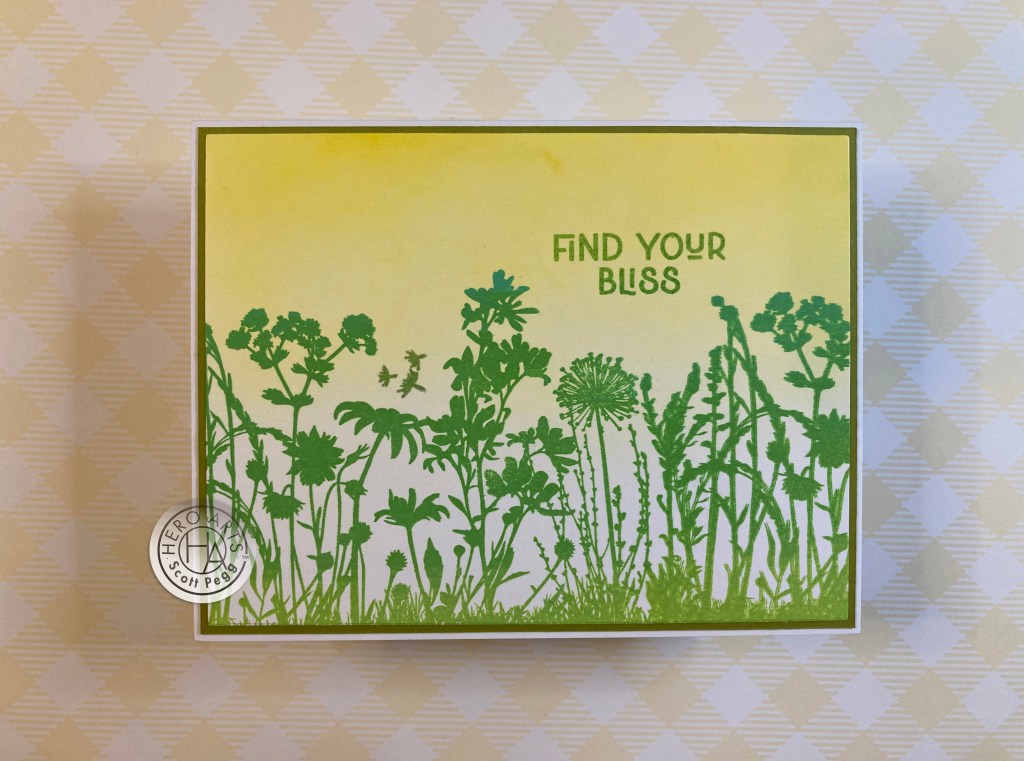
Naturally, since this is a 4.25″ wide stamp (seemingly designed for an A2 card in a portrait orientation) I want to expand this stamp to fit on an A2 card in a landscape orientation! On a panel of white card stock, I ink blended some Lemon Drop Reactive ink over a little more than half of the front. I stamped the wildflowers using the Ombre Reactive ink (I did the blue ink towards the top of the flowers thinking it would probably blend with the yellow background to make green – it did – close enough!) I shifted the stamp a little to the left for the first stamp (so you don’t see the left side of the stamp) and then stamped the right side (now we see the left edge!) to complete the panel.
I added the dandelion floaters (I actually thought those were dragonflies at first!) to add a little movement to this scene, and stamped the sentiment using only the greens on the Ombre Stamp pad. I trimmed the stamped panel to 4″ x 5.25″ and added a thin Pesto mat behind that. (No… I’m not cheating… I do have some Hero Hues Pesto card stock in my stash…) I glued those to a white A2 card base and called it done! I really like this arrangement of wildflowers – well composed and so much quicker than using the individual stamps!
The Dandelion Fancy dies caught my eye, and I thought it would be fun to pair up the dies with the dandelion stamps.

I die cut the three Dandelions and three floaters from some plain white card stock, and used a light grey alcohol marker for the stems and centers. I do like these dies! On a panel of light grey card stock, I ink blended some ‘windy’ swooshes with a very small blending brush, using the Blue from the Ombre Ink pad, and some Unicorn White Pigment ink. I stamped the Dandelion stamp (and the floaters) with HA Contour ink, and did a little stamp surgery on the floater stamp so I could get a single floater to stamp all by itself. I stamped the sentiment using the Contour ink (many stampings) and then used Embossing and Watermark ink to stamp it one last time so I could emboss it with clear embossing powder
I trimmed the stamped panel to 3.25″ x 4.5″ with a Lawn Fawn Stitched Rectangle die, and added a mat of Gina K. Blue Raspberry card stock, and glued those down to a White card base.
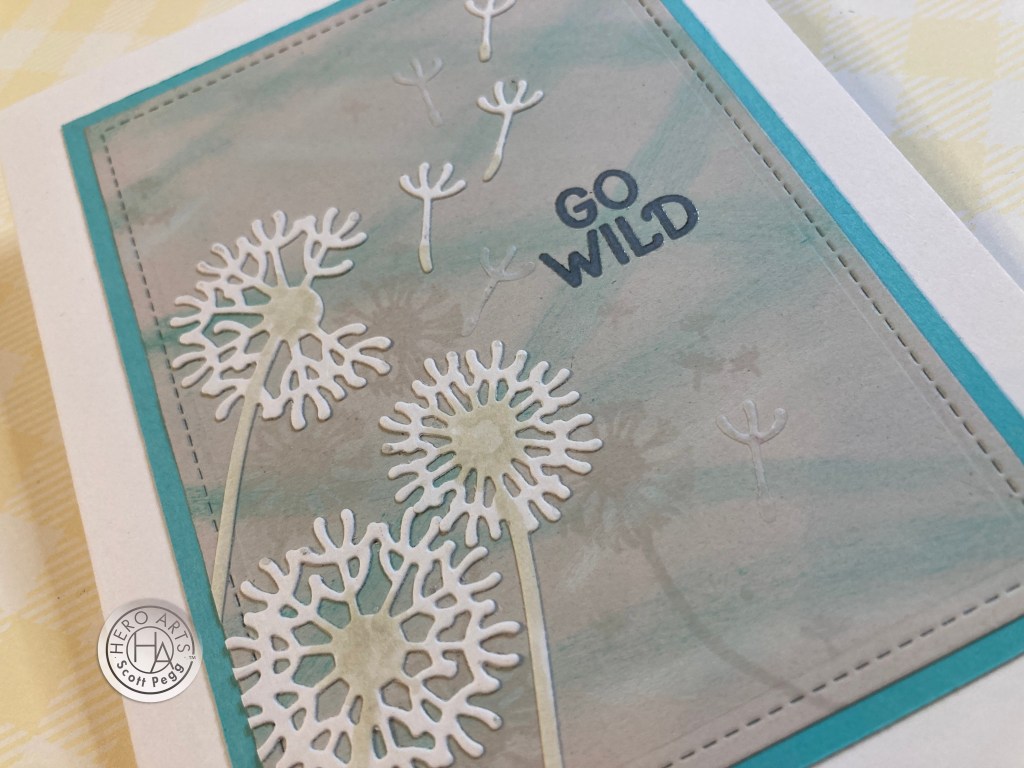
You know that ethereal quality that dandelions have when they’re ready to shed their seed…? I had a piece of vellum sitting on my desk and I wondered if that might possibly work for some of the floaters. I die cut the three floater dies from vellum and added them to the card front. They match the grey stamped floaters quite nicely…
I wonder what it might look like to die cut the complete dandelions from vellum – maybe add a card stock stem… or thicker vellum..? Very interesting!
We also get that 3′ x 4″ linen cling stamp in the Classic Kit… great for multi-media cards or just a simple background!

Well, HELLO…! I stamped the Linen Cling stamp on some White card stock using Lemon Drop and Creamsicle Reactive inks, and stamped the flower and snail and sentiment using HA Cocoa ink. I dug around in my stash and found the perfect die to cut that whole stamp out – the largest of the Spellbinders Nestabilities Deckled Rectangles Large dies.
I ink blended Walnut Stain Distress Oxide ink around the edges, and mounted that to a White card base with foam tape. This card needed a little sparkle, so I found these copper sequins in my stash and added a few to the card front. This is a very simple, straightforward card that still looks lovely and certainly packs a punch!
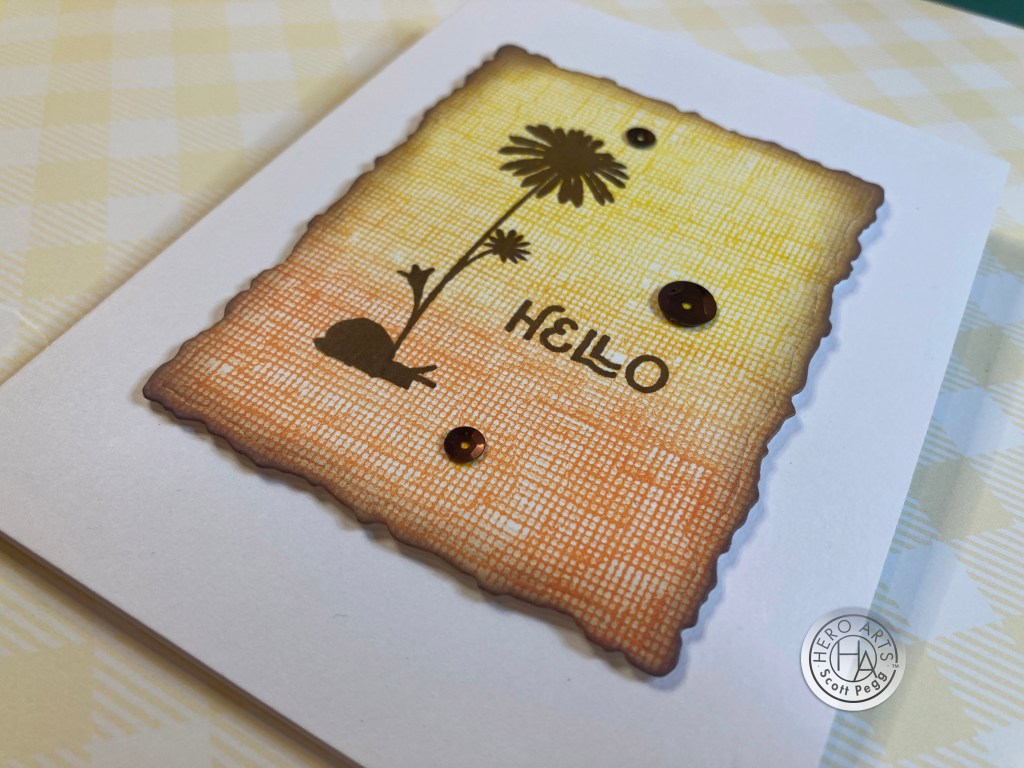
I will probably pay a little more attention to that cling stamp now that I know I have the perfect die for it!
The Parklands Window Fancy die. Hmm. This die didn’t seem to match the scale of our stamps or the dandelion dies…
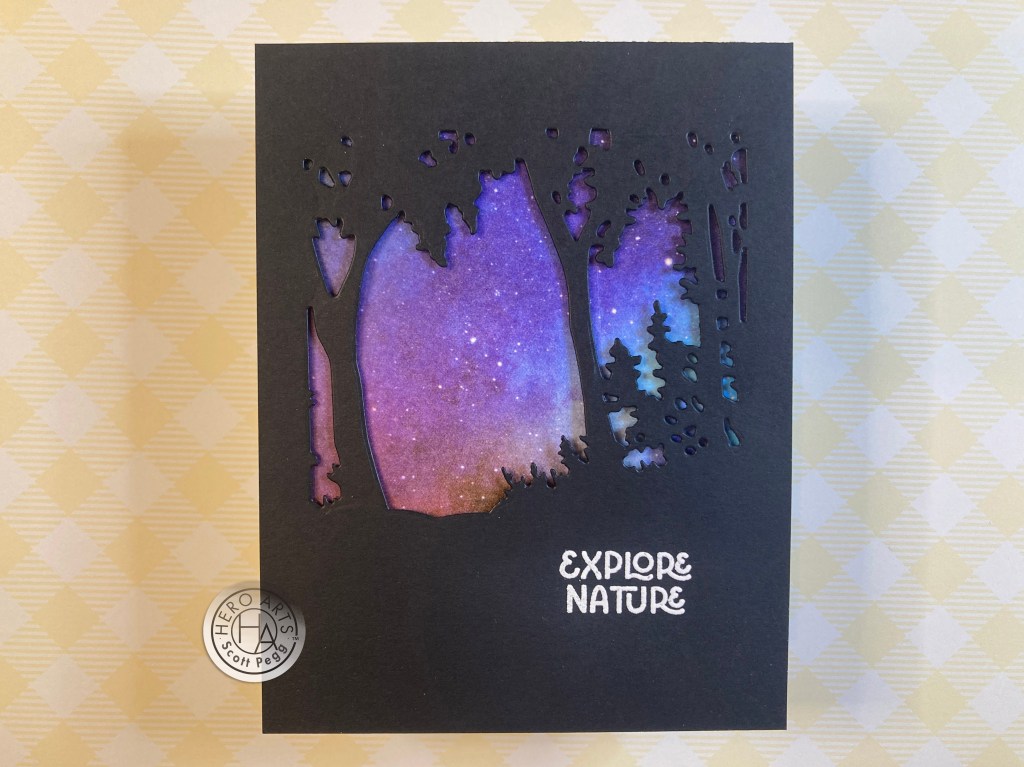
Talk about very simple, straightforward yet impressive card…! The Parklands Window is die-cut from a 4.25″ x 5.5″ piece of Hero Hues Pitch Black card stock. The sentiment is stamped with Unicorn White Pigment ink and embossed with White embossing powder. The background is a piece of Altenew Watercolor Nebula Wide Washi Tape burnished to the front of a White A2 card base. I added thin pieces of black foam tape behind the die cut and mounted it on top of the nebula. Though I’m not quite sure what you might use this sentiment for… I do think this is a beautiful card!
Okay… now I feel like I have short-changed that Parklands Window Fancy die. Let’s try this one again with some color!

This might be a little bit more in line with what the designers at Hero Arts were thinking about for that Fancy die! This time I die-cut the Parklands from a 4.25″ x 5.5″ White alcohol-friendly card stock and colored everything with my Spectrum Noir Alcohol markers.
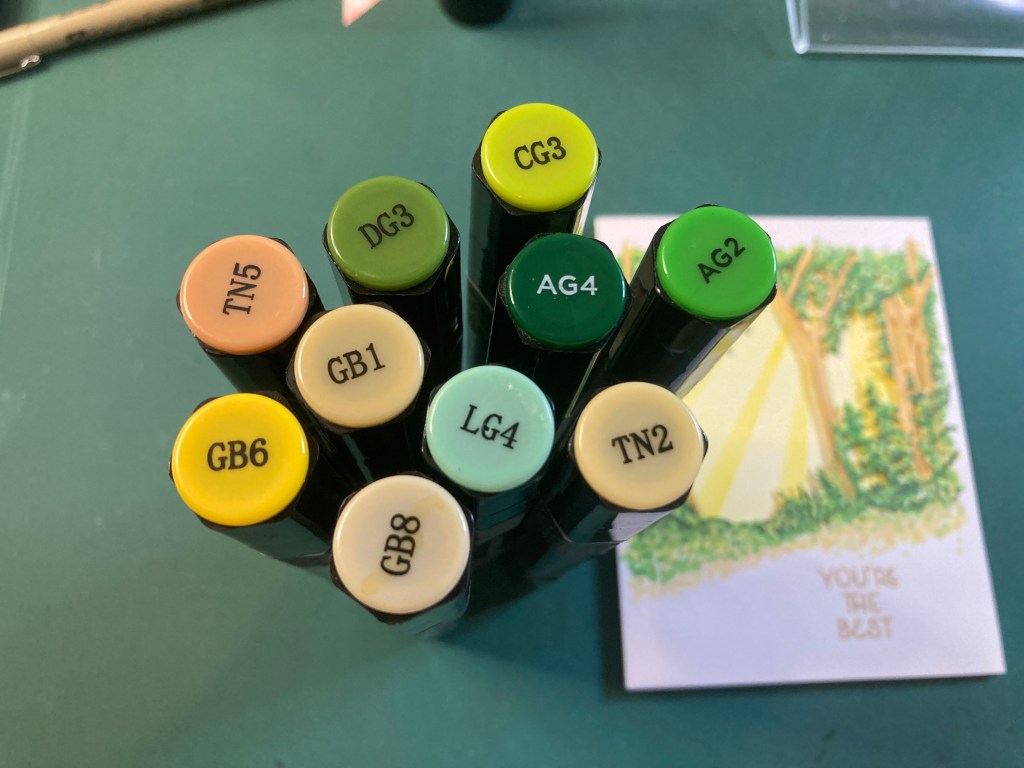
These are the markers I used to color the Parkland. Not a lot of colors, but I did go back over the whole thing many times… so there’s lots of layers! I think of this as a little bit more abstract than realistic… which also led me to just leave the edges ambiguous rather than try to color the whole card front or create some rigid framework.
I ink blended the sunbeams on a White A2 card base using Lemon Drop ink and some some simple masking.
I knew I didn’t want to draw in more Parkland in the background, and I thought a ‘clearing’ with the sun beaming through the trees would be effective. I stamped the sentiment with Antique Linen Distress Oxide ink and embossed it with Clear embossing powder. I added foam tape to the die cut and mounted it to the card base.

This is a fun encouragement card and a perfect thank you card… especially for something a little more personal!
Well, that’s five cards, but I haven’t used hardly any of the Wildflower stamps… sometimes I think silhouette stamps can be a little boring… and I was trying to bring some life (and color) to these flowers…

VOILA! I used my TomBow watercolor markers to color the stamps and then stamp ’em! I secured a panel of Canson Mixed Media card stock to a Stick & Stamp mat and put that in my MISTI to make multiple stampings easy. It’s been a while since I “watercolored” with stamps… Colorado Craft Co. has a whole line of stamps specifically made for “watercoloring” with watercolor markers..!

The best thing about coloring your stamps is you can give a flat silhouette multiple colors quite easily. You can also do selective “masking” by simply not coloring a portion of the stamp (the green plant on the far right actually has a leaf that would be right on top of the blue cornflower, so I simply just didn’t color it in… no masking needed)! Also note that the grass along the bottom doesn’t have a flat bottom edge..! You can also layer colors and create some depth and dimension which works particularly well with something organic… like wildflowers! Loving this!
There is a section in my corresponding YouTube video where I show the stamping of a few of these flowers… if you want to see. I stamped the sentiment with Walnut Stain Distress oxide ink and embossed it with Clear embossing powder. I die-cut the panel to 5″ x 3.75″ with a Lawn Fawn Stitched rectangle die, added a dark brown mat behind that and glued them both down to a White card base. Some tiny bronze gems adds a little more sparkle around the sentiment – Have a beautiful day, INDEED! I must remember to use this ‘stamp-coloring’ technique more often!
That covers almost all of the Classic Kit… now we can move on to the Premium Kit and those Picnic Fancy Dies!

Very cute Picnic basket! I die-cut the basket, champagne, grapes, cheese, bread and salami from some alcohol-friendly card stock and colored them all with my Spectrum Noir Alcohol markers. I did use a Gold Gel pen for the bottle accents and a White Gel pen for the grape highlights. I die-cut the champagne glasses from Hero Arts Acetate – we got some of that in our MMH November ’22 Kit – and two of the triangle dies from some old Lawn Fawn Gotta Have Gingham pattern paper.
I trimmed a piece of the yellow Lawn Fawn Gingham pattern paper to 3.5″ x 5.5″ and stamped the sentiment with Antique Linen Distress Oxide ink and embossed that with Clear embossing powder. I glued that to the center of an A2 White card base, and added two 1/8″ strips of Hero Hues Canary card stock to the edges. I attached all the goodies and the basket to the card front using glue and thin pieces of foam tape.

For a final touch I added some yellow gems to highlight the sentiment and add a little sparkle. These are all fun dies and I really think cutting the champagne glasses from acetate was rather inspired!
And then we have the Picnic Scenic Detail Fancy dies… another die set that doesn’t seem to match the scale of anything else in this kit… neither the stamps nor the ephemera nor the picnic dies… kind of a stand alone pair of dies…!
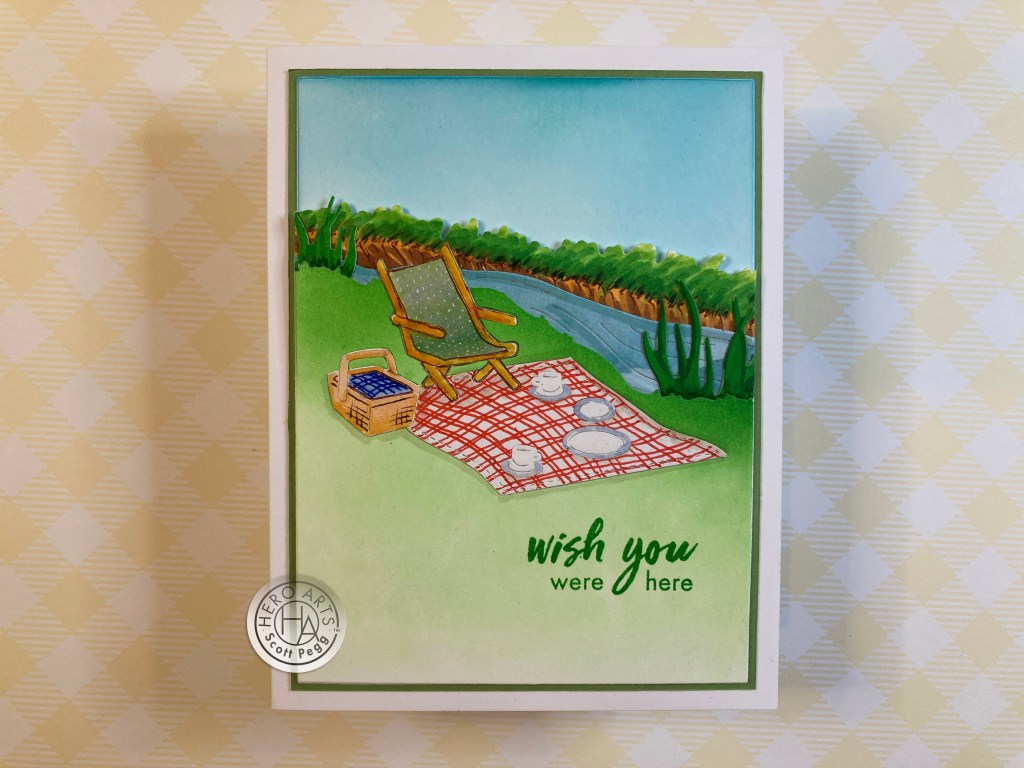
I went back and forth a few times on this card… I die-cut the picnic die just above the middle of an A2 panel of alcohol-friendly card stock and colored the chair and basket with alcohol markers and used a Red Pigma Micron pen to add the pattern to the picnic blanket. And a Blue Pigma Micron pen for the basket. Then I cut those pieces away from the panel. I die-cut another picnic die from more White card stock and, after cutting out the dishes, ink blended the panel with Green Apple Distress Oxide ink. Then I glued the colored pieces to the top of the ink-blended piece – including the dishes!
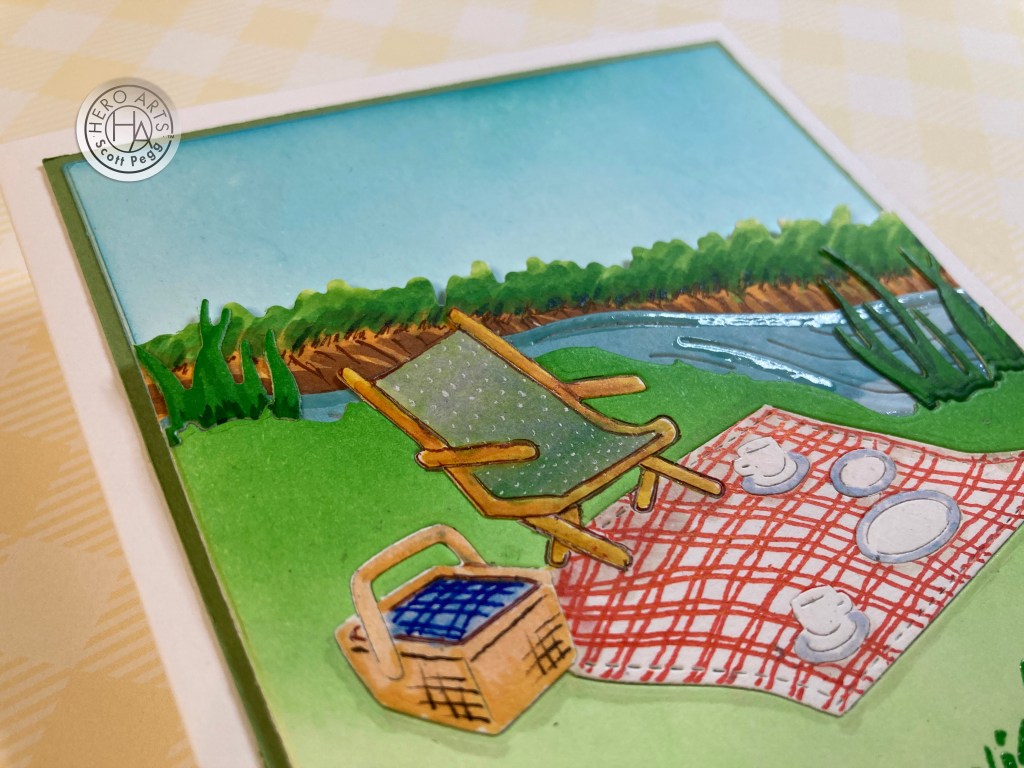
I die-cut the water (river!?) from a piece of blue watercolor pattern paper, added some clear embossing with an Emboss It Pen, and fiddled around with its placement. It seemed a little odd to me to put it behind the picnic die-cut, but I thought if I added the far bank of the ‘river’ it would make more sense! I colored up the far bank with alcohol markers and cut the top edge using the grass die from the MMH May ’23 kit. I also die-cut the two grass dies from the Dandelion die set colored them with alcohol markers and glued those behind the near bank to grass it up a bit.
One more panel of 3.75″ x 5″ card stock ink blended with some Splash Reactive ink will be our background. I trimmed the picnic, river and far bank pieces to 3.75″ wide and attached them to the card front with glue and some thin pieces of foam tape. I stamped this sentiment (from the MMH July 2019 kit!) with Green apple Reactive ink and embossed it with Clear embossing powder. I think the river die works well in this arrangement… the far shore piece certainly helps it to read a little better as a river, and I like this sentiment as well… since there’s only ONE chair… I do wish YOU were here!
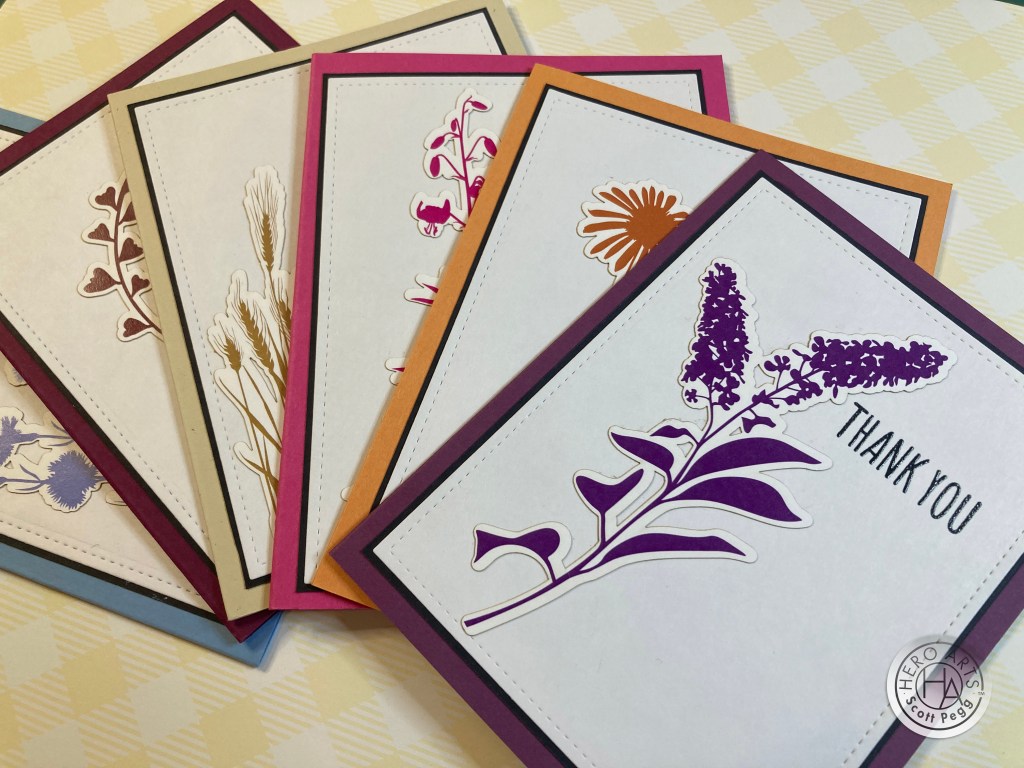
And then we have the 45 pieces of ephemera… I have to admit right here from the start that I am not a big fan of ephemera… and the pieces in this kit, though colorful, are still just simple silhouettes with variably accurate die-cuts.

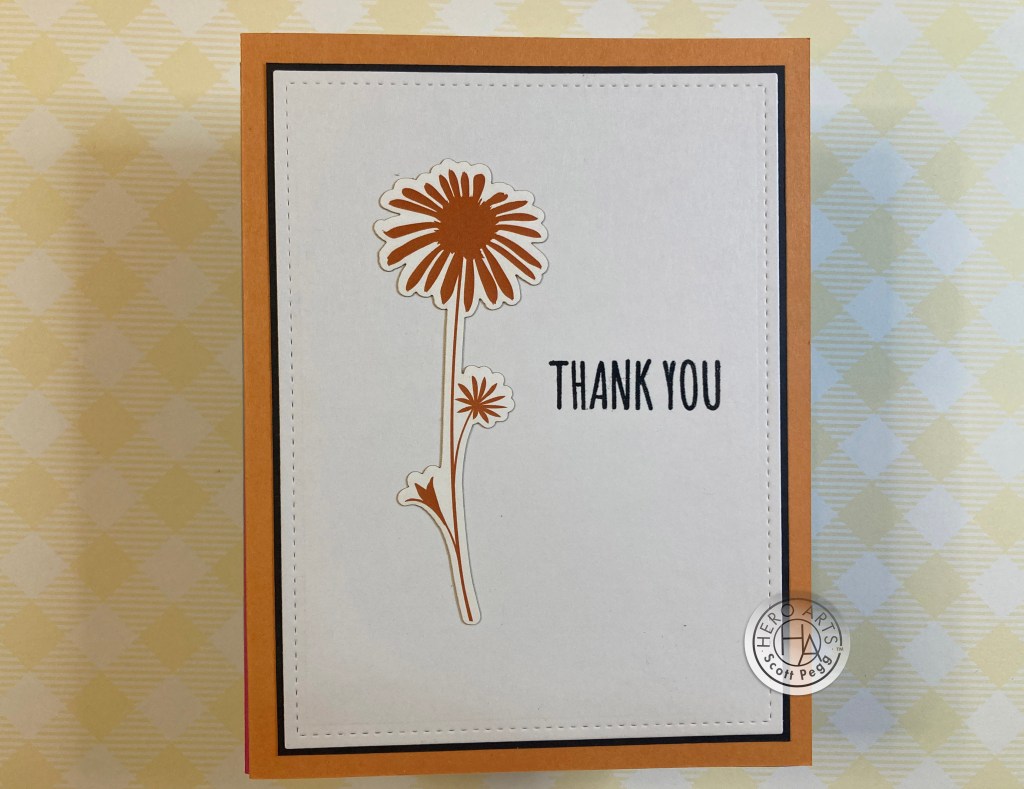

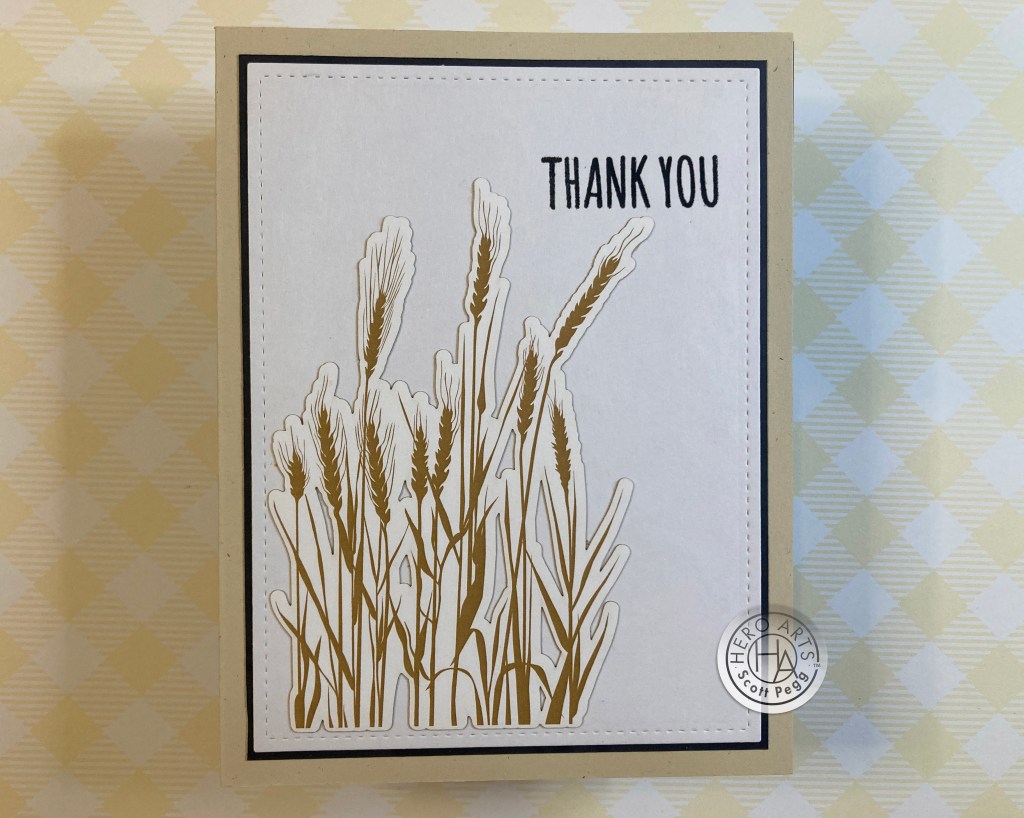
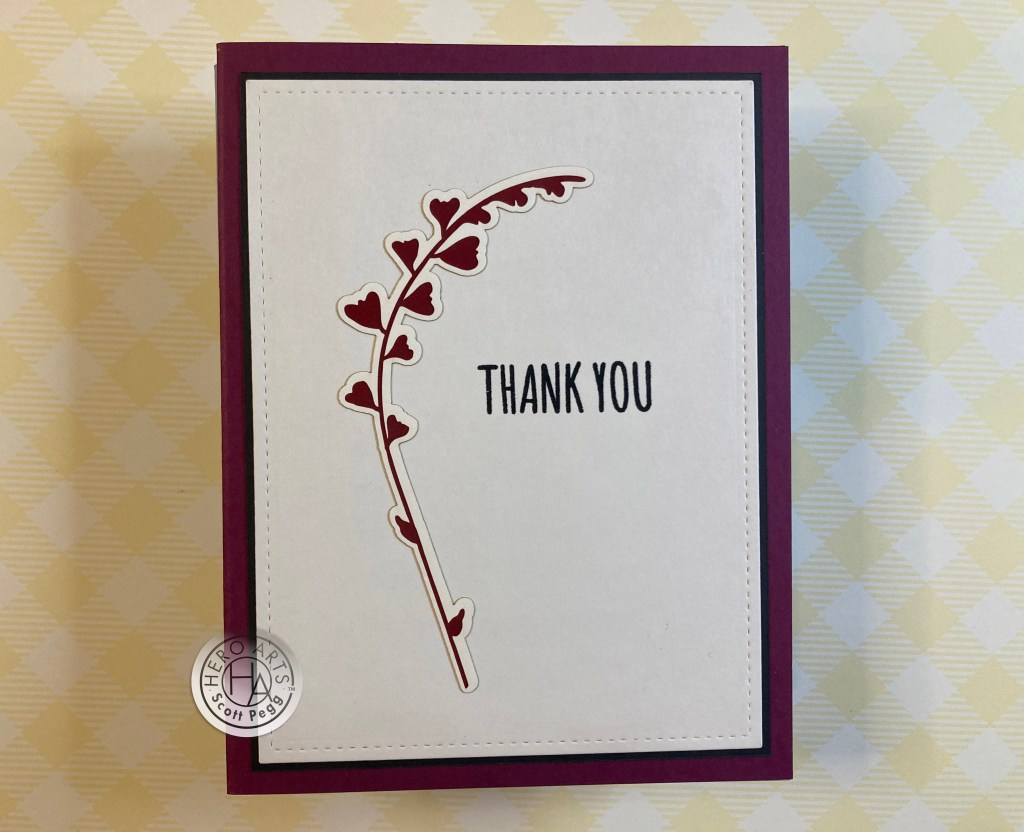
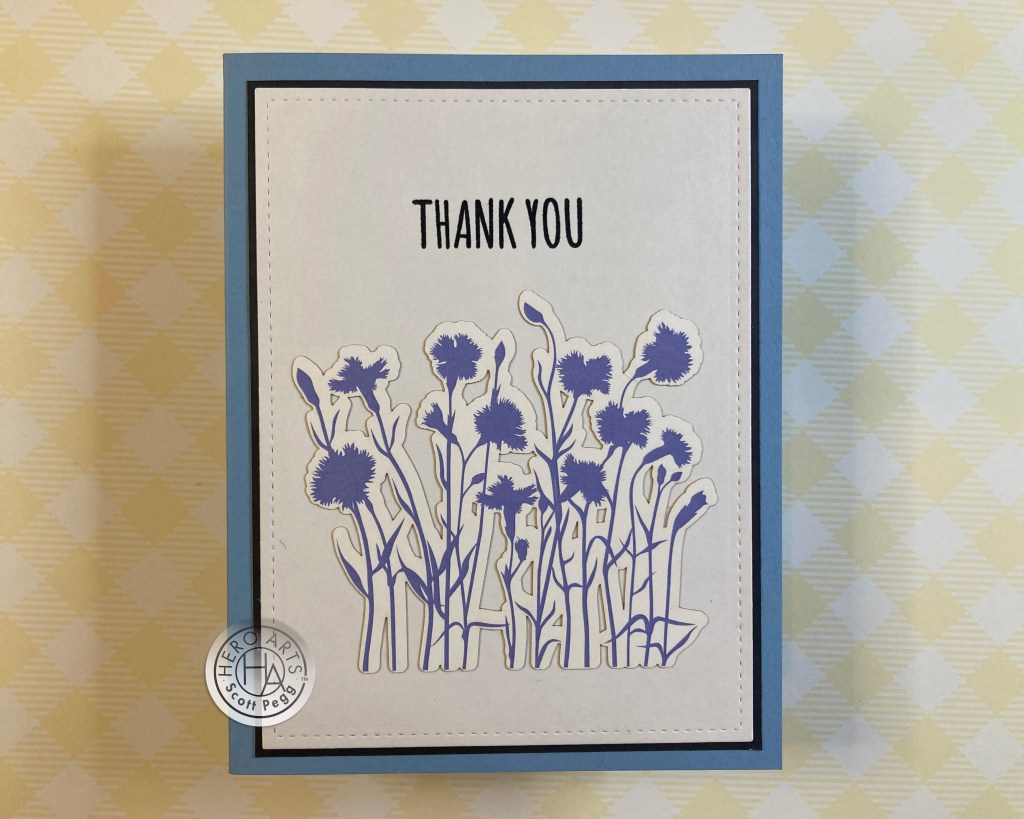
I thought one great way to use the ephemera would be to make a brilliantly colorful themed set of Thank You cards! Perfect for gift giving! I die-cut six panels of White card stock to 5″ x 3.75″ with a Lawn Fawn Stitched Rectangle die and added a thin black mat behind all of them. I picked out six of the largest ephemera pieces and dug through my stash to find matching card stocks – These turned out to be: Gina K Plum Punch, Gina K. Sweet Mango, Gina K. Passionate Pink, Gina K. Sandy Beach, Hero Hues Plum, and Hero Hues Periwinkle. Not perfect matches, but pretty darn close! (It sure seemed to me that almost every piece of ephemera in our kit was a completely different color…!)
I turned all that card stock into A2 card bases, and matched them up with the ephemera pieces and decided where to stamp the sentiment. I stamped the Thank You sentiment (from the MMH May ’23 Kit) with Intense Black ink and embossed them all with clear embossing powder. The panel is glued to the card front and the ephemera is glued on top of that.
I do enjoy giving a set of cards as a hostess gift or a simple present for any occasion – Thank you cards are certainly useful for almost anyone!
I really like the Pie Die that came with the Picnic Fancy Dies but I couldn’t justify packing it into our picnic basket on its side… all the filling would come out…! So I saved it for a good pun on my last card…
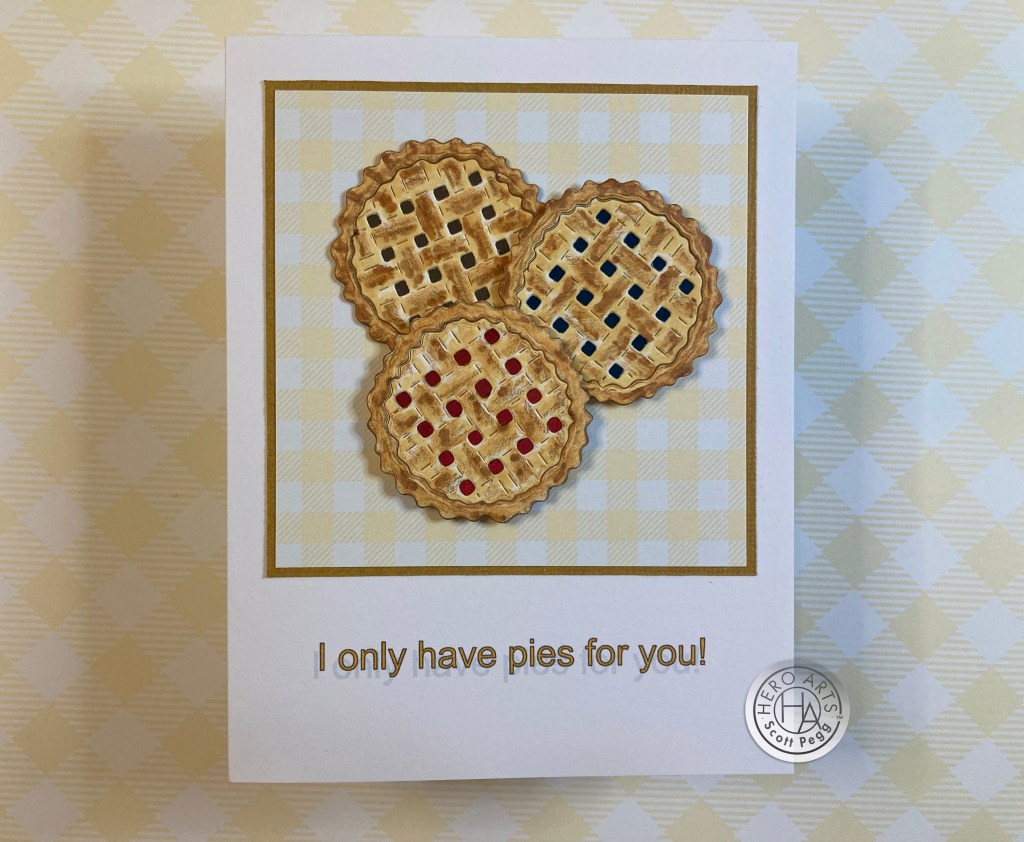
From some plain Ivory card stock, I die-cut six pies, and colored them with my Alcohol markers – the centers on three and just the crust edges on the other three – I also added a little texture with my colored pencils. I separated the crusts from their (uncolored) centers and glued them on top of the crusts on the three fully colored pies – that adds some nice thickness to the edges of our pies! I die-cut 1.5″ circles of Metallic card stock in red, blue and champagne (good apple filling color!) and glued those to the back of the die cuts for the fillings! That’s a great Pie Die!

I created and printed this sentiment using my Silhouette Software and the Arial font directly on the front of an A2 card base. I cut another piece of Yellow gingham to 3″ square, added a Mustardy/Tan mat and glued those to the card front. I attached the Apple pie with glue and the other two pies with foam tape.
Using the metallic card stock for the fillings really pops and adds all the shine this card will ever need! And I think that’s a terrifically good pun on top of it all!
There we have My 10 Cards (well… 15…) inspired by the My Monthly Hero July 2023 Classic and Premium Kits. Quite an eclectic batch of cards. I did feel like this kit had like three or four mini-kits included… we have the wildflowers and dandelions, the Parkland Window, the picnic dies and then the Scenic Detail Fancy dies… all apparently themed together, but not necessarily the easiest of items to USE together. I mean, we don’t even get to the picnic till card 7!

If you like a wide variety of items in your card kits then this one is right up your alley! I really like all the parts of this kit, but did find it a challenge to use them all together. I really love the ‘Beautiful Day” card, and the Nebula Parkland Window, and the pies (of course… I LOVE pie!) and the Thank You card set… there’s a lot of variety here!
Both the Classic and Premium versions of this month’s kit are still available at Hero Arts! If I have caught your eye or given you any new ideas and you want to grab a kit for yourself, please use my links listed below when you go shopping at Hero Arts. It is always thoroughly appreciated and it actually does help support this page! Thank you!!
My Monthly Hero July ’23 CLASSIC Kit: http://shrsl.com/45zas
My Monthly Hero July ’23 PREMIUM Kit: http://shrsl.com/45zau
Hero Arts July ’23 Complete Release: http://shrsl.com/45zax
Thank you so very much for sharing your time with me here! It is always appreciated and valued and I know you have so many other things to do with your time that I am quite humbled that you choose to spend some of it with me.
Let me know your thoughts on this kit, and which cards are your favorites. Please remember to Like me, List me, Pin me, Post me, Share me with all your crafty friends… beware of heatstroke… and I send you and yours Love and Light and, as always, Happy Crafting!
DISCLOSURE: This site contains some affiliate links to products. I may receive a commission for purchases made through these links (at no cost to you). As an Amazon Associate I earn from qualifying purchases. Thank you!

Scott, your cards are stunning as always. I love the linen cling stamp and the way that you inked it makes a look as if it’s a canvas. Thank you for sharing your creativity. I always look through YouTube to see if you had posted your monthly 10 cards one kit and I was surprised that you posted them at the end of the month.
LikeLiked by 1 person
Thank you, Florie! Sometimes I don’t get my kit till the middle of the month, so… it take me a while to get 10 cards together and post!
LikeLike
Thank you 😊 again. I haven’t had a chance to look at my kit yet because I just received it at the end of July. So happy that inspired me with this wonderful kit every month. There aren’t too many people that make 10 cards anymore.
LikeLiked by 1 person
Love your cards (as usual!) this month! My favorites include the Find Your Bliss, Explore Nature, and Life’s A Picnic cards. You always do an awesome job with coloring! ☺
LikeLiked by 1 person