Hello my dear Folks! Here we go again with my 10 cards created with the My Monthly Hero & My Monthly Super Hero Kits for June of 2026. Summer is in the air as we dig into these “Soak Up the Sun” themed kits. Even after last week’s heat wave, I am definitely ready for some warmer temps!
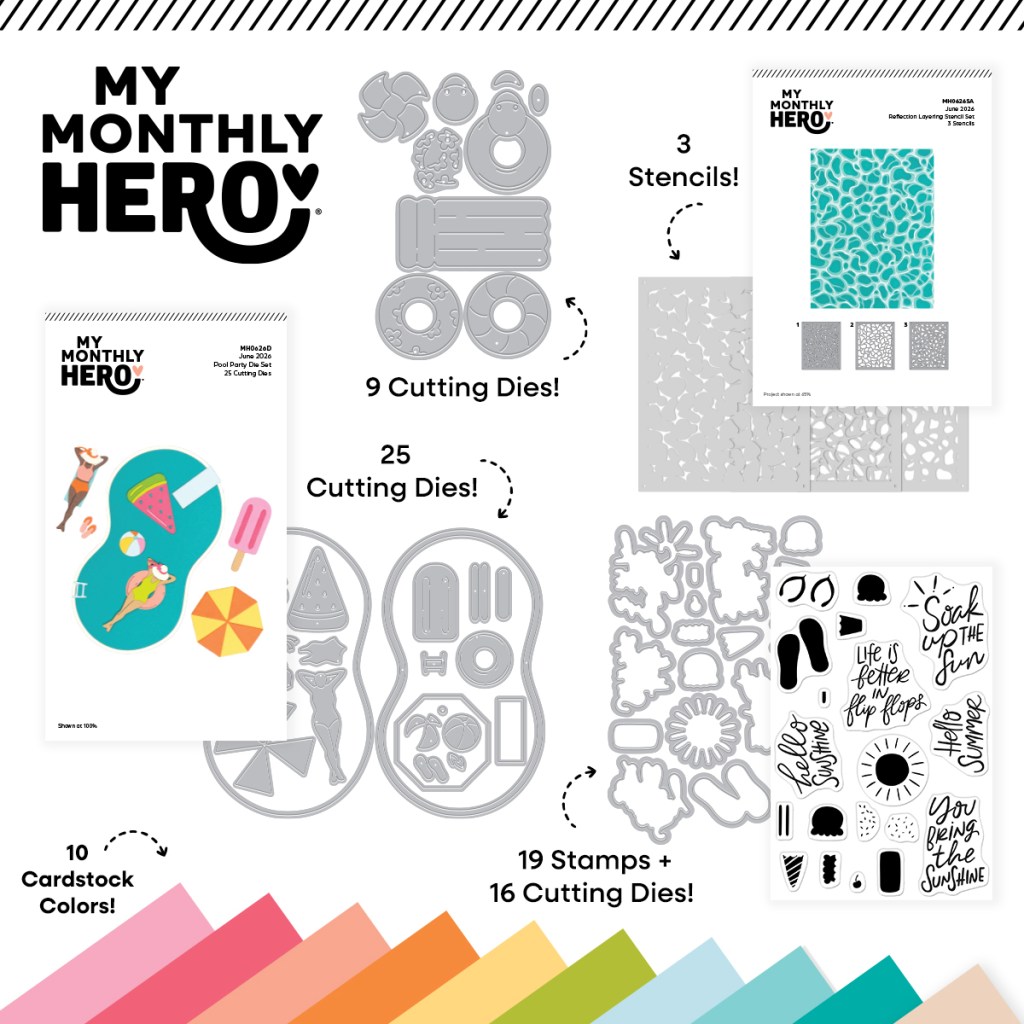
To kick off the My Monthly Hero kit we have the Hello Summer Stamp and Cut set with five sentiments and some summer icons silhouette stamps – and dies to cut everything out.
Then we have the Reflection Layering Stencil Set that includes three stencils to color this fun watery pattern.
The Pool Party die set comes next with a large kidney shaped pool and a young lady with an assortment of pool floats and umbrellas and a popsicle to boot! I guess there are no guys at this party… that seems kinda boring…! (let’s see if I can fashion a gentleman swimmer from these dies…!)
We also get this small Fun Floats Die Set with a variety of pool floats and even a Ducky preserver! WOW! That’s a lot of dies in this kit! We finish out the Hero kit with 10 (8.5″x5.5″) sheets of Spellbinders Color Wheel card stock in Tutu, Dahlia, Coral, Carrot, Beeswax, Peridot, Seaside, Waterfall, Teal Topaz and Fawn.
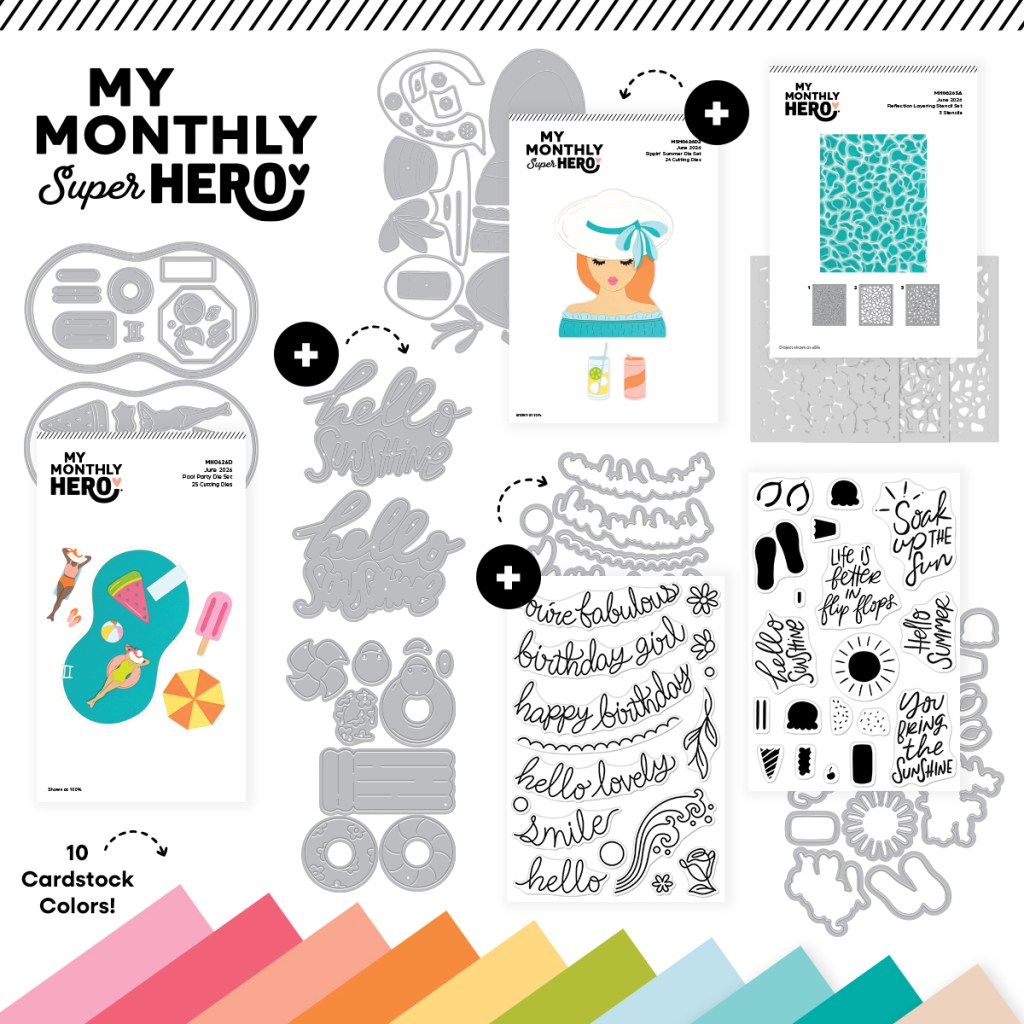
The My Monthly Super Hero Kit includes everything in the Hero Kit AND this Sippin’ Summer Die Set which makes a lady with downcast eyes and a big sun hat, along with a can (or glass) of something sippable!
Then we get a nice, large Hello Sunshine Die Set which includes the sentiment die and a shadow die as well. Not a very big shadow, but definitely helpful when assembling this sentiment.
Then we wrap up this whole kit with the Fabulous Phrases Stamp and Cut. Six more sentiments that appear to be curved to fit on the large sun hat in the Sippin’ Summer die set, and a few flowery icons. All the sentiments and images have matching dies as well.
Another great value with these kits though I am a little disappointed that there are not more stamps to color… maybe next month! I will go through this whole kit and try to make 5 cards with the Hero Kit and 5 more using the whole Super Hero Kit. Let’s see how much of this packed kit I can use on 10 cards! This first card seems perfectly appropriate to get us started!
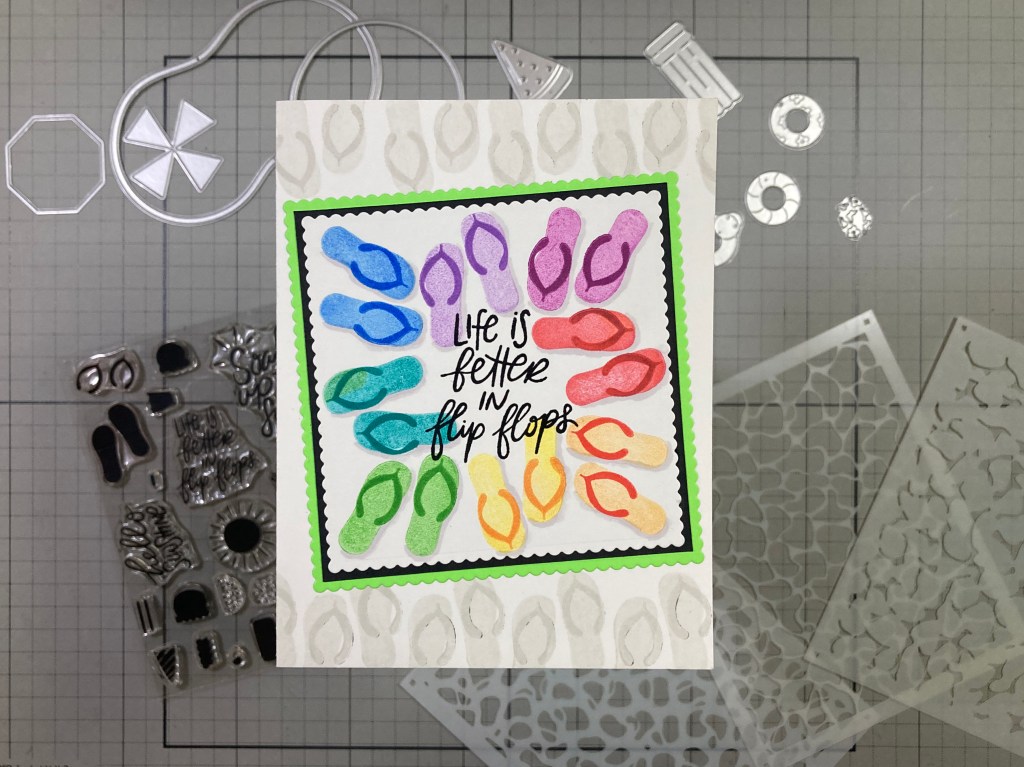
I reached for my Gina K Designs 4″ Wreath Builder Template to stamp these flip-flops in Hero Hues Fruit Punch, Creamsicle, Lemon Drop, Green Apple, Blue Raspberry, Blue Hawaii, Thistle, and Berry Smoothie Reactive inks. All the straps are stamped repeatedly in the same colors except for the Orange and Yellow which have straps of Red and Orange respectively. I did stamp the four outward facing thongs first, then repositioned the stamps for the four pair facing inward. When the stamping was complete, I stamped the sentiment with VersaFine Onyx Black ink and embossed that with Clear embossing powder.
I did take a Light Grey Alcohol marker and added some subtle shadowing around the flip-flops. That gives this footwear a bit more presence! I die-cut the stamped panel to 3.5″ x 3.5″ with a Tonic Studios Scallop Square Layering Die Set, added a thin Black mat behind and then added a Fluorescent Green mat die-cut at 3.75″ square with the same Scallop dies. I stamped the flip-flops across the top and bottom of an A2 White card base using Hero Hues Contour ink, then I glued the matted and inked panel on top at a fun angle. Remember when we used to call these thongs and nobody even snickered..!!??
Now we have the Reflection Layering Stencils. I was eager to see how well these worked and did learn that you do want to use your lightest color for Stencil 1, darker for Stencil 2, and darkest for Stencil 3. that seems to work best!
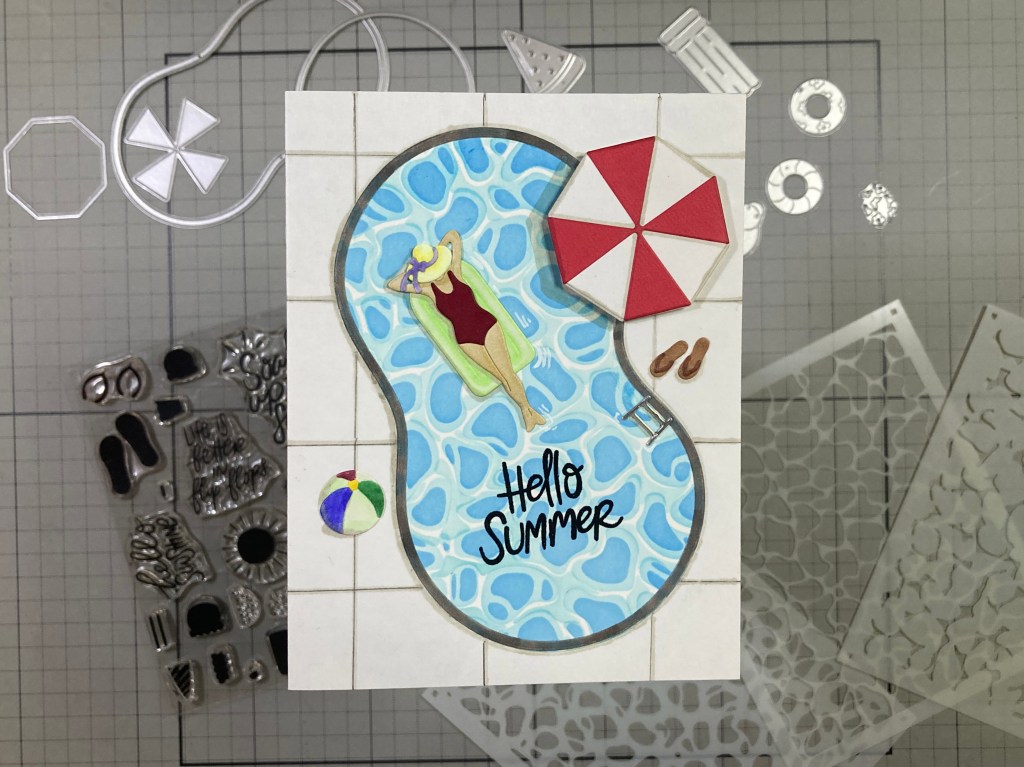
This Reflections Stencil is inked in Hero Hues Pool Party (#1) Splash (#2) and Blue Hawaii (#3) Reactive inks. I really do like the pattern the stencils give us!! I die-cut the Kidney Pool from the stenciled pattern and die cut the edge of the pool from White card stock and colored it with a Grey Alcohol marker. I glued those to the front of an A2 White card base. I die-cut the “ladder” from some Silver Metallic card stock and die-cut the umbrella, flip-flops and bathing suit from colored card stocks.
I die-cut our lady and her hat and bow, her pool float and beach ball from White card stock and colored them with my Alcohol markers. I actually used the top of the popsicle for her float – a little smaller than the Watermelon float in this set! I assembled all the die-cut images (those flip-flop straps rank as teeny-tiny fiddly bits) I stamped the sentiment in the water with Versafine Onyx Black ink and embossed it with Clear Embossing powder. I drew on some “concrete” lines to fill in the background using a pencil and a Light Grey Alcohol marker, and then I glued the assembled images in place. I mounted the umbrella on some foam tape for a little added dimension, and then added a little more umbrella, beach ball, and pool float shadows with a Light Grey Alcohol marker. Party of One? Right this way!
I do have a particular Embossing powder I wanted to try with the Sun stamp in this set, so I did a mock-up first to see how well it would work…
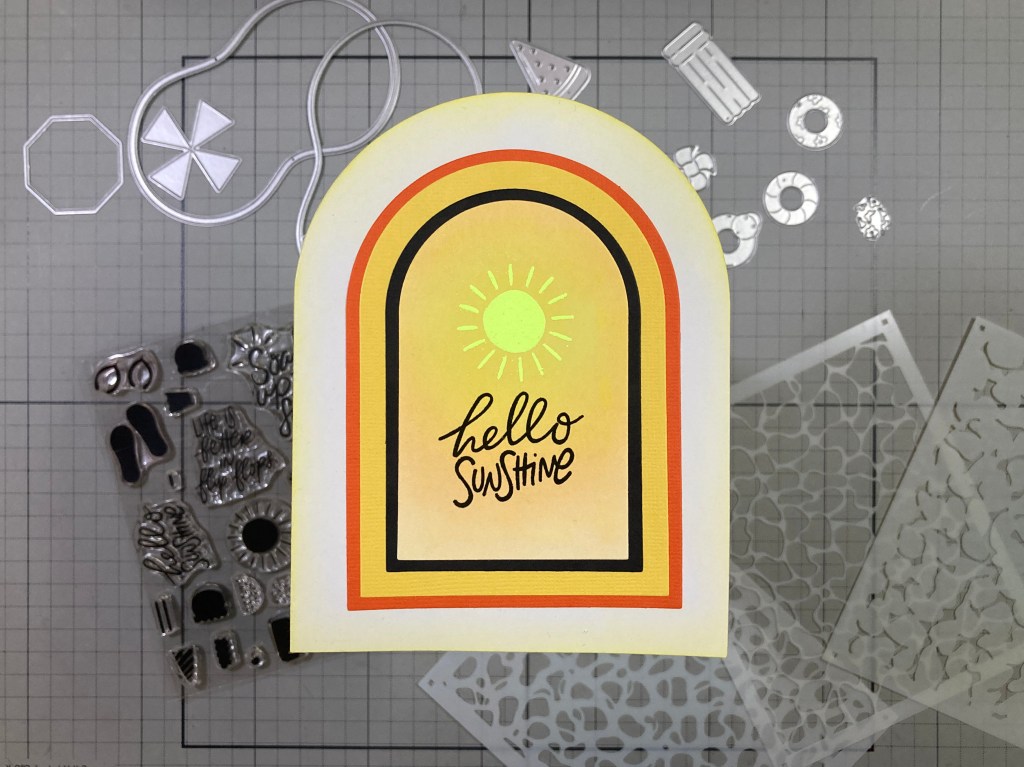
This is Neon Lemon Embossing powder from Love From Lizi! It works terrifically well! I ink blended Lemon Drop and Creamsicle Reactive inks on a small panel of White card stock and when that was well-dried, I embossed the Sun using VersaMark ink and the Neon Lemon embossing powder. Then I stamped and embossed the sentiment as usual.
I broke out my Spellbinders Essential Arches dies and and cut the inked panel with the 2.25″ wide die. The Black mat is 2.5″ wide, the Yellow mat is 3″ wide and the last Orange mat is 3.25″ wide. I die-cut a White card base with the 4.25″ wide Arch die and did some light ink-blending on the edges with Lemon Drop ink. I glued the matted and inked panels on top. LOTS of shine on this card without a single embellishment!
The Fun Floats Dies Set gave me the idea of doing a card just featuring pool floats! There are four complete floats in this die set and when added to the two floats in the Pool Party set, that’s SIX (seven if you count the popsicle top as a float!).
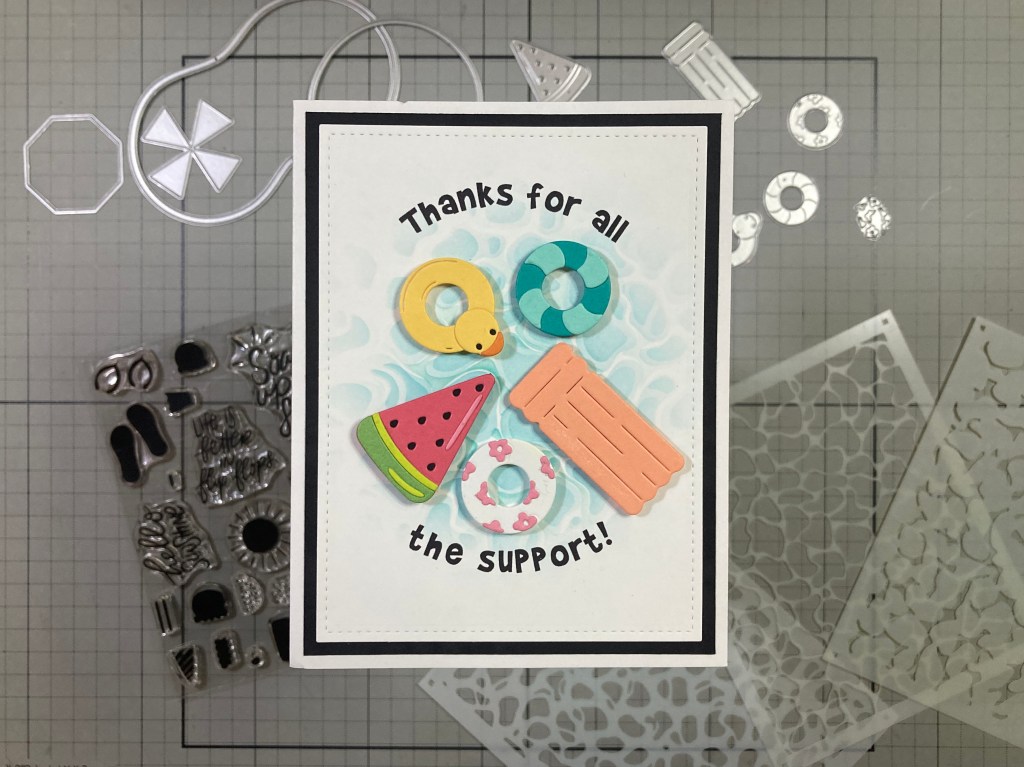
I did use only the Color Wheel Card stock in this set for our pool floats here! I started by ink-blending a circle of the Reflection stencils on a panel of White card stock ONLY using Pool Party Reactive ink – lightly for stencil #1 then darker for Stencils #2 and #3. A single color works very well with these stencils! I die-cut all the floats from the card stocks in the kit and assembled all the pieces together – some very small fiddly bits! (The Black and White is from my stash). Gotta love that duck and watermelon slice!
For a sentiment, I could have put “Soak up the sunshine” or “Hello summer / sunshine”. “You bring the sunshine” doesn’t work… even the sentiments in the Super Hero Kit don’t really do it for me! I finally came up with this Thanks sentiment as a little visual double-entendre..! Using my Silhouette Software, I printed this sentiment right on top of the reflections stenciling using the Brady Bunch Remastered font (one of my favorites!) and my piggy-back printing method. I die-cut the panel to 3.75″ x 5″ with a Lawn Fawn Stitched Rectangle die and added a 4″ x 5.25″ Black mat before gluing them both to a White card base. All that’s left is to add the floats with some foam tape! I did think about making these all shiny with Glossy Accents or even giving them white “reflections” with a gel pen, but I really liked the simple straight-forward approach for these die-cut pool floats – let them “shine” all on their own!
By this point I’m really dying to do some coloring… any coloring…! I’m going to have to jump into the Fabulous Phrases Stamps in the Super Hero kit for something to color…!!
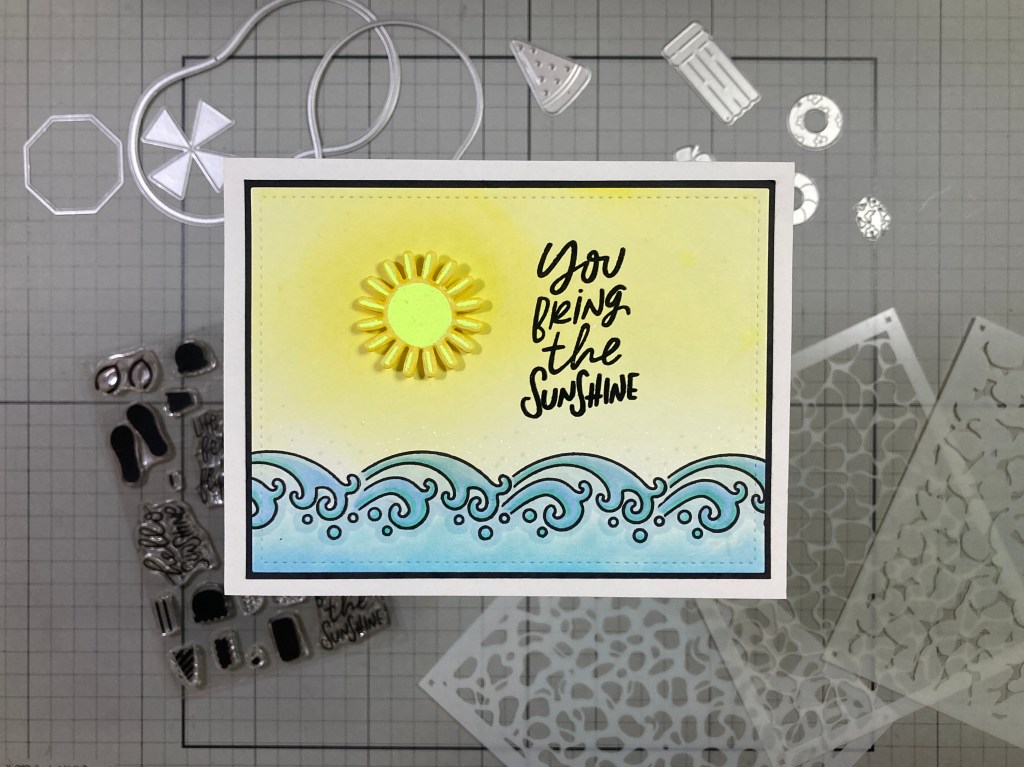
Okay… so it’s just waves… but at least I got to COLOR the waves!! I played around with this “wave” stamp for a while – in a few configurations – before I decided to just cut a mask for the front of the wave and group them together – that stamp does have very long “tails”. I stamped the line-up of waves on a panel of White card stock using VersaFine Onyx Black ink and when that was dry, I colored the waves with my Ohuhu Alcohol Markers. I ink-blended Lemon Drop Reactive ink on the top of the panel concentrating the color on the mid-left. When that was all dry, I stamped and embossed the sentiment as usual.
The sun is die-cut from the mock-up I did for the “hello sunshine” card – no point in wasting it! The panel is die-cut to 3.75″ x 5″ with a LFSRdie and a thin black mat is added and glued to an A2 White card base. I did add some soft dots of blue around the top of the waves, but the shine on the sun and the sentiment is all the sparkle that’s needed!
Now we have the quite large Sippin’ Summer Die Set. Lots of girls this month… not sure if I should feel slighted or not?
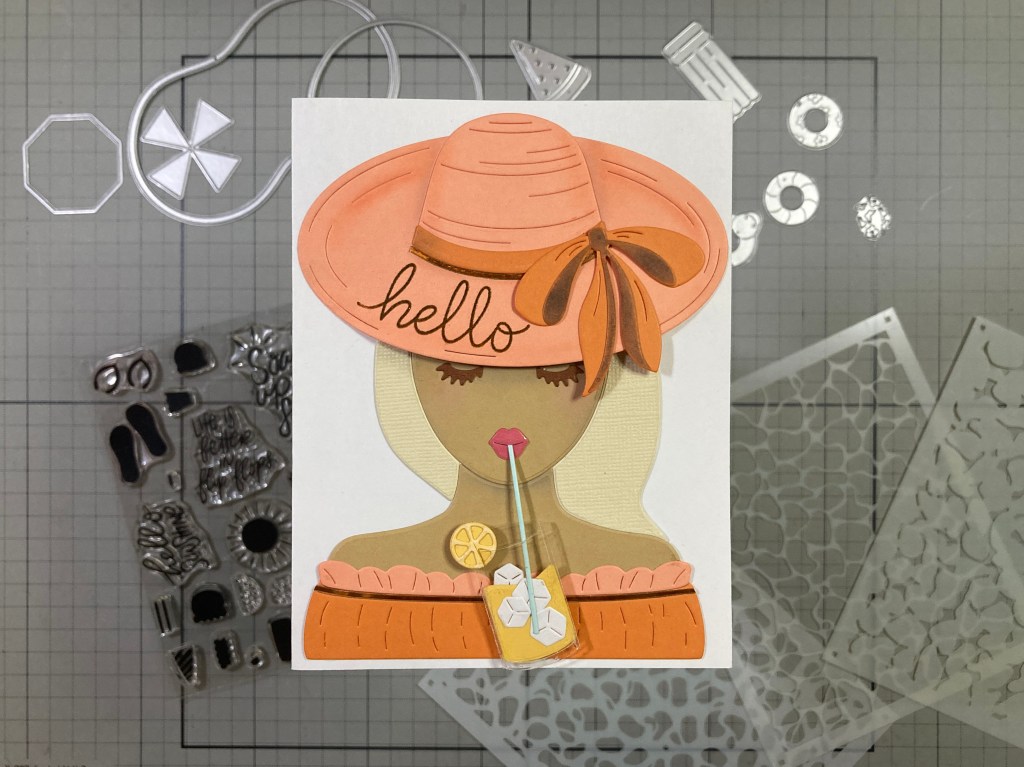
Very interesting die set! Truly unique to my stash! I die-cut her face and shoulders from the Fawn card stock in the kit and her dress and hat from Carrot and Coral card stocks. I die-cut her hair and eyelashes from some linen textured card stocks – I do like that texture in her hair – and I die-cut her lips from Dahlia card stock with packing tape on top for shine. I did do a “master” die-cut of her out of plain White card stock and then began gluing the die-cuts on top. I did take the time – as I was gluing her together – to add some soft shadows on her neck and jaw line – you can see a touch of pink on her cheeks too – I just used my Pebbles Chalk Palette to add those subtle touches.
This sun hat is almost 4.25″ wide!! I assembled the hat separately, adding more shading with chalk pastels – the dark parts of the bow are cut from Carrot card stock and colored with the chalk pastels – just rub it in good and it won’t go anywhere! Now a lot of the sentiments in the Fabulous Phrases Stamp set won’t fit on the brim of this hat if you use the bow – which I wanted to use – so I just stamped the “hello” on the brim with Root Beer Reactive ink and embossed it with clear embossing powder before assembling the hat together. I added some thin Orange/Gold Peel-offs from Love From Lizi on her dress and around the ribbon on her hat. Nice touch of sparkle!
I die-cut the glass from a thin piece of acetate and cut the extra “can” part away from the top using the “can top” die as a guide. The lemonade and lemon are die-cut from Beeswax card stock – I used a white gel pen to make the pith of the lemon slice lighter – and I die-cut the cubes from White and the straw from Seaside card stock. I glued the cubes to the “lemonade” and glued that behind the acetate with a thin bead of liquid glue just along the side edges. I cut the lemon slice and placed it on the “rim” of the glass, slipped the straw in the glass (and her lips) and started glueing everything down to a White card base. I used some foam tape behind the glass and under the brim of her hat where it is in front of her head. I do think this is a totally wacky die-set that I may rarely ever use, but it actually makes a nice card!!!
Once again, we get a large sentiment die in the Super Hero Kit… a big “Hello Sunshine” in a thin hand-written font…
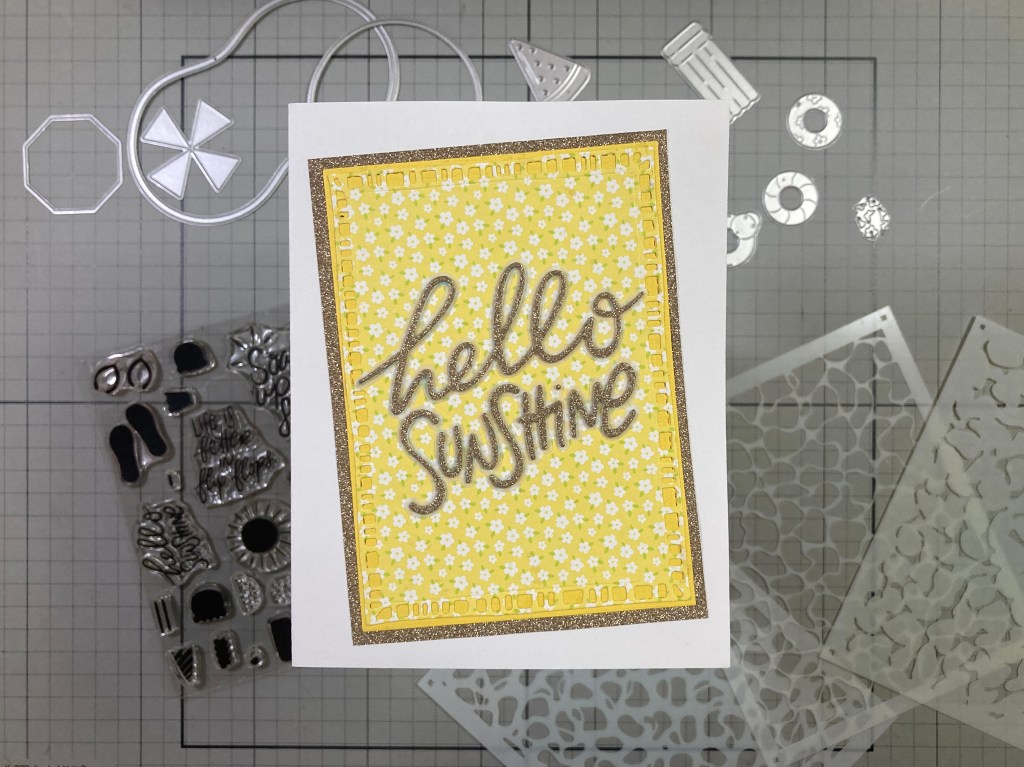
I found this great pattern paper in an old Simon Says Stamp card kit (March of 2017) and thought it would work perfectly with this sentiment. I die-cut the pattern paper with a Moda Scrap Framed Rectangles die (just under 3.25″ x 4.5″) and glued that to a piece of Beeswax card stock cut to 3.25″ x 4.5″. I die-cut the sentiment from an old DCWV Glitzy Glitter cardstock stack in Gold, die-cut another from White card stock and glued them together.
I die-cut the shadow die from some thick vellum and glued the stacked sentiment on top. The shadow die is not very much bigger than the sentiment die so it practically disappears on this card, but, trust me, it is very handy for assembling this sentiment together. I added a gold mat (3.5″ x 4.75″) behind the pattern paper stack and glued the sentiment on top. Talk about teeny-weenie fiddly bits – just try keeping track of the tittle on the “i”!!! The intense glitter on this card just makes me smile!
I mentioned the size of the sun hat in the Sippin’ Summer Die Set – seems big enough to feature on a card all by itself!
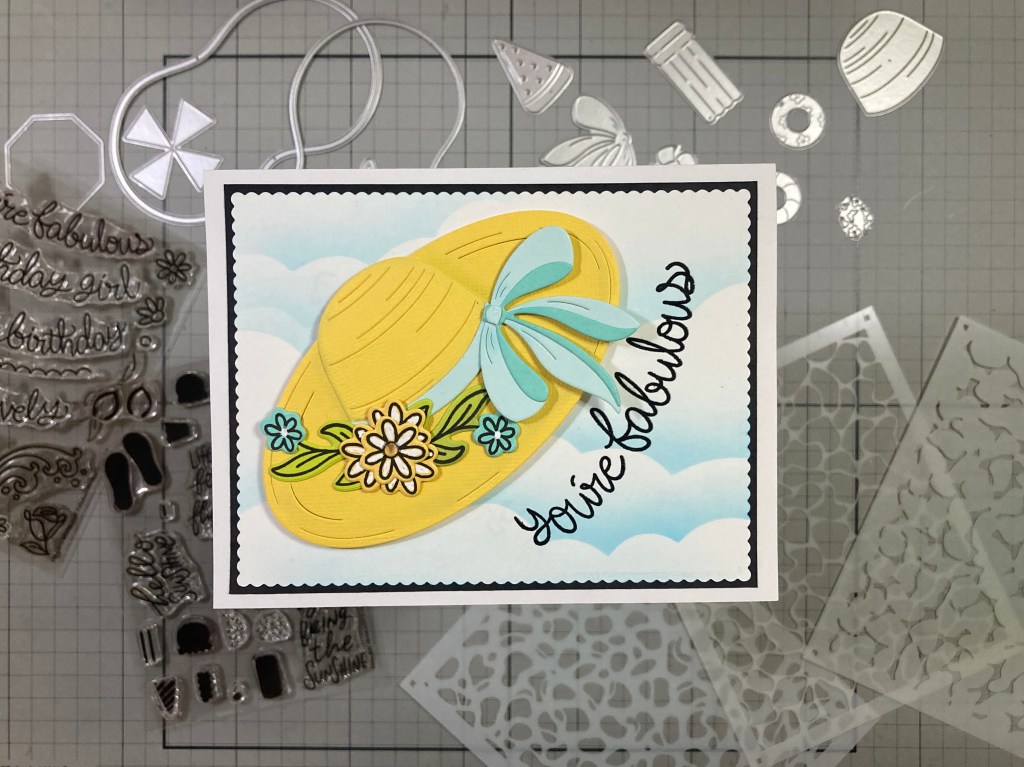
I die-cut the hat pieces from some Yellow textured card stock from my stash (SO close to the Beeswax card stock in the kit) and did some soft shading to the hat with my Chalk Pastels as I glued the pieces together. The ribbon and bow are cut from Seaside and Waterfall card stocks and glued to the hat. I stamped the big Daisies on Beeswax card stock, the leaves on Peridot card stock and the small flowers on Teal Topaz card stock using VersaFine Onyx Black ink and die-cut them all with their matching dies. I gathered them into a simple arrangement (that’s one Big daisy with three of the Coneflowers behind it in the center) and glued those to the sun hat.
I ink blended a panel of White card stock with Splash Reactive ink and a Cloud Edges stencil, decided on my sentiment placement, then stamped and embossed the sentiment as usual. Then I had to do some partial die-cutting with my Square Scallop dies to get a 3.75″ x 5″ inked piece. I added a thin Black mat behind and glued those to an A2 White card base. I attached the hat with foam tape including more foam squares under the edges of the bow. Finally, I added a small clear gem in the center of the flower spray. That’s a nice hat floating by… and certainly kind of fabulous!!
This card is way off theme, but I’m trying to use all the stamps in the kit, and I’m still jonesing for a little more to color…!
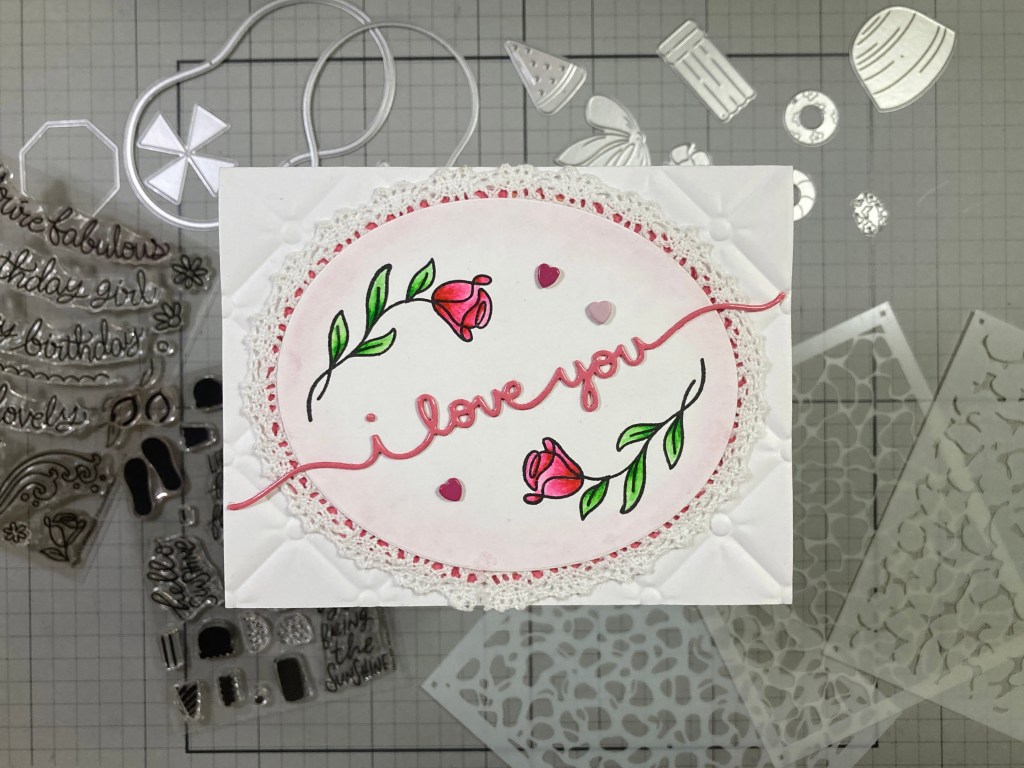
A sweet, classic valentine! I played around with the Rose and leaves stamp until I came up with this arrangement. I stamped these on Bristol Smooth card stock with VersaFine Onyx Black ink and colored them with my Zigg Clean Color Real Brush markers. Ahhhhh… even better than coloring waves!! I die-cut the colored panel with a HA Nesting Ovals Infinity die (4.5″ tall) and lightly inked some Fruit Punch Reactive ink around the perimeter. This oval was crying out for some lacy trappings so I moistened a piece of lace ribbon and stretched it around the oval perimeter and taped it in place to dry under weight. When dry I went back and added liquid glue to hold the lace in place. Then I added a a mat of Dahlia card stock (cut with the next larger Oval die) behind the lace.
Using an old Lawn Fawn Scripty Borders die, and the Dahlia card stock that already had packing tape on it (lips!) I die cut the sentiment (keep track of that tittle!). I embossed the front of a White Card base with the Spellbinders Tufted 3D Embossing folder and glued the lacy oval on top. I glued the sentiment down letting the ends hang over the oval and the lace. Three little enamel hearts add a little more texture and shine to wrap things up. I do love these roses!
After college, I spent 7 years living in the Phoenix, AZ area and was pleased to have been able to go tubin’ on the Salt River – it was always a huge party of friends and acquaintances forming virtual inner tube flotillas bobbing along the river. I also mentioned that I would try to find a way to get a man to join the party!
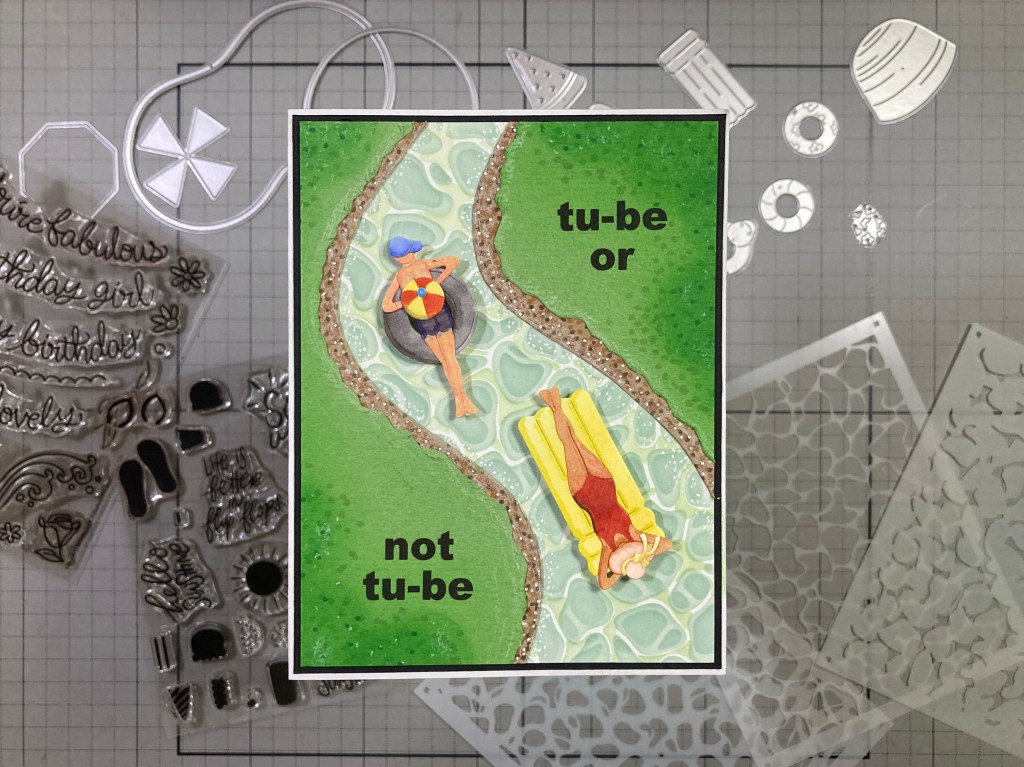
This river isn’t nearly as big as the Salt River, but I think it gets the idea across! And we have a Gent on the inner tube! AND a pun!! HA!! I ink blended the Reflections Stencil on an A2 panel of White card stock using only Altenew Misty Morning ink – I knew this “Grey” had a definite green tint and thought it would feel a little more natural than blues. I free-hand cut the “river” from the stenciled panel so I was able to use the off-cuts as patterns for the riverbanks, and I could then lay out my pun-y sentiment. Using my Silhouette software and the Arial Black font, I printed the sentiment on a panel of textured linen Green card stock.
Then I cut the two layers for the banks – Kraft card stock and the textured Green. The Kraft shore goes over the edges of the river, and the “greenery” is trimmed back and distressed with the edge of a scissors. I glued everything together and used Green Apple Reactive ink, some Alcohol markers and a White Gel pen to add texture and detail to the greenery, shore and water – I think this has a nice flow… a good sense of movement!
Our die-cut folks are all cut from Neenah Solar White card stock and colored with my Ohuhu Alcohol markers – even her swimsuit is colored on. For the gent, I just trimmed the curves off the female die cut (mostly hips), removed his head and arms, gave him a bit of a neck for his head, flipped the arms down so he wasn’t in the same pose, colored some cut-offs for his trunks and then cut off the trunks and shortened his legs a bit. His hat is cut from her hat die (easy!) and his beach ball is the center off-cut from the white tube on card four. To help with coloring, I taped the cut out to the back of the big beach ball die so I could run it through my die-cutting machine and get the score lines on the small ball!
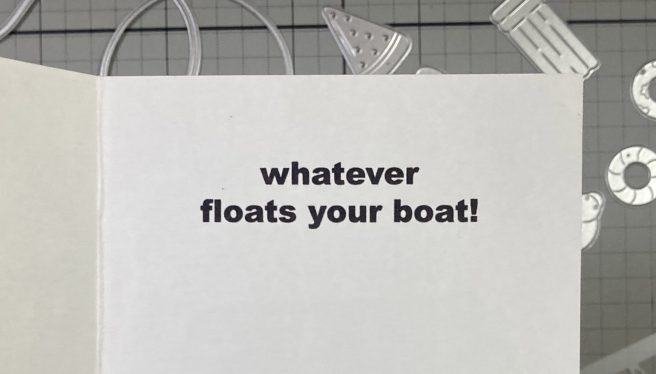
I trimmed the background panels to 4″ x 5.25″ and added a thin black mat before gluing them down to an A2 White card base. Our assembled participants are mounted with thin foam tape for a little more dimension. I and couldn’t resist printing this sentiment completion on the inside of the card – BEFORE assembly!! This card tickles me and evokes fond memories!
And that wraps up our ten summer party cards – okay, there’s one valentine but most everything is a party! I did manage to use almost everything in this kit – I never got to the silhouette ice cream stamps and I only used a couple of the Fabulous Phrases sentiment stamps but I did use those ephemera stamps in that set… and a lot of the card stocks too!
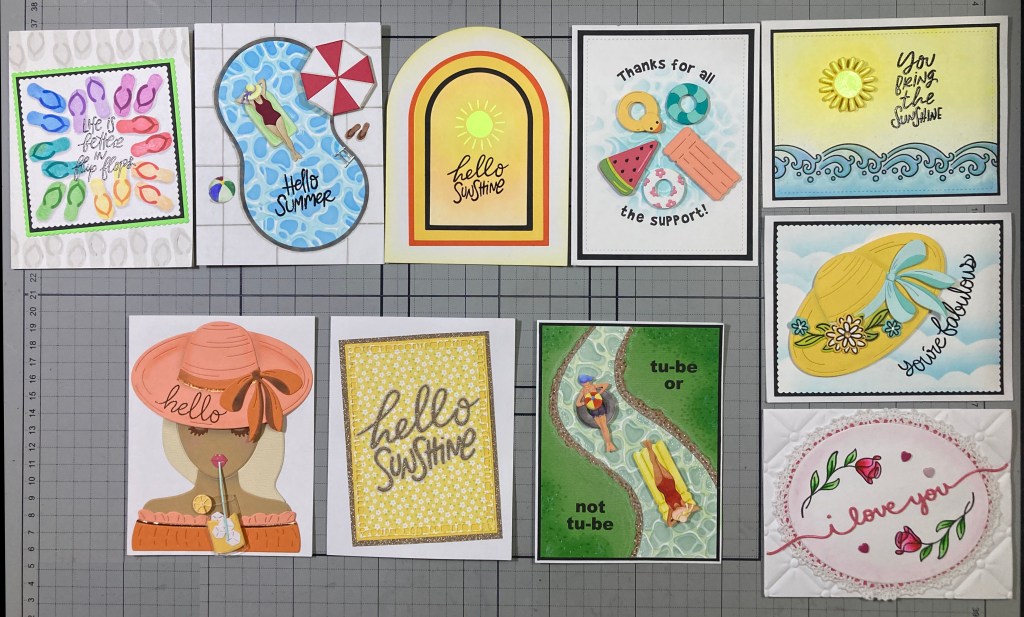
This is a bright colorful batch of cards this month – perfect for spreading around a little summer-time cheer! My favorite part of this kit has to be the Reflection Layering Stencil Set and the Pool Party dies are terrifically fun, and who would have thought that you could get a sweet vintage Valentine out of a “Soak Up The Sun” Kit!
If you like the ideas I’ve come up with or something different has clicked and you want to grab a kit for yourself, please use my links listed below. I do get a small commission from whatever you buy through my links (at no cost to you) and it is always supremely appreciated!
My Monthly Hero: https://www.dpbolvw.net/click-101337132-16962401?url=https%3A%2F%2Fheroarts.com%2Fproducts%2Fmy-monthly-hero
My Monthly Super Hero: https://www.jdoqocy.com/click-101337132-16962401?url=https%3A%2F%2Fheroarts.com%2Fproducts%2Fmy-monthly-super-hero
Hero Arts: https://www.jdoqocy.com/click-101337132-16957493
Thank you for spending a little time with me today. Your clicks are always appreciated! If you enjoyed this post, please click the Like Star at the bottom of the page, and if you wish to be notified when a new post comes out, just click the Follow Me button at the top of the page. And don’t hesitate to send me a note if you have any questions, comments or just to say Hi!. Please take a moment to Like Me, List Me, Pin Me, Post Me, share this post with all your crafty friends – And remember… Don’t run with scissors! As always, I send You and Yours Love and Light and Happy Crafting!!
DISCLOSURE: This site contains some affiliate links to products. I may receive a commission for purchases made through these links (at no cost to you). As an Amazon Associate I earn from qualifying purchases. Thank you!
 CardCut-ups