Gina K. Designs • Floral Fix Card Kit • 10 Cards from 1 Kit • May ’25 Release

Hello Folks!!! Scott here with a bit of a mid-month surprise for you! I have a 10 Cards from 1 Kit post featuring Gina K Designs Floral Fix Card Kit! I do follow Gina K. on YouTube, and I happened to catch her May 2025 Release Party and couldn’t resist this versatile kit!

The Floral Fix Card Kit comes with:

Ruffled Blooms 6″x8″ Stamp Set and Die Set

Mr. Fix-it 4″x6″ Stamp Set and Die Set

Ruffled Blooms 5 piece Coloring Stencils

Frangipani Layering Stencil

FREE GIFT: 3-D Embossing Folder w/ Die

Though I have followed Gina for many years (anyone remember Stamp TV?) I have never bought one of her Card Kits… To be honest, I thought they were a little expensive… but at $59.95 this kit is a nickel cheaper than what Hero Arts is charging for their Card Kits and you don’t have to subscribe… you just have to be quick – this kit sold out very quickly!! I do believe it was the Mr. Fix-it stamps and dies that originally caught my eye, and then, when I saw stencils and dies and embossing folders that worked with the Ruffled Blooms Stamps… well, that clinched the deal!

I was very impressed with the amount of goodies in this kit, and was doubly excited when I realized that Gina includes magnetic sheets with her Die Sets!! That’s a BIG plus in my book!

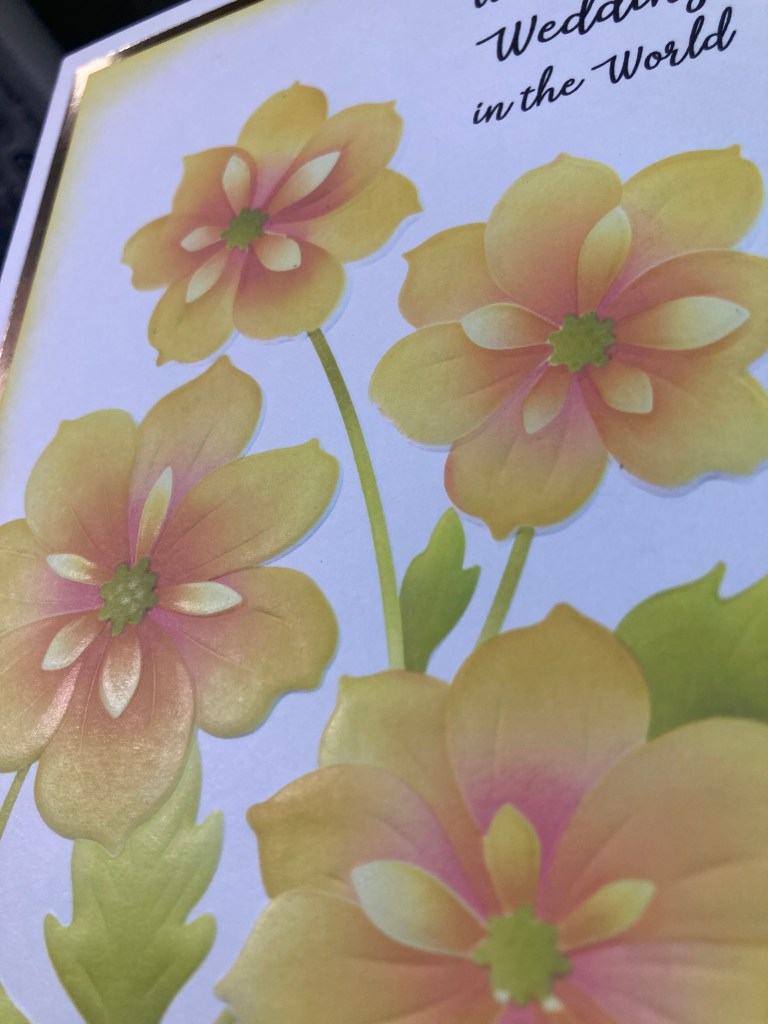
My neighbor needed a Wedding card “right away” and I thought this kit would fit the bill.
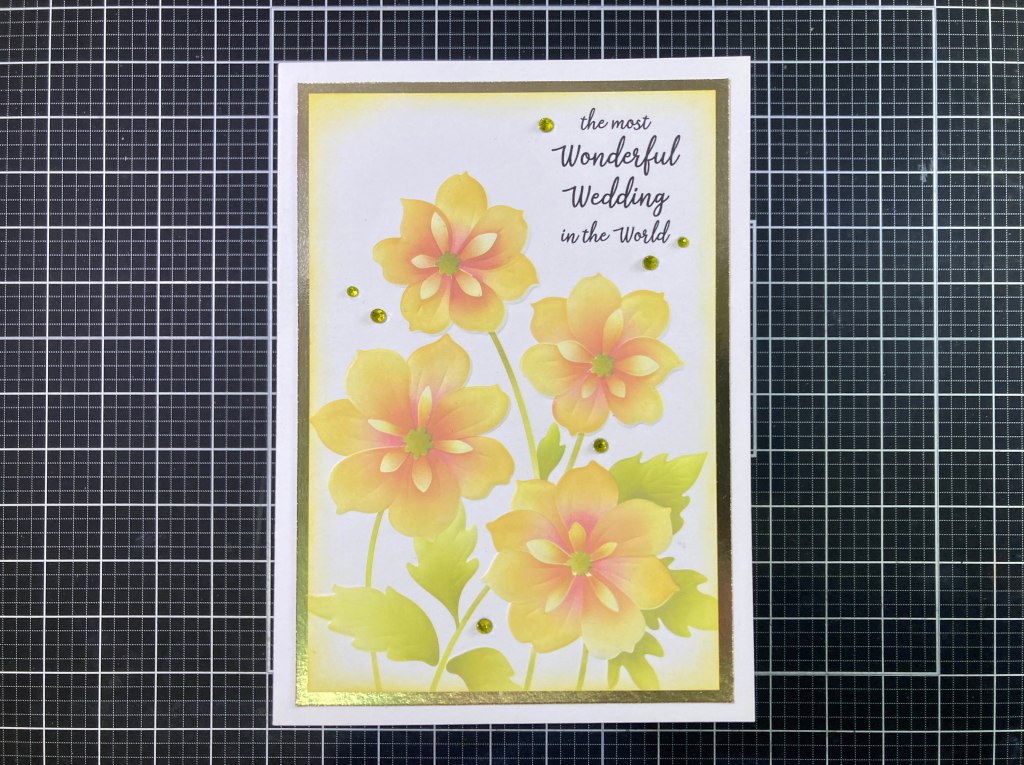
My neighbor was very specific in that she wanted a 5″x7″ card with yellow and pink flowers, and it had to say “the most wonderful wedding in the world”. This Ruffled Blooms design is large enough to command a big card and still leave a little room for this rather unorthodox greeting.

I used the Ruffled Blooms Coloring Stencils on some Neenah 80# Solar White card stock with Hero Arts Lemon Drop, Creamsicle, Taffy, Fruit Punch, Key Lime Fizz and Green Apple Reactive inks. The stencils lined up very nicely and I really liked that the little five-petaled centers were able to be colored separately. I used my Silhouette Software and the Dream State font to print the sentiment directly on the stenciled panel. I did want to use the Embossing folder on this, but since I was using a 5×7 inch panel, it wouldn’t fit in the embossing folder. Hmmmmmmmmm…

I opened up the embossing folder flat, lined up the stenciled panel on the flat folder, and using a rubber embossing pad and embossing plate, sent it through my die cutting machine and actually got a decent embossing. That really makes the Coloring Stencils really stand out!

I trimmed that panel to 4.25″ x 6.25″ and ink blended more Lemon Drop ink around the edges, and added a mat of Champagne Metallic card stock to the back before gluing it all down to a 5″x7″ card base.

Some bright Yellow Gems adds the required Wedding sparkle, and I’m happy to report that my neighbor was thrilled with this card!
During the Release Party, Gina mentioned that for some unknown reason, the stencils didn’t line up perfectly with the stamp… the individual flowers will line up but you will need to move the stencil around a bit to match each flower.

I decided to just color the stamp for this card using my Ohuhu Alcohol markers. I did stamp the flowers using Gina K. Designs Amalgam ink on 80# Neenah Solar White card stock, and only used 8 markers to color the flowers – Y080, Y1, Y2, YR170, YR240, GY5, GY8, and GY42. I don’t care what kind of ink you use to stamp your images, I do find that you have to be careful when coloring with Yellow alcohol markers – invariably, lighter markers can pick up most any kind of ink… I always heat set whatever ink I’m using when I use my Alcohol markers… but I still find the need to be careful!

I trimmed the colored panel to 4 1/8″ x 5 3/8″ and ink blended a bit of Green Apple ink on the edges, and embossed it with the embossing folder – I also try to remember to tape my panel down to the embossing folder (especially 3-D ones) to help prevent shifting when it goes through your die cutting machine. This embossing came out terrifically! I cut a panel of Green card stock to 4.25″ x 5.5″ and glued that to an A2 White card base and added the colored/embossed panel on top leaving a thin green frame exposed.

I stamped the sentiment with VersaFine Onyx Black ink and embossed it with Clear embossing powder and die-cut it with the matching die. I die-cut two more sentiment blanks and glued all three together for some dimension, and then glued that to the card front. I like the light orange centers of the flowers and the texture of the embossing folder – wow!

I’m loving that 3-D embossing folder, so I thought I could do a card featuring JUST the embossing folder…

I grabbed a piece of Tim Holtz Dark-Red Kraft-Core card stock and did a reverse embossing with the embossing folder – the flowers are de-bossed from the front which effectively makes the background the highest part of the image. I took a core-donations Sanding Block to the front of the embossing and lightly sanded away the red top of the card stock to reveal the Kraft-Core. With some careful sanding, I was able to reveal most of the embossed details on the flowers and leaves. I trimmed the panel to 4 1/8″ x 5 3/8″ and tore about a quarter inch off of the right edge before gluing the panel to an A2 White card base.

I stamped the sentiment on a matching piece of card stock using HA Unicorn White ink and embossed that with White Embossing powder. I die-cut the sentiment (I love the detailed sentiment dies in this kit – no simple square banners for these sentiments!) and used foam tape to pop it up a bit on the card front. Again… great texture on this card – I love that the flowers really stand out, and after sanding, this card front is oh, so velvety soft! So simple yet so effective!

Just because there are 5 stencils in the Ruffled Blooms Coloring stencils, doesn’t mean you have to use all 5 of them!

I stamped the flowers using VersaFine Onyx Black ink on 80# Neenah Solar White card stock and used the open flowers stencil and HA Splash Reactive ink to lightly color the four blooms. I did have to shift the stencil just a little bit from flower to flower to cover everything, but it was quite easy to line the blooms up. I skipped the two petal stencils, and used the inner petal stencil to blend Blue Hawaii Reactive ink in the center petals and Green Apple Reactive ink on the stems. I used the final leaf stencil and Green Apple ink for the leaves and used a tiny touch of Bundled Sage Distress Oxide ink on the flower centers. Even with having to watch where your stencil is, this stencil coloring was quite easy!

I die-cut the flowers with the included die – again, a nicely detailed die and so easy to line-up with the stamping. I took an A2 panel of white card stock and die-cut it with an Altenew Cross Stitch Canvas die for a little interesting texture on the background without adding any new colors. I glued that to an A2 White card base and added the flower die cut using foam tape. I stamped, embossed and die-cut the sentiment as usual, added one die-cut blank to the back and glued those to the card front. Some matching Blue gems adds great sparkle, and I think this simple coloring is really effective!

Our FREE Embossing Folder came with a die too – the die will cut out the largest (middle left) Ruffled Bloom stamp.

Or stencil! I used the three Flower petal stencils on some Neenah Solar White card stock to color these blooms with Tattered Rose, Worn Lipstick, Picked Raspberry, and Candied Apple Distress Oxide ink. I did finish off the coloring with Squeezed Lemonade Distress Oxide ink for the centers. I die-cut all three blooms with the included (FREE!) die. Once cut, these blooms snap into place over the corresponding bloom on the embossing folder. I taped the blooms into place and embossed all three. That works REALLY well!

I ink blended some Green Apple Reactive ink through my old Stampendous Petals Background stencil and die-cut that panel to 3.75″ x 5″ with a Lawn Fawn Stitched Rectangle die and added a thin Black mat behind. I trimmed the slightest little bit from an A2 panel of Pink card stock and glued that to a White card base leaving the thinnest of white frames around the edge. I glued the matted background onto the pink and decided on my arrangement before stamping the sentiment with VersaMark ink and embossing it with Clear Embossing powder. I did cut off the “and” at the beginning of this sentiment which makes it usable all on its own. I mounted the Blooms with foam tape and added small Black Gems for sparkle. I also added tiny Black dots on the centers of the blooms – it’s those little details and the impressive embossing that makes this card stand out.

Let’s move on to the Mr. Fix-it Stamps and Dies. These tool stamps are what caught my eye in the first place!

I admit to loving this sentiment! To begin with, I stamped all the tools and fasteners using VersaFine Onyx Black ink on some Bristol Sooth card stock and used my Zig Clean Color markers to color everything. Then I die-cut all the pieces with their matching dies and set about making some masculine cards!

I had some 2″ Aluminum Foil Duct tape in my stash, so I taped a piece of that on a scrap of White card stock and embossed it with an old Sizzix/Tim Holtz Distressed Diamond plate embossing folder. I cut the embossed tape down to just under 2″ x 5.5″ and glued it to a White card base. I stamped and embossed the sentiment as usual, directly on the card front, and added a couple Silver Mylar Peel-offs (Love From Lizzi) to the sides of the tape. I mounted the hammer and nail (pointing right at the sentiment) with foam tape. This card also reminds me of the old Abraham Maslow quote: “To a man with a hammer, everything is a nail.” I’ve always loved using aluminum duct tape with embossing folders – especially this one!

It was Father’s Day recently, so I felt obliged to make a card celebrating the one who keeps everything working…!

I know MY dad was the go-to guy whenever anything broke or stopped working. He was the first to dig in and look at the problem and was often all that was needed to get whatever it was repaired. This card is almost all about the background…! I took an A2 panel of some old Altenew White Woodgrain card stock and scored panels on the back every 3/4″ from top to bottom. I die-cut the panel to 3.75″ x 5″ with a LFSRdie and then I ink blended (with a foam pad) Frayed Burlap Distress Oxide ink around the whole panel – that makes the woodgrain and scored planks really stand out!

I added a thin black mat behind the woodgrain and glued those to an A2 White card base. I stamped the sentiments with Frayed Burlap ink and embossed them with Clear Embossing powder and die-cut them with their matching dies. I added the sentiments and the tools with foam tape. I do love those tool stamps! This is even a great card for your handyman, or mechanic, or plumber regardless of whether they’re YOUR Father or not!

I’ve got four more tools colored and cut and ready to use… and another great sentiment in this stamp set..!
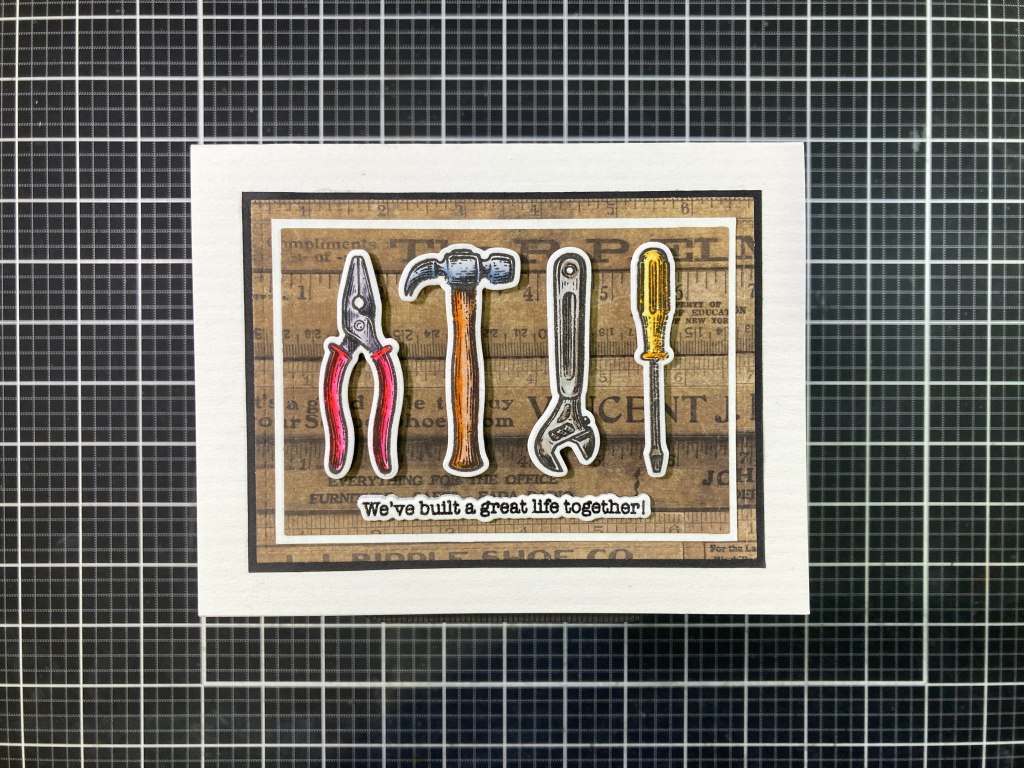
I knew I had some measuring stick pattern papers in my stash somewhere! This paper is from an old Tim Holtz / idea-ology 8″x8″ Collage Mini Stash pad. I die-cut the pattern paper to 4.5″ x 3.25″ with a LFSRdie and cut the center rectangle at the same time using the next smaller die – 4″ x 2.75″. A thin White mat behind the center piece and a thin Black mat around the larger one allows you to glue them all together and then down to a Textured (light stripes) White card base.

I stamped, embossed, die-cut and stacked the sentiment as usual and glued that directly to the card front and added all the tools with foam tape. I did take one of the die cut screws and the second nail and glued those to opposite corners of the inside writing surface. This card would be great for an Anniversary, or a new home, or most any familial celebration!

I have one more big item left to use in this card kit – the Frangipani Layering Stencil… only two layers but quite large!

I did have to look up what a Frangipani looks like! This is my interpretation of the most common Frangipani colors I found. On an A2 panel of Neenah Solar White card stock, I ink blended Worn Lipstick Distress Oxide ink through the large #1 stencil trying to concentrate on the edges, and then ink blended Squeezed Lemonade through the smaller #2 stencil trying to concentrating more on the centers. I thought that worked really nicely and gave us a pretty good representation of a common Frangipani! Since the stencils are a little larger than an A2 panel, I decided to fussy-cut the whole image out.

I die-cut a panel of Dark-Green card stock with a 3.75″ x 5″ LFSRdie and glued that to a White A2 card base. I outlined the Green with some Brushed Gold Peel-offs (Love From Lizzi) and mitered all the corners. I glued the Frangipani on top matching up the edges to the card base. I stamped the sentiment with VersaFine Onyx Black ink and embossed it with Golden Crown Embossing powder (LFL). I die-cut the sentiment and two blanks and glued them together before gluing them to the card front. Brushed Gold enamel dots adds a little more shine and this card reminds me of spring even as the summer starts bearing down upon us.

There are more colors to Frangipani than just Pink and Yellow…! I did find one that was deep Purple and Red!
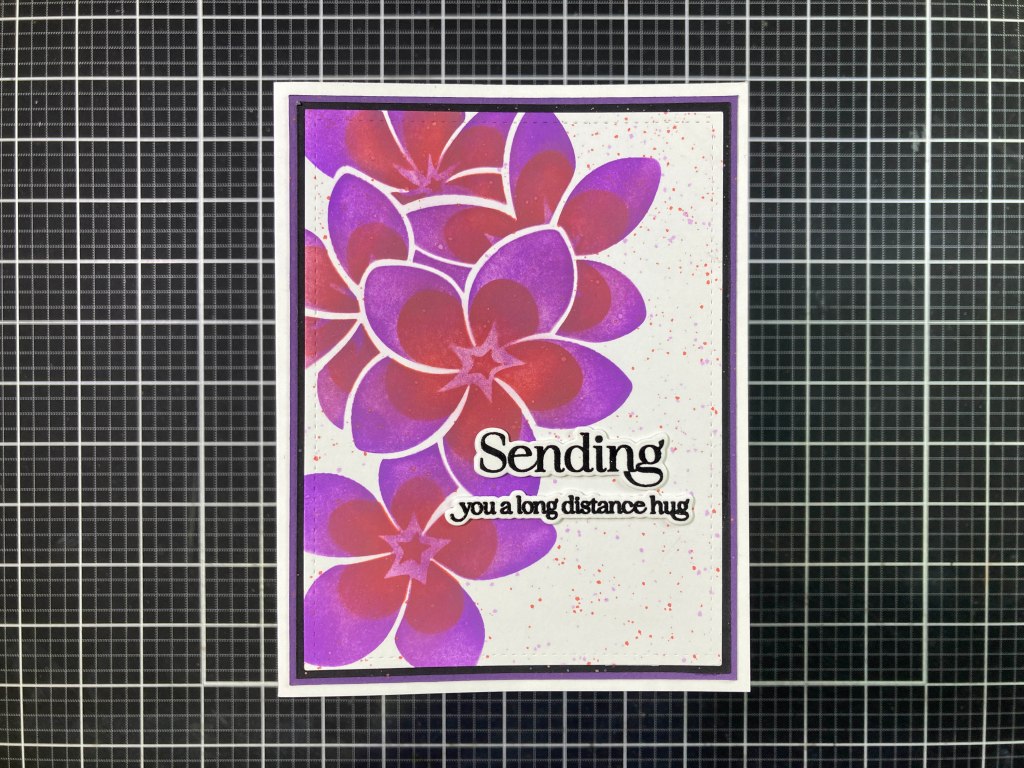
I thought I would try stenciling these in reverse order – first Candied Apple Distress Oxide ink through the smaller #2 stencil and then Wilted Violet Distress Oxide ink through the large #1 stencil. The Violet toned down the Red and together they make for some very vibrant blooms! I smushed a little of the inks on a craft mat and added a drop of water to each, and spattered the same two colors on the rest of the inked panel. When dry, I die-cut that panel to 3.75″ x 5″ with a LFSRdie, and added a thin Black and a thin Purple mat behind, and glued all the layers to a White card base.

I stamped, embossed, die-cut, and stacked (just two layers) both sentiments as usual and glued them directly to the front of the card. I do really like the different sizes of sentiments in this kit, and I really like how detailed the dies for the sentiments are. And as far as I am concerned, everybody deserves a hug every day!!

That’s my ten cards using my first ever Card Kit from Gina K. Designs! I am pleasantly surprised by how many options are afforded with this kit – there’s so much you can do with these supplies that I’m sure I’ve only just scratched the surface! I’m going to have to keep a closer eye on the Gina K. Design releases now!

What a great array of cards from this Floral Fix Card Kit! Those Ruffled Blooms stamps and all their matching supplies are oh-so-very versatile, the Mr. Fix-it stamps and dies are perfect for masculine cards of many varieties and even the simple Frangipani stencils can be used in many ways!

Of course this kit sold out so very quickly… I do know that Gina K. Designs will often re-order Kits if there is a big demand so if you look and the current kit is sold out, DO put your name on the Notify Me When Back in Stock tab so they have a good idea how many to re-order! I know the Relax and Have Fun Card Kit from the June Release is still available and actually has sentiments that coordinate with the sentiments in this kit! Hopefully, I can come back with more Gina K. Designs inspirations to share… I will keep my eye on her offerings!!

Thank you so much for sharing your time with me here. Your attention and encouragement keep me inspired! If you enjoyed this post please click the “Like” star at the bottom of this page, and if you would like to be notified of new posts click the Follow Me button at the top of this page. Please take a few moments to Like Me, List Me, Pin me, Post Me, Share me with all your crafty friends, and remember… Don’t run with scissors!! As always, I send you and yours Love and Light and Happy Crafting!
10 Cards from 1 Kit • Hero Studio Card Kit of the Month • June 2025

Hello Folks! Scott here with my 10 cards created from the Hero Studio Card Kit of the Month for June of 2025!

(What happened to the May Kit?) Well… we’re mixing it up again this month… The folks at Hero Arts had been holding off on sending me the Card Kits each month until they had the complete kit put together – meaning that I didn’t get my kit until well past the release date, which then delayed my 10C1K posts to the point that once I was able to publish, the kits often weren’t available any more. Now, I am on the list for early deliveries of the main elements of the monthly kits (all the stamps, dies and stencils, but possibly not all of the extras) in the hopes that I can get my posts out to you a little closer to the Hero Studio release date! Unfortunately, this shift precluded me getting the Hero Studio May ’25 Card Kit (I did like those retro truck dies!) but I am totally on top of the June 2025 Hero Studio release!

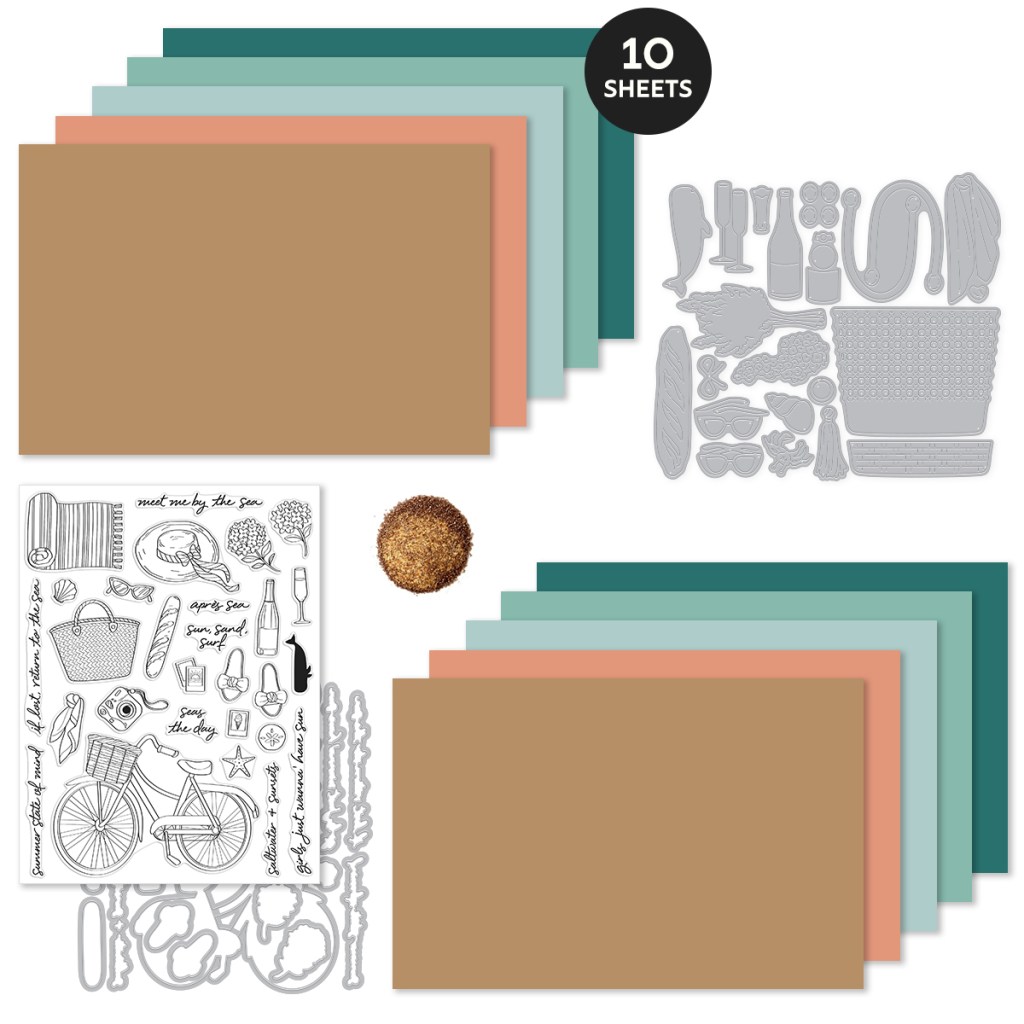
Hero Studio Coastal Vibes Card Kit June ’25

•Summer State of Mind 6″x8″ Clear Stamp Set

•Summer State of Mind Coordinating Dies

•Beach Bag Fancy Die Set

•Sand Embossing Powder (.5 oz)

• 10 Sheets 8.5″ x 5.5″ Card Stock in Fawn, Coral, Seaside, Waterfall, and Blue Spruce (2 sheets of each)

I did not receive the card stocks or embossing powder, but I have the Sand embossing powder in my stash and I can approximate some of these card stocks (except I couldn’t find any matchable Coral or Blue Spruce in my stash..!)

Often, when I get a stamp set with a big variety of images, I will stamp, color and cut everything as a launching off point!

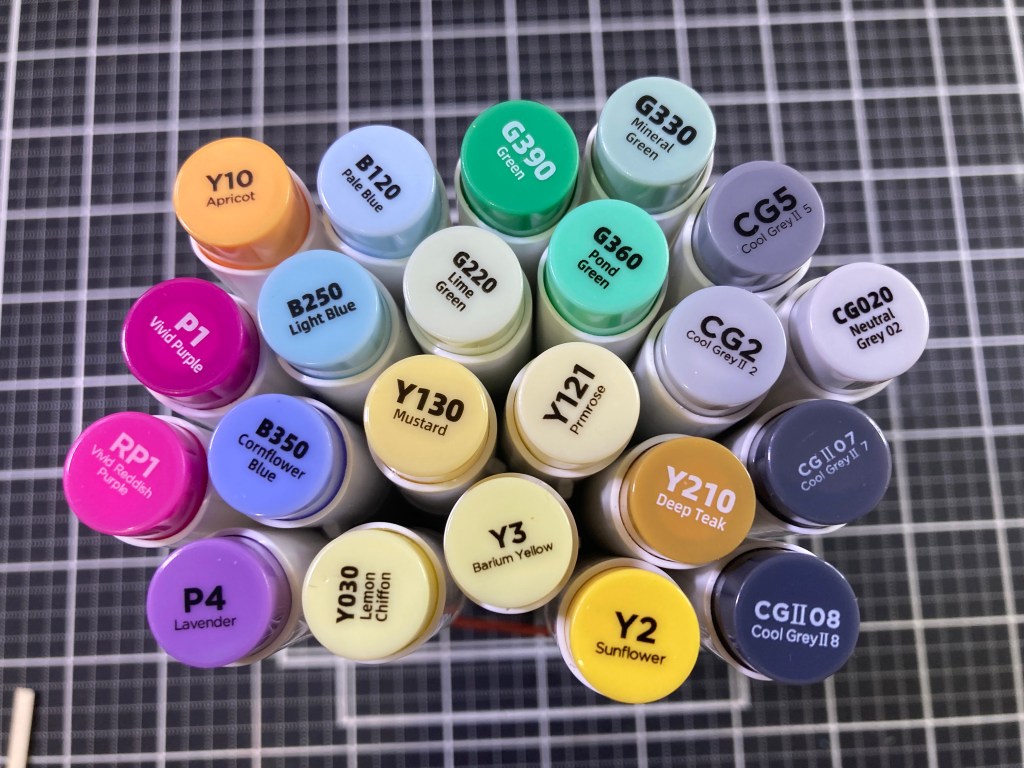
I grabbed some Neenah Solar White 80# card stock and decided to reach for my Ohuhu alcohol markers to do my coloring this month… I stamped everything with VersaFine Onyx Black ink and here’s a shot of the markers I used to color everything – keeping in mind the irresistable lure of the coast! After coloring, I die-cut everything with their matching dies. Here you can also see the eight sentiments in this stamp set… certainly an interesting hodgepodge of images and sentiments… and other than the Sand Embossing Powder, no beach or sea stamps… Hmmmmm…

That Sand Embossing Powder has got to be one of Hero Arts’ most popular embossing powders of the last decade! Since I have a couple of pots of that embossing powder already in my stash, that’s where I decided to start!

I covered an A2 panel of Kraft card stock with double sided adhesive (6″x6″ Scor-Tape) and covered that with the Sand Embossing Powder and heat set the whole panel. I do believe that embossing powder has earned its sterling reputation! I die-cut that with a 4.5″ x 3.25″ Lawn Fawn Stitched Rectangle die and added a thin black mat behind. I glued those to the front of an A2 White card base.

I stamped the sentiment on a scrap of White card stock with VersaFine ink, embossed that with some Clear embossing powder, and die-cut it out. I die-cut 2 more blanks of that sentiment and glued the three pieces together for some added depth. Grabbing the most “feminine” items from our stamp set (and the blanket / towel) I arranged those on the front with the blanket glued flat and everything else mounted on top with Foam tape. I glued the sentiment directly to the card front – I do love that we get dies for ALL the sentiments this month! I do wish I had some teeny-tiny rhinestones to add to the corners of the glasses, but that Sand Embossing powder will have to provide all the shine!

I really liked the coloring on the bicycle and the accuracy of the coordinating die-cuts (I guess it was too much to ask for the die to cut out the spokes!) so that’s where I went with my next card…

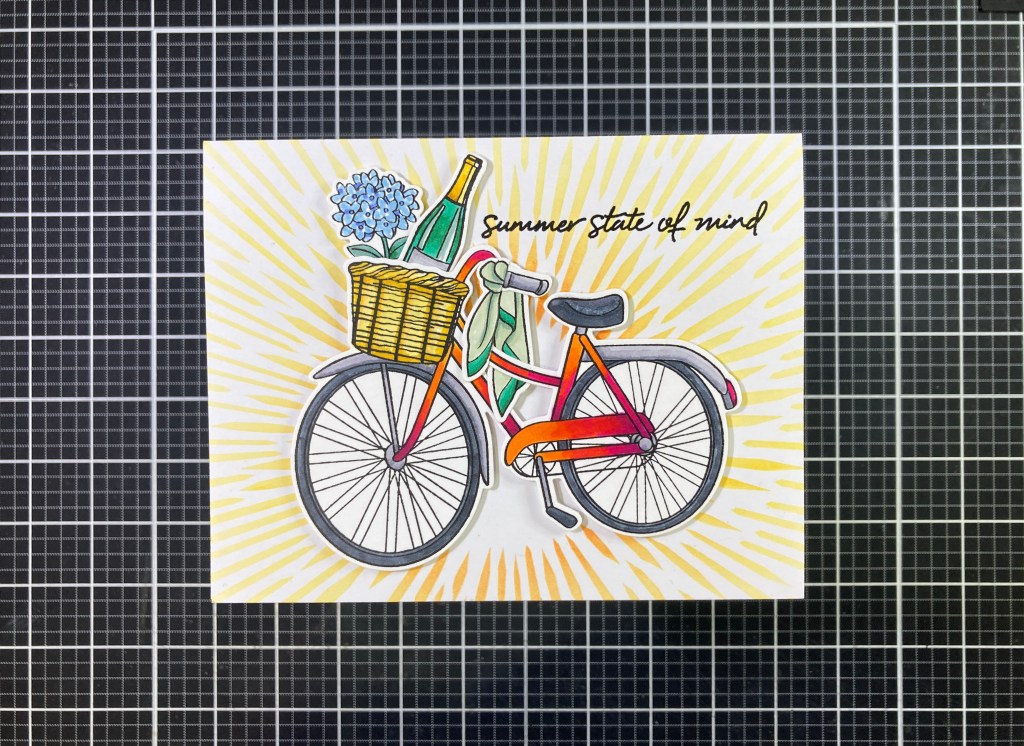
I reached for the Sun Stencil (from the MMH February 2024 kit) and lined up the top of the stencil to the top of an A2 White card base, and ink blended Hero Hues Lemon Drop and Creamsicle Reactive inks through the rays of the stencil. I did keep the center circle of the stencil (sun) covered so it would leave the center white.

I arranged the champagne and flowers in the bike basket and “tied” the scarf to the handlebars, and decided where to stamp the sentiment – again, stamped in VersaFine ink and embossed with Clear embossing powder. I added the bicycle assemblage to the card front with thin foam tape. I like this bicycle stamp a lot (despite the fact that the back wheel seems to be stuck between the seat tube and the chainguard!) And keeping the center of the stencil white actually helps it blend in perfectly with the white card behind the spokes – looks intentional!

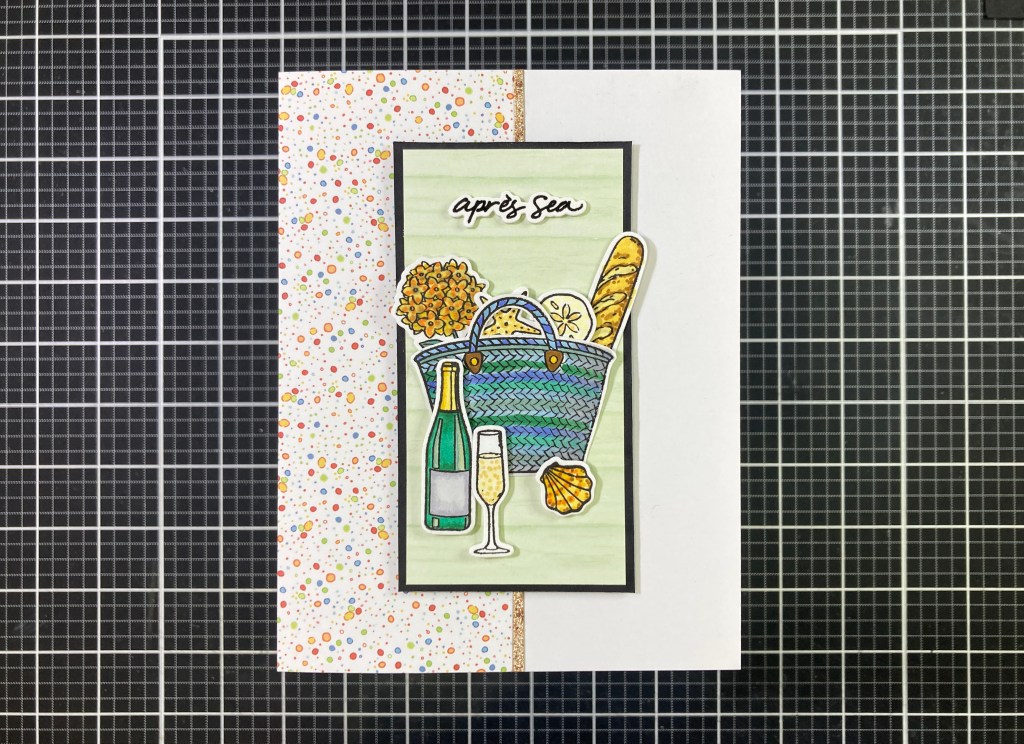
The “après sea” sentiment apparently means “after the sea”. The common après-vie means “after life” – a little somber for me… so I figured “after the sea” would mean what happens after we get home from a trip to the sea…!?

I dug around in my stash for some beach-y patterned papers and found this soft, pale green wood-plank piece and matching dotted pattern paper. I fiddled around with an arrangement for the stamps and ended up cutting the green pattern paper to 2″ x 4″ and gluing a thin Black mat behind. I cut the dotted pattern paper to 2 1/8″ x 5.5″ and glued that to the left side of an A2 White card base. Then I added the green matted panel with thin foam tape, and finally glued a couple of thin strips of the Sand embossing leftovers along the exposed edges of the pattern paper.

I arranged the items in the bag (I did have to create another bottle) and glued the bottom half of the bag to the card front leaving the top pieces free. The champagne, glass and seashell are mounted with foam tape. I stamped, embossed and die-cut the sentiment as usual, die-cut two more blanks and glued them together before adding them to the card front. Examining your seaside collections while sipping a little bubbly sounds like the perfect thing to do when you get home from the beach!

Some of the sentiments in this kit stretch the imagination as far as their greeting card usefulness, but this one works!

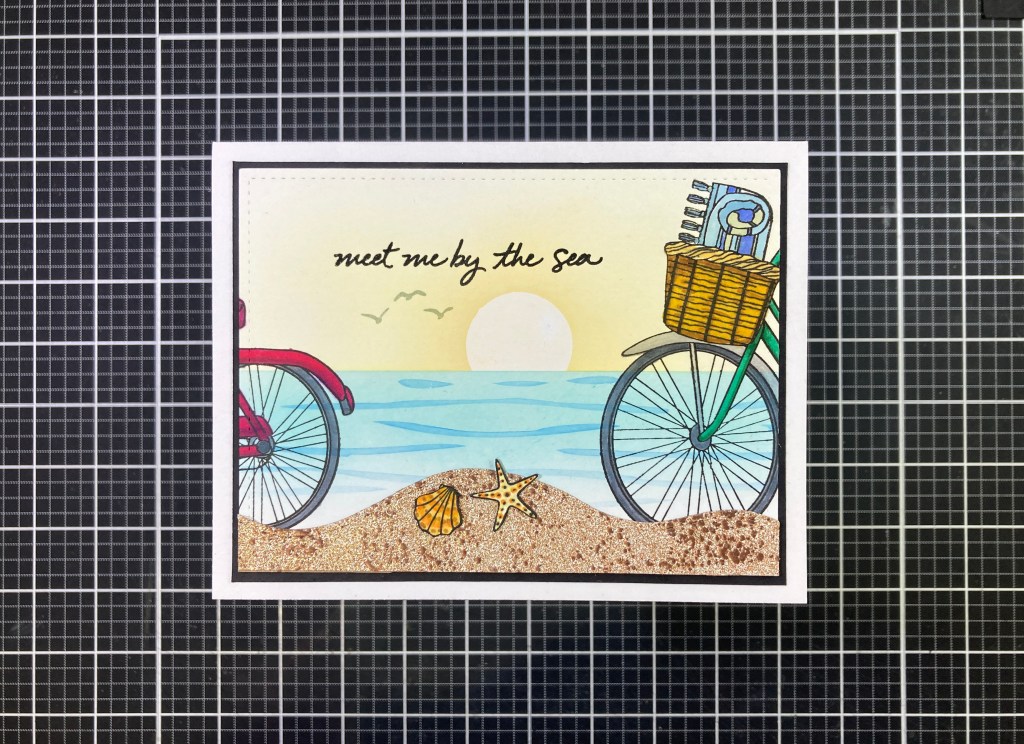
I wanted to indicate a couple of people with this card so we have “two, two, two bikes in one”! On an A2 panel of 80# Neenah Solar White card stock I ink blended a little sea and sky using Pool Party, Lemon Drop and a touch of Creamsicle Reactive inks along with some masking paper for the horizon and sun. I also used a homemade stencil and Blue Hawaii ink to add the ripples on the sea. Then I stamped the front of the bike on the right and the back of the bike on the left… interesting… if I didn’t want to include people (or portions of people) then that really limited how much stamp I could expose – I didn’t want to have to deal with a butt on the seat or a hand on the handlebars so that dictated how much of the stamps to use… With the help of some more masking, I stamped a truncated version of the blanket inside the basket, and then colored all the stamping with the same Ohuhu markers.

Once the coloring was done, I die-cut the panel with a 5″ x 3.75″ LFSRdie and added a thin Black mat behind before gluing both to an A2 White card base. Using a Lawn Fawn Stitched Hillside die (along with the same stitched rectangle die) I die-cut some leftover Sand embossed paper for the beach at the bottom. I stamped and embossed the sentiment as usual, and added some birds using a stamp from the MMH June 2023 Kit and Soft Granite ink. I did stamp, color and fussy-cut another starfish and seashell and glued those on the beach between the bikes. This solves the conundrum of getting some background behind the spokes on those bicycle tires…!

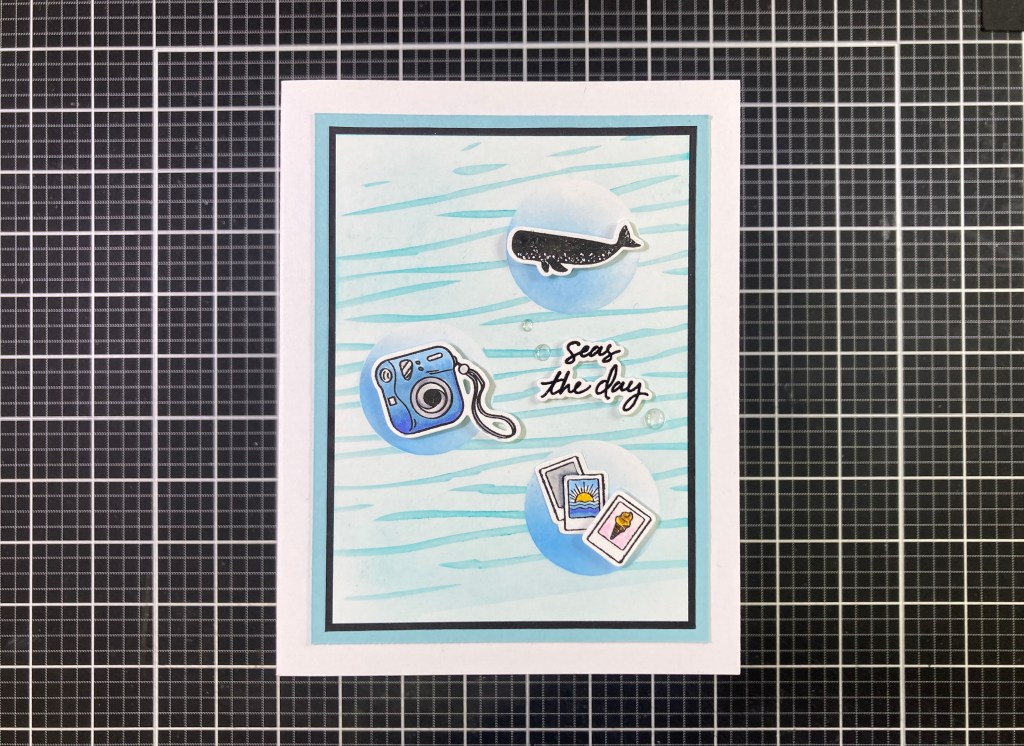
I wasn’t quite sure what to do with the Whale stamp… other than shells and such, this is the only animal in this kit!

Whales certainly afford a good photo op! And the “seas the day” pun becomes even more if you think of it in terms of “seize the day” ie: take a picture! I die-cut a panel of masking with three 1.25″ circle dies and ink blended some Blue Hawaii through the openings. I removed the mask and arranged the images and realized the plain white background didn’t feel beach-y enough. So I placed the circle die cut masks over the inked circles and ink blended the rest of the panel lightly with Pool Party Reactive ink and then more heavily through my “ripples” stencil. That did the trick and pulled this whole card together!

I cut down the inked panel to 3.25″ x 4.5″ and added a thin black mat and a thicker mat of Hero Hues Mist card stock and glued all down to a White card base. I stamped, embossed, die-cut and stacked the sentiment as usual and glued it to the card front. I glued the double polaroid down flat and added all the other images using foam tape. A few Hero Hues Clear Enamel Dots adds some bubbly sparkle to the sentiment, and I think the double pun really works here!

Those five cards used up all the images (plus!) in the stamp set…! We still have some sentiments to get to, but now it’s time to look at the Beach Bag Fancy Dies!

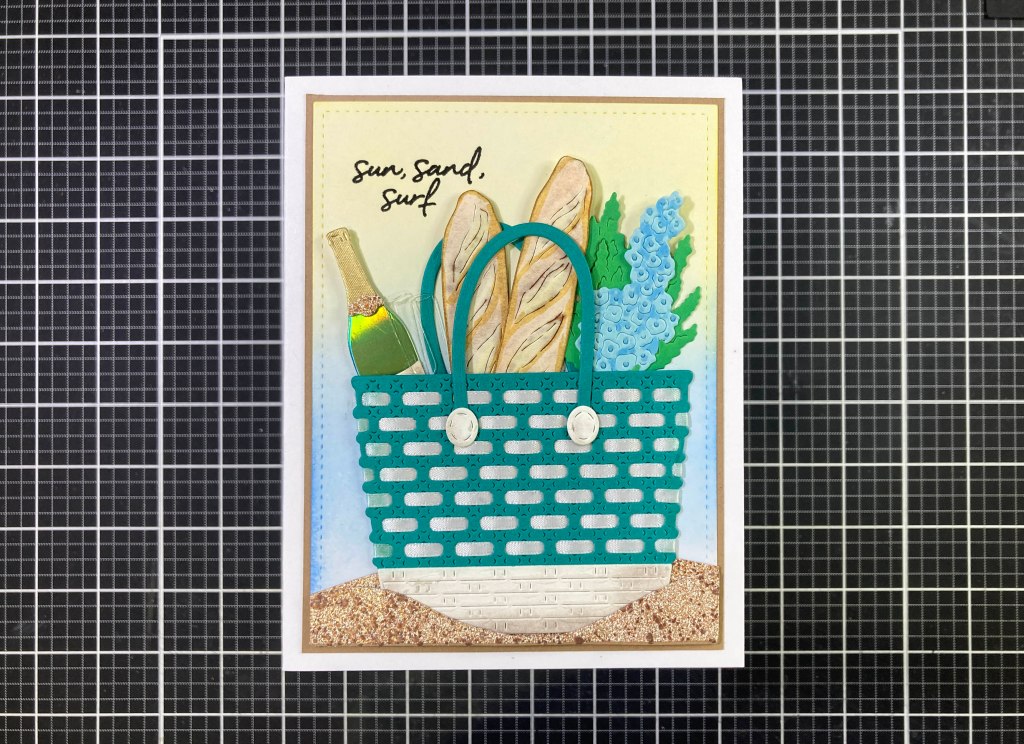
From the moment that I die-cut the large basket die (from one of my approximations of the card stock included) and noticed all the holes it makes, I immediately wanted to weave something through those holes! I just happen to have a big stash of thin (apx. 1/8″ wide/3 cm.) satin ribbon and sure enough, they weave through these holes perfectly. On the ends where the ribbon comes out on top of the basket I simply folded the edges to the back and glued them down. For the ends where the ribbons finished up behind the basket (rows 1, 3, and 6) I glued the ends behind the thin edges of the basket on the sides, and, when dry, trimmed the extra ribbon off. LOVE THAT WEAVE!

I die-cut matching handles, and die-cut the basket bottom (and handle reinforcements) from some Hero Hues Antique Linen card stock. I glued the bottom in place and added a touch of shading along the edges with my Chalk pastels, and set to filling up my basket. I die-cut the bread from some plain Ivory card stock in my stash, the foliage from some plain Green card stock, and the flowers from my approximation of the Seaside card stock in the kit. I added some color and shading to those with the same alcohol markers. I really like the Champagne bottle dies in this Kit! I die-cut the bottle from some Green Holographic paper in my stash (very glassy reflections!) and cut the bottle topper from some lightly textured gold paper (I swear this was from a MMH kit but I couldn’t figure out which). If you look closely, the collar is die-cut from a scrap of the Sand embossing as well. For the last bit of packables, I die-cut the champagne glasses from some clear acetate.

I lightly ink blended Blue Hawaii and Lemon Drop Reactive ink on a panel of White card stock and die-cut it to 3.75″ x 5″ with a LFSRdie and added a mat of the (close approximation) of Fawn card stock and glued those to my card front. I arranged all the goodies in the basket (flip the bread around and you have two different loaves!) then added the handle and reinforcements to the front and the second handle to the back. I decided on an arrangement and stamped and embossed the sentiment in place. I glued two scraps of the Sand embossing to the bottom (the front layer is actually the negative die cut from card #4 (the bicycles) and the back scrap is just cut to size with the matching LFSRdie. I glued the back piece of sand flat and glued the basket on top of that – elevating the tops of the goodies with thin foam tape. The other piece of Sand is glued on top – nestling the basket into the sand.

This is one of the sentiments that felt incomplete to me, so I added “and you!” to the inside of the card using my Silhouette software and the Dream State font. I did print this on the card base before adding anything to the front of the card. This finishes up that sentiment nicely and gives some purpose to this card.

I loved weaving ribbon through this basket die, but wanted to see what the die gave us without any extras.

I still felt the need to cover up those holes so I used some translucent yellow glassine to cover the back of this half-basket. The basket and handle are cut from plain Ivory card stock and I used the bottom of the basket die to actually cut off the bottom of the basket. I shortened the handles and die-cut the reinforcements from the gold paper and added thin strips of the same paper to the top and bottom edges of the basket before adding a light touch of shading to the edges with my Chalk pastels. I die-cut the crab and the shell from scraps of White card stock and colored them with the same alcohol markers. I die-cut the scarf and knot from some glittery pattern paper and added a little shading with a light grey alcohol marker and glued that to the basket handle.

I blended the background on a panel of White card stock using some masking paper for the horizon, and blended Pool Party ink over the bottom half. Then I used my “ripples” stencil and VersaMark embossing ink through the stencil and embossed the ripples with Clear embossing powder. Then I could ink blend over the top with Blue Hawaii Reactive ink making the ripples lighter…! I flipped the horizon masking and ink blended the sky with Candy Apple, Creamsicle, and Lemon Drop Reactive inks. I decided what size my scene needed to be and die-cut the background to 2.75″ x 4″, added a thin mat of Dark Blue Pearlescent card stock and glued them down to an A2 White card base. I stamped the sentiment as usual (VersaFine ink and Clear embossing) and added all our elements with thin foam tape. I did add the “and you!” printed sentiment on the inside to complete the stamped sentiment, and I have to admit that I really like that little crab perched on the top of the basket…

Then (similar to the stamp set) there’s that whale die… I wasn’t quite sure what to do with that in the context of this kit…

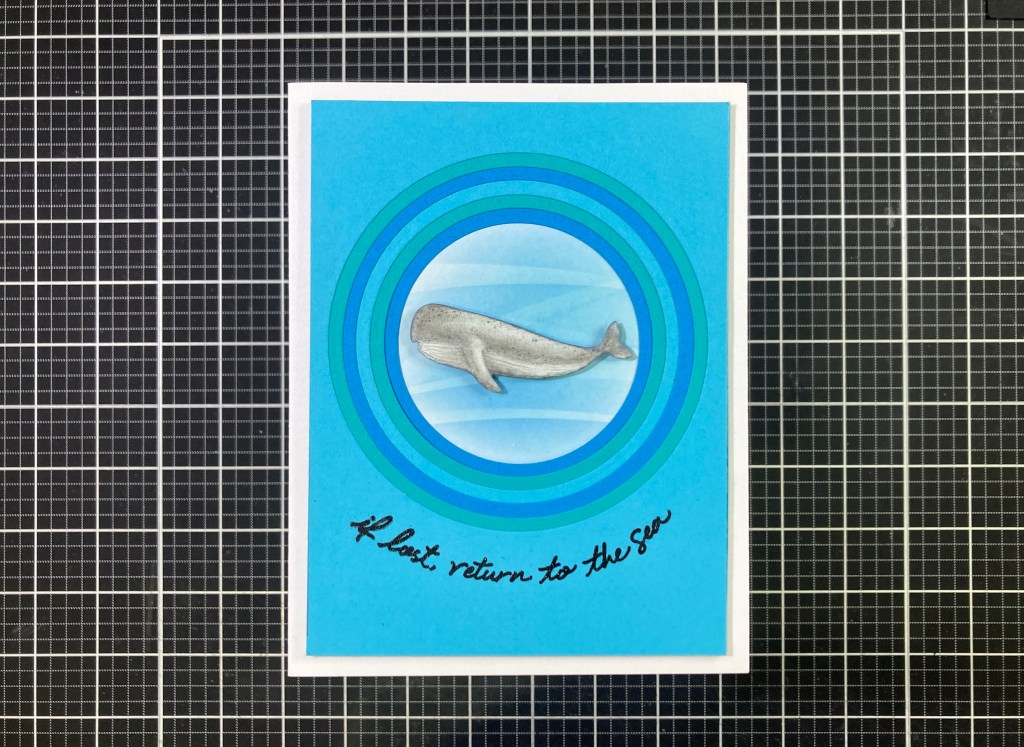
I just started sketching on the whale die cut with a pencil and before long I had a really nice depiction of a whale – I do like using pencil to color grayscale images… it’s easy to layer and blend and even erase to get the effect you want. On a white card base, I ink blended the background with Pool Party and Blue Hawaii Reactive inks and a Lawn Fawn Simple Hillside Stencil. That gave us a nice watery background but I didn’t care for it just fading out into white… I grabbed some old Astrobrights card stock from my stash (from some mega collection I had bought) and grabbed light blue, green blue and dark blue colors to focus in on the whale.

I cut A2 panels from the card stock (two per color) and reached for the HA Circle Infinity dies to cut the circles – I need a 2.25″ circle to go around the whale, and then I just stepped up each layer to the next size die (ending with the 3.5″ circle die) until I had all six layers. Rarely will all of these die-cuts line up perfectly, so I glued them together trying to make the rings even, but that left the edges a little ragged. I used a LFSRdie to trace a square pattern around the edges of the assemblage, and then carefully cut all the edges with a craft knife evening out all the edges. Slow and steady does it!

I curved the sentiment to match the circles and stamped and embossed it as usual. I glued the layered circles motif to the card front and added our whale with thin foam strips. I guess you can take this sentiment personally or ecologically!! HA! LOVE that whale! And I believe that uses up all eight sentiments in this kit!

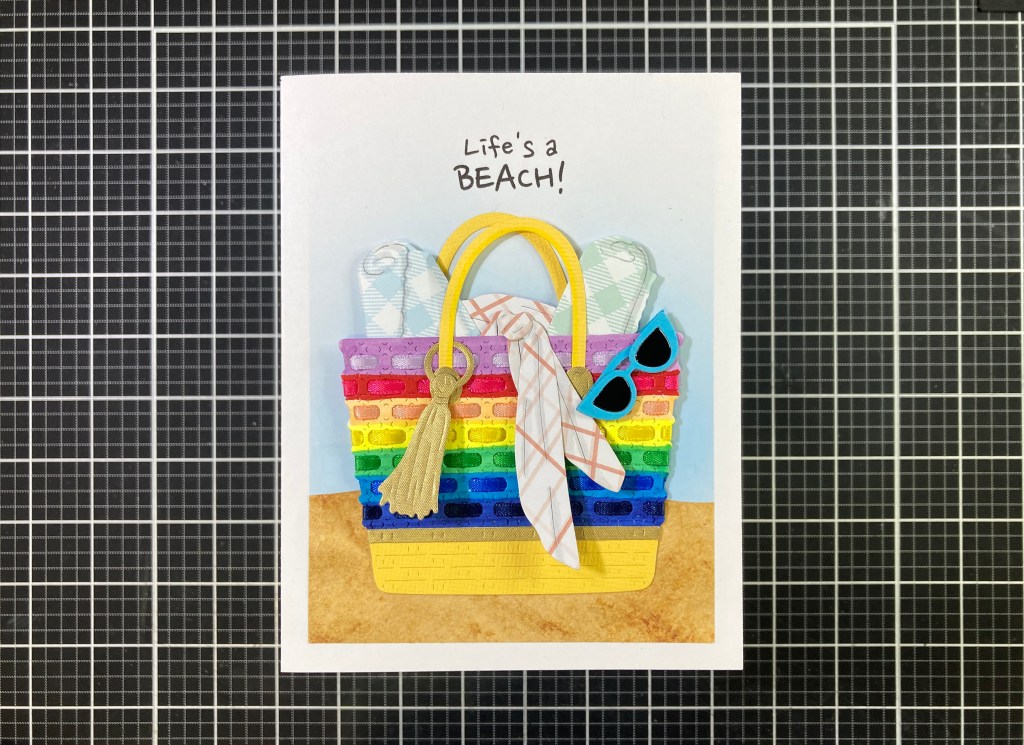
I couldn’t resist some more weaving with that great Basket die, and I thought we could bring a little more color into play.

There’s some fun summer-y beach-y colors for you! I die cut the basket from some 80# Neenah Solar White card stock and dug through my thin ribbon stash for some rainbow colors (I didn’t have a real good Orange but this Coral color seems to work just fine). (of course you could use plain White ribbon and color that with your alcohol markers for a perfect match, but I didn’t have that much White ribbon…!) Anyway…! I dug around in my Ohuhu markers for colors matching the ribbons – here’s the colors I picked – close enough for horseshoes and hand grenades!

I tried using the patterns on the die cut basket to guide where the colors should go – that worked pretty good – and after coloring all the stripes I wove the ribbon through the holes. Even better!

I die-cut the basket bottom and handles from some textured Yellow card stock in my stash and glued them in place. I used the basket bottom die to cut a strip of the Gold paper for the top edge of the bottom and for the handle reinforcements too.

I used the blanket die from the stamp set to cut a couple of “blankets” for my basket from some plaid pattern paper. I did cut them apart and pieced them back together to create a little variety and added some shading with alcohol markers and a little pencil. I cut the scarf die twice from more pattern paper, rearranged the die cut and draped that over the edge of the basket. The three-piece glasses are die-cut from the same Light Blue as the whale card, and the lenses are cut from some Glossy Black card stock and pieced into place. Finally I die-cut the tassel from the same gold paper along with the ring and glued those around the handle

I found this beach-y pattern paper in my stash and die-cut it with a 3.75″ x 5″ LFSRdie and cut a simple curve on the top edge. I placed that in position at the bottom of an A2 card base and taped the bottom edge in place. Then I used strips of masking paper to extend the sides of the beach up to the top of the card. Then I just folded down the beach pattern paper (on its taped hinge) and ink blended Blue Hawaii Reactive ink between the masking paper strips and faded that out as I got to the top of the card. I removed the beach-y pattern paper and printed this sentiment on the card front using my Silhouette software and the Nanum Pen Script font.

I glued the pattern paper in position at the bottom of the card front. I glued the basket in place with thin foam tape behind the top edge and the blankets. I slipped the glasses over the edge of the basket and glued them into place. I don’t think you can get a much more colorful Beach bag…! And, yes, sometimes life IS a beach!

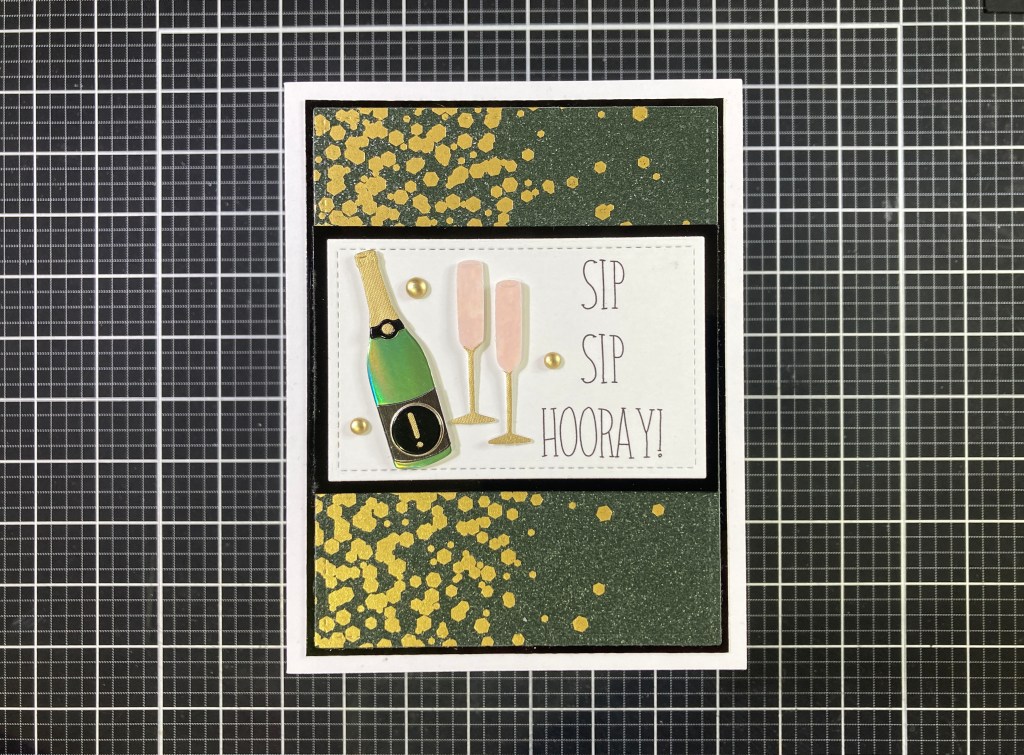
My other favorite die has got to be the champagne bottle and all its pieces… Maybe it’s just the green holographic paper I have that really does it for me!

And another Pun! This is a delightfully fun congrats card! The bottle and the foil wrapper I die cut from the same as card number 6, but I die-cut the square label from some Tim Holtz Onyx Metallic card stock, and the circle and collar from Glossy Black card stock. I took the time to add a Gold paper dot to the center of the collar label, and… believe it or not… the next to the last HA Circle Infinity die actually cuts a circle that makes a perfectly thin frame around the circle die in the kit. I cut that from some Tim Holts Champagne Metallic card stock. I finished off the bottle with an exclamation point on the label cut from the Gold paper using an old Marker Micro Alpha die.

I die cut the glasses from some thick 40# vellum, but wasn’t satisfied with how that read on a white background. So I die-cut the glasses from more of the gold paper and trimmed away the goblet to give me some gold stems for our glasses. I glued the gold stems on top of the vellum die cut. The goblet portion still wasn’t reading very well so I ink blended a little Tattered Rose Distress oxide ink on a scrap of White card stock and die-cut the glasses again from that. No need to separate the goblet from the stem here, so I just glued the pink card stock on the back of the vellum die cuts. Hmmmm… must be Pink Champagne!!

I found this black and gold pattern paper in my stash and die-cut it to 3.75″ x 5″ with a LFSRdie and added a thin Glossy Black mat to the back and glued those to an A2 White card base. I printed this sentiment on some White card stock using my Silhouette software and the Paprika font, and die-cut it with a 3.5″ x 2.25″ LFSRdie. I added a thicker mat of the Glossy Black card stock behind that (wanting to reach to the Black mat behind the pattern paper). I glued that to the card front a little bit higher than dead center and added the champagne service with thin foam tape. A few Brushed Gold enamel dots adds a little sparkling effervescence to finish up this card. I think this calls for a drink!

And before you know it we have wrapped up my 10 Cards using the Hero Studio Card Kit of the Month for June of 2025. I actually used every single stamp in our stamp set (including all the sentiments) and I used every Die in the Beach Bag die set except for the one-piece glasses die and the little bow… I definitely put this kit through its paces!

It’s interesting that I used just the stamps for the first five cards and then only the dies for the second five cards… I didn’t plan it that way, it just happened! Though I was initially concerned that we didn’t have any beach or sea images in this kit, I found it fairly simple to create some seashores – especially with the help of the Sand Embossing powder. And if you’ve been getting card kits from Hero Arts for any length of time, then there are lots of seaside and beach-y images in older kits that you can certainly use with this one!

I did have a great time creating these 10 cards with this Coastal Vibes Card Kit – we’ve got a nice variety of looks and sentiments and even a couple of puns! Let me know which cards are your favorites!

If you’d like to get this kit for yourself, you do need to Subscribe to the Hero Studio Card Kit of the Month. If you go shopping at Hero Arts, please use my links listed below… I make a small commission from whatever you buy (at no cost to you) and that helps support this page and keeps a little inspiration coming your way. Thank you!

Hero Arts: https://www.tkqlhce.com/click-101337132-16957481

Hero Studio Card Kit of the Month: https://www.anrdoezrs.net/click-101337132-16959232?url=https%3A%2F%2Fheroarts.com%2Fcollections%2Fsubscriptions%2Fproducts%2Fhero-studio-card-kit

Hero Studio Monthly Subscriptions: https://www.anrdoezrs.net/click-101337132-16959232

Thank you so very much for sharing your time with me here… your attention and encouragement mean a lot to me. If you enjoyed this post please click the “Like” star at the bottom of this post, and if you would like to be notified of new posts click the Follow Me button at the top of this page. Please take a few moments to Like Me, List Me, Pin me, Post Me, Share me with all your crafty friends, and remember… Don’t run with scissors!! Thanks again, and as always, I send you are yours Love and Light and Happy Crafting!
10 Cards 1 Kit • Hero Studio • Card Kit of the Month • March 2025

Hello Folks! Long time no see! My most sincere apologies!! As many of you know Hero Arts has been going through some growing pains and actually merged with Spellbinders late last year… I know this has been a tricky transition for them, and I apparently got lost in the shuffle. But I am back (finally!) with a new 10 Cards from 1 Kit post using the Hero Studio Card Kit of the Month for March 2025. (Happy Belated New Year!!!!)

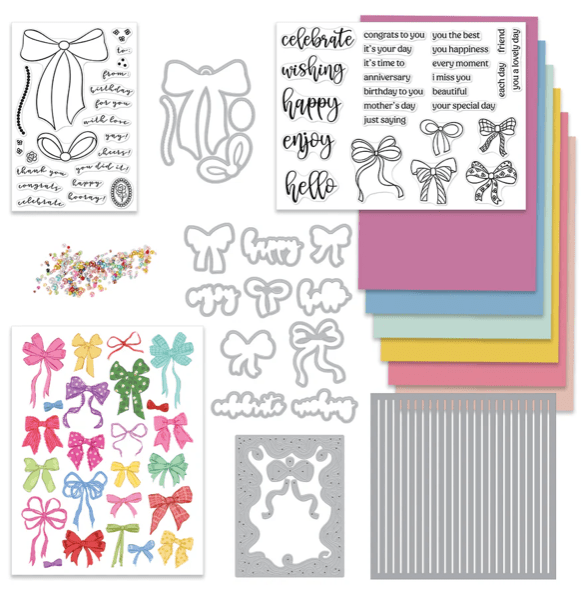
March 2025 Card Kit of the Month includes:

Bows & Messages Clear Stamp Set, 6” x 8”

Bow Tag Clear Stamp Set, 4″ x 6″

10 Bows and Messages Coordinating Dies

4 Bow Tag Coordinating Dies

Ribbons Cover Plate Die

Thin Stripes Stencil, 6″ x 6″

2 Bows Rub-On Transfer Sheets

6 Sheets of Cardstock, 5.5″ x 8.5″

Pastel Pearl Embellishments

I did ask to get my kit as early as possible this month and was offered the opportunity to get a kit before they were actually ready for shipping, but only if I was okay with not getting final packaging, and the possibility of missing an item or two. I thought “No problem!” I was just excited about getting the kit early! I did miss out on the Bows Rub-On Transfer Sheets this month… they weren’t quite ready when my kit was mailed. But, I’m always up for a challenge!

This might prove to be a little more difficult than I thought… there’s not a great number of image stamps this month, but at least I do get the opportunity to do some coloring!

Even though there are coordinating dies in the kit, I decided to do some direct stamping to start with. This sentiment and bow fit really well together so I stamped them with VersaFine Onyx Black ink on some Neenah Solar White 80# card stock and colored the bow with colored pencils. This is the largest bow in the Bows and Messages Stamp set and it’s large enough to function nicely as a focal point. I did try to add as much dimension with my coloring as possible – even adding a little shadow underneath the bow. I trimmed the panel to 3.25″ x 4.5″ with a Lawn Fawn Stitched Rectangle die, and added a thin mat using the Pink card stock from the kit. I glued those to an A2 white card base and added some pink Pastel Pearl Embellishments for a finishing touch. Lovely and simple!

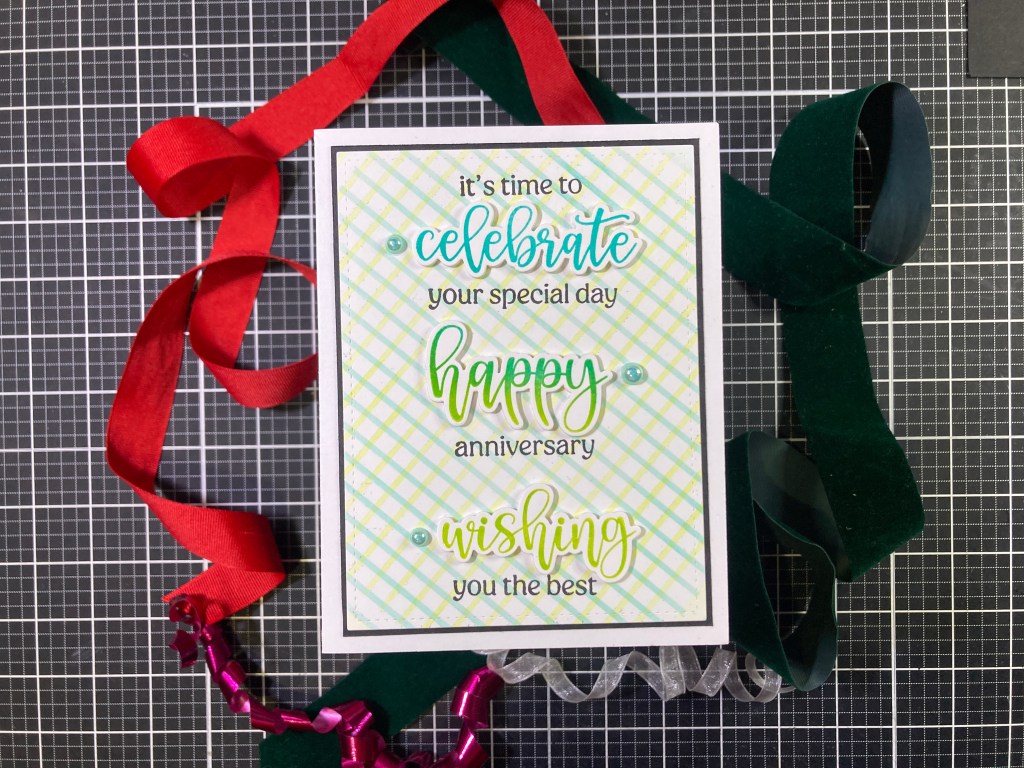
We do have five large sentiments as well as five bows in the main stamp set… let’s try skipping the bows and just concentrate on the sentiments for this next card!

I also reached for the This Stripes Stencil to make the background for this card. I blended HA Key Lime Fizz and Pool Party reactive inks through the stencil crisscrossing the colors to make a bit of a “lattice” pattern in the background. I trimmed the panel to 3.75″ x 5″ with a Lawn Fawn Stitched Rectangle die and added a thin black mat behind. I stamped the large sentiments using the same inks (both inks together on the center “happy”) and embossed all three with Clear Embossing powder. I die-cut the words with their matching dies and added two die-cut “blanks” to the back of each one for some added dimension. I arranged the die cut words on the background panel and decided where to stamp the sub-sentiments… kind of makes a complete thought! I stamped the sub-sentiments with VersaFine Onyx Black ink.

I glued the panel to an A2 White card base and added some matching Pastel Pearl embellishments. Since the front of this card seemed quite “chatty”, I decided to add one more sentiment on the inside – thinking this justifies my verbosity on the front! A very “spring-y” anniversary card!

That’s four of the five large sentiments… one more to go… and I’ve also got four more bows on the stamp set!

I stamped the sentiment and bows on a panel of Bristol Smooth card stock and colored the bows with my Zig Clean Color Real Brush markers – these three go well together because all of the bows are patterned! But there is one more (non-patterned) bow stamp… perfect for a background mat! I stamped that bow all over a piece of Kraft card stock (concentrating on the edges) using Vintage Photo Distress Oxide ink (good match for the Kraft card stock!) and trimmed that to 4.125″ x 5.375″. (That leaves us a nice 1/16″ frame) I die-cut the colored panel to 3.75″ x 5″ (LFSRdie) glued that to our stamped mat and then down to an A2 White card base.

I thought one of the incongruities if this kit is the simple fact that bows are actually quite dimensional… there’s not much chance to add dimension to these stamps (especially if you do direct stamping and coloring) but I did think that a little pop-up action might do the trick!

I stamped, colored and die-cut the larger bow and attached it to a 1/2″ piece of white card stock cut to 2.75″ and scored at 1/4″ on the left end and 1/4″ and 1/5″ at the right end. That makes our pop-up mechanism. To add a little more illusion of dimension, I traced the bow opening on the bottom left onto the mechanism and cut that out so you can see right through to the back of the card. A nice little surprise on the inside with terrific dimension! And this card actually uses all five of the bows!

That pretty much covers the Bows and Messages Stamp Set… let’s move on to the Ribbons Cover Plate Die…

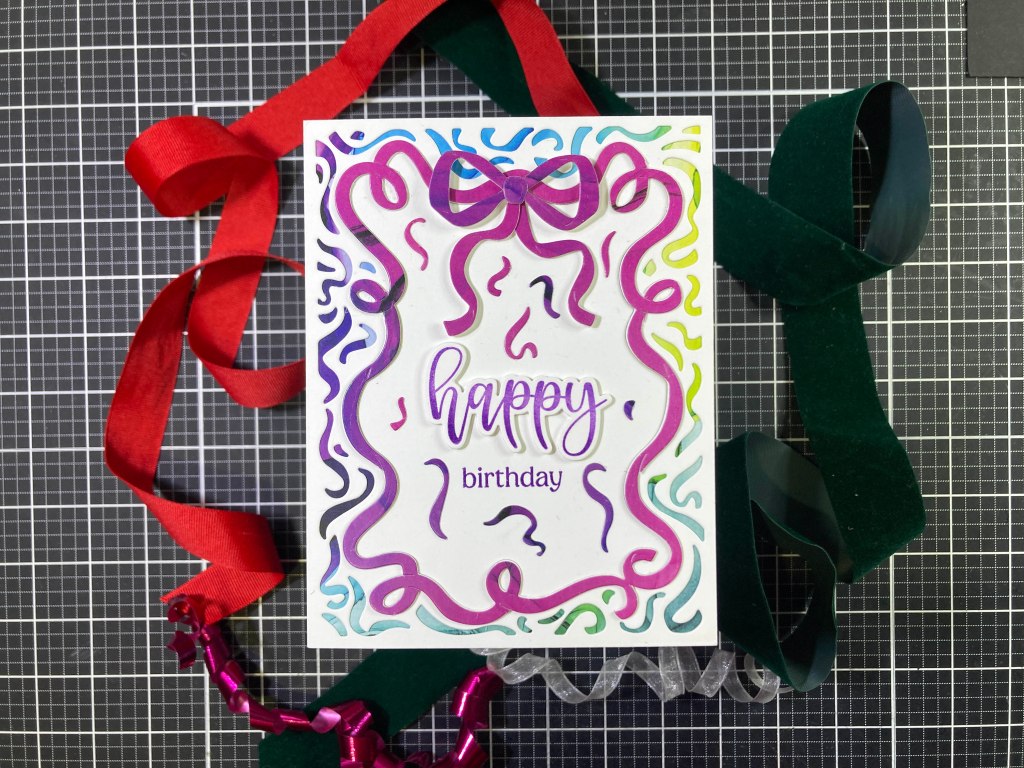
I wanted to give this Cover Plate die as much color as possible without necessarily having to ink blend all over the place. First, I die-cut a 4.25″ x 5.5″ panel of White card stock (saving the center cut-out). Then I reached for my Altenew Alcohol Ink Backgrounds 6×6 Paper pad, found a piece with some nice color variations to it and trimmed it down to (slightly smaller than) 4.25″ x 5.5″. I glued the White die cut piece to the background and glued the center cut-out back into place. On a different Alcohol Ink Background, I die-cut the Cover Plate die again and trimmed the framing ribbon away from the rest of the die cut. Then it was quite easy to glue that on top of the white ribbon on the original die cut! The extra layer adds a touch of dimension as well!

I die-cut the bow pieces from the same Alcohol ink background and assembled that at the top of the ribbon frame. I stamped the large sentiment on a scrap of White card stock using HA Thistle and Grape Slush Reactive inks and embossed that with clear embossing powder. I die-cut the “happy” along with two blanks and glued them together for a nice chunky sentiment. I stamped the sub-sentiment with Grape Slush ink on the card front and embossed that with Clear Embossing powder as well. I glued the “happy” in place and glued the whole panel to the front of an A2 card base. The center white area was feeling a little plain so I grabbed a bunch of the purple die cuts (from the Ribbons Cover Plate die cut) and filled in the spaces with more streamers! That was just what this Happy Birthday card needed!!

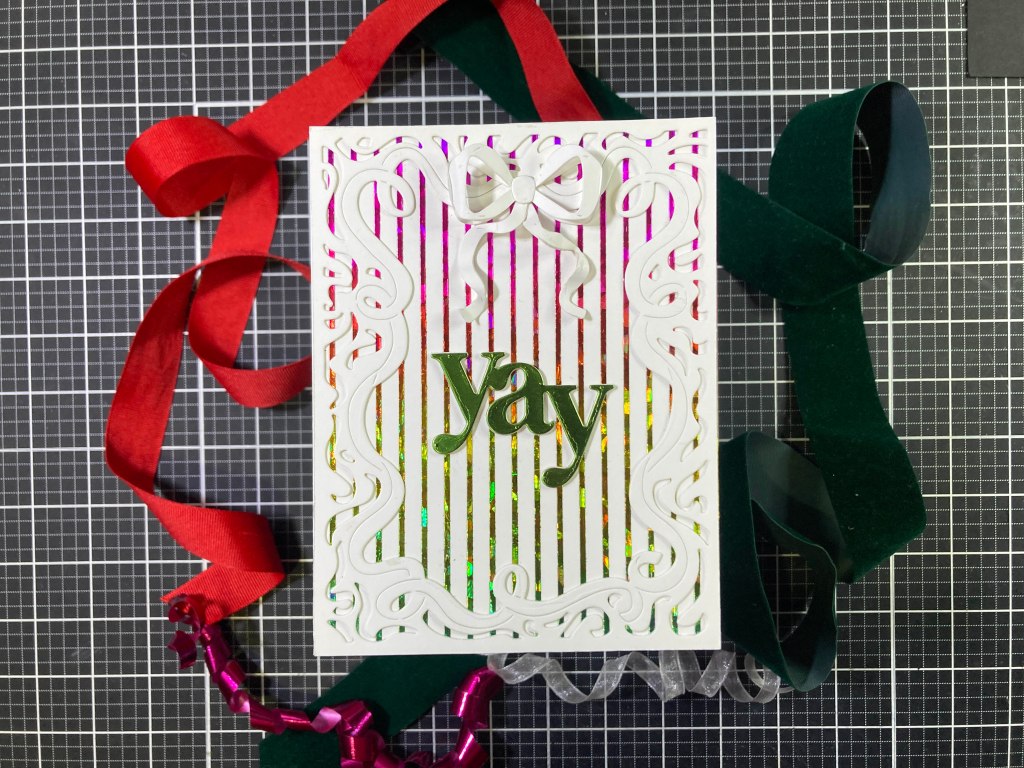
Whenever we get simple pattern stencils with our kits, I am always interested in trying to do some foiling using the DecoFoil Transfer Gel right through the stencil!

And who can resist rainbow foiling!! I spread some DecoFoil Transfer Gel through the stencil and onto a panel of White card stock and let that dry completely. I laid a DecoFoil Rainbow Shattered Glass transfer sheet on top of the dry stenciling and ran that through my laminator. Extra special shiny! I glued the foil stripes background to an A2 White card base. I die-cut the cover plate die from some 110# White Card Stock and glued that on top of the foiled stripes.

I’m still looking for ways to add dimension to these bows so I die-cut all the bow pieces twice from some 80# White card stock. I glued the tail pieces together (2 layers) and curled the paper around before letting the glue dry. I used a small tab of card stock to glue the outer edges of the bow pieces together and curved the front piece forward and the back pieces backwards to make a 3-D Bow! Not perfect, but pretty darn close!! I assembled the pieces of the bow together and glued it to the top of the card.

The Bow Tag Stamp Set has a small “yay!” sentiment and that made me think of the My Monthly Hero kit from May of 2024 where we got a 50th Anniversary gift of a “Yay” Fancy Die. That’s big enough to command attention all on its own. I die-cut that from a Tim Holtz Metallic Kraft Jewels paper pad – the green works with the rainbow foil beautifully – I also cut a couple blanks to glue all together for more dimension. I added the assembled sentiment to the middle of the card front. There is so much sparkle here… no need for extra embellishments!

Now let’s move along to the Bow Tag Stamp set and the matching dies… definitely the biggest bow in the whole kit!

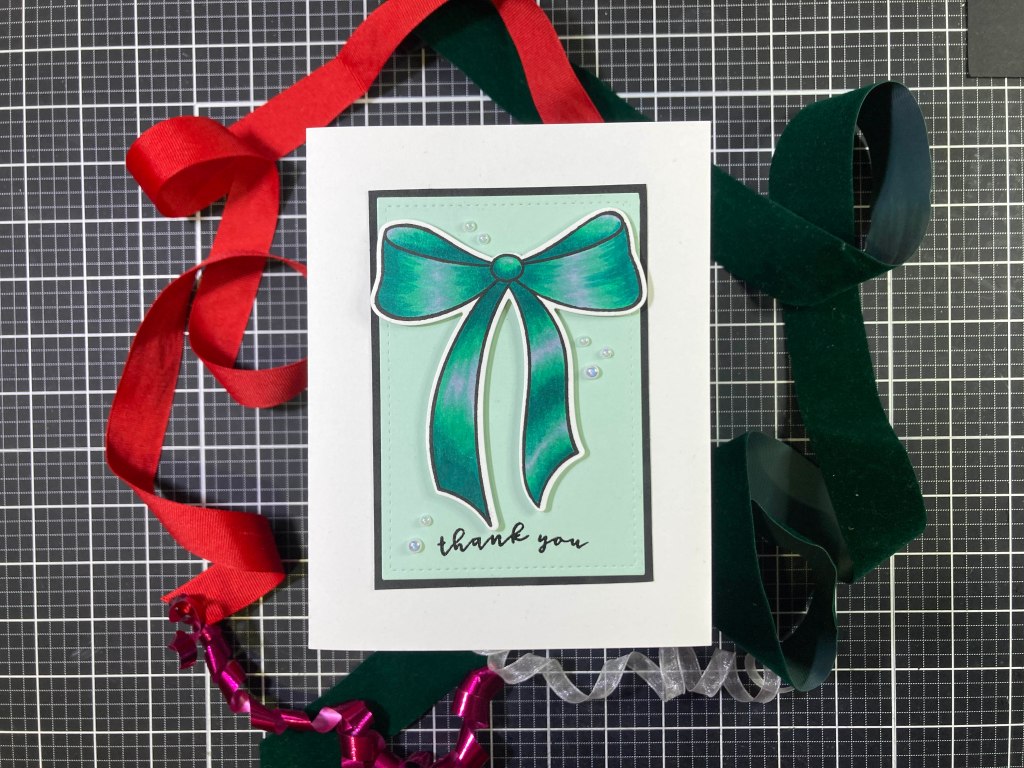
When we get a nice big image like this I love to reach for my alcohol markers! I stamped the bow using VersaFine Onyx Black ink on some Neenah Solar White 80# card stock and colored the bow with my Ohuhu markers (BG6, G360, BG9 ). I die-cut the bow with the matching die and trimmed away the tag hole from the top.

I die-cut the teal card stock from the kit with a 2.75″ x 4″ Lawn Fawn Stitched Rectangle die and added a thin black mat behind before gluing both to a White Card Base. I stamped the sentiment on the bottom of the background with VersaFine ink and embossed it with Clear embossing powder. I mounted the bow with foam tape and added some Pastel Pearl Embellishments for a little extra sparkle. I do like that big bow!

The Bow Tag Stamp set also has a bow stamp with only two loops and no tails… I have seen some of the designers using these die-cut loops behind the bow – kind of like a second layer of ribbon… hmmmmm…

How about a LOT of extra loops behind the big bow? I stamped the bow on a plain piece of White card stock using VersaMark ink and stamped a second on some masking paper and fussy cut that out. I placed the mask over the bow and stamped the double loop stamp (matching the center knots) above the bow and then below the bow. I fussy-cut a mask of the Double Loop stamp and laid it over the loops on top of the bow and stamped a single loop in the top center. The bottom loops didn’t need masking since the bow mask covered the intersections so I simply stamped another single loop in the center of the bottom part of the bow. Remove the masking and Voila! Two bows in one!

I then set to coloring this big bow, and I’m not sure why, but I got it into my head to color this bow with plain ol’ pencils! You can blend graphite with your fingers or a paper stomp and I had such a good time coloring this – it almost has a silver quality to it! And of course, I’m always in the market for some dimension, so I did fussy-cut this fancy bow out – very simple, easy curved lines for no-muss fussy-cutting! Lastly, I did spray some Sheer Shimmer Mist (Sparkle) over the whole bow for a great glitter effect.

I reached for my old Gina K. Oval dies (Large Set single stitch and Small Set double stitch) to die-cut some of the Yellow card stock from the kit along with a Black mat. (the stitching on these dies makes lining up the mat almost foolproof – I’ve always had problems getting oval mats to line up correctly!) I ink blended some Hickory Smoke Distress Oxide ink through the Thin Stripes Stencil on the Yellow oval and glued that to the Black oval mat and then glued those to an A2 White card base. I gathered all of the “encouragement” sentiments from the stamp set and arranged them around the oval – I kept the “you did it!” sentiment for the main sentiment and stamped the other four sentiments with Hickory Smoke ink and embossed them with Clear Embossing powder. I stamped the main sentiment with VersaFine ink and embossed that as well. Finally I added the bow to the center of the ovals with foam tape. These oval dies fit this compound bow beautifully!

I do realize that the small oval “Cameo” stamp in this set was probably created to go in the center of the bow, but…

The curved line of dots stamp reminded me of jewelry, so I decided to treat the stamp as an actual Cameo..! I stamped the Cameo with VersaFine ink and two of the curved dots with VersaMark ink and embossed them with Gold Embossing powder and die-cut them with their matching dies. I used the Gina K. Oval dies again to die cut the Black oval and Yellow mat and glued them together. I took a white card base and marked a center line down the front and did a partial die-cut with the largest Oval die to match the card stock oval. That gives us a perfectly matched cut edge!

I used the Thin Stripes stencil and Fossilized Amber Distress Oxide ink to blend the stripes on the front panel of the card base, feathering out towards the center of the card. I colored the Cameo with my Alcohol Markers and a Gold Gel pen, and die-cut it with the matching die. I stamped the sentiment on the oval with VersaMark ink and embossed it with Gold embossing powder, and arranged the “pearls” and Cameo on top. The “pearls” are glued flat and the cameo is attached with foam tape. I though the right side of this card felt a little empty, so I stamped all the tiny stamps from the Bow Tag Stamp set in a triangular arrangement on the top and bottom corners using the Fossilized Amber ink – because of the cut-away card front, these are actually stamped on the inside of the card. I do love using “beautiful” as the sole sentiment here…! Quite versatile!

I feel like I have used just about every stamp in both of these stamp sets at this point but I wanted to see if I could actually color the framing ribbon on the Cover Plate die without having to separate it from the rest of the die.

I die-cut the Cover Plate Die from some Bristol Smooth card stock, and set about using my Zig markers to “watercolor” the ribbon. It’s pretty easy to “stay in the lines” if you insert a piece of paper or cardstock behind the ribbon (where the cuts allow) and color slowly around the whole perimeter moving your “masking” as you go along. Very pleased with how that came out! I glued the colored die cut to a piece of Pumpkin card stock and down to a White card base. I stamped the big bow on more Bristol Smooth card stock and colored that with the same Zig Markers as the ribbon, and fussy-cut it out.

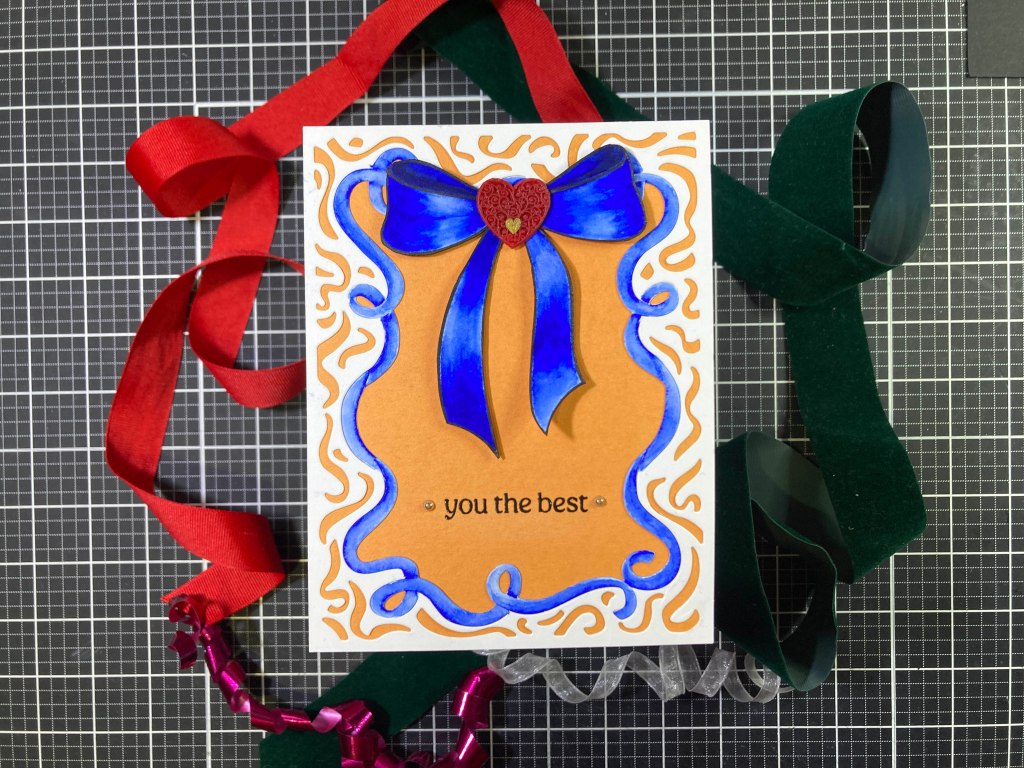
This “broken English” sentiment makes me giggle, but certainly gets the point across! I stamped that with VersaFine ink and embossed it With Clear embossing powder. I’ve noticed that wax seals are becoming a little trendy these days so I broke out my wax and created this filigree heart with one of my wax stamps (I did cut the excess wax seal away from the heart). I colored the interior heart with a Gold gel pen and glued that to the center knot of the bow. I mounted the completed bow with foam tape and added a couple of Pastel Pearl Embellishments to highlight the sentiment. I really like using the big bow with the Ribbons Cover Plate die, and I really do like this “broken” sentiment!

My brain was starting to tie itself into knots with all these bows… I decided to take the smaller stamp set at face value!

It is called the Bow TAG Stamp Set… and the matching die does cut out a hanging loop on the top of the bow! I took a #8 standard manila business tag (3.125″ x 6.25″) and trimmed it down to 5.25″ and ink blended Faded Jeans Distress Oxide ink through the Thin Stripes stencil over the whole tag. I stamped the bow with VersaFine Onyx Black ink on 80# Neenah Solar White card stock and colored it with my Ohuhu Alcohol Markers (B270, B250, B120). I die-cut the bow (leaving the hole at the top) and used Silver cord to tie the bow through the real tag hole leaving it to swing as it may. I stamped the “to:” and “from:” (along with the triple dots) using VersaFine ink. I really like this big bow stamp, and this tag would dress up any package regardless of wrappings or ribbons!

That’s my 10 Cards 1 Kit offerings for this month… I do try to imagine some alternative uses for these kits and try not to duplicate what I see other designers do with theirs. Apart from a few sentiments, I did use almost every stamp in our stamp sets… I used the Cover Plate Die on three cards… and the Thin Stripes Stencil on five cards. I even used a number of the Pastel Pearl Embellishments and three of our card stock sheets. That large bow has got to be my favorite stamp from this kit… and I ended up liking the cover plate die more than I thought I would!

It is good to be back again with a new kit in hand, (apologies for the radio silence!) but following the Spellbinders merger, HA has changed their Hero Studio Subscription policies again… it seems you can only get a kit during the month of its release by subscribing. Each month the “New Subscriber” registration window is open from the 1st of the month through the 27th, then the kit will not be available again until the 20th of the next month and that’s only if there are any leftovers and it may be at a higher price…

I am disappointed that you can’t purchase any of the Hero Studio kits a la carte until the 20th of the following month and then only if there are any left, and it may be at a higher price. The December 2024 Card Kit is listed on the Hero Arts website at $108.99. Yowza! The July, October, and November Card Kits are listed at $40.00 (actually cheaper than the $46.00 subscription price) I guess they must have a lot more of those kits on hand than the leftover December kits.

So… tell me what you think! Should I move on from Hero Arts? I have been with them for many years now, and am feeling that a change of pace might be in the cards… (pun intended!) What do YOU want to see me tackle? Should I jump to a different company? Altenew? Gina K. Designs? Lawn Fawn? Simon Says Stamp? Pretty Pink Posh? Spellbinders? Love From Lizi? Most companies seem to offer some kind of a monthly card kit and I am truly interested in hearing what you think I should do… Or is it useful for me to stay with Hero Arts? Let me know your thoughts!

If you enjoyed this 10 Card 1 Kit exploration, please click on the “Like” star at the bottom of this post (and the “Follow Me” link at the top of this page)! Remember to Like Me, List Me, Pin Me, Post Me, Share me with all your crafty friends and please Stay Tuned for further card-making adventures! I send you and yours love and Light and Happy Crafting!!!

DISCLOSURE: This site contains some affiliate links to products. I may receive a commission for purchases made through these links (at no cost to you). As an Amazon Associate I earn from qualifying purchases. Thank you!