Gina K. Designs • Floral Fix Card Kit • 10 Cards from 1 Kit • May ’25 Release

Hello Folks!!! Scott here with a bit of a mid-month surprise for you! I have a 10 Cards from 1 Kit post featuring Gina K Designs Floral Fix Card Kit! I do follow Gina K. on YouTube, and I happened to catch her May 2025 Release Party and couldn’t resist this versatile kit!

The Floral Fix Card Kit comes with:

Ruffled Blooms 6″x8″ Stamp Set and Die Set

Mr. Fix-it 4″x6″ Stamp Set and Die Set

Ruffled Blooms 5 piece Coloring Stencils

Frangipani Layering Stencil

FREE GIFT: 3-D Embossing Folder w/ Die

Though I have followed Gina for many years (anyone remember Stamp TV?) I have never bought one of her Card Kits… To be honest, I thought they were a little expensive… but at $59.95 this kit is a nickel cheaper than what Hero Arts is charging for their Card Kits and you don’t have to subscribe… you just have to be quick – this kit sold out very quickly!! I do believe it was the Mr. Fix-it stamps and dies that originally caught my eye, and then, when I saw stencils and dies and embossing folders that worked with the Ruffled Blooms Stamps… well, that clinched the deal!

I was very impressed with the amount of goodies in this kit, and was doubly excited when I realized that Gina includes magnetic sheets with her Die Sets!! That’s a BIG plus in my book!

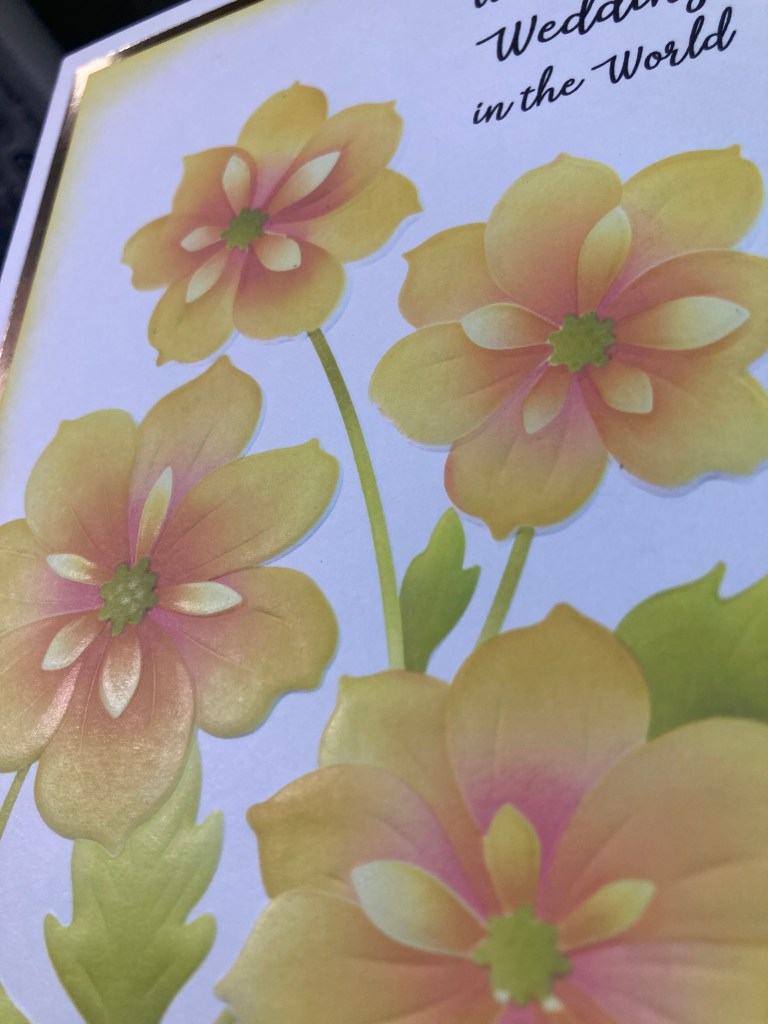
My neighbor needed a Wedding card “right away” and I thought this kit would fit the bill.

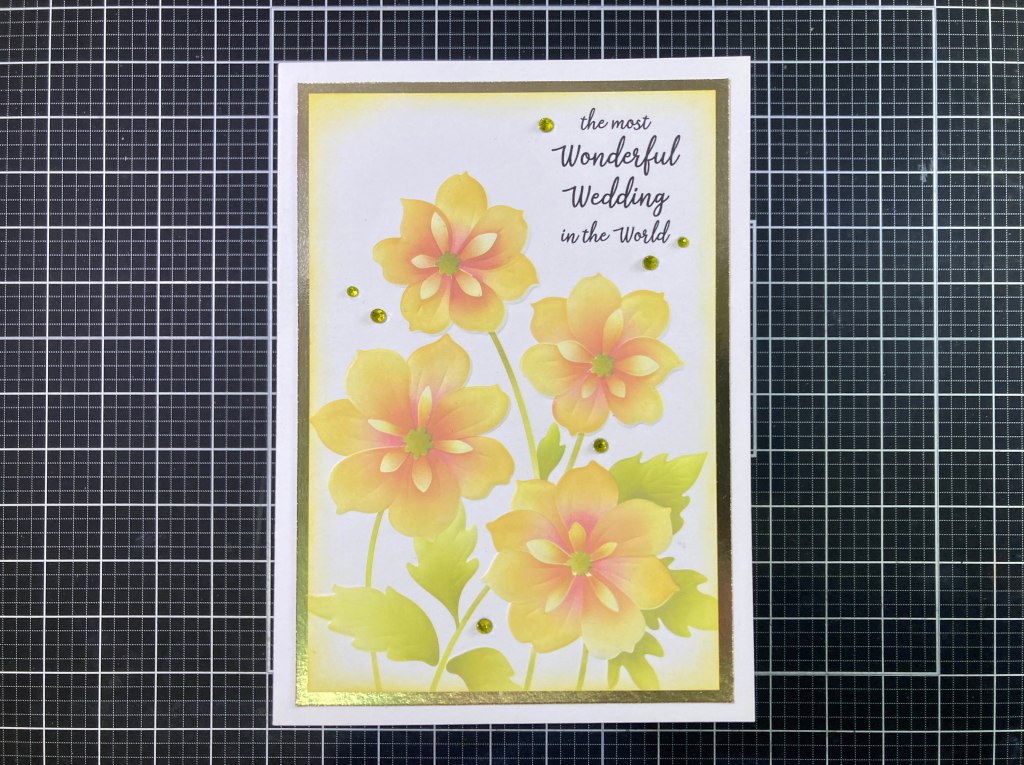
My neighbor was very specific in that she wanted a 5″x7″ card with yellow and pink flowers, and it had to say “the most wonderful wedding in the world”. This Ruffled Blooms design is large enough to command a big card and still leave a little room for this rather unorthodox greeting.

I used the Ruffled Blooms Coloring Stencils on some Neenah 80# Solar White card stock with Hero Arts Lemon Drop, Creamsicle, Taffy, Fruit Punch, Key Lime Fizz and Green Apple Reactive inks. The stencils lined up very nicely and I really liked that the little five-petaled centers were able to be colored separately. I used my Silhouette Software and the Dream State font to print the sentiment directly on the stenciled panel. I did want to use the Embossing folder on this, but since I was using a 5×7 inch panel, it wouldn’t fit in the embossing folder. Hmmmmmmmmm…

I opened up the embossing folder flat, lined up the stenciled panel on the flat folder, and using a rubber embossing pad and embossing plate, sent it through my die cutting machine and actually got a decent embossing. That really makes the Coloring Stencils really stand out!

I trimmed that panel to 4.25″ x 6.25″ and ink blended more Lemon Drop ink around the edges, and added a mat of Champagne Metallic card stock to the back before gluing it all down to a 5″x7″ card base.

Some bright Yellow Gems adds the required Wedding sparkle, and I’m happy to report that my neighbor was thrilled with this card!

During the Release Party, Gina mentioned that for some unknown reason, the stencils didn’t line up perfectly with the stamp… the individual flowers will line up but you will need to move the stencil around a bit to match each flower.

I decided to just color the stamp for this card using my Ohuhu Alcohol markers. I did stamp the flowers using Gina K. Designs Amalgam ink on 80# Neenah Solar White card stock, and only used 8 markers to color the flowers – Y080, Y1, Y2, YR170, YR240, GY5, GY8, and GY42. I don’t care what kind of ink you use to stamp your images, I do find that you have to be careful when coloring with Yellow alcohol markers – invariably, lighter markers can pick up most any kind of ink… I always heat set whatever ink I’m using when I use my Alcohol markers… but I still find the need to be careful!

I trimmed the colored panel to 4 1/8″ x 5 3/8″ and ink blended a bit of Green Apple ink on the edges, and embossed it with the embossing folder – I also try to remember to tape my panel down to the embossing folder (especially 3-D ones) to help prevent shifting when it goes through your die cutting machine. This embossing came out terrifically! I cut a panel of Green card stock to 4.25″ x 5.5″ and glued that to an A2 White card base and added the colored/embossed panel on top leaving a thin green frame exposed.

I stamped the sentiment with VersaFine Onyx Black ink and embossed it with Clear embossing powder and die-cut it with the matching die. I die-cut two more sentiment blanks and glued all three together for some dimension, and then glued that to the card front. I like the light orange centers of the flowers and the texture of the embossing folder – wow!

I’m loving that 3-D embossing folder, so I thought I could do a card featuring JUST the embossing folder…

I grabbed a piece of Tim Holtz Dark-Red Kraft-Core card stock and did a reverse embossing with the embossing folder – the flowers are de-bossed from the front which effectively makes the background the highest part of the image. I took a core-donations Sanding Block to the front of the embossing and lightly sanded away the red top of the card stock to reveal the Kraft-Core. With some careful sanding, I was able to reveal most of the embossed details on the flowers and leaves. I trimmed the panel to 4 1/8″ x 5 3/8″ and tore about a quarter inch off of the right edge before gluing the panel to an A2 White card base.

I stamped the sentiment on a matching piece of card stock using HA Unicorn White ink and embossed that with White Embossing powder. I die-cut the sentiment (I love the detailed sentiment dies in this kit – no simple square banners for these sentiments!) and used foam tape to pop it up a bit on the card front. Again… great texture on this card – I love that the flowers really stand out, and after sanding, this card front is oh, so velvety soft! So simple yet so effective!

Just because there are 5 stencils in the Ruffled Blooms Coloring stencils, doesn’t mean you have to use all 5 of them!

I stamped the flowers using VersaFine Onyx Black ink on 80# Neenah Solar White card stock and used the open flowers stencil and HA Splash Reactive ink to lightly color the four blooms. I did have to shift the stencil just a little bit from flower to flower to cover everything, but it was quite easy to line the blooms up. I skipped the two petal stencils, and used the inner petal stencil to blend Blue Hawaii Reactive ink in the center petals and Green Apple Reactive ink on the stems. I used the final leaf stencil and Green Apple ink for the leaves and used a tiny touch of Bundled Sage Distress Oxide ink on the flower centers. Even with having to watch where your stencil is, this stencil coloring was quite easy!

I die-cut the flowers with the included die – again, a nicely detailed die and so easy to line-up with the stamping. I took an A2 panel of white card stock and die-cut it with an Altenew Cross Stitch Canvas die for a little interesting texture on the background without adding any new colors. I glued that to an A2 White card base and added the flower die cut using foam tape. I stamped, embossed and die-cut the sentiment as usual, added one die-cut blank to the back and glued those to the card front. Some matching Blue gems adds great sparkle, and I think this simple coloring is really effective!

Our FREE Embossing Folder came with a die too – the die will cut out the largest (middle left) Ruffled Bloom stamp.

Or stencil! I used the three Flower petal stencils on some Neenah Solar White card stock to color these blooms with Tattered Rose, Worn Lipstick, Picked Raspberry, and Candied Apple Distress Oxide ink. I did finish off the coloring with Squeezed Lemonade Distress Oxide ink for the centers. I die-cut all three blooms with the included (FREE!) die. Once cut, these blooms snap into place over the corresponding bloom on the embossing folder. I taped the blooms into place and embossed all three. That works REALLY well!

I ink blended some Green Apple Reactive ink through my old Stampendous Petals Background stencil and die-cut that panel to 3.75″ x 5″ with a Lawn Fawn Stitched Rectangle die and added a thin Black mat behind. I trimmed the slightest little bit from an A2 panel of Pink card stock and glued that to a White card base leaving the thinnest of white frames around the edge. I glued the matted background onto the pink and decided on my arrangement before stamping the sentiment with VersaMark ink and embossing it with Clear Embossing powder. I did cut off the “and” at the beginning of this sentiment which makes it usable all on its own. I mounted the Blooms with foam tape and added small Black Gems for sparkle. I also added tiny Black dots on the centers of the blooms – it’s those little details and the impressive embossing that makes this card stand out.

Let’s move on to the Mr. Fix-it Stamps and Dies. These tool stamps are what caught my eye in the first place!

I admit to loving this sentiment! To begin with, I stamped all the tools and fasteners using VersaFine Onyx Black ink on some Bristol Sooth card stock and used my Zig Clean Color markers to color everything. Then I die-cut all the pieces with their matching dies and set about making some masculine cards!

I had some 2″ Aluminum Foil Duct tape in my stash, so I taped a piece of that on a scrap of White card stock and embossed it with an old Sizzix/Tim Holtz Distressed Diamond plate embossing folder. I cut the embossed tape down to just under 2″ x 5.5″ and glued it to a White card base. I stamped and embossed the sentiment as usual, directly on the card front, and added a couple Silver Mylar Peel-offs (Love From Lizzi) to the sides of the tape. I mounted the hammer and nail (pointing right at the sentiment) with foam tape. This card also reminds me of the old Abraham Maslow quote: “To a man with a hammer, everything is a nail.” I’ve always loved using aluminum duct tape with embossing folders – especially this one!

It was Father’s Day recently, so I felt obliged to make a card celebrating the one who keeps everything working…!

I know MY dad was the go-to guy whenever anything broke or stopped working. He was the first to dig in and look at the problem and was often all that was needed to get whatever it was repaired. This card is almost all about the background…! I took an A2 panel of some old Altenew White Woodgrain card stock and scored panels on the back every 3/4″ from top to bottom. I die-cut the panel to 3.75″ x 5″ with a LFSRdie and then I ink blended (with a foam pad) Frayed Burlap Distress Oxide ink around the whole panel – that makes the woodgrain and scored planks really stand out!

I added a thin black mat behind the woodgrain and glued those to an A2 White card base. I stamped the sentiments with Frayed Burlap ink and embossed them with Clear Embossing powder and die-cut them with their matching dies. I added the sentiments and the tools with foam tape. I do love those tool stamps! This is even a great card for your handyman, or mechanic, or plumber regardless of whether they’re YOUR Father or not!

I’ve got four more tools colored and cut and ready to use… and another great sentiment in this stamp set..!

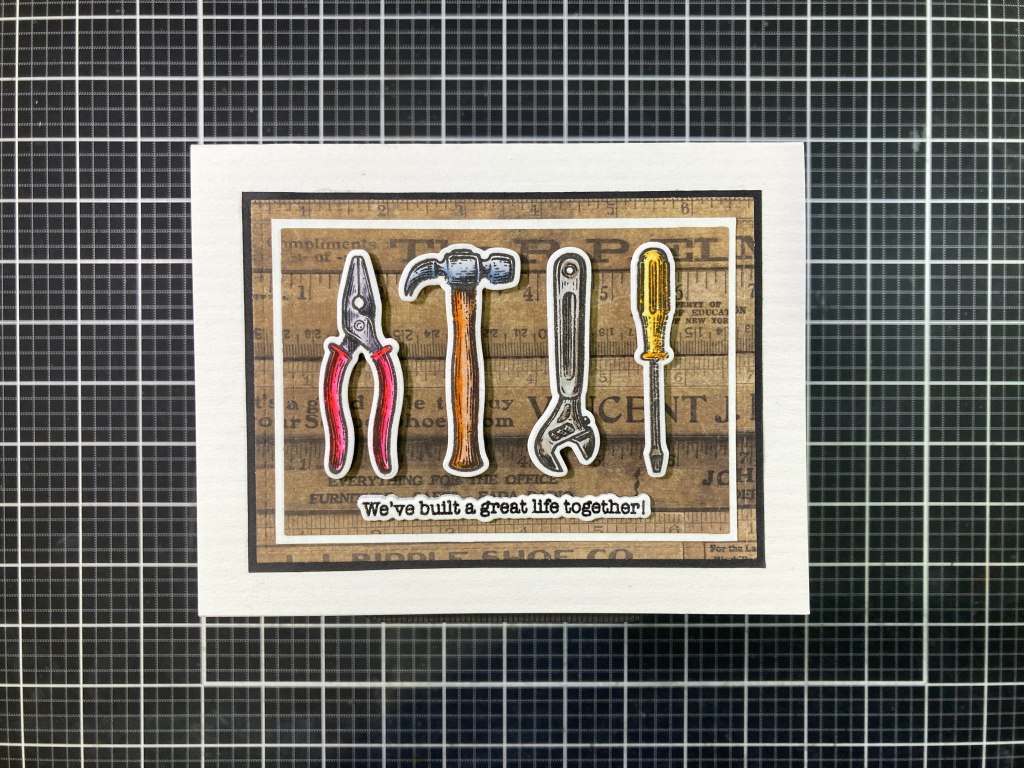
I knew I had some measuring stick pattern papers in my stash somewhere! This paper is from an old Tim Holtz / idea-ology 8″x8″ Collage Mini Stash pad. I die-cut the pattern paper to 4.5″ x 3.25″ with a LFSRdie and cut the center rectangle at the same time using the next smaller die – 4″ x 2.75″. A thin White mat behind the center piece and a thin Black mat around the larger one allows you to glue them all together and then down to a Textured (light stripes) White card base.

I stamped, embossed, die-cut and stacked the sentiment as usual and glued that directly to the card front and added all the tools with foam tape. I did take one of the die cut screws and the second nail and glued those to opposite corners of the inside writing surface. This card would be great for an Anniversary, or a new home, or most any familial celebration!

I have one more big item left to use in this card kit – the Frangipani Layering Stencil… only two layers but quite large!

I did have to look up what a Frangipani looks like! This is my interpretation of the most common Frangipani colors I found. On an A2 panel of Neenah Solar White card stock, I ink blended Worn Lipstick Distress Oxide ink through the large #1 stencil trying to concentrate on the edges, and then ink blended Squeezed Lemonade through the smaller #2 stencil trying to concentrating more on the centers. I thought that worked really nicely and gave us a pretty good representation of a common Frangipani! Since the stencils are a little larger than an A2 panel, I decided to fussy-cut the whole image out.

I die-cut a panel of Dark-Green card stock with a 3.75″ x 5″ LFSRdie and glued that to a White A2 card base. I outlined the Green with some Brushed Gold Peel-offs (Love From Lizzi) and mitered all the corners. I glued the Frangipani on top matching up the edges to the card base. I stamped the sentiment with VersaFine Onyx Black ink and embossed it with Golden Crown Embossing powder (LFL). I die-cut the sentiment and two blanks and glued them together before gluing them to the card front. Brushed Gold enamel dots adds a little more shine and this card reminds me of spring even as the summer starts bearing down upon us.

There are more colors to Frangipani than just Pink and Yellow…! I did find one that was deep Purple and Red!

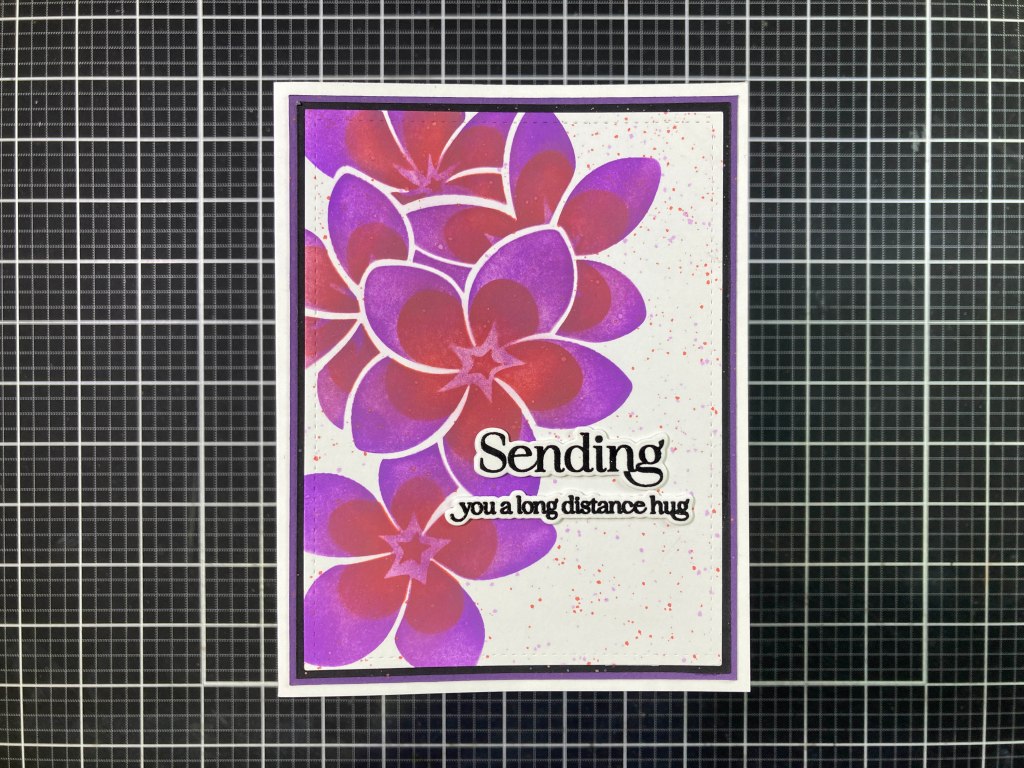
I thought I would try stenciling these in reverse order – first Candied Apple Distress Oxide ink through the smaller #2 stencil and then Wilted Violet Distress Oxide ink through the large #1 stencil. The Violet toned down the Red and together they make for some very vibrant blooms! I smushed a little of the inks on a craft mat and added a drop of water to each, and spattered the same two colors on the rest of the inked panel. When dry, I die-cut that panel to 3.75″ x 5″ with a LFSRdie, and added a thin Black and a thin Purple mat behind, and glued all the layers to a White card base.

I stamped, embossed, die-cut, and stacked (just two layers) both sentiments as usual and glued them directly to the front of the card. I do really like the different sizes of sentiments in this kit, and I really like how detailed the dies for the sentiments are. And as far as I am concerned, everybody deserves a hug every day!!

That’s my ten cards using my first ever Card Kit from Gina K. Designs! I am pleasantly surprised by how many options are afforded with this kit – there’s so much you can do with these supplies that I’m sure I’ve only just scratched the surface! I’m going to have to keep a closer eye on the Gina K. Design releases now!

What a great array of cards from this Floral Fix Card Kit! Those Ruffled Blooms stamps and all their matching supplies are oh-so-very versatile, the Mr. Fix-it stamps and dies are perfect for masculine cards of many varieties and even the simple Frangipani stencils can be used in many ways!

Of course this kit sold out so very quickly… I do know that Gina K. Designs will often re-order Kits if there is a big demand so if you look and the current kit is sold out, DO put your name on the Notify Me When Back in Stock tab so they have a good idea how many to re-order! I know the Relax and Have Fun Card Kit from the June Release is still available and actually has sentiments that coordinate with the sentiments in this kit! Hopefully, I can come back with more Gina K. Designs inspirations to share… I will keep my eye on her offerings!!

Thank you so much for sharing your time with me here. Your attention and encouragement keep me inspired! If you enjoyed this post please click the “Like” star at the bottom of this page, and if you would like to be notified of new posts click the Follow Me button at the top of this page. Please take a few moments to Like Me, List Me, Pin me, Post Me, Share me with all your crafty friends, and remember… Don’t run with scissors!! As always, I send you and yours Love and Light and Happy Crafting!

10 Cards 1 Kit • My Monthly Hero • May 2024

Hello Folks! Scott here with my 10 cards created using the My Monthly Hero Classic and Premium Kits for May 2024. Happy Birthday to Hero Arts! It’s their big 5-0 this month, and Hero Arts has pulled out all the stops to give us a celebratory kit fill with all sorts of fun extras!

CLASSIC KIT INCLUDES
• Floral Cake Clear Stamp Set, 4″ x 6″
• 11 Coordinating Dies
• 6 Sheets Luxe White Watercolor Paper, 5.5″ x 8.5″
• Contour Ink Pad
• Flat Water Flow Brush
• Watercolor Palette
• Watercolor Swatch Cards

Plus Special (50th Anniversary) Gifts:
• Message Clear Stamp Set, 3” x 4”
• 3 Coordinating Dies
• Yay Fancy Die

PREMIUM KIT INCLUDES everything in the Classic Kit AND:
• Balloon Background Cling Stamp, 4.6″ x 5.8″
• Champagne Sequins
• Birthday Enamel Dots

Plus Special (50th Anniversary) Gifts: • Yay! Clear Stamp & Coordinating Die • Congrats Fancy Die

There is also an added surprise (though I didn’t receive one) of a Limited Edition Tone-on-Tone Blue Metallic Spray! We truly get so many goodies this month and, of course, Birthday Cards are always extremely useful! That big CONGRATS! die is particularly eye-catching! But we’ll have to wait till I get to the Premium Kit… As usual, my first five cards will be done using just the Classic Kit supplies… OH, and if your Birthday is this month… HAPPY BIRTHDAY!

Apparently, they are encouraging us to do some no-line water-coloring this month, so that’s right where I’ll start!

I am certainly no expert when it comes to no-line coloring… especially with watercolors…but, I’m very pleased with this! I used the watercolor paper, the water brush and the Watercolor Palette to create our background. There is much more color on that watercolor palette than one might think! And I am quite pleased with the Flat Water Flow brush! I have gobs of water flow brushes in my stash but this is the first flat water flow brush I own! Once I was happy with my background, I die-cut the panel with a Lawn Fawn Stitched Rectangle die (5″x3.75″) and glued that flat to a White A2 card base.

I stamped the cake, plate, and candle on more watercolor paper using the Contour ink. I stamped them all three times before I could really discern the outlines. I did use regular small brushes to paint everything… For some reason, I decided to do a pink cake (I know, right!!) but a lighter, even white cake base would make coloring all the florals much easier – I did have to paint many layers for the flowers to show up on the pink. One secret I did learn about no-line coloring is to do your final detailing with colored pencils… it’s easy to add some shading and definition with pencils and not lose the no-line coloring effect.

I die-cut all three stamps with their matching dies, glued the cake to the plate and the candle behind the cake. I also stamped and colored the small strawberry and flower cluster the same as the others, die-cut them out and added them to the cake with thin foam tape for a bit more dimension. I added thin foam tape behind the whole cake assemblage and added that to the front of the card.

I stamped the two sentiments with VersaFine Onyx Black ink and embossed them both with Clear embossing powder. I die-cut them out with their matching dies – you know I love me some sentiment dies! I added two blank die-cuts behind the yay! sentiment for a little dimension and glued that to the card front. I mounted the HB sentiment with foam tape. I don’t think I’ve ever done a no-line coloring project with images quite this small… I think the technique is probably easier with larger images… but I am quite pleased with how this first card came out. Very colorful!

Well, that one took me more time than I thought it would…! Let’s try something a little simpler for my next card.

On a panel of Bristol Smooth Card Stock, I stamped the birthday candles using the Gina K Wreath Builder template along with Gina K Designs Obsidian Amalgam ink. I do like the consistency of the Wreath Builder template – always seems to work for me! I colored the candles with my Zig Clean Color Real Brush Markers and die-cut the panel with a HA Infinity rectangle die (4″ x 5.25″). I stamped the sentiment(s) with VersaFine Onyx Black ink and embossed them with Clear embossing powder. I mounted the stamped panel on a mat of Black Tie Glitter card stock and glued those to a White A2 card base.

I die cut the YAY die from the same Black Tie Glitter card stock, and, die cut 6 more from a rainbow of thin card stock and glued them all together – that adds a fun pop of color behind the YAY. I die-cut the YAY shadow from 40# vellum, glued the stacked YAY on top and then down to the card front. I added a touch of glitter to the candle flames, and I think the halo of candles sets off the YAY die beautifully!

I do like the big bold sentiments included in our 3″x4″ Message Clear Stamp set “extra” this month. Most of my Happy Birthday sentiments in my stash are much smaller!

A fun background and those big sentiments are all you need for a lively Birthday greeting! I reached for my favorite party stencil – an old Stampendous Flourishes metal stencil. I used Lemon Drop and Fruit Punch Reactive inks through that stencil on a panel of White card stock and got a nice orange tone where the colors meet. I die-cut that with a HA Infinity Rectangle die (5″ x 3.75″) and glued it to a 5.25″ x 4″ specialty Gold card stock mat and down to a White card base.

I arranged the sentiments on the front and ombre stamped them with Purple Galaxy on the bottom and Blue Hawaii Reactive ink on the top. Because the Reactive Inks stay wet for a bit, I embossed the sentiments with some Clear embossing powder. For a final touch, I stamped the star from the same stamp set with VersaMark ink and embossed that with some HA Gold Embossing powder. Lots of shine for a card with no sequins!

I knew I would have to attempt that cake stamp again but this time, I wanted to just stamp it in black and color it!

On Bristol Smooth card stock and using Gina K. Amalgam ink, I stamped the cake plate, masked the top edge and then stamped the cake, masked the top of the cake and stamped the candles. Fairly easy to accomplish, and, especially with the outlines, makes for a very cohesive image. I colored everything with my Zig markers and was able to die cut the whole image using (very careful) partial die-cutting, I did have to fussy-cut a little around the candles, but it is mostly die cut! OOPS! So much for a White cake frosting…!!!

I ran across the perfect embossing folder for a birthday card – a Sizzix 3-D Textured Impressions Happy Birthday Embossing folder. I embossed a 3.75″ x 5″ panel of white card stock with the folder, glued that to a 4″x5.25″ plain black mat, and glued those to an A2 Kraft card base. I stamped the sentiment using VersaFine Onyx Black ink, embossed that with clear embossing powder, and die-cut it with the matching die (love those sentiment dies!). I attached the cake to the card front with thin foam tape, added another die-cut layer to the sentiment, and added that to the card front with foam tape as well.

I like this more than the no-line colored cake… I do think larger images work better with no-line coloring. I like this card a lot and that embossed background really sets this whole card apart!

We also have the “piece of cake” stamp and I have to admit, with all those layers, my mind immediately went to…

A rainbow cake!! Okay, we might be missing a layer, but still…! On another panel of the watercolor paper in the kit, I used the flat water brush and the watercolor palette to paint another yellow/orange/red background. (I guess I think those are party colors!!) Once that was dry I stamped the candles all over the background using Soft Granite ink – echoing the diagonal nature of the watercoloring. When that was dry, I die-cut the panel with a LFSRdie (4.5″ x 3.25″) and matted that to a Glossy Black mat and then to a White card base.

I stamped the cake on a scrap of Bristol Smooth card stock (masking off the candle) and colored it with my Zig markers. I was trying to get some dimension around the icing when I came up with the idea to use some texture paste and “ice” the cake myself. I added a touch of grey ink to a small dab of texture paste and applied it with a toothpick. You can kind of see the texture in the picture, but it’s much more obvious in real life…! I thought that was fun and added a touch of Sparkle pen to the icing as well. Finally, some White gel pen adds a little crumb texture to the layers. I cut the cake panel to 1.25″ x 2.5″ and added another glossy black mat behind that and mounted them to the card front with foam tape.

I stamped, embossed and die-cut the sentiment same as before, added two blank die-cut layers behind that, and glued the sentiment directly to the card front. Loving me some of that Rainbow Layer Cake!

That’s my five cards using the Classic kit… I almost used all the stamps in the classic sets just on these cards alone! But now we get to dig into the Premium Kit goodies and I can’t wait to use the big CONGRATS! die!

This card started with an Alcohol Ink background in blues that I happened to have on hand. It worked beautifully for the big CONGRATS die. I die-cut the shadow with glossy Black card stock and glued them together. Now we have the big Balloon cling stamp to use but I didn’t want to compete with the bright alcohol ink die cut. I reached for the Butterfly Garden Palette Reactive Ink Pad (from the MMH February ’23 Kit) for a fun gradient stamping. I stamped that on a panel of the watercolor card stock and, since the palette ink pad is reactive, lightly brushed water over the stamping to spread the colors out just a little. Not enough to lose the outlines, but enough to spread a little color. For a final touch I sprayed the whole background with some Sheer Shimmer Craft spray for some added sparkle.

I trimmed the background to 4″ x 5.25″ and added a thin mat of glossy Black card stock and glued those to a White A2 card base. I added the die-cut sentiment with thick foam tape. Though I do think the Congrats die can be used for more than just Birthdays, the Balloon background certainly suggests a Birthday party! Love that Congrats Die!

Of course we have to color all those balloons at some point… Lets make the balloons the focus and the die a highlight…!

So… wanting to get as much bang for my buck as possible with coloring all these balloons, I reached for my Yasutomo Pearlescent watercolors (very inexpensive!) and some Pitch Black card stock. I stamped the balloons using HA Unicorn White ink and embossed the stamping with White embossing powder. I colored all the balloons with the Yasutomo watercolors leaving their “highlights” blank. I knew I wanted a plain white die-cut on top, so I reached for my Dr. Ph. Martin’s Bleed Proof White watercolor for all the balloon highlights. Lastly I used a Karin Deco Brush Metallic Gold marker (from the MMH May 2020 kit) for all the ribbons and confetti. I trimmed the painted panel to 4″ x 5.25″ and glued that to a White card base.

I die cut the CONGRATS die – along with the exclamation point twice from the included watercolor card stock and glued both layers together and then flat down on the card front. A Spectrum Noir Sparkle pen adds some glitter to the sentiment. The Pearlescent watercolors (and sparkle pen) add a lot of shine to this card and I like how all the white highlights play off the stark white sentiment.

Time to spend some time and really color these balloons… let’s go back to our watercolor swatch card for this go round!

I stamped the cling stamp using Gina K. Amalgam ink on Bristol Smooth card stock hoping that Bristol card stock would help spread the watercolors around instead of sucking them up. All the balloons are water-colored using the swatch card and the confetti is colored again with the Karin metallic pen. I trimmed the painted panel to 4.25″ x 5.5″, sprayed all with the Sheer Shimmer Craft spray, and glued that to a white card base.

I stamped the two large sentiments in an ombre using the Butterfly Garden Palette ink pad – Thistle and Taffy for the bottom sentiment, and Creamsicle and Taffy for the top sentiment. The palette ink pads make creating an ombre effect quite easy on large sentiments like this. Again I embossed them both with clear embossing powder and die-cut them (with an extra ‘blank’) using their matching dies. I stamped the “it’s your” sentiment on a scrap of Pitch Black card stock using Unicorn White ink and embossed that with clear embossing powder. I die-cut that with a Lawn Fawn Everyday Sentiment Banners die and mounted it to the center of the card front with foam tape. I glued the double die cut sentiments together (for a little strength) and mounted them to the card front with foam tape. A fun sprinkle of the Enamel dots finishes out this extremely colorful card. HOORAY indeed!!

That card used some of the enamel dots in our kit… but we also got a huge batch of Champagne Sequins… a HUGE batch!

This may be the first no-frame shaker card I’ve ever done…! Using the Butterfly Garden Palette ink pad, I stamped eight YAY! stamps in every ombre that ink pad afforded. That effect is easy to achieve on these large stamps if you mark the side of the palette ink pad where the colors change. I die-cut all the YAY!s with the matching die and glued them down to a Pitch Black A2 card panel. I also added a good sprinkling of the enamel dots filling in some of the spaces around the YAY! die cuts.

I took apart the plastic packaging that held the Premium Kit contents and cut out a piece of that about 4.75″ x 6″. Then, using 1/4″ Scor-Tape, I glued the bottom of the acetate to the back of the black panel. Working around and trimming the corners I attached the two sides of the acetate to the back of card front as well. I left the top open for adding the sequins.

I die-cut the large yay die and the big exclamation point from some Champagne Metallic card stock, and die-cut the shadow from some Pitch Black card stock. I glued the sentiment to the shadow and glued everything down on top of the acetate. I like how the exclamation point nestles in there under the A and next to the Y! Now all that’s left is to add as many sequins as you like (or that the plastic will hold…!!), fold over the top flap and glue it to the back of the card panel. Then the whole card panel gets glued to an A2 White card base. Ta-Da! A no-frame shaker card! I really like this! Lots of shaker action with the sequins, and I believe the card is thinner than most “foam tape dam” shaker cards! YAY!

This idea came to me while I was coloring the rainbow layer cake and is appropriate for my last card of the month…

I stamped the cake, candle and confetti with Gina K. Amalgam ink on a scrap of Bristol Smooth card stock using judicious amounts of masking and drawing in the missing lines with a Black Pigma Micron 02 pen (matched the line thickness of the stamps nicely) I colored all with my Zig markers again… making this in honor of Joel’s favorite Yellow Cake with Chocolate Frosting. I happened to have enough of the card stock scrap to fussy cut the cake and create a ground for our scene… is it a plate…? is it a table…? is it the product of a fevered and delusional mind…? Probably!

I found this great pattern paper in my stash for the background – I die-cut a panel of that with a LFSRdie (5″ x 3.75″) and glued that to a thin Pitch Black mat and down to a White A2 card base. The cake “plate” seemed a bit forlorn floating on the background all alone, so I die-cut a scrap of white card stock using the same LFSRdie. I glued that behind the plate and down to the bottom edge of the card front – the stitching matches perfectly!

I turned to my trusty Silhouette software for the sentiment. I used the Hiragino Sans W9 font (which is a MacOS font) in three layers (black, white and black) to echo the WISH and YAY! sentiment stamps. I cut the sentiment with my Silhouette Portrait and cut 4 matching blanks to glue all together and down to the card front.

I was showing this card to Joel and he said it’s nice but I’m not sure what you would use this for… I told him to open the card… Of course there’s a perfect birthday reason for a card like this! Who hasn’t been a few days late for someone’s celebration?! Naturally, I printed this on the inside of the card base before I glued anything to the top. This makes me giggle… the gold stripes on the background are very festive and I even added some sparkle to the cake with a sparkle pen.

I think that’s a fun way to wrap up our cards this month! This was certainly an enjoyable and extremely useful kit! Happy 50th to Hero Arts! Birthday cards for EVERYONE!!! I do think I used just about everything in the kit on my cards this month – I did use every image stamp in the kit – I missed a couple of the smaller sentiments but that’s it!

Both the Premium and the Classic Kits are still available at Hero Arts! Im sure stock is running low so if you need a great Birthday Card kit with lots of terrific extras I’d grab one while you still can! If you do go shopping at Hero Arts please use my links below! That really helps support CardCutups and keeps the crafty goodness coming your way!

My Monthly Hero May 2024 Classic Kit: http://shrsl.com/4jnz3

My Monthly Hero May 2024 Premium Kit: http://shrsl.com/4jnz8

It appears that this Birthday is also a farewell to the original My Monthly Hero moniker. We are witnessing the birth of the new Hero Studio! A whole suite of subscriptions designed to cater to your specific interests and bank books!

Hero Studio now offers us six original options each month! You can subscribe to the Card Kit of the Month, Layering Stencils of the Month, Cling Stamp of the Month, Clear Set + Dies of the Month, Fancy Dies of the Month, or The Whole Studio (all five in one)! Subscription prices range from $15 to $46 (or $120 for The Whole Studio) so you can create a subscription just for you! Apparently, current MMH subscribers will be upgraded to the Hero Studio Card Kit of the Month and new kits will still launch on the First Monday of every month.

I know I’m looking forward to seeing what Hero Arts has in store for us. Click HERE for more information at Hero Arts!

Thank you so much for sharing your time with me here today. I am sorry this is a little tardy but I have been SO busy this spring! I believe things will slow down a little bit as summer kicks in. I hope you know that your support and encouragement is ALWAYS noticed and is so gratefully appreciated. YOU are the reason I do this! Please take a moment to click the little “Like” star at the end of this post, and share this on your Facebook and Pinterest pages. And let me know what card(s) are your favorite this month. As always, I wish you and yours Love and Light and Happy Crafting!

DISCLOSURE: This site contains some affiliate links to products. I may receive a commission for purchases made through these links (at no cost to you). As an Amazon Associate I earn from qualifying purchases. Thank you!