
Hello Folks! Scott here again with 10 new cards inspired by the Hero Studio Card Kit of the Month for November 2025. One More Chapter is the title of this month’s release and that might as well be One More Book once you see how many books are featured in this kit.
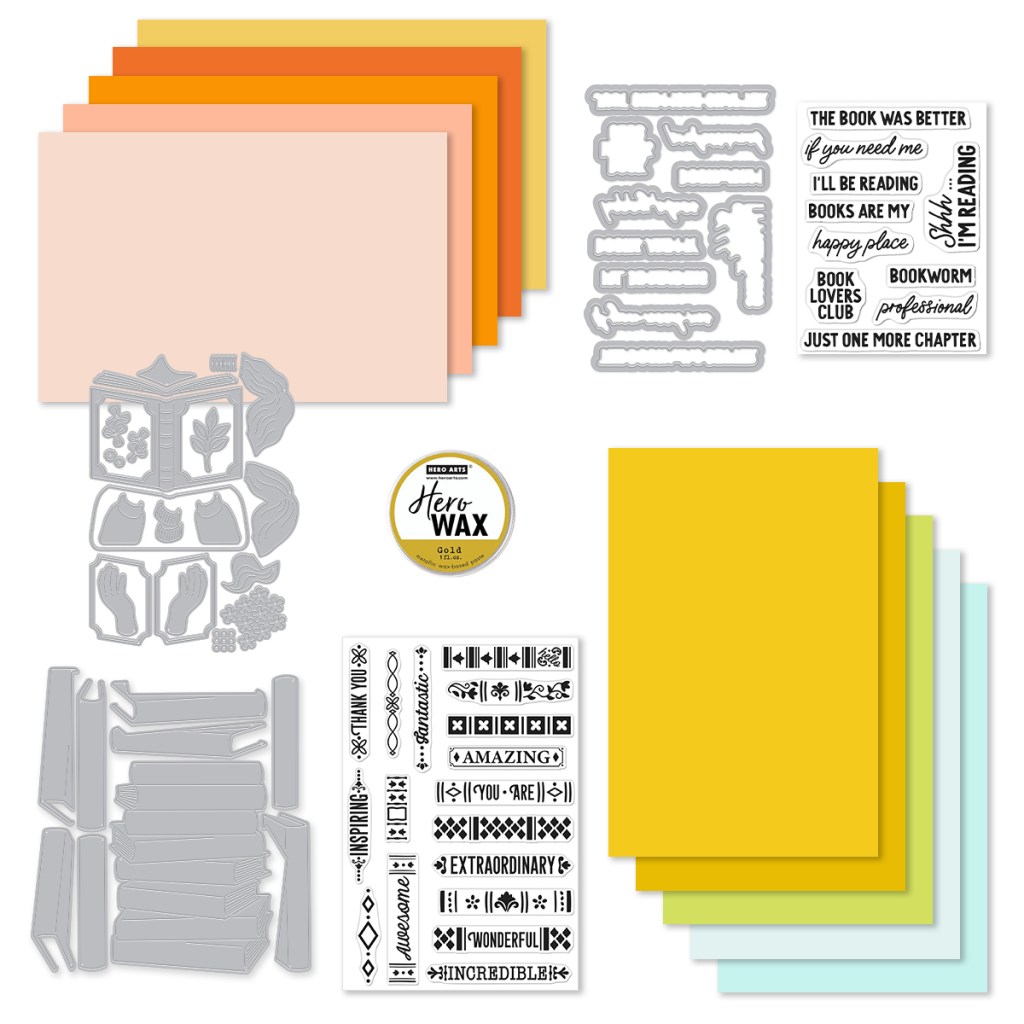
| Card Kit of the Month Includes: • To Be Read Pile 4×6 Clear Stamp Set • To Be Read Pile Coordinating Dies • Happy Place Die Set • Professional Bookworm 3×4 Stamp & Cut • Gold Hero Wax, 1 oz. • 10 Sheets of Cardstock- 1 of each color, 5.5″ x 8.5″ (Bellini, Coral, Carrot, Terra Cotta, Beeswax, Saffron, Tuscan, Peridot, Seaside, Waterfall) |
I think that’s a lot of books! There’s 8 books in that “pile”! The Coordinating dies are a fairly clever die set with the covers of the books rendered as 8 individual dies. Lots of spine decorations, but not much to color this month… The Happy Place die set is fairly unique and should be fun to assemble, but the Professional Bookworm stamp and cut set makes very little sense to me… many of the sentiments are about the sender not the receiver – “If you need me I’ll be reading”, “Books are my happy place”, “Shhh… I’m reading” etc… those kinds of sentiments seem odd to me…!
So I naturally started with the To Be Read Pile stamps and dies. I like the dimension the separate cover dies provide!
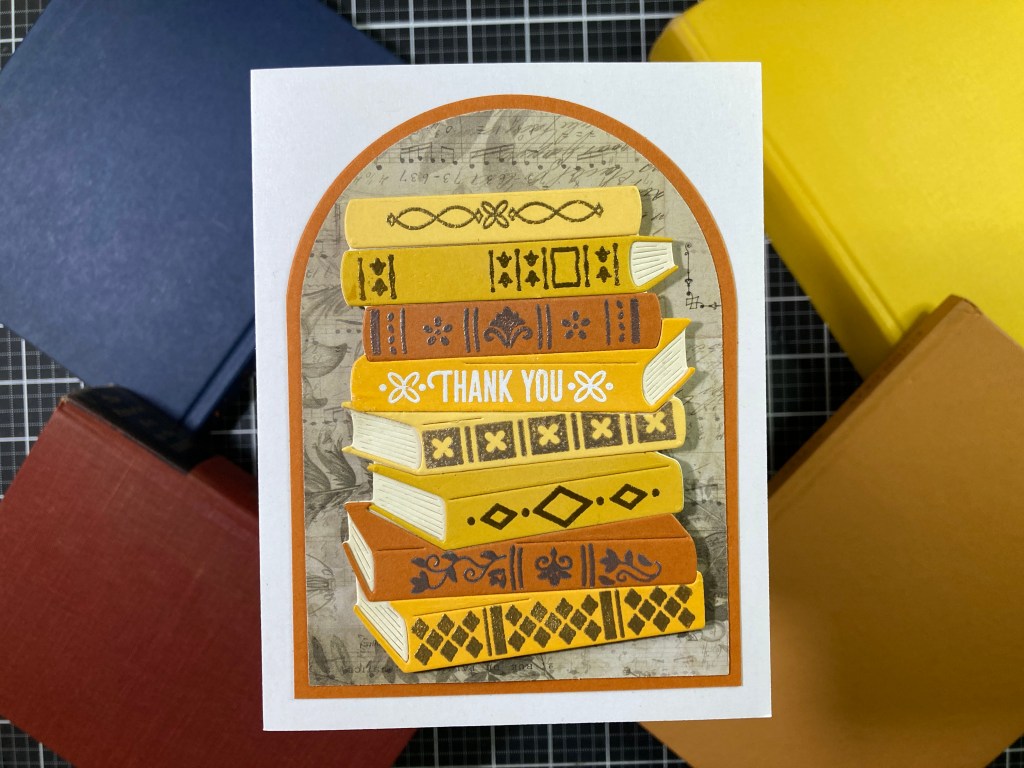
I started this card by die-cutting the book pile from some plain ivory card stock. I do keep plain old ordinary (Staples grade, generally) Ivory and Grey card stocks in my stash – they come in very useful! Then I die-cut the 8 book covers from the Spellbinders card stock included in the kit – Terra Cotta, Beeswax, Saffron, and Tuscan. I stamped and embossed the book bindings using VersaMark ink with HA Gold and Silver embossing powder, LFL Golden Crown embossing powder, and HA White embossing powder. Then it’s a simple matter of gluing the book covers on top of the full pile – but BEWARE! All of the cover dies line up edge-to-edge EXCEPT for the 4th book down from the top. The left side of the 4th book cover has to layer ON TOP of the fifth book cover die. So I suppose it’s better to glue those book covers on going from the bottom to the top…
I die-cut a piece of the Terra Cotta card stock and a piece of Tim Holtz pattern paper with two Spellbinders Essential Arches dies and glued them together before gluing them to the front of an A2 card base. I added some foam tape behind the assembled pile to attach it to the card front. That’s a lovely Thank You card for your favorite bibliophile!
I mentioned my disappointment that there weren’t really any images to color… so I made do with coloring the pile itself!
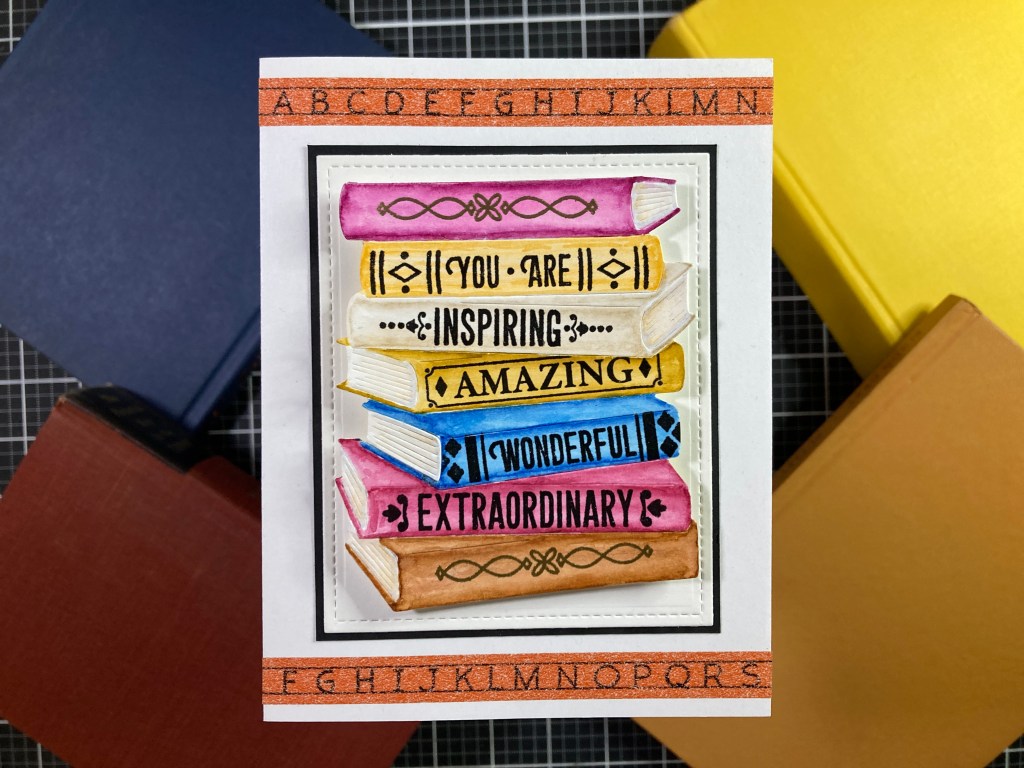
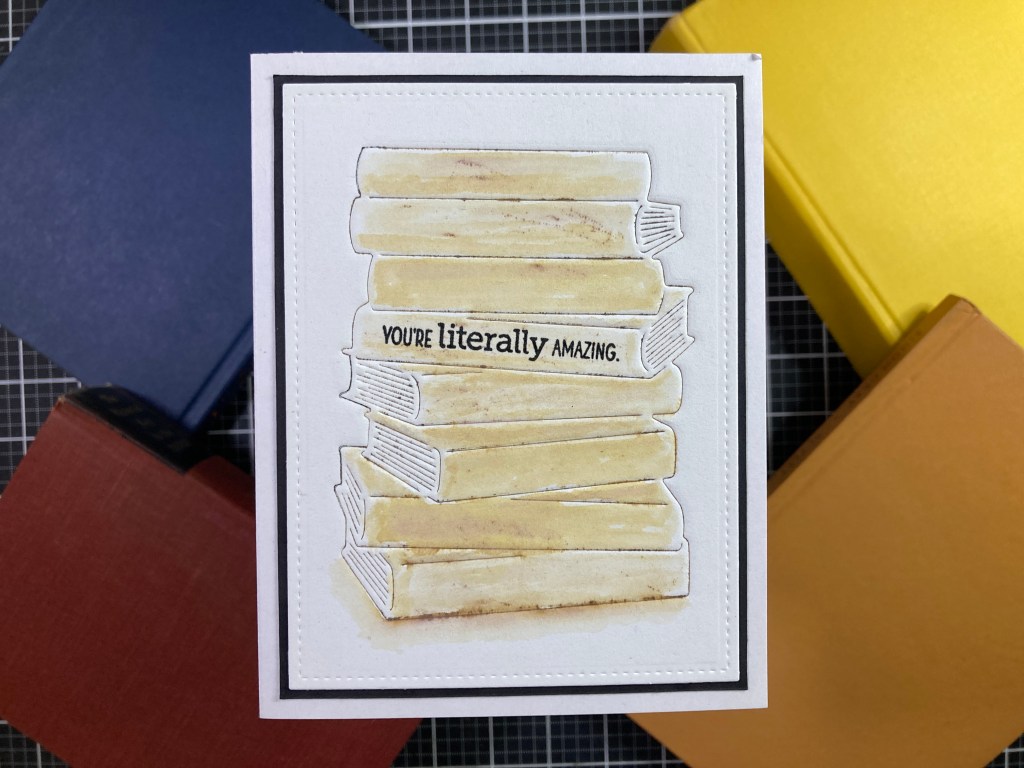
I die-cut the pile of books from some Bristol Smooth card stock and used my TomBow watercolor markers along with some water and a brush to color all of the book covers. That satisfied my coloring mojo a little, and I swear it took no more time than die-cutting and assembling all the book covers. Do note that I removed the top book from the pile… yup… there’s only 7 books here! Once the water coloring was dry, I stamped and embossed the spines using VersaFine Onyx Black ink with Clear embossing powder for all the words, and VersaMark ink with Gold embossing powder for the top and bottom books. I did use some craft tape on the back of this die-cut to hold all the cut lines together.
I die-cut a panel of White card stock to 3.25″ x just under 4″ using a Lawn Fawn Stitched Rectangle die (3.25″ x 4.5″) and doing some partial die-cutting to bring that die cut down to size. I added a thin black mat behind and glued those to a White card base. I used thick (1/8″) foam tape on the back of the book pile and placed that in the center of the card front. A couple of strips of alphabet washi tape completes the literary theme and compliments the water colors nicely. The embossed spines add plenty of sparkle to this highly complimentary card!
That’s the covers done with colored card stock and simple water colors… let’s die-cut AND color with alcohol markers!

I do like this pile! Note that I did cut the top TWO books off. I die-cut the pile die from Ivory card stock again (trimming away the top two books) and die-cut the remaining 6 book covers from some alcohol friendly White card stock.
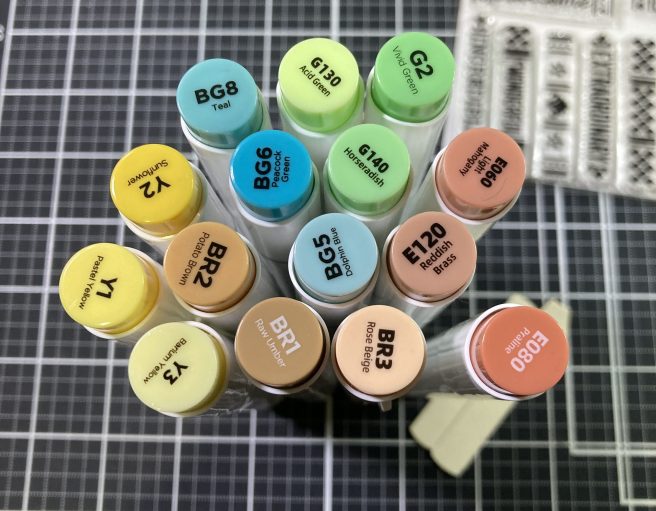
Here’s a pic of the Ohuhu alcohol markers I used for the book die-cuts in this pile.
I figured it was about time to play with the Gold Hero Wax, so I used a paintbrush to color the edges of the die-cut book pages with the wax. I glued the colored covers in place (book 2 overlaps book 3 here!) and this pile looked so nice I decided we didn’t need any spine stamping but we could sure use some more of that gold wax!
I was surprised that we got this pot of Gold Hero Wax in this kit but didn’t get any kind of stencils to use with the wax. I dug through my stash and found this nice Rococo wallpaper stencil (I believe it’s an old Michael’s stencil (very thin!)). I took a 4″ x 5.25″ panel of the Seaside card stock and spread the Gold Hero wax on through the stencil. Really nice shine to that wax!! When the stenciling was dry I added a thin Black mat and glued those to a White A2 card base.
I was perusing my stash for alternate sentiments to use with this kit when I came across the MMH March 2021 card kit. That kit has some great book oriented sentiments – including the one I used on this card. I thought the “you are the author of your own story” was appropriate for a stash of untitled books…! I stamped that on a scrap of Seaside card stock with VersaFine Onyx Black ink and embossed it with Clear embossing powder and trimmed it down to size. I added foam tape behind the book pile and the sentiment and added them to the card front. I really do like this card a lot.
That’s book piles of 8, 7 and 6… maybe there’s something we can do with the 2 book-cover dies that are only the book spines…

I took the card stocks from the kit and started die-cutting the 2 spines from them – from the left – Terra Cotta, Saffron, Tuscan, Seaside, Terra Cotta again. I stamped the spines with Black Soot, Walnut Stain and Blueprint Sketch Distress Oxide inks. It’s easy to make a shorter book by just trimming down the die-cuts with the dies! Then I sketched in some “page-turning” titles using colored Pigma Micron pens. Not too shabby if I say so myself!
I stamped the sentiment (again from the MMH 3/21 kit) on a scrap of Beeswax card stock using VersaFine Onyx Black ink and embossed that with Clear embossing powder and trimmed it down to size with a Lawn Fawn Everyday Sentiment Banners die. I die-cut a panel of my Staples Ivory card stock to 3.25″ x 4.5″ with a LFSRdie and ink blended some Vintage Photo Distress Oxide ink around the edges. I also used that ink to add a little shading to the edges of our books. A thin Black mat completes the background on a White card base, and I trimmed the sentiment to be our “bookshelf” and mounted everything to the card from with foam tape. You may disagree with my idea of a “page-turner” but you could personalize this card to anyone’s particular tastes! Harlequin Romances, perhaps?
I’m running out of ideas on how to use the To Be Read Pile of stamps and dies… I thought the stamps might give me something a little more graphic…

I started this card by stamping the four spine stamps on a panel of White card stock using VersaMark Onyx Black ink and embossed them all with Clear Embossing powder. That was very flat and colorless, so I started thinking about how to add some color to this stamping… water colors… alcohol markers? I even thought of covering the stampings with colored vellum. Finally I realized I could die-cut masking with the spine dies and blend ink over the stampings to add color. I used HA Reactive inks in Taffy and Fruit Punch on top, Key Lime Fizz and Green Apple on the right, Splash and Blue Hawaii for the bottom, and Thistle and Grape Slush on the left.
I die-cut the colored panel to 4″ x 2.75″ with a LFSRdie and added a thin Black mat behind. I cut a piece of the Bellini card stock from the kit to 4.5″ x 3.5″ and glued that to a White card base. I stamped this sentiment (from the MMH 3/21 kit again) with VersaFine Onyx Black ink and embossed it with Clear embossing powder. A bit more of a graphic card here but the sentiment works and the ink-blended books provide an interesting frame – with a little “hello” in the corner!
It feels like I’ve done just about everything possible with the To Be Read Pile stamps and dies… moving along…!

For the Happy Place die set, I used my Staples Ivory card stock to cut out the hand and forehead and hair (the book pages too) and colored those with my Ohuhu alcohol markers (R18, R19, R20 for the skin tones) I reached for some textured card stock for the book – Core’dinations Cardstock Brights – and die-cut the embellishments from the same and used a darker red alcohol marker to color them before gluing them in place on the covers and the spine. I die-cut the clothes from some random dot pattern paper in my stash (plain white for the cuffs) and gave them a little dimension by ink-blending Black Soot Distress Oxide ink on their edges. I die-cut the flowers and their centers from more Beeswax card stock (coloring the centers with a Brown alcohol marker) and arranged all nine of them on the cover of the book. The leaf (die-cut from Ivory and colored with HA Key Lime Fizz and Green Apple Reactive inks) is inset on the back cover.
The background is made from a Danielle Steele “book” (The Affair) that was printed in the NYTimes many years ago as a special fold and cut booklet – of course I put that in my pattern paper stash! I cut that to 3.75″ x 5″ and added a thin Black mat before gluing down to an A2 White card base. I glued the assemblage together and mounted it to the card front with foam tape. I decided to go with this sentiment from the Professional Bookworm stamp and die set… I stamped that sentiment on a scrap of White card stock with VersaFine Onyx Black ink and embossed it with Clear embossing powder and trimmed it down with a Lawn Fawn Everyday Sentiment Banners die.

In order to make this a little more useful as a greeting card, I decided to add this secondary sentiment on the inside. I created this sentiment using my Silhouette Software and the Mutaka Mahee Extra Bold font printed on the inside flap of the card base. I think this is a pretty good reason for being a touch late…!
While I was looking for a background for that last card, I did do a dry-embossing of the book pile die on some watercolor card stock thinking it might work as a background behind our engrossed reader – unfortunately, the assembled reader almost covered the entire embossing… so it was not useful as a background, but it did give me an idea for this next card…

I dry-embossed the Book Pile die on more watercolor card stock but this time I inked the die with some Walnut Stain Distress Oxide ink before embossing. Then I took a brush and some water and started spreading that ink out from the lines. I did add more ink to help fill in the covers, and I also used some Vintage Photo Oxide ink as well. I really like this watercolor look all in sepia tones… and inking the die really shows the outline here! I die-cut the watercolor panel to 3.75″ x 5″ with a LFSRdie and added a thin Black mat.
This sentiment is once again from the MMH 3/21 kit – stamped with VersaFine Onyx Black ink but NO embossing – I thought any shine would take away from the watercolor feeling of this congratulatory card. This is similar to the stamp set with the whole compliment on one spine. “Literally” would be a useful (pun-y) word to have in this stamp set!
There is another sentiment in the MMH 3/21 kit that works perfectly with the Happy Place die set…

I don’t think you could find a more appropriate sentiment for this die set than this one! I die-cut and assembled this reader like the first one I did, but I used HA Liquid Watercolor in Cocoa for the skin tones and Vintage Photo Distress Oxide ink for the shading on her clothing. The book is die-cut from the Seaside card stock and the embellishments are cut from the Waterfall card stock. The flowers were cut from Ivory card stock and colored with alcohol markers and glued to the covers – small one to the left.
The leaves on the Spellbinders Leafy 3D Embossing Folder look very similar to the leaves on the flowers, so I embossed a panel of Green textured Core-dinations card stock adding HA Green Apple ink to the embossing folder for a darker shade in the background. I trimmed that down to 4″ x 5.25″ and added a thin Black mat before gluing them down to a White card base. The sentiment is stamped on a scrap of White card stock with VersaFine Onyx Black ink and embossed with Clear embossing Powder. I die-cut that sentiment with another Lawn Fawn Everyday Sentiment Banners die and did a little ink-blending on the edges with Key Lime Fizz Reactive ink. Our reader and the sentiment are mounted to the front of the card with foam tape.The Leafy background is so immersive… it kind of makes me feel like I’m on the same chapter!
As usual, I start looking for ways to use this die-set that doesn’t necessarily entail assembling the whole reader…

That usually leads me to something a little more graphic. And another perfectly appropriate sentiment from the MMH 3/21 kit! I die-cut the five books from the textured Core’dinations card stock. For the Blue, Green, Red, and Purple books, I used a negative die-cut from the embellishment outline to color the outlines with a Gold Gel pen. I took a scrap of White card stock and spread some of the Gold Hero Wax on it for the embellishments on the Yellow book. I also spread the Gold Wax on the exposed pages. I decided to inset the frames on the covers so I die-cut the frames from the center of the book covers and inset the Gold Wax frame with the yellow centers.
I stamped the sentiment (last one from the old kit, I promise) on the cover of the Yellow book with VersaMark ink and embossed that with Gold embossing powder. Unfortunately, I couldn’t get a good embossing on the textured card stock so I pulled that inset panel off, die-cut another from the smooth side of the card stock, replaced that inside the frame and embossed the sentiment again. Much nicer! I decided to do the leaf in the same embossing powder, so I melted some Gold embossing powder on a scrap of card stock and die-cut the leaf from that. I inset the leaf on the back cover of the book – a nice match to the sentiment.
I glued the plain books in an interesting modified chevron to a White A2 card base trimming off their edges on either side, and then mounted the Yellow book with thick foam tape behind the spine and thin foam tape at the edges. Some Enamel dots from the Hero Studio Card Kit of the Month from September of this year adds a little celebratory sparkle to this card – a perfect birthday card to go along with a book for your favorite reader!
I was starting to keel a little guilty about not using much of the Professional Bookworm stamp and die set, so…

I don’t think I’ve ever combined a stamped sentiment with a printed sentiment, but I think this works quite well and is certainly a topical reminder to put down your screens every once in a while…! I die-cut, colored and assembled our reader the same as our first one, and used some pattern papers from a Sizzix Geometrics Paper pad. I used HA Splash reactive ink for shading on the clothing (looks like pajamas here!) and used the Gold Wax for the cover embellishments. I decided to cut the inner panels of the book covers from the same pattern paper I used for the background. That gives this card a fun, almost see-through feel…
I printed this sentiment on a scrap of White card stock using my Silhouette Software and the BM Hanna Pro OTF font. Then I stamped the Shhh… (which I trimmed away from the accompanying “I’m reading” sentiment) with VersaFine Onyx black ink and did some partial die-cutting to cut out the Shhh… and continued the die cut in a simple box around the printed sentiment. The background is die-cut at 3.75″ x 5″ with a thin Black mat added and glued to an A2 White card base. Our reader is glued to the card front along the bottom edge and I used some foam tape behind the book and head for a little dimension. Finally I added this “compound” sentiment along the bottom with some foam tape. I do believe we could all use a little Digital Detox these days!!! What better way than with a book!
That wraps up my 10 Cards from 1 Kit post using the Hero Studio Card Kit of the Month for November 2025. This is actually quite a colorful collection of cards this month… and though I didn’t use every single stamp this month, I did use all the die sets! And, despite my reservations at the beginning, I did get to do some coloring this month!
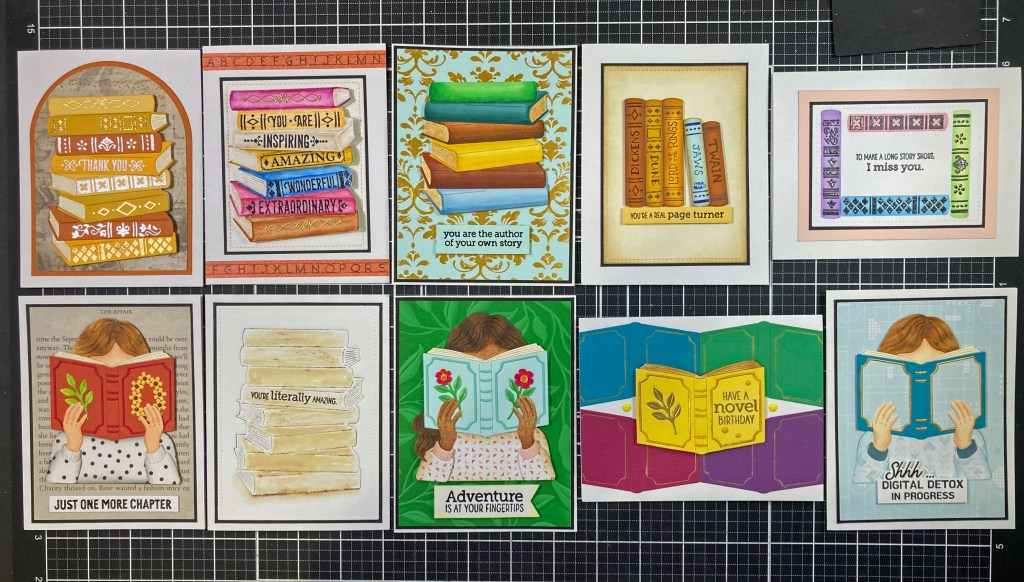
I recognize that having the My Monthly Hero March 2021 kit in my stash was a big help in creating ten usable greeting cards! I actually used all six sentiments from that old kit! Thank you, stash! Though all these cards are book-oriented, I think I did manage to get a good variety of looks this month. I really like the short stack of colored books on the Gold HA Wax background, and the sepia-toned watercolor card really stands out, as well as the graphic Novel Birthday card. Both of the die sets are very unique, and I know where I’ll turn when I need a greeting card for a real book lover! Let me know which cards are your favorites!
As usual, if you’d like to get this kit for yourself, you will need to Subscribe to the Hero Studio Card Kit of the Month by November 27th. If you do go shopping at Hero Arts, please use my links listed below… I make a small commission from whatever you buy (at no cost to you) and that helps support this page and keeps a little inspiration coming your way!
Hero Studio Card Kit of the Month Subscription: https://www.kqzyfj.com/click-101337132-16959232?url=https%3A%2F%2Fheroarts.com%2Fproducts%2Fhero-studio-card-kit
Hero Studio Monthly Subscriptions: https://www.tkqlhce.com/click-101337132-16959232
Hero Arts: https://www.jdoqocy.com/click-101337132-16957493
Thank you so very much for sharing some time with me here… Your participation means so much to me! If you enjoyed this post please click the “Like” star at the bottom of this page, and if you wish to be notified of new blog posts click the Follow Me button at the top of this page. Please, take a few moments to Like Me, List Me, Pin me, Post Me, Share this post with all your crafty friends, and remember… Don’t run with scissors!! As always, I send you and yours Love and Light and Happy Crafting!
DISCLOSURE: This site contains some affiliate links to products. I may receive a commission for purchases made through these links (at no cost to you). As an Amazon Associate I earn from qualifying purchases. Thank you!

My favourite is just one more chapter for the belated birthday card. I will use this idea for sure, as soon as my kit arrives.
LikeLiked by 1 person
Any excuse helps!! Thank Deb!
LikeLike