
Hello Folks! Scott here with my new 10 Cards 1 Kit post featuring the Hero Studio Card Kit of the Month for September 2025. Fall in the Forest is the theme this month and the Card Kit features a quintuplet of cute squirrels. SQUIRREL!!
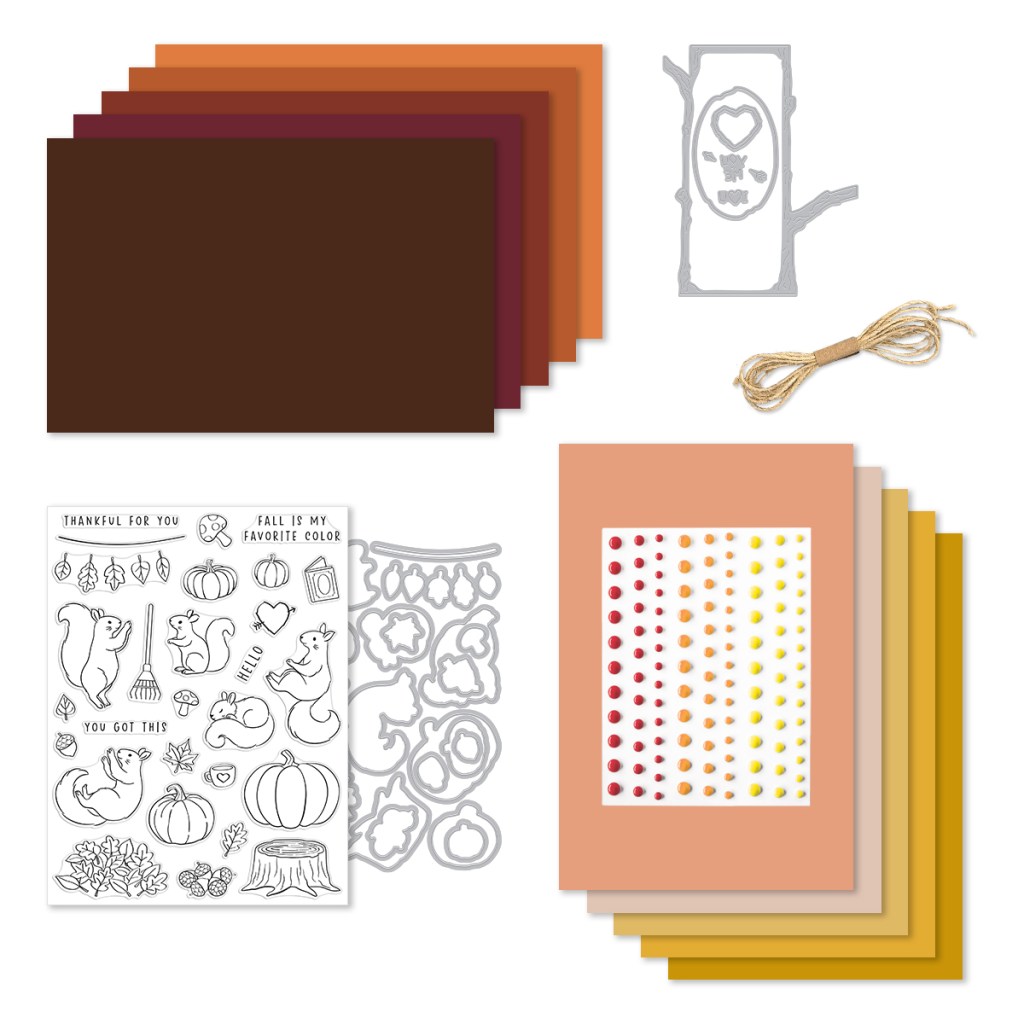
| Card Kit of the Month Includes: • Fall is my Favorite 6×8 Stamp Set • Fall is my Favorite Coordinating Dies • Treehouse Die Set • Sunset Enamel Dots • Brown Twine, 1 yard • 10 Sheets of Cardstock- 1 of each color, 5.5″ x 8.5″ (Truffle, Merlot, Cinnamon, Terra Cotta, Carrot, Coral, Bellini, Beeswax, Saffron, Tuscan) |
This kit is perfectly appropriate for all your Fall or Autumnal needs… Not a lot of sentiments this month but that just gives me more room to come up with a few classic chestnuts (pun intended) and maybe some new sentiments as well!
Now, it may be the simple juxtaposition of the sleeping squirrel and the big pumpkin on the stamp set that made me think of this, but my first thought was putting that squirrel on top of the pumpkin…

Very Cozy! On a panel of 80# Neenah Solar White card stock, I stamped the squirrel with VersaFine Onyx Black ink and stamped the same on a piece of masking paper. I fussy-cut the bottom of the squirrel masking and placed that over the stamped squirrel and then stamped the large pumpkin with the same ink. I also stamped the same pumpkin on more masking paper, fussy-cut the bottom edge, laid the mask over the pumpkin, and stamped the pile of leaves at the bottom. That gives us a perfectly stacked little vignette.
I decided that this would be a great kit to practice coloring with my Ohuhu Alcohol Markers. All of the colored images this month (except for the small individual leaves) were colored with this batch of markers. Quite the autumnal palette!
I did do some partial die-cutting to cut this little vignette out. I die-cut the top half of the squirrel and the bottom half of the leaves just to where they meet the pumpkin, and then I fussy-cut the sides of the pumpkin to join the two partial die cuts.

Looks like there was a die especially made for this combination! AND you don’t have to worry about extraneous white borders on your die cuts! I do love that! I didn’t think any of the kit sentiments were particularly appropriate for this little scene so I dug through my old MMH kits and found these two sentiments in the MMH Sept. 2023 (Happy Autumn) and the MMH Sept. 2020 (Let’s get cozy) kits. Even though these are from two different MMH kits, they work quite well together! I stamped both on White card stock with VersaFine Onyx Black ink, embossed them with Clear embossing powder, and die-cut both with a Lawn Fawn Everyday Sentiment Banners die.
Fortunately, I had stamped our vignette right in the center of a 4.25″ x 5.5″ White panel, and with the partial die-cutting and fussy-cutting, I had a perfectly shaped hole in the center of an A2 panel. I trimmed that panel to 3.75″ x 5″ with a Lawn Fawn Stitched Rectangle die (keeping the die cut opening in the center) and embossed it with a Taylored Expressions Burlap embossing folder (that kinda killed the stitching). I inked the top raised side of the embossing folder with Antique Linen Distress Oxide ink which gives us some color to the inside of the depressions, and I ink blended a little more of the same ink around the edges. That texture feels cozy too! I added a thin Black mat behind the embossed panel (filling in the center opening as well) and glued that to an A2 White card base. I added the sentiments and vignette to the card front with thin foam tape. When viewed at an angle you get a perfectly shaped black shadow right under the die cut vignette. Not quite an eclipse card but kind of! Love that sleeping squirrel stamp!
Let’s see what I can do with the sentiments in this stamp set. “You Got This” seemed like a good place to start.


That sentiment and the “standing” squirrel inspired an interactive card with the squirrel juggling the pumpkin! I stamped the squirrel and the second largest pumpkin on Neenah Solar White card stock, colored them with my Ohuhu Alcohol markers (I think my pumpkin coloring is better on this one) and die-cut them with their matching dies.
I’m pretty sure everyone is over my constant reliance on the Lawn Fawn Stitched Rectangle Dies… so I bought a new ModaScrap Framed Rectangles die set (on sale!). Only four dies in this set but I do love the casual feel and the funky cut-out border on these dies! I die-cut a panel of 100# (need some strength here) Neenah Solar White card stock to (just under) 3.25″ x 4.5″ with the second largest die in the set. I decided on an arrangement for the squirrel and pumpkin, and stamped the sentiment in place and embossed it with Clear embossing powder.
I marked where the center of the pumpkin would fall on the die-cut panel and used a HA Infinity Circle die to cut a hole through the panel. I took a double layer of foam tape and fashioned a circle from that (smaller than the hole) and stuck that on the center back of the pumpkin. I die-cut another circle (larger than the hole) from a scrap of white card stock, then put the pumpkin foam tape through the die cut hole and glued the larger die-cut circle to the back of the doubled foam tape – allowing the pumpkin to spin around without coming off. Once the pumpkin was in place I glued the squirrel directly to the front panel.
I added a SINGLE layer of foam tape around the die-cut panel (inside of the border cuts) and attached that to an 3.25″ x 4.5″ panel of Terra Cotta card stock (from the kit) and then glued that down to a White card base. This is a fun card to play with! Not only will the pumpkin spin around just by shaking the card, but (with the help of the pumpkin stem) it is greatly satisfying just to manually spin the pumpkin round and round! Big pumpkin for such a little squirrel!
Autumn themed Stamp Sets usually have some kind of a “thankful” sentiment included – this kit is no different!
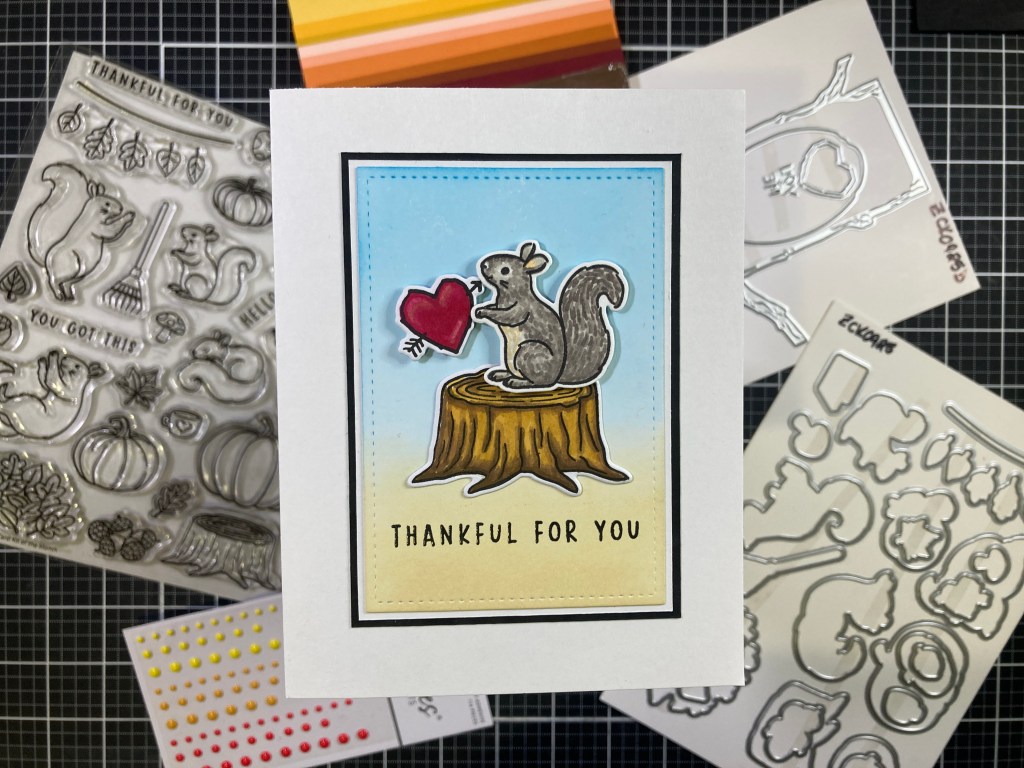
I stamped the stump, squirrel and heart on 80# Neenah Solar White card stock with VersaFine Onyx Black ink and colored them all with my Ohuhu Alcohol markers and die-cut them with their matching dies. I die-cut a 2.75″ x 4″ panel of more Neenah card stock (with a LFSRdie!) and ink blended HA Splash Reactive ink on the top half and Antique Linen Distress Oxide ink on the bottom half. I decided on my arrangement and stamped and embossed the sentiment as usual. I added a thin White mat and a thin Black mat behind the inked panel and glued those down to a White card base. I glued the stump flat to the card front and added the squirrel and heart with thin pieces of foam tape. This would even work for a Valentines Day card… maybe “I’m squirrel-y for you!” Cute!
We’re slowly making our way through all the squirrels in this set… and I’m trying to use all the accessories as well.
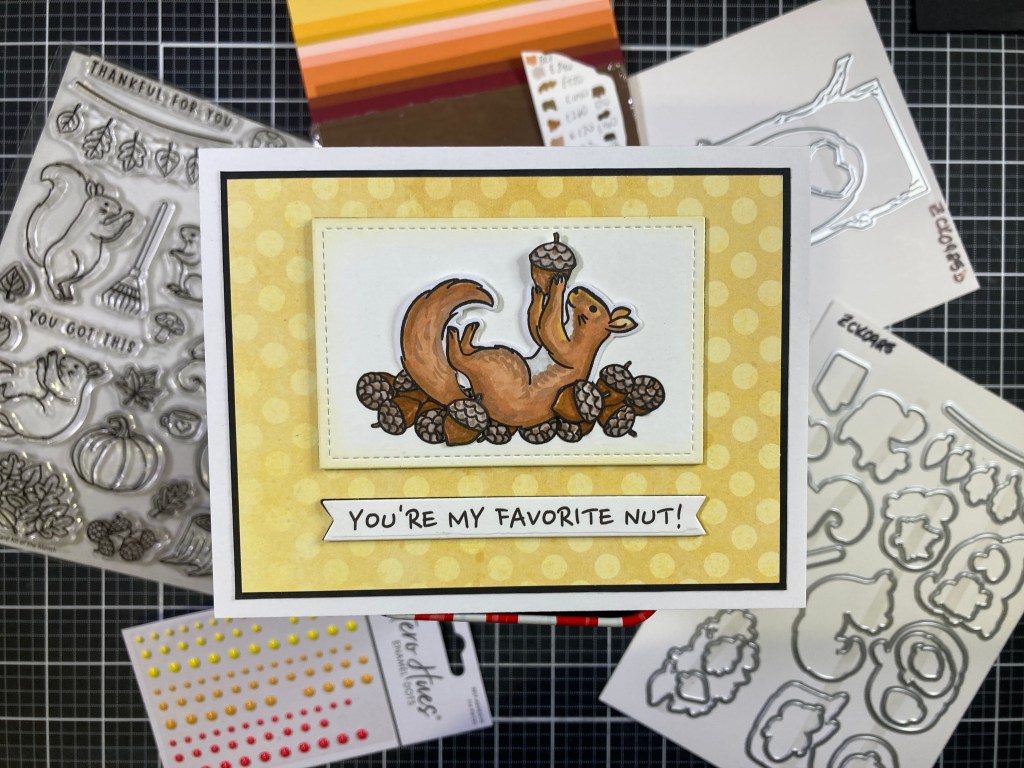
This card displays a certain nutty logic…! I stamped the group of nuts (VersaFine ink) on a panel of Neenah card stock three times – cutting a mask for the center group (left and right ends) so I could add to the grouping on both sides. That seemed to be enough nuts to nestle this squirrel into comfortably. I stamped the squirrel and three single nuts on more Neenah card stock and colored everything with my Ohuhu Alcohol markers.
I die-cut the squirrel with its matching die, and fussy-cut the three nuts. I die-cut the panel to 3.5″ x 2.25″ with a LFSRdie and ink blended a bit of Antique Linen Distress Oxide ink on the edges. I did some selective fussy-cutting on the back side (and hands) of the squirrel to get rid of the white borders where the die cut stamps intersect. I glued the squirrel and nuts flat to the panel with two spots of thin foam tape behind his tail and his favorite nut!
I dug out some fall themed pattern papers from my stash and picked this fun polka-dot for my background. I trimmed that paper to 5″ x 3.75″, added a thin black mat, and glued them to an A2 White card base. I created this sentiment using my Silhouette Software and the Nanum Pen Font. I printed that on a scrap of White card stock and trimmed it to size with a Lawn Fawn Everyday Sentiment Banners die. I added 2 layers of Pitch Black card stock behind the sentiment and the assembled panel and glued them both to the card front. I did consider a couple different sentiments for this card… there’s plenty of racy puns that would work! But I like this personalized approach!
I was more than a little intrigued by the book stamp in this set… Squirrel bibliophiles? Okay… There is what appears to be a sitting squirrel…
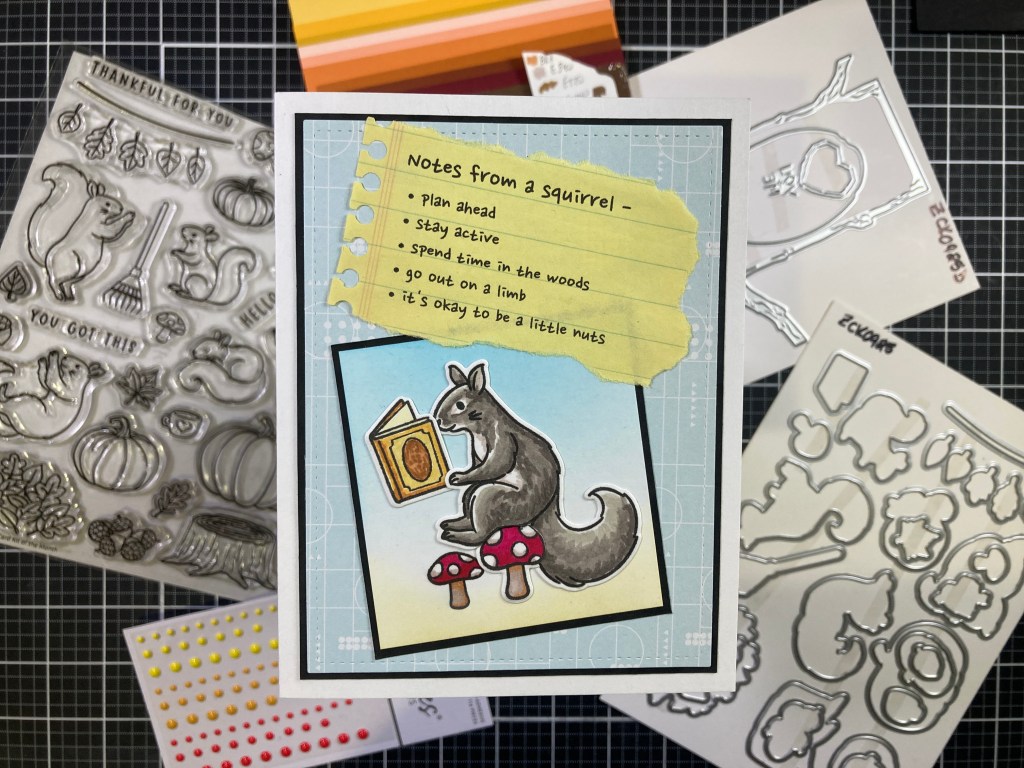
Maybe bibliophiles are good advice columnists!? This card tickles me…! I stamped the squirrel, book, and large mushroom on more Neenah card stock, colored them with my Ohuhu Alcohol markers and die cut them with their matching dies. I played around with an arrangement and cut a scrap of white card stock to 2 5/8″ x 2.75″ and stamped and colored the smaller mushroom before ink blending Splash and Antique Linen on the top and bottom. I added a thin Black mat behind the inked panel. I die-cut this blue pattern paper from my stash to 3.75″ x 5″ with a LFSRdie, added a thin Black mat and glued that to a White card base.
I created these “notes” using my Silhouette Software and the Nanum Pen font again. That is a great font for this stamp set! I printed the notes on a scrap of legal pad, and punched the spiral-bound edge with an old American Crafts punch and carefully tore the edges around the other three sides. Chewed?!? I glued the squirrel to the mushroom using a little fussy-cutting (on his butt and the right side of the mushroom) to hide the die cut white borders – I like that his leg is in front of the mushroom but his tail is behind.
I glued the book in the squirrels hand (not bothering with the white borders) and glued the assemblage flat on the inked panel. Now the smaller mushroom becomes a toad stool foot stool! I glued the completed panel to the card front and added the sentiment using a tape runner. I do think this advice is pretty sound… especially coming from a squirrel… I really like the fourth one – go out on a limb…!
I guess the five squirrels in this kit each deserved their own card…! Let’s turn our attention to the Tree House Die Set…
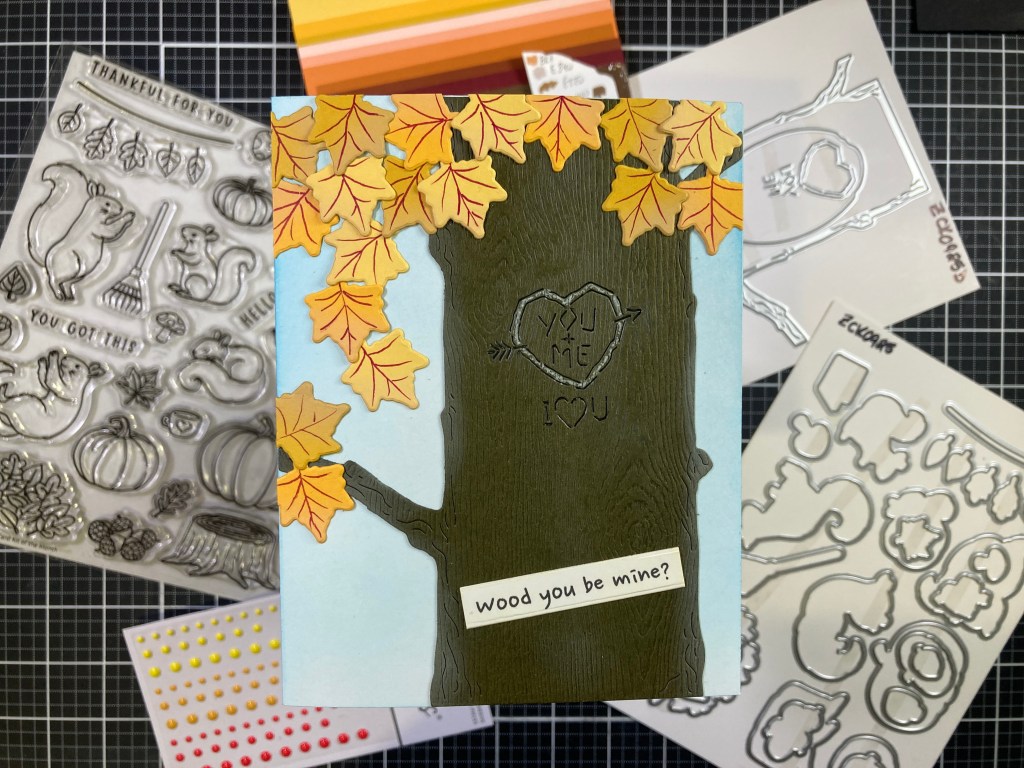
And here we have an honest to goodness pun! I couldn’t resist die-cutting this tree from Wood Abachi Solid card stock (from the MMH Sept. 2019 kit) Great texture for a tree trunk with no effort! I die-cut the “carvings” into the tree trunk and blended a little Antique linen on the edges and a touch down the center of the tree. I wanted a bunch of leaves for the top of this tree, but wasn’t looking forward to having to color every leaf, so I die-cut the “maple” leaf die from Beeswax, Saffron, and Tuscan card stocks from the kit. I did ink blend some Antique Linen Distress Oxide ink on all the card stock pieces before die-cutting the leaves – just for a little variation.
I added some veining to the otherwise plain leaves with a Pink Pigma Micron pen – that gives us a nice touch of added color and detail without having to color all 18 leaves! I ink blended HA Splash reactive ink on the sides of an A2 White card base and glued the tree trunk on top. I arranged the leaves and glued everything flat to the card front. I did try to hide the stems of all the leaves as they were attached (because of no branches, you know!).
I printed this sentiment (same as the rest) on a scrap of White card stock, trimmed it to size with a Lawn Fawn die and swiped over it with a little Antique Linen ink. I highlighted the heart “carving” using a disposable Micro Applicator and the Antique Linen ink. I also went over the die cut lettering with a .03 Pigma Micron pen to darken it up as much as possible. Another Valentine from this Fall kit… with a pun!
So this is a “Treehouse” die set and there is an oval die for the squirrels home inside the tree. Okay… I swear if any creature opened up a hole this large in a tree it would surely kill the tree!

Ding-dong! I die-cut the tree from Neenah card stock along with the house hole, stamped the standing squirrel and colored both with my Ohuhu Alcohol markers. I did fussy-cut the squirrel. On another panel of Neenah card stock I placed the tree in position and outlined where the house hole fell. I removed the tree and stamped the two squirrels inside the house and colored all with my Ohuhu markers. I ink blended Splash Reactive ink on the sides of the panel before trimming it to 4″ x 5.25″ and adding a thin Black mat behind.
I glued the inked panel and mat to a White card base and stamped the sentiment using HA Unicorn White ink and embossed that with White embossing powder. I added two layers of Pitch Black card stock behind the tree for some homey depth, and arranged our visiting squirrel on the branch. Since he was fussy-cut it was easy to split his arms and legs so it looks like he’s holding on to the tree. For a final touch, I die-cut some Translucent Leaf Notes (from the MMH September 2018 kit) with one of the leaf dies in this kit and added them to the card front for some extra color and shine. Maybe that house hole is so large because it’s just a dead tree stump… the lack of branches might support that theory!
I knew I was going to have to buckle down and color me some leaves before I was done with this card kit…!

I did switch to my Zig Clean Color Real Brush Markers to color the leaves – I do prefer the Zig markers for coloring such small pieces. On a panel of Bristol Smooth card stock I stamped the smallest pumpkin along with a mask using VersaFine Onyx Black ink. I fussy-cut the left side of the mask, placed that over the small pumpkin and stamped the larger pumpkin next to it. I stamped the leaves randomly across the rest of the panel, and stamped a few extra leaves on some scrap Bristol Smooth card stock. I colored everything with my Zig markers.
I die-cut the panel to 3.5″ x 2.25″ with a LFSRdie and used my Pebbles Chalk palette around the leaves to tone down the white a little bit. I had this breezy background paper in my stash – the dotted swirls are actually gold with a little touch of shine. I die-cut the pattern paper with a 5″ x 3.75″ LFSRdie, added a thin Black mat and glued those to a White card base. I stamped the sentiment on a scrap of matching card stock and embossed it with Clear embossing powder, cut it to size, and added a thin Black mat behind as well.
I fussy-cut the extra leaves (I almost always color the edges of my fussy-cuts with a Black Memento marker) and added a thin Black mat to the colored panel. I glued the sentiment and colored panel directly to the card front, and added two of the individual leaves breaking through the boundaries of the panel with thin foam tape. For the final touch I added a number of the Sunset Enamel Dots for more texture and shine… I have always felt very comfortable in fall colors…!
I was determined to figure out another way to use that Treehouse die… since the only branches on this die end in abrupt cut-offs (actually at the edges of an A2 card) this presented a bit of a challenge, but I really like this idea…

I die-cut the tree from more Neenah Solar White card stock, and cut it right down the center so I could move the flat, cut edges to the sides with the branches in the middle. On the die, the top branch is short and stubby, so I die-cut another of the longer branch, flipped it upside down and melded that with the short branch to make it longer. I colored both trees with Ohuhu markers. I die-cut a piece of HA Arctic card stock to 3.75″ x 5″ with a LFSRdie, and ink blended HA Splash Reactive ink down the center. I taped the two trees in place on that panel, and cut off the overlaps along the top edge (including the now longer branch).
Since the leaf was the main focal point, I wanted one that was a little larger than the leaves in the kit. I found this leaf from the MMH September 2018 kit, stamped it on Bristol Smooth card stock with VersaFine Onyx Black ink, colored it with my Zig markers and fussy-cut it out. I printed the sentiment on the inked background panel (just like the rest of my sentiments) and added a thin Black mat and glued those to a White card base. I glued the trees flat to the card front and added the leaf with thin foam tape. I really like this encouragement card – splitting the tree in two and moving them to the sides almost makes this a three-panel card front… the blues and browns work well together, and the leaf is just the right size with enough detail to really pop. Love it!
The MMH September 2023 Kit (I used the “Happy Autumn” sentiment from this kit on card one) also has some larger decorative sentiments perfectly themed to the changing season…

I stamped this sentiment on a piece of pattern paper from my stash, and embossed it with Clear embossing powder. I colored the little leaves and mushroom with Alcohol markers and added a little drop shadow behind the sentiment. I do believe this sleeping squirrel is my favorite in this set. I stamped, colored and fussy-cut him just like the other squirrels.
I die-cut the stamped panel with a HA Oval Infinity die, and die-cut the next larger Oval from Black and glued them together. I wrapped the brown twine around and around the bottom of the squirrel to create a little messy nest for comfort. I used a thick piece of foam tape for the top of the squirrel, and glue for the nest, and placed the squirrel right on top of the sentiment.
The background is a piece of watercolor paper perforated with a Honey Bee Stamps Spring Leaves Pierced Cover Plate and trimmed it to 4″ x 5.25″. I ink blended Antique Linen ink over the whole background, added a thin Black mat and glued those to a White card base. I glued the oval down to the card front and added a few Sunset Enamel Dots for some extra shine. Looks like a perfectly cozy nest for napping.
And there you have all ten of my cards inspired by the Hero Studio CCM for September 2025. I have to admit these squirrels are pretty cute and I do love the overall palette created with this batch of cards! Now, I’m usually pretty slavish over trying to use every stamp in a stamp set but I relaxed a bit this month… I didn’t use the rake, the coffee cup, or the leaf banner stamps. I thought I was doing good just figuring out how to use the book in this set!
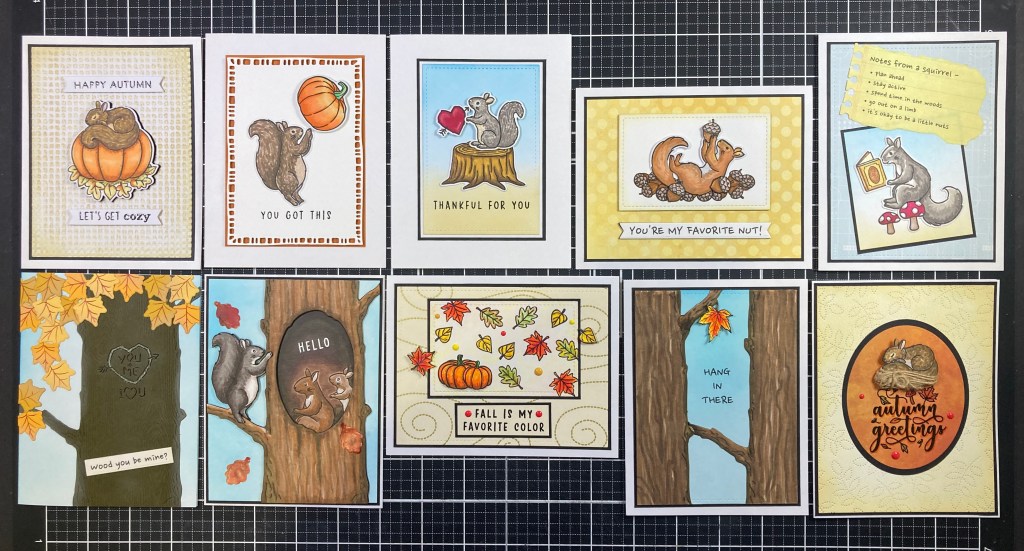
For a Fall themed Kit, we have a pretty diverse group of cards here… there are a few outright Autumn cards but we also have some possible Valentines and encouragement cards and friendship cards, a pun, and even a moving interactive card! Let me know which card(s) are your favorites!
As usual, if you’d like to get this kit for yourself, you need to Subscribe to the Hero Studio Card Kit of the Month by September 27th. If you do go shopping at Hero Arts, please use my links listed below… I make a small commission from whatever you buy (at no cost to you) and that helps support this page and keeps a little inspiration coming your way!
Hero Studio Card Kit of the Month Subscription: https://www.kqzyfj.com/click-101337132-16959232?url=https%3A%2F%2Fheroarts.com%2Fproducts%2Fhero-studio-card-kit
Hero Studio Monthly Subscriptions: https://www.tkqlhce.com/click-101337132-16959232
Hero Arts: https://www.jdoqocy.com/click-101337132-16957493
Thank you so very much for sharing your time with me today… Your attention means the world to me! If you enjoyed this post please click the “Like” star at the bottom of this post, and if you wish to be notified of new blog posts click the Follow Me button at the top of this page. Please, take a few moments to Like Me, List Me, Pin me, Post Me, Share this post with all your crafty friends, and remember… Don’t run with scissors!! As always, I send you and yours Love and Light and Happy Crafting!
DISCLOSURE: This site contains some affiliate links to products. I may receive a commission for purchases made through these links (at no cost to you). As an Amazon Associate I earn from qualifying purchases. Thank you!
