
Hello Folks!! Scott here with another 10 Cards 1 Kit post featuring the Gina K Designs “Relax and Have Fun” Card kit released in June of 2025! This unique kit includes two 6″ x 8″ stamp sets, along with dies and stencils and a great big free gift in the guise of ANOTHER 6″ x 8″ stamp set and dies! So much to play with this month!
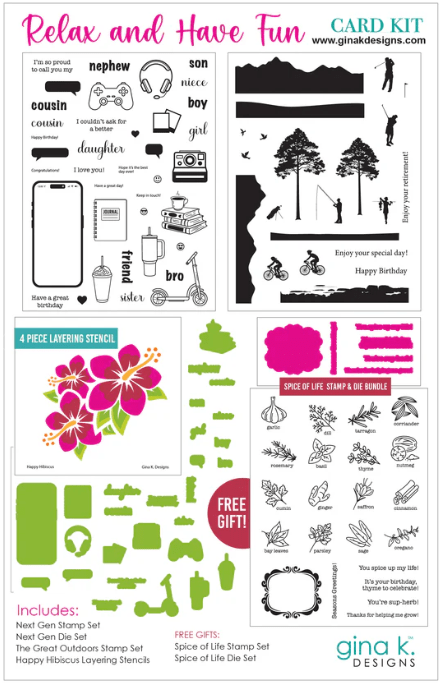
Relax and Have Fun Card Kit includes:
Next Gen 6″ x 8″ Stamp Set and Dies
The Great Outdoors 6′ x 8″ Stamp Set
Happy Hibiscus Layering Stencils (4)
FREE GIFT:
Spice of Life 6″ x 8″ Stamp Set and Dies
The Next Gen Stamp and Die Set is designed to expand upon the sentiments included in the Flora Fix Card Kit with additional familial designations, and we get some classic Gina K silhouettes with the Great Outdoors Stamp Set, and the Spice of Life Set is an adorably huge freebie – useful all over the house!
Often, when I am confronted with a new stamp set, I’ll get the juices rolling by stamping and coloring all the images in the set. Especially when there’s a larger number of smaller icons to work with.
I stamped all the images from the Next Gen Stamp set using VersaFine Onyx Black ink on Bristol Smooth card stock and colored everything with my Zig Clean Color Real Brush Markers. I guess the phone didn’t need coloring..!?

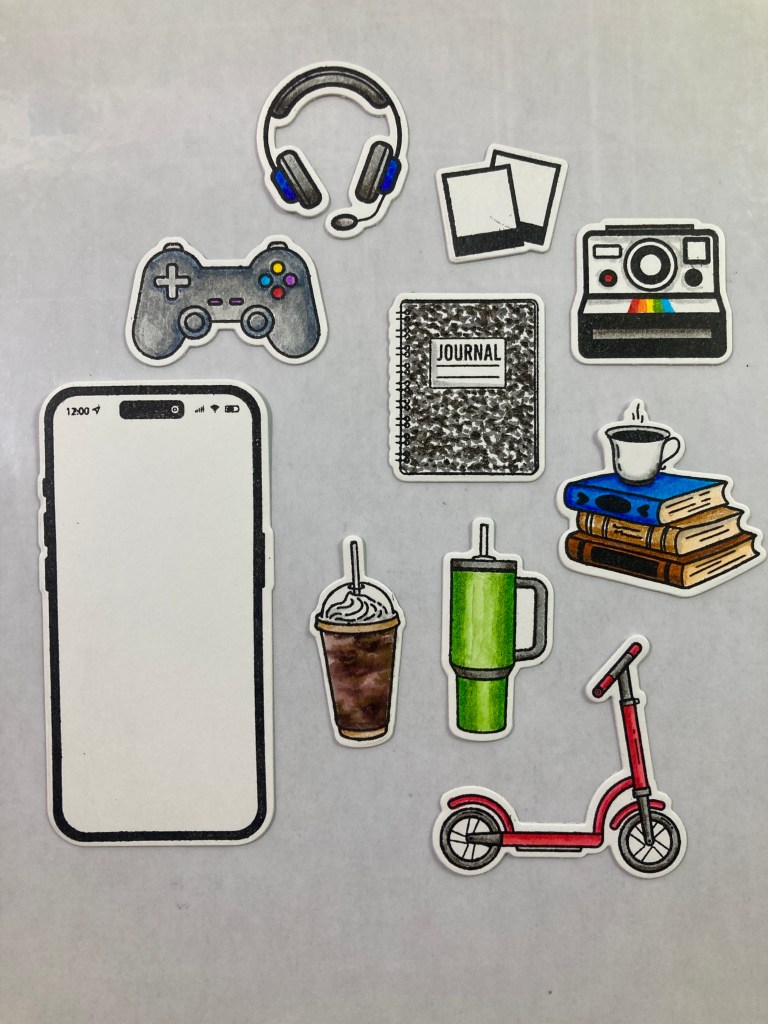
Then I’ll usually take the matching dies and die-cut everything out. This makes it easy for me to fiddle around with combinations and layouts, and get the old noggin’ focusing on the new stamps!
The stack of books with a cup of tea (coffee?) on top seemed appropriately feminine to me, so that’s where I started.

I found a nice piece of pattern paper from an old Sizzix 6″ x 12″ Geometrics Paper Pad (lovely combination of pinks and corals) and die-cut that to 2.75″ x 4″ with a Lawn Fawn Stitched Rectangle die, added a thin Black mat and another thin Pink mat and glued those to an A2 White card base. I stamped the sentiments on a scrap of White card stock with VersaMark Onyx Black ink and embossed them with Clear embossing powder, and then die-cut them all with their matching dies. I do love sentiment dies! I glued the sentiments directly to the card front and added the die cut stacked books and tea with foam tape.
Okay… I don’t have a daughter, but if I did!!!
The phone stamp gave me a little bit of a pause… there are five little sentiments and three speech bubbles to create a text exchange on the phone, but the sentiments are rather generic and there doesn’t seem to be much chance to have an actual conversation just using the stamps… and, of course, my mind goes a little overboard with a challenge like this.

We have two speech bubbles (long and short) for our side of the conversation, but only one speech bubble (long) for the replies… hmmmmm. Happy Birthday seemed a safe place to start. I stamped the speech bubbles in Hero Arts Dusty Blue Core ink (for my bubbles) and HA Contour ink for the speech bubble replies. There are no “thank you” or “that means a lot to me” replies in the stamps so I just used smileys for the replies. It was easy enough to color the smiley faces on the grey speech bubbles with a Yellow Zig Marker, but that wouldn’t work on the blue speech bubbles – and besides, I wanted the ‘heart eyes’ to be in red. So I stamped another heart smiley on a scrap of white card stock using Concord and 9th Poppy ink. Then I colored in the mouth and outline with an 03 Black Pigma Micron pen. Finally, I cut it out using a standard hole punch – close enough – and glued it over the original black stamped smiley.
(I didn’t realize till much later, that the smileys DON’T need a speech bubble… DOH!)
The phone still seemed a little barren so I got the idea to add hearts floating up from the heart smiley – I think most phones have this feature now… floating balloons or hearts or fireworks on top of your texts. I used some Love From Lizi Red Glitter Heart peel-offs for the rising hearts – they come in three sizes, so that worked quite well to indicate the animation of floating hearts!
I felt like the phone wasn’t quite enough for me… so I decided to add a little pun-y sentiment to this card… Are you taking about the recipient of the card or are you talking about your phone..?!? I die-cut another piece of pattern paper (from the same Sizzix paper pad) to 3.75″ x 4.5″ with a HA Rounded Rectangle Nesting die. I created the sentiment with my Silhouette software and the Typewriter Hand font, and printed it directly on the pattern paper. I added a thin Black mat behind that and glued them both to the card front. I die-cut another phone from some Silver Metallic card stock and offset it behind the phone for a little touch of shiny metal and some added thickness. I rounded the corners of the card base with my Crop-A-Dile Corner Chomper, and glued the phone in place. A pun-y, funny Birthday card for your favorite smartphone addict!
For some reason I thought these three images went well together… and provided another little challenge for me.
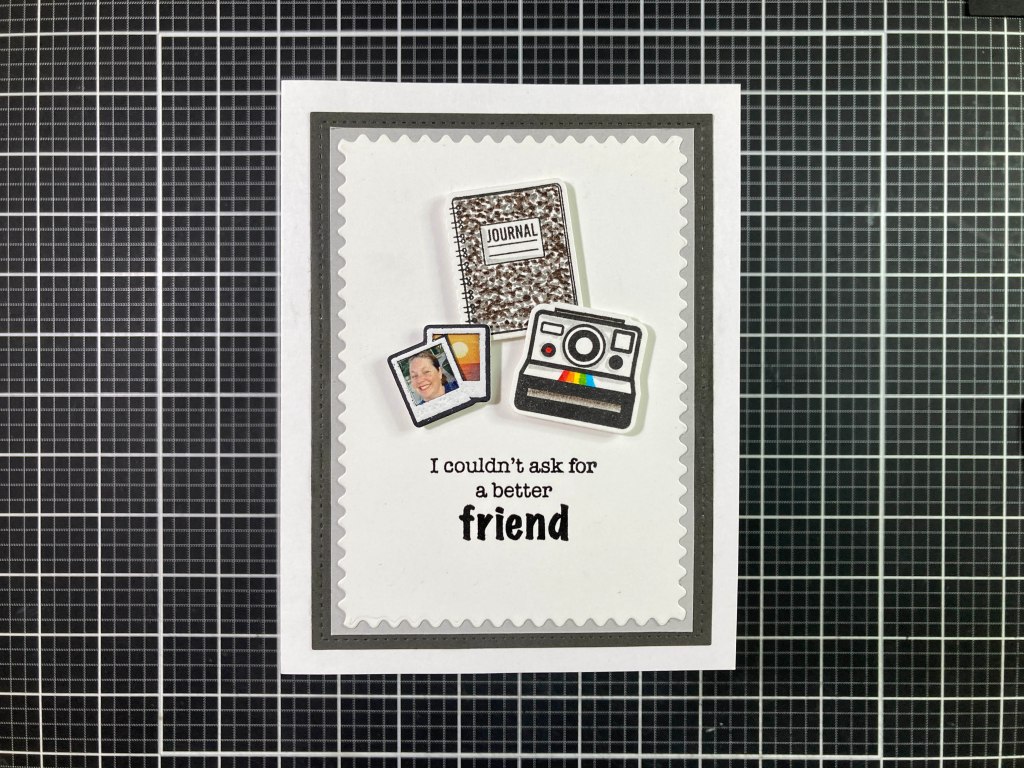
First off – – I LOVED coloring the rainbow on the camera – the original white Polaroid Camera did have a rainbow under the lens… adding a little angle to the sides of the rainbow helps sell the 3-D. I also enjoyed coloring the Journal like a composition notebook, and after fiddling with the stamped (black) polaroid pics decide to up the ante with those.
I stamped the polaroid pics stamp on a scrap of black card stock with HA Unicorn White ink and embossed that with White embossing powder, and die-cut it with the matching die. I decided I need some pictures in there so I searched the internet for a couple of images, shrank them down to size (using my Silhouette software) and printed them on some glossy paper. I fussy-cut the inside of the polaroid pics stamp (leaving a thin black line between the pics) and glued the printed pics into the openings. (No, I don’t know who that lady is, but it would be easy to include the recipient’s pic there as well!)
I cut a panel of White card stock to 3.25″ x 4.5″ with a Simon Says Stamp Modern Postage Stamp Rectangle die and stamped the sentiment using VersaMark Onyx Black ink and embossed that with Clear embossing powder. I added a thin Grey mat behind that, and a panel of Black card stock (die-cut to 3.75″ x 5″ with a LFSRdie) behind that and glued everything down to a White card base. Finally, I added the images with thin foam tape. This is a great friendship card and if you put your the recipient’s pic on the polaroid it’s completely personalized!!
Now there’s that Stanley to-go mug and a Starbucks to-go cup… I seem to remember a coffee themed kit in my stash…

I remembered right…! The My Monthly Hero August 2018 Card Kit is all about coffee!! I used the sentiments and paper from that kit for this card. I cut the Coffee & Tea Dyed Decorative Paper to 1.25″ x 5.5″ using my Tim Holtz Deckle Edge trimmer and glued that to a 1.5″ x 5.5″ strip of Black card stock. I decided on my arrangement and stamped the sentiments directly on the decorative paper (sentiment dies were rare back then!) and of course I embossed them with Clear embossing powder as well.
I ink blended Frayed Burlap Distress Oxide ink on the top and bottom of an A2 White card base and glued the strip down to the card front just above the center line. I added the to-go cups with thin foam tape and used some tiny copper gems for a touch of extra sparkle. A little anthropomorphizing of the cups makes for a sweet card usable for all your coffee friends and tea addicts!
I did like the little scooter stamp in the Next Gen Stamp Set, but I had a problem pairing it up with anything else…

Perfect for another pun! I started this card by sketching a little black ground line across a panel of White card stock with a Pigma Micron pen… I did sketch that in with a pencil and when I went over it with the pen, I tried to draw it all in one stroke. I die-cut that panel to 2.75″ x 4″ with a LFSRdie. I created this sentiment using my Silhouette Software and the Times new Roman and Raustilla fonts, and printed that directly on the die-cut panel. Then I added a thin Black mat behind.
I found this polka-dot pattern paper in my stash and die-cut that to 3.75″ x 5″ and added a thin Black mat behind that and glued those to a White A2 card base. I added the printed white panel on top of the polka-dots and mounted the scooter with thin foam tape. I added a little indication of movement behind the back wheel of the scooter with the Pigma Micron pen. Love this little scooter! One of my friends once called me Scooter… ONCE!
Suddenly I realized that I’ve done five cards already and have only used one of the stamp sets… best be moving along!

Anybody in your circle play golf?! I have many avid golfers in my family! (and one of them is actually retired!) I took a panel of White card stock and ink blended some HA Splash Reactive ink on the top half and then stamped all the landscape stamps using Altenew Misty Morning, Cloudy Sky, Nimbus, and Dark Night inks. I got a lot more layers by overlapping the stamps and letting the combined colors be visible – even flipping the small hill stamp upside-down below the golfer. I stamped the golfer, the tree the bird and the flagstick with VersaFine onyx Black ink (and some Dark Night ink) and then I die-cut the inked panel to 3.75″ x 5″.
I stamped and embossed the sentiment as usual, added a thin Black mat behind the inked panel, and glued all to a White card base. We did have a lively discussion about which direction the golfer was actually facing… (does a silhouette stamp automatically indicate that you are behind the figure?) and I finally made the case that we have a left-handed golfer here at the end of his stroke. Works for me!! For a final touch, I figured we needed a ball flying through the air towards the hole, and after dismissing most little round dots (die-cut or stamped), I ended up using my Pigma micron Pen to add the golf ball. That seems perfectly in scale! And I LOVE those tree silhouette stamps!!
We have golfing, fishing and biking in the Great Outdoors Stamp Set and we have both men and women doing all three!

I thought I would concentrate on the women for this card! I started out with a bunch of 1.25″ strips of White card stock. The long strip is 5″ and the short strips are all 2.25″ long. I ink blended HA Splash reactive inks on the four strips (top or bottom or all-over) for some variation. For the biking strip I stamped the small hill stamp with Concord and 9th Wheat ink, and stamped the riverside (fishing) with Concord and 9th Dove ink and I used Concord and 9th Evergreen ink for the small hill under the golfer. I stamped all the figures and images with VersaFine Onyx Black ink. When everything was dry I added thin Black mats behind each strip.
I decided on my arrangement and stamped the sentiment on the card front with VersaFine Onyx Black ink and embossed that with Clear embossing powder. All of the strips were then glued directly to the card front. I thought about adding the Happy Birthday stamp but decided that there were more occasions that his card could be used for, than just a birthday – so I’m keeping the options open!
And we have another set of Layering Stencils in the kit this month – a big graphic grouping of Hibiscus blossoms!

On a panel of White card stock I ink blended the stencils with HA Lemon Drop, Fruit Punch and Green Apple Reactive inks. I tried to keep away from the outer edges of the second stencil (the centers) for a little more of a blended feel as opposed to the strongly graphic layering of colors. I added a little water to a smoosh of Lemon Drop ink and spattered that across the background.
I die-cut the flower panel to 3.75″ x 5″ with a LFSRdie, added thin black and yellow mats behind and glued all to a White card base. I had to dig around for this sentiment in my stash – I knew I had a “Be Amazing” stamp and die but it was too large and would cover up a lot of the hibiscus… I finally found this sentiment from an old Paper Pumpkin kit. Works perfectly for this bright, colorful happy card!
Finally we get to the FREE GIFT stamps and dies – the Spice of Life set… beyond labeling your garden, there are some great pun-y sentiments in this set too!

I figured a great pun like this needed more than a single sprig of thyme so I stamped the thyme stamp repeatedly in a circle on a panel of Bristol Smooth card stock. I did fussy-cut a mask of the right side of the stamp, and masked off the “thyme” label as well… I believe there are eight stampings giving us a total of sixteen branches. I colored all the herbs with my Zig markers. That gave me a little circle just over 2.25″ in diameter… Hmm… I decided to cut the circle in half to stretch it out! For some reason, I created the division on an angle and thought that was interesting enough to keep playing with that angle. I stamped the sentiment on a scrap of Bristol Smooth card stock using HA Green Apple Reactive ink and embossed that with Clear embossing powder.
I assembled the sentiment strip and the two halves of the herbs using craft tape to hold everything together and then I die-cut the whole thing with a 2.75″ x 4″ LFSRdie. While everything was still taped together, I added a thin black mat behind but only gluing it to the two herbal halves of the assembly – then I could remove the sentiment strip to add a thin black mat behind that as well. I die-cut a panel of Green card stock with a 3.75″ x 5″ LFSRdie and embossed that with a Spellbinders 3D “Leafy” embossing folder. I added a thin Black mat behind the Green panel and glued those to a White card base. I glued the matted herbs directly to the card front and added the sentiment strip using foam tape. A great Birthday card for your favorite gardener, or herbal enthusiast or anyone who appreciates a good pun!
Now this may seem a little esoteric, but I couldn’t get this idea out of my mind so I decided to follow up on it!
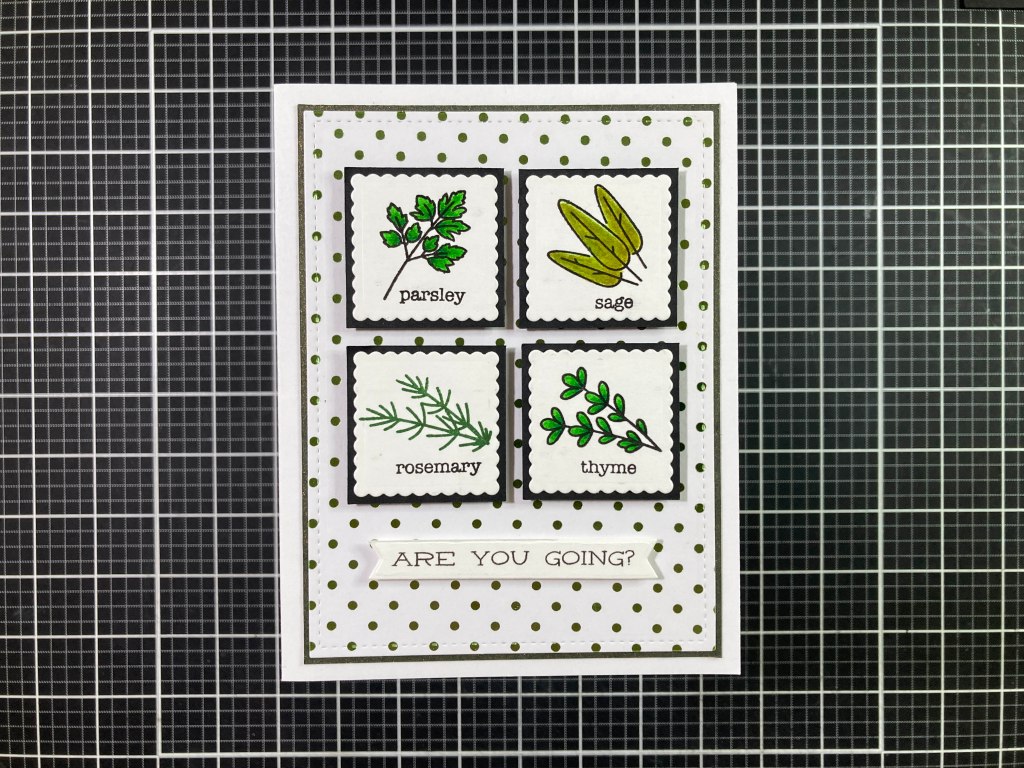
Where…? Why to Scarborough Fair of course!! I stamped the herbs on a panel of White card stock using VersaMark Onyx Black ink (I stamped the rosemary with C&9 Evergreen ink (masking off the label) and then stamped the label (masking off the herbs) in Black. A 1.25″ Scalloped Square Layering die (from Tonic Studios) fit all the stampings nicely, so I die-cut the 4 herbs and added thin Black mats behind them all.
I found this foiled green polka-dot pattern paper in my stash (from a Love From Lizi May ’18 card kit!) and die-cut a panel to 3.75″ x 5″ with a LFSRdie and added a thin Green/Gold mat (from the same kit) behind that and glued them down to a White card base. I used my Silhouette Software and the Winnie Font to print this sentiment on a scrap of White card stock, and I die-cut that with a Lawn Fawn Everyday Sentiment Banners Lawn Cuts. The herb blocks and the sentiment are all mounted with foam tape. I wasn’t sure everyone would get this reference, but I figured that between the Simon and Garfunkel fans and the The Graduate movie fans, then that should cover a lot of bases right there! Beside the fact that it tickles me!
And there we have all ten cards using the Relax and Have Fun Card Kit from Gina K Designs! There is so much more that can be done with this kit and the plethora of supplies contained within! I kind of feel like I barely scratched the surface! I usually try to use everything in a Card Kit on my ten cards but there’s so much stuff in this kit!

I didn’t get to the game controller or headset from the Next Gen kit… missed a couple of guys in the Outdoors… and I didn’t use the lovely frame stamp in the Spice Kit… but we certainly have an eclectic groups of card this month! There’s a number of Birthday cards (always useful) and friendship/love cards, a retirement card, and even an all-purpose card! And, boy! Those hibiscus really pop!
This post went live the day after Gina released the New Card Kit for July… which I believe means this kit is no longer offered as a kit but the stamp sets are available individually! DOH!!
I had a great time with this kit and I believe all the stamp sets this month are great stash builders and will get plenty of use over the years! It’s always a good thing to have a wide variety of options – especially sentiment options!
Thank you so very much for spending your time with me here today! Let me know if you have any questions or any comments you’d like to make! If you enjoyed this post please click the “Like” star at the bottom of this page, and if you would like to be notified of new posts click the Follow Me button at the top of this page. I would kindly appreciate it if you would take a few moments to Like Me, List Me, Pin me, Post Me, Share me with all your crafty friends, and remember… Don’t run with scissors!! As always, I send You and Yours Love and Light and Happy Crafting!
DISCLOSURE: This site contains some affiliate links to products. I may receive a commission for purchases made through these links (at no cost to you). As an Amazon Associate I earn from qualifying purchases. Thank you!
