
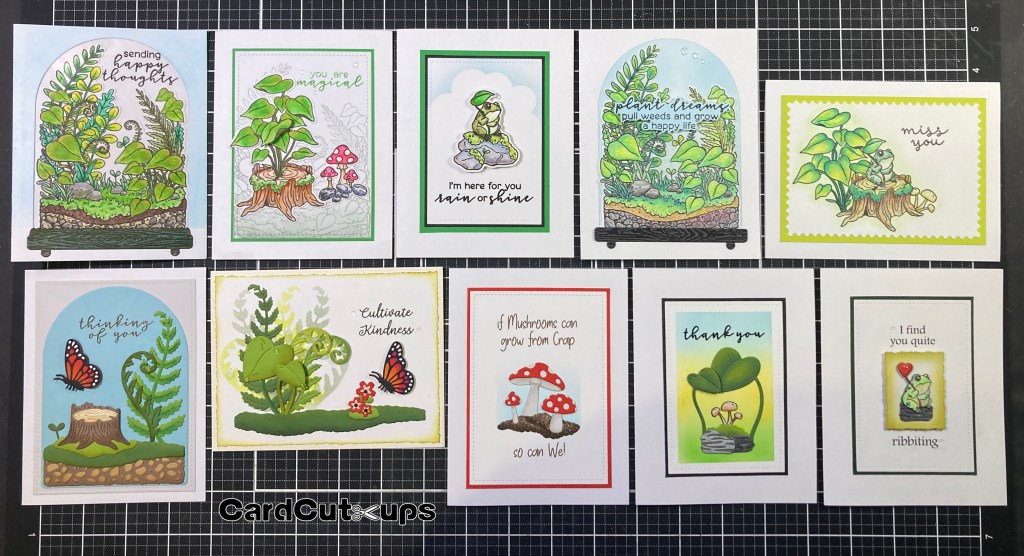
Hello folks! Scott here with my 10 Cards 1 Kit post featuring the Hero Studio Card Kit of the Month for April 2025. This month is “Tranquil Terrarium” month – this kit is perfect for nature lovers and those seeking a peaceful, botanical touch for their crafts… and you can build your own serene terrarium with the detailed stamps and dies in the Card Kit.

April 2025 Card Kit contains:
Terrarium Clear Stamp Set, 6″ x 8″
16 Terrarium Coordinating Dies
20 Terrarium Fancy Dies
Clear Hero Enamel Dots
3 Clear Card Panels, 4.25″ x 5.5″
9 Sheets of Cardstock, 5.5″ x 8.5″ Anchor, Fog, Truffle, Fawn, Alabaster, Fern, Rainforest, Peridot, Poppy
This unique kit looks like fun! Whether you want to do shaker cards or just create some plant-forward vignettes, this Card Kit certainly gives us a lot of opportunity for coloring!
I was looking forward to coloring theses stamps so I began by stamping all the stamps (with VersaMark Onyx Black ink) on some Bristol Smooth Card Stock to color with my Zig Clean Color Real Brush Markers, and stamped another batch on some Stonehenge White card stock for coloring with my colored pencils.
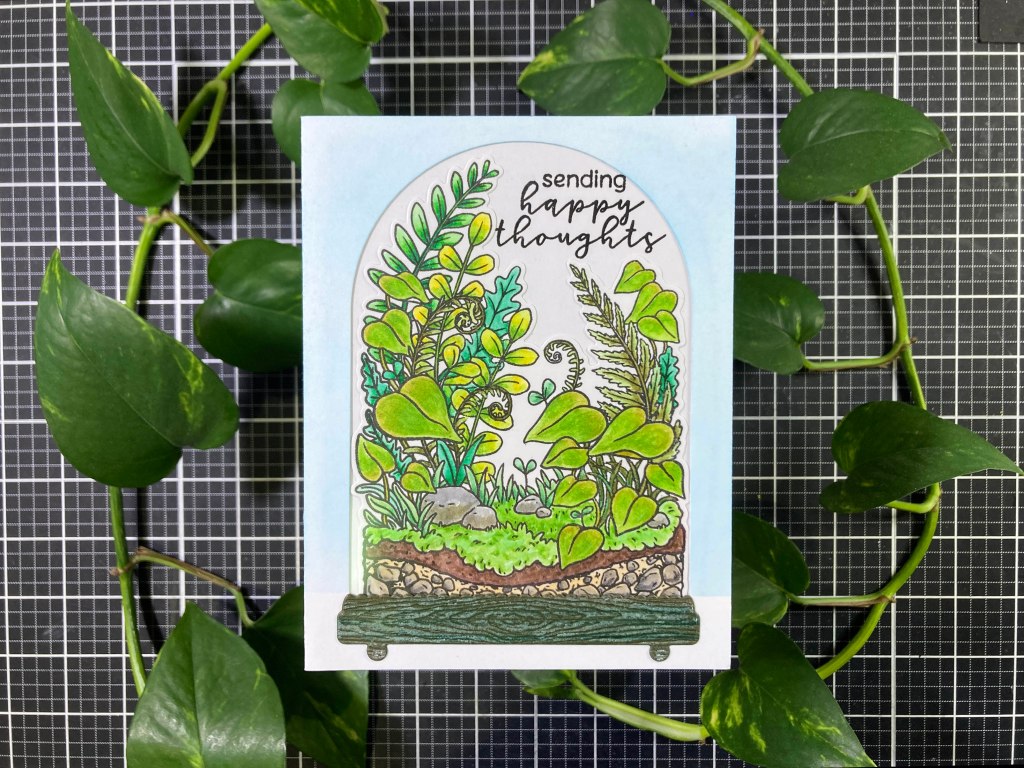
Of course, I began with the big terrarium stamp – LOTS of details on this stamp, but if you take it plant by plant, it’s fairly easy to differentiate all the flora from each other! On the front of an A2 White card base, I die-cut the domed opening and lightly blended HA Splash Reactive ink around the sides and top. I die-cut the colored stamp and glued it in place on an A2 panel of White card stock. I stamped the sentiment with VersaFine ink and embossed it with Clear Embossing powder. Then I glued one of the clear acetate panels on top and glued those to the back of the die cut card base centering the stamp in the arched opening. (I did trim the panel to fit.)
I die-cut the terrarium base from a scrap of wood-grained Dark Green card stock (from the MMH September 2019 Kit) and highlighted the texture with a little white crayon before gluing it to the base. That’s a bit of a tight fit to get everything to fit on an A2 card… I toyed with adding some of the other smaller images to the terrarium, but I don’t much care for the white borders the coordinating dies leave (and trying to hide them – or worse, cut them away) and I thought a lot of the individual images were a little out of scale for a terrarium of this size. Still… an absolutely adorable (and verdant!) little terrarium!
I wanted to use the other images in the stamp set, so I did go ahead and color all the smaller images with my Zig Markers and dutifully die-cut them out. Of course everyone’s going to put the frog on the tree stump, but I was more interested in the crack of the stump and what might be growing out of that!


I decided to use the terrarium stamp for some background, so I stamped that on a panel of White card stock with some Hero Arts Fog Reactive ink, and did some soft blending on the bottom of the panel with the same ink. When I glue a couple of die cut images together, I like to trim away the white border only where the images overlap – I trimmed the border away from the plant only where it sits on top of the stump, and I trimmed away the border on the rocks where they are in front of the mushrooms – that gives me a seamless coupling without having to fussy-cut the whole image. I cut a small slit in the trunk to “plant” the Pothos and glued the shrooms to the back of the rocks.
I die-cut the stamped panel with a 3.25″ x 4.5″ Lawn Fawn Stitched Rectangle die and added a thin Green mat behind that and glued them to a White card base. I stamped the sentiment with HA Apple Green Reactive ink and embossed that with Clear Embossing powder. I arranged the images on top and glued them directly to the card front. I fussy-cut the single Pothos leaf and added that to the plant with some foam tape for some added dimension, and colored in the mushroom dots with a Sparkle Gel pen. The single leaf actually adds a great amount of depth, and I love the plant growing out of the trunk.
That leaves me with the large moss-covered rocks, the frog and the small mushrooms… Frogs sit on rocks!!

I glued the frog to the rocks (I just cut away the small seedlings on top of the rocks) and trimming the white border on the frog where he overlaps with the rock – almost looks like both pieces were die-cut as one! I die-cut a scrap of White card stock with a 2.75″ x 4″ LFSRdie, and ink blended some clouds across the top with a MFT Mini Cloud Edges stencil and Splash Reactive ink. I stamped the sentiment with VersaFine ink and embossed it with Clear embossing powder. Then I added a thin black mat and a thicker Green mat before gluing both to a White card base. I added the frog and rocks using foam tape, and added a couple of Clear Hero Enamel Dots to the leaf… one drop is precariously perched on the tip of the leaf ready to roll off… I do love that frog!! I wish there were a few more critters in this kit!
Lets turn to my Prismacolor colored pencils, and the images stamped on the Stonehenge White card stock…

A little less intense coloring than the Zig Markers afford, but every bit as verdant… I think I actually have more greens in my colored pencils than I do in my Zig Markers! I also used Gamsol and a blending stump (tortillion) to help blend the colored pencils… I forget how well Gamsol works! I die-cut the colored terrarium and added some light blue to the white spaces to help it blend into the background. The background Dome is actually the one I cut from our first card – it already had the Splash Reactive ink blend around the edges. I stamped the sentiment with VersaFine Onyx Black ink on a scrap of White card stock ink-blended with more Splash ink, and die-cut it with the matching die.
I die-cut the terrarium base from some Black woodgrain card stock (again from the MMH September 2019 kit) and trimmed off the top (scalloped) layer – that’s a little simpler, and it takes up less room as well! I glued the colored stamp to the Dome background, and the base to the bottom and glued them all to the front of a White card base. I added the sentiment with foam tape (that is kind of a wacky sentiment!) and (instead of acetate) I added three graduated sized Clear Dots to the top edge of the dome – a suggestion of glass (or moisture) without using up the acetate sheets. I like this coloring so much, I didn’t even think about adding any of the smaller images… looks like a pretty busy terrarium as is!
I couldn’t avoid putting that frog on the tree stump, but I was much happier using some fussy-cut masking to stamp this vignette instead of having to resort to the matching dies.

First I stamped the frog on a panel of Stonehenge White card stock, and stamped the same on a piece of masking paper and fussy-cut it out. I covered the frog with the masking and stamped the tree stump (along with another on more masking paper). I fuss-cut the stump mask and placed it over the stamped tree stump. Then it was a simple matter of stamping the Pothos plant and the mushrooms – remove the two masks and VIOLA! A sweet little vignette! I colored everything with Prismacolor colored pencils and used Gamsol for blending – lots of shades of green here!
I dug around in my stash for this sentiment (HA Many Everyday Messages stamp set) and stamped that in VersaFine ink and embossed it with Clear Embossing powder. I die-cut the panel with a SSS Modern Postage Stamp Rectangle and glued it to a 4.75″ x 3.5″ Peridot mask (from the kit) and then down to a White card base. The vignette seemed a little stark against the pure White card stock so I reached for my Pebbles Chalk Palette and blended a soft green haze around the scene – that anchors everything quite nicely! That frog really looks like he’s missing someone!
That covers all the image stamps from our stamp set (a couple more sentiments to use yet) but time to dive into the Terrarium Fancy Dies. Personally, I’d rather color than die-cut – I do get a little anxious about coloring or shading die-cuts… I just don’t think I’m very good at that… but I went ahead and die-cut all the Fancy dies and glued the layering pieces together.

As far a die-cuts go, I’m always at odds over whether to cut them from White card stock and color the shapes, or color white card stock first and then die-cut the shapes or die-cut from colored card stock and add shading. Since we have so much colored card stock in this kit I decided on the latter technique. And, yes, the lighter stones on the darker soil are paper pieced on top!
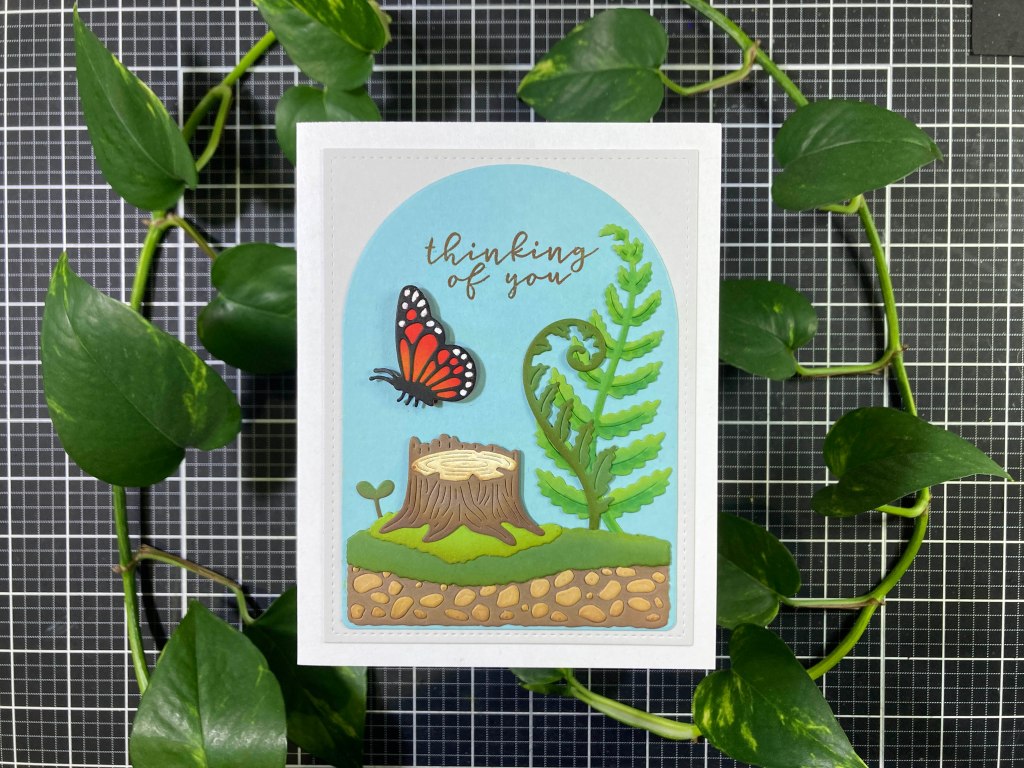
On the large fern I actually started with my Ohuhu Alcohol markers… not as perfect of a blend as I might have wanted, but serviceable. For the rest of the greenery and the stump I ink blended Green Apple and Vintage Photo Distress Oxide ink on them with blending brushes or foam. I do like that the rocks (because they are glued on top) catch the ink blending perfectly! Lastly, I die-cut the Dome from some Hero Hues Mist card stock
I liked that the large fern seemed very happy on the right side of the Dome background so I arranged everything around that and stamped the sentiment using Vintage Photo Distress Oxide ink and embossed that with Clear Embossing powder. For the butterfly, I took a small paintbrush (very small!) and some White Gouache and painted in the dots on the edges. Oh, baby!! That certainly brought that butterfly to life! I also blended in some Orange Chalk pastels close to the body and just wiped the excess off of the black – that’s a nice subtle blend! I glued everything together and down to the Dome die cut and added a couple pieces of scrap card stock behind the top of the stump to keep it level. I mounted the butterfly with foam tape and decided to add a kind of mat behind the Dome – I die-cut a piece of the Fog card stock from the kit with a 3.75″ x 5″ LFSRdie and glued that to a White card base and then glued the Dome with assembled die cuts on top. Love that butterfly and the clean and simple graphic nature of the die cuts. Not necessarily a terrarium…!
After fussing with painting in the white dots on the butterfly I figured there had to be a better way, so I die-cut the butterfly background from Fog card stock (in the kit), layered that with the Black detail die-cut and marked where the dots were. Then it was pretty simple to color in the rest of the wings and the body with my Alcohol markers and just leave the edge white. I think that worked extremely well and it was pretty simple to boot!

This stamps and dies in this kit are obviously intended for Portrait oriented cards… I’ve got to mix it up a little and try to expand the horizons of this kit with a Landscape oriented card
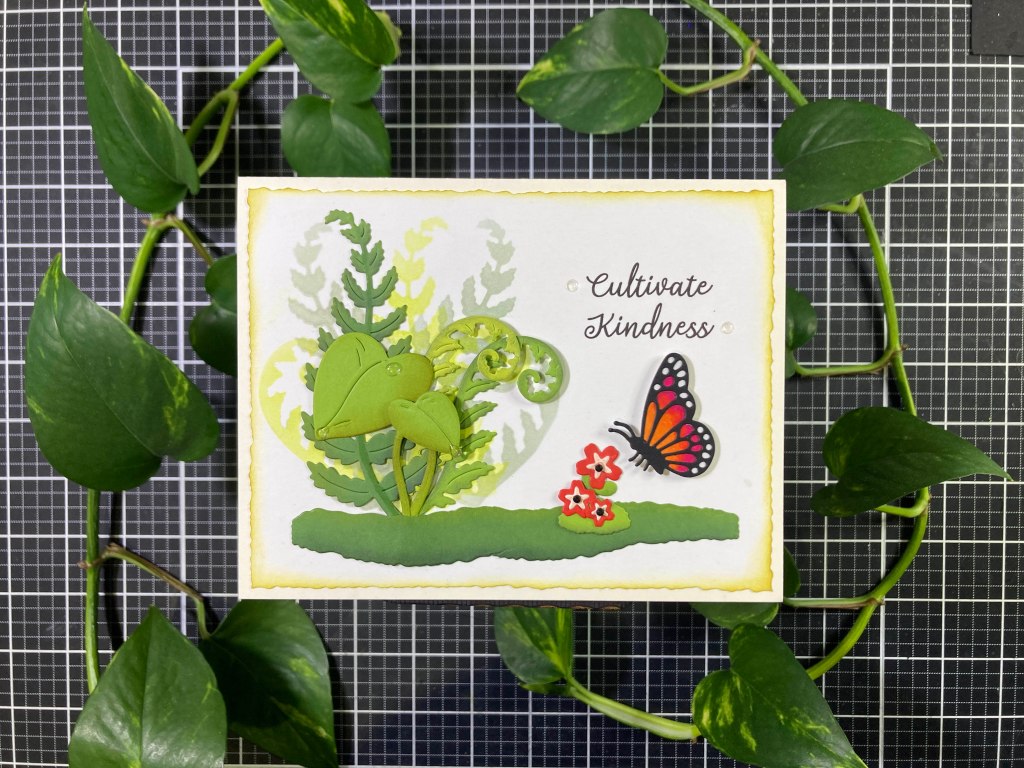
I did some partial die-cutting to extend our ground cover to 4.5″ long – perfect to anchor our landscape arrangement. I also realized that the die-cut negatives from the Fancy Dies would make great stencils! On an A2 panel of White card stock, I stenciled in the two ferns a few times on the left with HA Fog and Key Lime Fizz Reactive inks – in a nice little grouping that will fill in behind our die cuts perfectly! I ink blended Vintage Photo on all the greenery die cuts for a little touch of shading. I decided on an arrangement and turned to my printer for this sentiment. I used my Silhouette software and the Dream State Font to print this sentiment on the panel.
I trimmed the panel to 4″ x 5.25″ with my (NEW!) Tim Holtz Deckle Guillotine paper cutter (I do love a deckle edge) and lightly ink blended some Forest Moss Distress Oxide ink around the edges. I glued the printed and stenciled panel to a White A2 card base, and started gluing down the die cuts – the small Pothos leaf and the ends of the Fiddlefern dies are mounted with foam tape – as well as the butterfly! A few Clear Dots to highlight the sentiment and I used the HA Spring Enamel Dots (from the MMH April ’22 Kit) on the big leaves – there are actual drop shaped and oval dots in that pack. Finally I colored some tiny gems black (with an alcohol marker) to use as flower centers. And a lovely sentiment!
Beyond the butterfly dies, I think my favorite dies are the Mushroom dies – I love that they come in two pieces!
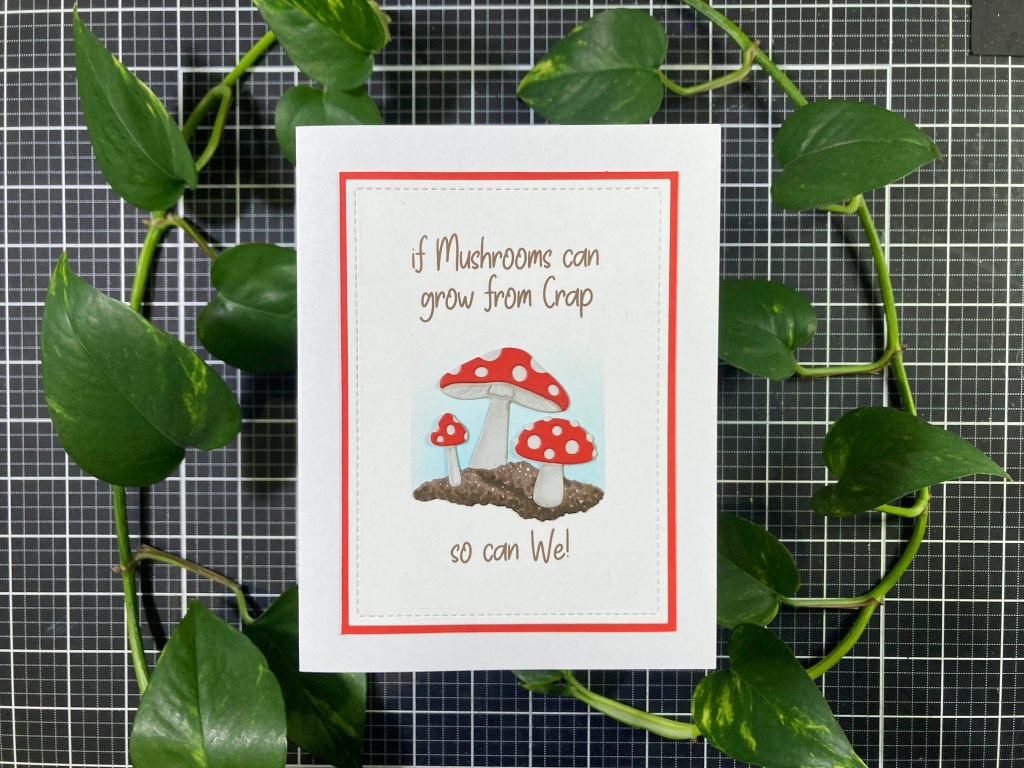
This is a unique encouragement card! And a good reminder for all of us! I die-cut the largest mossy groundcover die from the Truffle card stock in the kit (how appropriate!) and colored it with my Ohuhu Alcohol markers. I do find that coloring die-cuts with alcohol markers usually works better for me when I stipple in assorted colors – less of a blending and more of a texturing with colors. I also did some light blending on the underside of the mushrooms with my Pebbles Chalk Palette. The die cut groundcover measures right at 2″ across, so I masked out a 2″ square in the center of an A2 card panel and ink blended some Splash Reactive ink inside that square to ground our image.
I used my Silhouette Software and the Take Charge Font to print this sentiment (in Brown) around the Splash square. Then I die-cut the panel with a 3.25″ x 4.5″ LFSRdie and added a thin mat of the Poppy card stock – I want that to match the mushrooms! I glued that to an A2 White card base and glued the die cuts in place. I did add scraps of card stock behind the tops of the front two mushrooms to keep them level. You know, some mushrooms are actually cultivated on dung and most all mushrooms grow from some form of rotting organic decay… Crap is a nice way of saying that! And if mushrooms can flourish in that kind of an environment, then I think we can too! (And since this is a printed sentiment, you could also easily swap out the “We” for “You”.)
I still have the die cut rocks and some leaves along with the die cut mushrooms from the stamp set..

I went ahead and fussy-cut the white border from the mushrooms – a little tedious, but worth it! I arranged those with two rocks, the medium groundcover and two leaves into this pleasing arrangement. I masked off a 2.25″ x 3.5″ area in the center of an A2 White card panel and ink blended Green Apple, Lemon Drop and Splash Reactive inks for a nice ombre background. I die-cut that panel with a 2.75″ x 4″ LFSRdie and added a thin black mat behind before gluing that to the front of an A2 White card base.
I did the blending on the die-cuts with my Pebbles Chalk Palette – I love the shading on the leaves! That may be my favorite way to add some simple shading to die cuts! I stamped the sentiment (last one in the stamp set!) with VersaFine Onyx Black ink and embossed that with Clear Embossing powder. I glued the die cuts and mushrooms in place and used a touch of foam tape behind the smaller leaf in front. I love that the leaves seem to be protecting the mushrooms – or at least shading them… that gives some great context for a Thank You card!
At this point, I have used every stamp in the Stamp set and every Fancy die in the kit… except for the heart..!

Now I’m feeling back to form with this terrific little pun! I still had the frog stamped on some Stonehenge White card stock so I colored him up with my colored pencils and fussy-cut him out (getting rid of the leaf but keeping the stem). The frog fits perfectly on top of the die cut rock. I was going to stamp and die-cut the heart but realized the die cut alone makes for a perfect heart, so I die-cut the heart from the Poppy card stock in the kit. I glued the frog to the rock and the heart to the stem.
I die-cut a scrap of white card stock with a 1.5″ x 2″ apex.) Spellbinders Deckle Rectangles die and ink blended Forest Moss Distress Oxide ink around the edges. I used my Silhouette software and the Footlights MT Light font to print this sentiment on a White card panel and die-cut that with a 2.75″ x 4″ LFSRdie. I added a thin Dark Green mat behind that before gluing both to the front of an A2 White card base. I added the deckle rectangle with foam tape and glued the images in place – with a scrap of card stock behind the frog and a touch of foam tape behind the heart. A couple of Clear Dots highlight the sentiment and a clear Heart Dot (from the Spring Enamel Dots) right in the middle of the heart. I do love that frog stamp, and this is a terrific lovingly pun-y sentiment!
And that covers my 10 cards for the month I really had a good time working with this kit… I think the terrarium concept is fun and unique, and the stamps and dies are detailed and quite adorable. I really like that the frog stamp is more realistic than cartoony – he actually looks a little grumpy! I’m always trying to create cards that go a little beyond what the design team shows us and that hopefully gives you some new ideas about using these supplies. I did manage to use all the stamps and Fancy dies on these 10 cards! Let me know which ones are your favorites!
My only reservation about this kit is that the Stamps and Fancy Dies are very similar – tree stump stamp… tree stump die cut… mushroom stamp… mushroom die cut… pothos stamps… pothos die cuts… you get the idea… not to mention that you need to use the Dome and Base Fancy Dies to make a stamped terrarium… And I did wish for more critters than just a frog and a butterfly. Those are minor quibbles with what I found to be a delightful kit. Maybe HA is just trying to appeal to both stampers and die-cutters this month!
You can pick up this April ’25 Card Kit of the Month by subscribing to the Hero Studio Card Kit of the Month through April 27th. If there are any leftovers after then, they will become available beginning the 20th of May.
I guess that wraps things up this month! If you enjoyed this post and these cards please click on the “Like” star at the bottom of this post (and the “Follow Me” link at the top of this page)! Remember to Like Me, List Me, Pin Me, Post Me, Share me with all your crafty friends…! Remember… don’t run with scissors…! And as always, I send you and yours love and Light and Happy Crafting!!!

LikeLiked by 1 person