
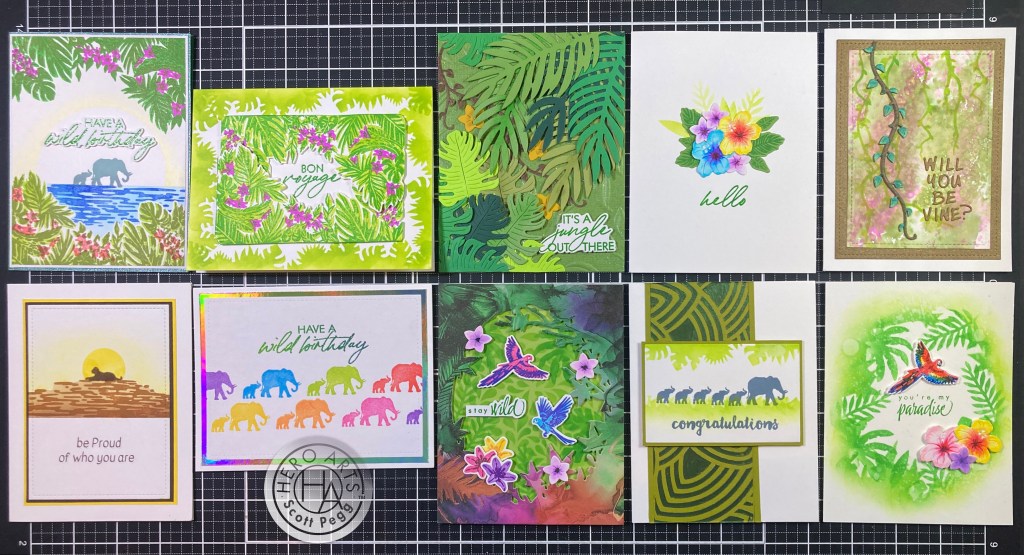
Hello Folks! Scott here with my new 10 cards created with the Hero Studio August 2024 Card Kit of the Month. We are jungle bound this month with new HeroScape stamps, dies, stencils and new inks! Here’s what’s included this month:

• Jungle HeroScape Clear Stamp Set, 6″ x 8″
• 12 Coordinating Dies
• 5 Fancy Dies
• Jungle Scenic Stencil, 6″ x 6″
• Olive Hero Wax
• White Plastic Palette Knife
• 3 Reactive Ink Cubes (Key Lime Fizz, Green Apple, Fruit Punch)
• 2 Reactive Glitz Ink Pads (French Pink, Byzantine Green)
• 5 Printed Washi Sticker Sheets, 6″ x 6″
I am quite tardy with my post this month, but it appears Hero Arts was having a hard time getting their hands on the new Glitz ink pads. (As well as getting the new Hero Arts Christmas Catalog released) I finally received my kit on Monday, August 26th. Aside from the new inks, this is also my first pot of Hero Wax (a metallic, wax-based paste) to add to my stash. Tons of supplies as usual, with lots of different kinds of jungle foliage.

I reached for the HeroScape foliage stamp to start with, and stamped the solid background on an A2 panel of Neenah White card stock with the Green Apple Reactive ink. I lined up the detail stamp on top and stamped that with the Byzantine Green Reactive Glitz ink – the glitz is very subtle on a stamped image, but if you look closely, little golden highlights are there! I lined up the flower stamp on top and stamped that with the French Pink Reactive Glitz ink – a little more golden highlights in the flowers!
I thought those foliage stamps would work well as a foreground too, so on the bottom of the panel I stamped the solid stamp with Key Lime Fizz ink and stamped the detail with the Byzantine Green again. This time I used the Fruit Punch ink for the flowers. I wanted the water to be behind the foliage, so I die-cut a piece of masking with the matching foliage die and laid that over the stamped image. I stamped the water stamp with Blue Hawaii Reactive ink, added another mask along the top edge of the water stamp and ink blended Splash Reactive ink to fill in the water. I removed the water mask and took a 2.75″ die-cut circle that was just laying around and taped that on top of the water and ink blended Lemon Drop Reactive ink around the circle for a big hot sun.
I stamped the Elephants in the middle with Altenew Misty Morning ink (nice blueish tones to that grey) and trimmed the whole panel to 4′ x 5.25″. I added a thin white mat and glued both to a textured green shimmer card base. I stamped the sentiment on 110# card stock with Green Apple ink and embossed that with Clear embossing powder. I die-cut the sentiment out with 2 extra blanks and glued them all together for the nice chunky sentiment. I like how different the top and bottom foliage looks with just changing inks, and Birthday cards are almost always in demand!
When the stamps in a kit are obviously intended for a portrait orientation (only 4.25″ wide) I do like trying to figure out how I can use those stamps in a landscape orientation. Because of the layered stamping, there’s not really a convenient place to divide and extend the foliage…

So let’s use the die the way it was intended – to cut out two copies of the Heroscape foliage – both stamped with Key Lime Fizz for the background, Green Apple for the detail, and French Pink for the flowers. The width of the die-cuts are right at 4.25″ (1.25″ less than 5.5″), so to fit centrally on a landscape A2 card base, the height of the die-cuts together should be right at 3″ (1.25″ less than 4.25″). I used foam tape on the left and right overlaps to attach the two pieces together. That gives us a nice window where I can just squeeze in this sentiment!
I took a regular A2 panel of White card stock and stenciled the border stencil around all four sides using the Key Lime Fizz ink. I figured out where to stamp the sentiment using Green Apple ink with Clear embossing powder. I glued the panel too the front of a White card base, and added the inner frame with foam tape. I don’t think I’ve ever sent anyone a Bon Voyage card, but if I knew someone going to Hawaii, then this is the card I would send!
The big leaf dies in the Fancy Dies set were calling to me…maybe it was that jungle sentiment…
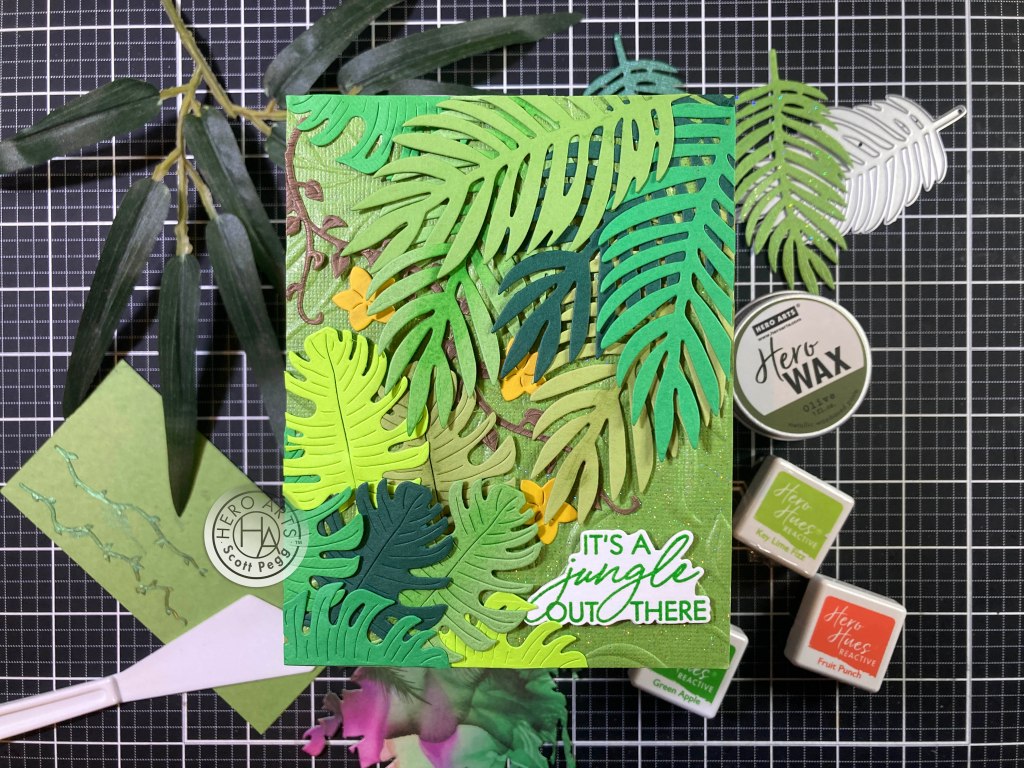
I gathered up all my green card stock scraps and had a small die-cutting party – I think there are twelve leaf die-cuts here. I thought that would be enough for this card to feel like a forest. I did start doing a little ink blending on a couple of the leaves but decided that it really wasn’t needed when you have so many leaves! For the background, I took a panel of glitter green card stock from my stash and embossed that with a Spellbinders 3D Leafy embossing folder and glued that to a White card base. I started arranging the die-cut leaves on the background leaving room at the bottom right for the sentiment.
I decided I needed a touch of transition between the monstera leaves and the palm fronds so I die-cut the vine Fancy die from some wood veneer card stock and glued that diagonally to the card front (behind the leaves) and virtually pointing to the sentiment. I nestled in three lotus flowers die-cut from Hero Hues Mustard card stock for a little pop of color. I stamped, embossed, glued and stacked-up the sentiment exactly the same as my first card and glued it in place on the card front. Certainly a very lush forest here, and I love the pops of glitter that show up all over through the leaves.
I do try to use all the stamps in a kit – including the sentiments – and there’s only one sentiment left in this kit…

I die-cut the Hibiscus and lotus flowers from some Bristol Smooth card stock and colored them with my Zig Clean Color markers. I stamped the large and small leaf stamps on some green card stock using the Green Apple ink and die-cut them out with their matching dies. I arranged the flowers and leaves together taping the arrangement together on the back. I decided we could use a little more greenery (and a little extra depth), so I used Key Lime Fizz ink through the smaller leaf stencils around the top of our arrangement. When I was happy with the extra leaves, I stamped the sentiment on the card front with Green Apple ink and embossed that with Clear embossing powder. I glued the arrangement in place (no foam tape needed) – I like the combo of Fancy dies, stamped die-cuts and stenciled leaves here – very colorful yet clean and simple! I do like my white space!
That takes care of all the sentiments in our stamp set… but you can always use another Birthday card…!

I think this card came about from my desire to stamp some Pink Elephants! Using my MISTI stamp platform, I stamped the parade of elephants using Reactive inks in Thistle, Splash, Key Lime Fizz, Fruit Punch, Lemon Drop, Creamsicle, and Taffy. I stamped the sentiment with the Earth Palette Ink pad from the MMH 12/19 kit, and embossed that with Clear embossing powder. I die-cut the panel with a Lawn Fawn Stitched Rectangle die (5″ x 3.75″) and added a mat of Rainbow Mirror card stock. I glued all to the front of an A2 card base and we have a colorful B-day card for any pachyderm fan!
I’ve used all the sentiments in our stamp set now, so I’m searching around for some forest puns… few and far between!!

How ’bout a pun-y jungle Valentine!? I wasn’t terrifically impressed with the new Reactive Glitz inks when used for simple stamping, so I thought some ink smooshing would bring out the Glitz a little more. I smooshed the Byzantine Green and French Pink on my craft mat, sprayed a splash of water on top and started pressing a panel of Multi Media card stock into the inks. I let the panel dry and did a couple more smooshes with the ink until I was satisfied with the background. You can see the Glitz much better when the inks are used more liberally. I did sprinkle a few water droplets on top for a little more variety and texture.
I die-cut the Fancy Vine die from another scrap of wood veneer card stock and stacked that to the top of another plain brown die cut. I wanted to color the leaves, so I took some White Gouache paint and colored the leaves white and let them dry before coloring them with my Zig markers. That worked extremely well! I stenciled the vines on the background using both Green Apple and Key Lime Fizz through the vine stencils. That added a little more detail to the background without pulling much focus. I die-cut the panel (and an Auburn Pearl mat) with two LFSRdies and glued them together and down to a White card base.
The sentiment is die-cut from the same Auburn Pearl card stock using an old Marker Micro Alpha die from my stash and then glued directly on the card front – I didn’t want to risk putting the background through my printer, so a die-cut sentiment works best – this one is pretty simple and this Marker font die is a good match for the card. A very unique Valentine for the horticulturalist in your life!
I do have a few more images in our stamp set that I haven’t gotten to yet… and I’m supposing the other animal silhouette stamp is a lioness…? Hmmmmmm…
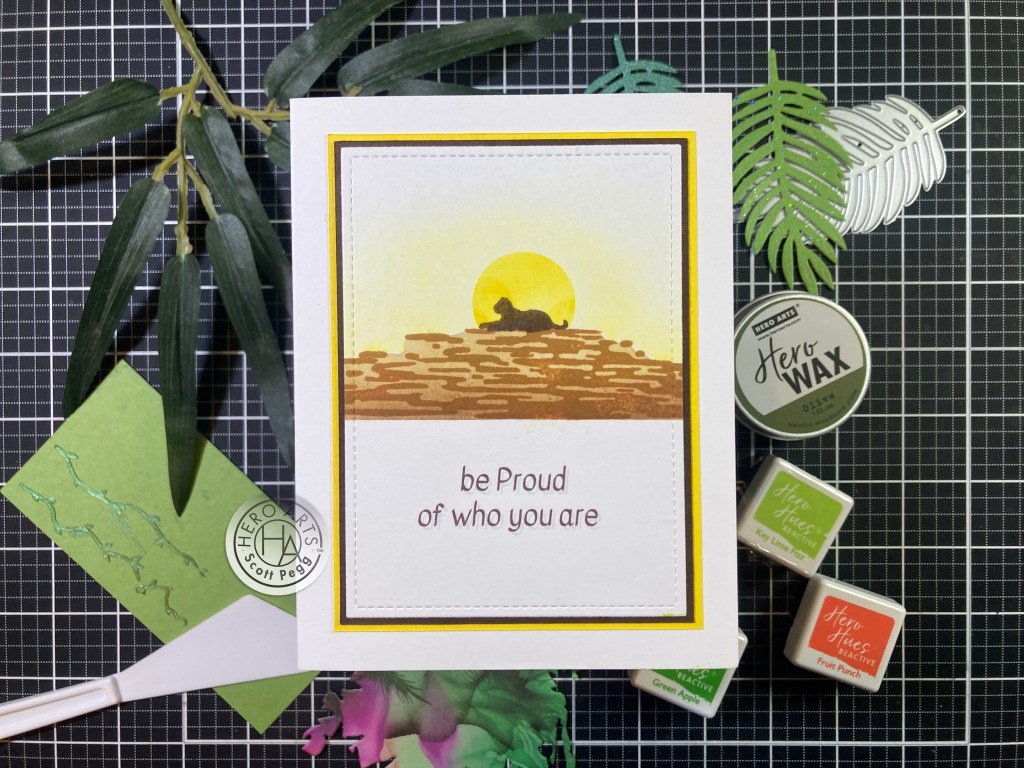
I had been imagining other ways to use the water stamp in this set and decided to flip the stamp (and the element!) on its head to create a little perch for our lioness. I stamped the water on some masking paper and fussy cut it out keeping both the positive and negative masks. I stamped the water (upside-down) on a panel of White card stock using HA Caramel ink. I placed the negative stencil over the stamping and filled the shape in with HA Sand ink. I put the positive mask over the perch and removed the negative mask and added s circle mask to ink in the sun with Lemon Drop ink. I removed the sun mask and blended more Lemon Drop around the sun and perch. When everything was dry, I stamped the lioness with HA Cocoa ink (a few times).
I did turn to my printer for this sentiment. I used my Silhouette Software and the Kavivanar font to print the sentiment directly on the inked panel. I trimmed that panel to 3.25″ x 4.5″ with a LFSRdie and added thin mats in Dark Brown and Yellow before gluing down to a White card base. The water stamp makes for a great perch and featuring just the lioness is quite effective – and the sentiment wraps it all up! I like this one!
I was fretting over how to use the Washi Sticker sheets so I just covered a panel of card stock with my favorite sheet.
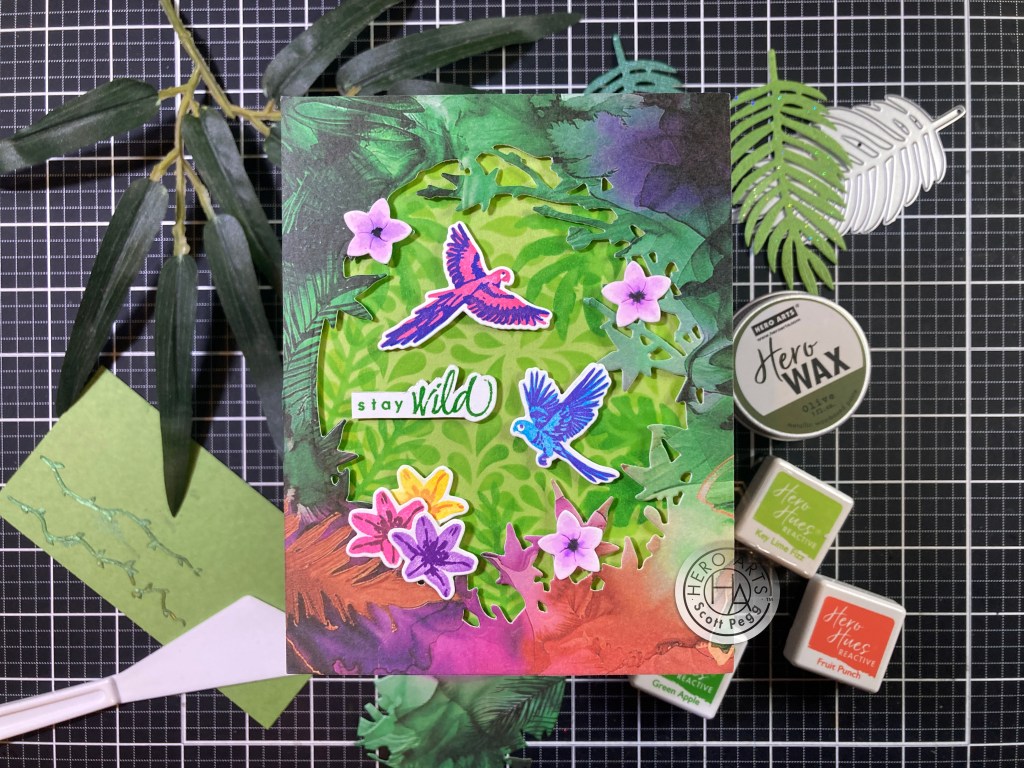
While flipping through old MMH kits I came across this Window die from the September 2018 Kit. I thought it was appropriately leafy and die-cut the washi panel right in the center. For the background inside the window, I took a panel of Green card stock and a Stampendous Petals Background stencil and blended Green Apple ink through the stencil. That provided a nice background pattern but we need a little more chaos! I added more greenery using the leafy stencils in the kit and spreading them around the edges of the die-cut window. There’s even a couple of palm trees in the mix! I added the washi window to the stenciled background using foam tape and glued them to a White card base.
I experimented with a few color combinations using the bird stamps and got these two perfectly aligned using Fruit Punch and Blue Hawaii inks and Splash and Thistle inks. I stamped the lotus blooms with Lemon drop/Creamscicle; Fruit Punch/Thistle; and Thistle/Grape Slush and die-cut them and the birds with their matching dies. The three flat blooms were left over from the #4 Hello card. The flowers are glued and foam taped to the die-cut window, and the birds are mounted with foam tape on the background inside the window.
My Jungle themed sentiments were running thin, but I remembered an old Jungle themed MMH kit from way back that might have some useful sentiments… Sure enough, the June 2019 kit was a jungle theme with more jungle sentiments! I stamped this sentiment from that kit on a scrap of White card stock with Green Apple ink and embossed it with Clear embossing powder. I fussy-cut the sentiment and added it to the card front with foam tape. Very lush and colorful jungle, and though the birds are small, when stamped correctly they’re really cute. And this sentiment works perfectly!
I realize elephants don’t give birth to litters of calves but I couldn’t get this image out of my head…! HA! I imagine this could be a new baby card for someone who already has 4 kids… or you could stamp as many (or as few) of the youngsters as you like for a variety of new arrival congrats!

I did experiment a little with the Hero Paste and the stencils included in the kit, but turned to a big background stencil instead – it helped that this Leaf Pattern stencil was in the MMH June 2019 kit that I pulled the last sentiment from! I used a panel of Hero Hues Pesto card stock and, using the palette knife in our kit, spread the Olive Hero Paste through the stencil and onto the card stock. When that was dry, I trimmed it down to a vertical panel 2.25″ x 5.5″. That paste has a really nice metallic shine to it.
I stamped the elephants (masking off the big one to get the single babies) using Altenew Nimbus ink (another blue-ish grey). I used the edge stencils and Key Lime Fizz ink to add some ground and a little overhead foliage. This sentiment is from an old Paper Pumpkin kit (Feb. 2016) stamped in the Nimbus ink, and the whole panel is trimmed down to 3.5″ x 2.25″ and matted on more Pesto card stock. I glued the background panel to a White card base and added 1/4″ strips of Pesto card stock to the vertical edges for a finishing touch. I added the stamped panel and mat with foam tape and we have an infinitely adaptable new baby card! Just the single stamp alone would work great for a new baby card!
There was another sentiment from the June 2019 kit that caught my eye, and I had to try using watercolor markers on one of those bird stamps… something I haven’t tried with layering stamps before.
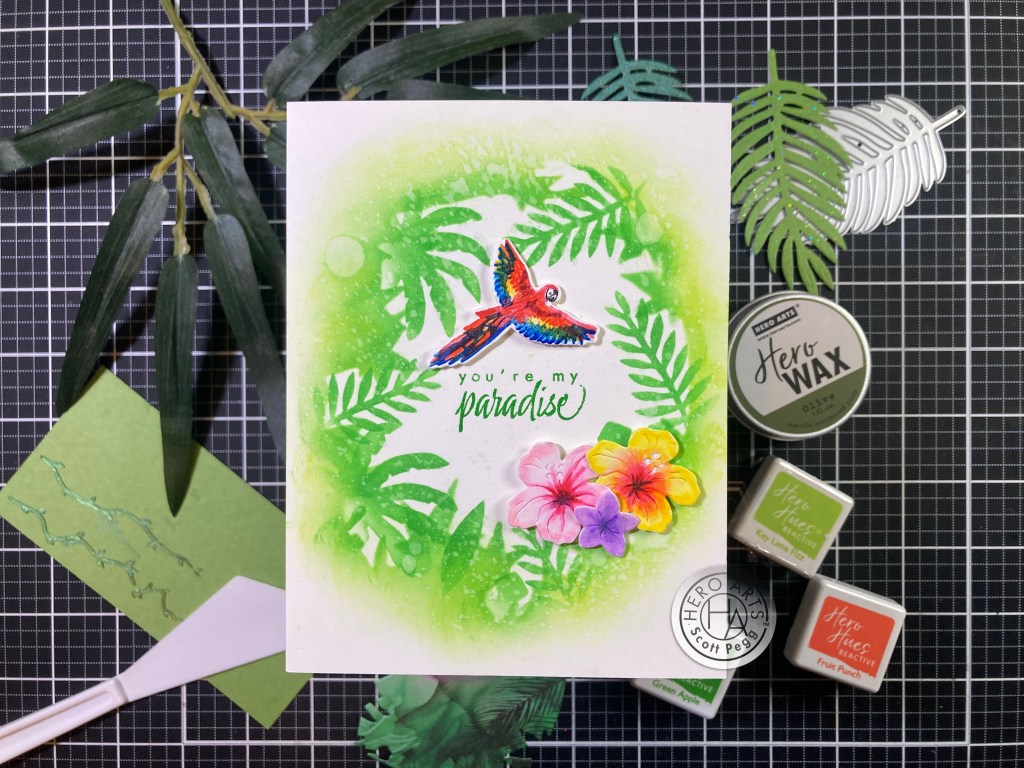
To start with, I took the inside negative die-cut of the leafy window die from card #8, and temporarily stuck that to the center of a White card stock panel. I ink blended around that with the Green Apple and Key Lime Fizz inks. I removed the temporary mask and filled in around the edges of the window with the leafy stencils from our kit and more Green Apple ink. I gave all the blending and stenciling a spritz of water for more texture. Nice and lush!
I used my TomBow Dual-tip markers to color and stamp the bird – I shied away from the face hoping to keep a classic white and black parrot head which I added with a Pigma Micron pen. I’m very pleased with this colorful parrot! I die-cut him with the matching die, and colored more of the Fancy die cut flowers with my Zig markers. I stamped the sentiment (from the 6/19 kit) in the center of the panel using Green Apple Reactive ink and embossed that with Clear Embossing powder. I glued the panel to a White card base and added the flowers and parrot with foam tape. This turned out to be almost like a “negative” version of card #8 but every bit as lush.And I really like this sentiment!
That’s my big ten this month! I did manage to use every stamp in our stamp set, most of the coordinating dies, all of the Fancy dies, all of the inks, paste and Washi sheets. This batch of cards really put this kit through its paces!
Rather a verdant group of cards this month! I find it interesting that there are six sentiments in Green Apple… three elephant cards, lots of foliage, a couple of Birthday cards, and even a sweet pun! The June 2019 Jungle theme kit featured a lot of animals, while this Jungle theme kit seemed more focused on the flora. Double them up!
This kit is still available at Hero Arts! If you decide you need more greenery in your cards, or if I was able to give you some fresh ideas, please use my links below when you go shopping at Hero Arts. It is always extremely appreciated and is a great way to help support this page and keep CardCutups afloat. And if you haven’t taken a look at the new Hero Studio Subscription options, take a gander here: https://heroarts.com/pages/subscribe
Hero Arts: https://heroarts.com?sca_ref=6639489.ubrhdU2VDFY73qx
Hero Studio Card Kit of the Month August 2024: https://heroarts.com/collections/august-2024/products/ck0824-august-card-kit-of-the-month?sca_ref=6639489.ubrhdU2VDFY73qx
All my thanks and appreciation for sharing some time with me today. I enjoyed this kit more than I thought I would and I hope you like my creations as well. Let me know which cards are your favorite! Please take a moment and click on the Like Star at the bottom of this post (helps recommendation algorithms) and Share this post on your Pinterest, Instagram, and Facebook pages and with all your crafty friends. Remember… don’t run with scissors…! As always, I wish you and yours Love and Light and Happy Crafting!
DISCLOSURE: This site contains some affiliate links to products. I may receive a commission for purchases made through these links (at no cost to you). Thank you!
