
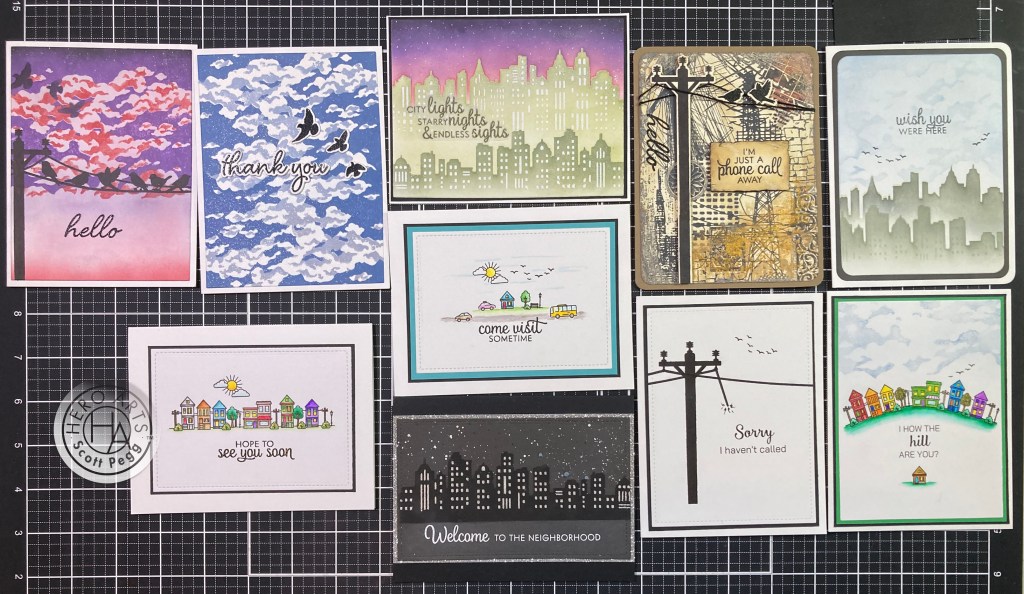
Hello Folks! Welcome to the launch of the NEW Hero Studio and their inaugural Card Kit of the Month for June, 2024. I am thrilled to be able to continue along with Hero Arts and am excited to take a look at the new Card Kit! Here’s a quick look at all the goodies we have in store for us this month.

• Urban Sky HeroScape Clear Stamp Set, 6″ x 8″
• Neighborhood Message Clear Stamp Set, 4″ x 6″
• 10 Coordinating Dies
• City Stencil, 6″ x 6″ with 3 Fallout City Skylines
• 5 Ink Cubes (Peony, Pitch Black, Dusty Blue, Stonewash, Amethyst)
• 2 Sheets Each of Silver Foil, Silver Glitter, Silver Cube & Pitch Black Cardstock, 5.5″ x 8.5″
• 2 Sheets City Textures Hero Transfers (Rub-Ons)
Quite an assortment of supplies in this month’s kit! A plethora of urban design elements from city landscapes, to skies filled with clouds and birds. And this from Hero Arts: “The lines, shapes, and colors of buildings and power cables will add the beauty of modern design to your projects.” Okay..! Hmm… Interesting… all the cables in NYC are buried underground so we don’t even have telephone poles around here… But I do like the “birds on a wire” motif!
I gather the Stonewash and Dusty Blue inks were intended for the cloud stamps… but wouldn’t Amethyst and Peony work as well?
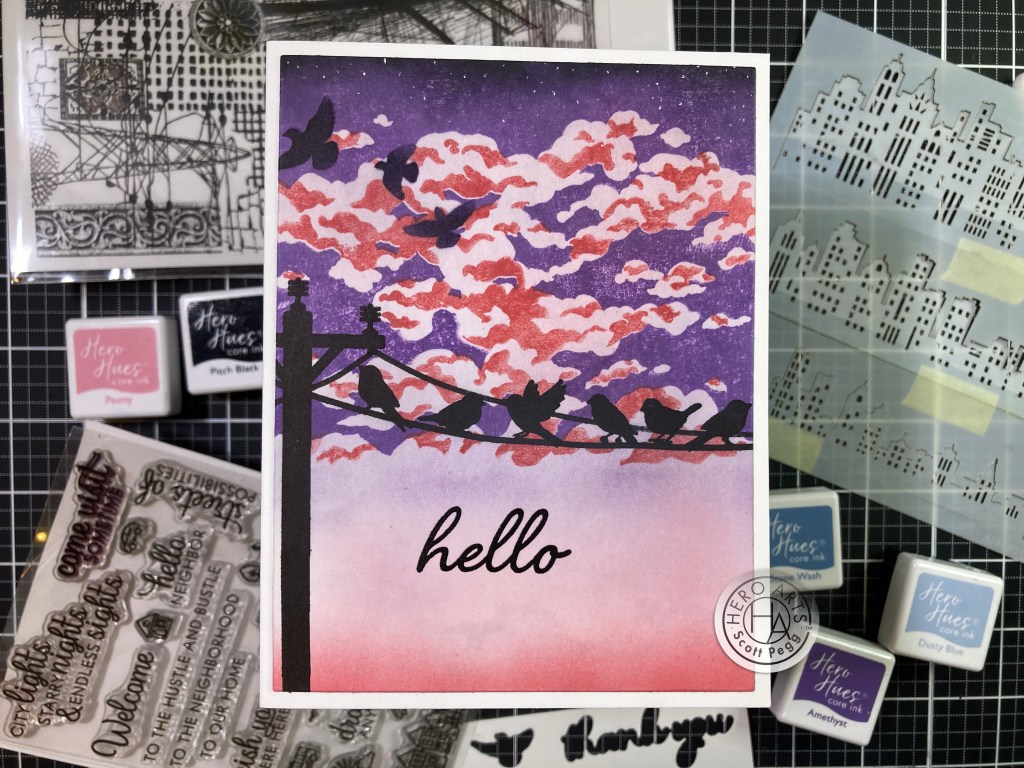
On a panel of Neenah Solar White card stock I stamped the cloud stamps with the Amethyst and Peony inks and added a little ink blending in the same inks over the rest of the panel. I did add a touch of Pitch Black ink blended at the top edge to give this a little more of a dusk-y feel.
I stamped the telephone pole, wires, and birds using the Pitch Black ink – that is extremely BLACK ink… I love it! Easily covered over the background stamping. I’m not sure why, but I chose to add the power cables to the bottom of the insulators on the poles… I think I just liked that aesthetic better than the cables coming from the top of the insulators. Of course that’s wrong, but what do I know… we don’t have telephone poles in NYC!!
I stamped the sentiment using VersaFine Onyx Black ink and embossed it with some clear embossing powder for a little texture and shine, and I added a few stars at the top with a white gel pen and a glitter gel pen. Just a touch of sparkle. I trimmed the panel to 4″ x 5.25″ and glued it to an A2 White card base. I liked that I could curve the line of birds to match the curve of the cable, and I like the straightforward simplicity here – all on a one-layer card!
I guess this is a fairly unique set of cloud stamps. A good amount of space at the top of the stamp, and barely 3.5″ long… Maybe I could use these stamps to fill the whole card up with clouds!
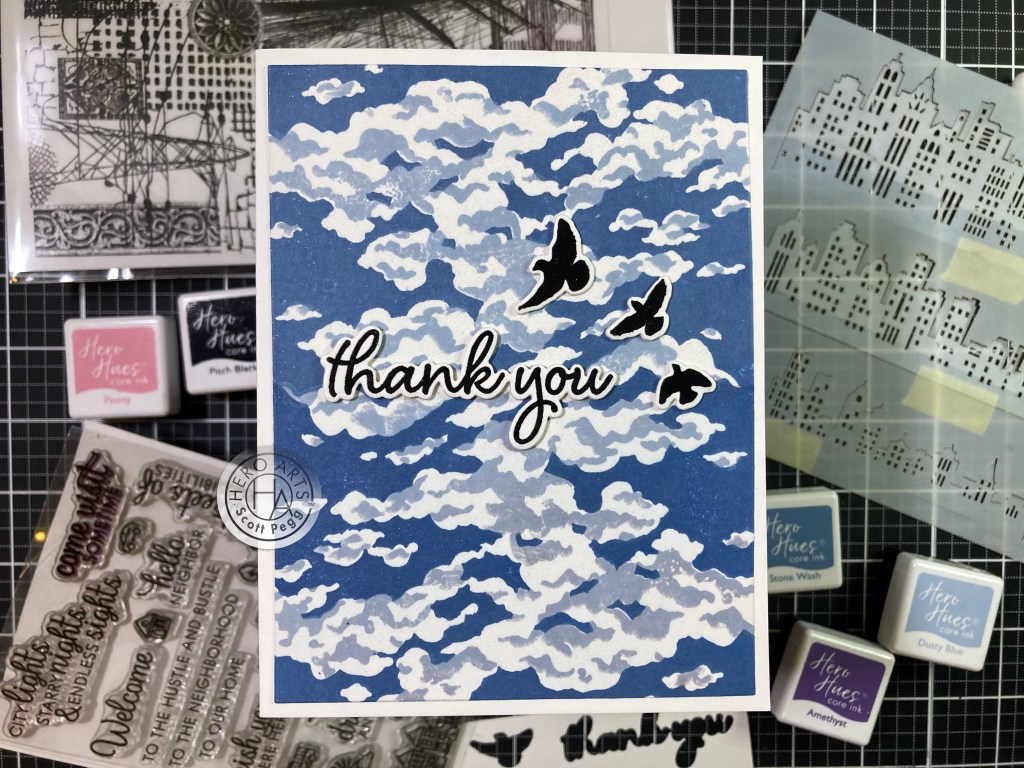
I really like this one. On an A2 panel of White card stock I stamped the 2 cloud stamps moving the clouds right up to the top edge of the panel (with Stone Wash and Dusty Blue inks). Then I rotated the panel and did the same on the bottom edge (now top) edge. I did try to pay attention to any overlaps in the center, but was able to avoid anything unseemly. Though the bottom clouds are technically upside-down, it’s kind of hard to tell – just a bunch of clouds!
I stamped the sentiment and birds on 110# card stock with VersaFine Onyx Black ink, embossed them all with Clear embossing powder and die-cut them out with the matching dies. Gotta LOVE those sentiment dies! I die-cut two blanks for the sentiment and one blank for the birds and glued them all together. I trimmed the cloud panel to 4″ x 5.25″ and added some Sheer Shimmer Spritz for some overall sparkle. I glued the panel to an A2 White card base and the sentiment and birds to the card front. ALMOST a one-layer card! Feels very Johnathan Livingston Seagull to me!
My eyes wandered over to the City Stencil and I wondered how I could make the windows appear on the inked-in silhouettes of the buildings… I guess you could use embossing powder, or gel or paste… but can you use the knock-out parts of the stencil to help ink-blend a sky around the building outlines…? So many questions…!

On an A2 panel of White card stock, I secured the knock-out part of the largest skyline down to the panel and blended in the sky above with Peony, Amethyst and Pitch Black inks. I had decided to use White Embossing powder for the windows, so I don’t worry about getting ink in the window parts of the stencil. Once the sky is inked in, I add the open stencil to the window stencil and pounced VersaMark ink through the windows, and embossed them with White embossing powder. Then I remove the knock-out window stencil, and ink blend the buildings using HA Contour ink (that’s the lightest Grey ink I own).
I repeat the same for the lower buildings without having to blend in the sky – darker ink will cover over any extra Contour ink down below. I used C&9th Dove ink for the front buildings after embossing the windows in White. I trimmed that panel down top 4″ x 5.25″ and added a thin black mat before gluing them down to an A2 White card base. I stamped the sentiment on some 40# vellum using VersaFine ink and embossed that with Clear embossing powder.
I fussy-cut the sentiment and glued it to the front of the card with small dots of liquid glue. I added some stars in the sky with a White gel pan and stamped the sentiment on the inside using the Pitch Black ink. I like being able to use the knock-out stencil to blend in a sky, and the White embossing powder worked really well through the window stencils. Another one-layer card!

Trying to figure out how to use those stencils hurt my brain a little, so I turned to the Neighborhood Message stamp set!
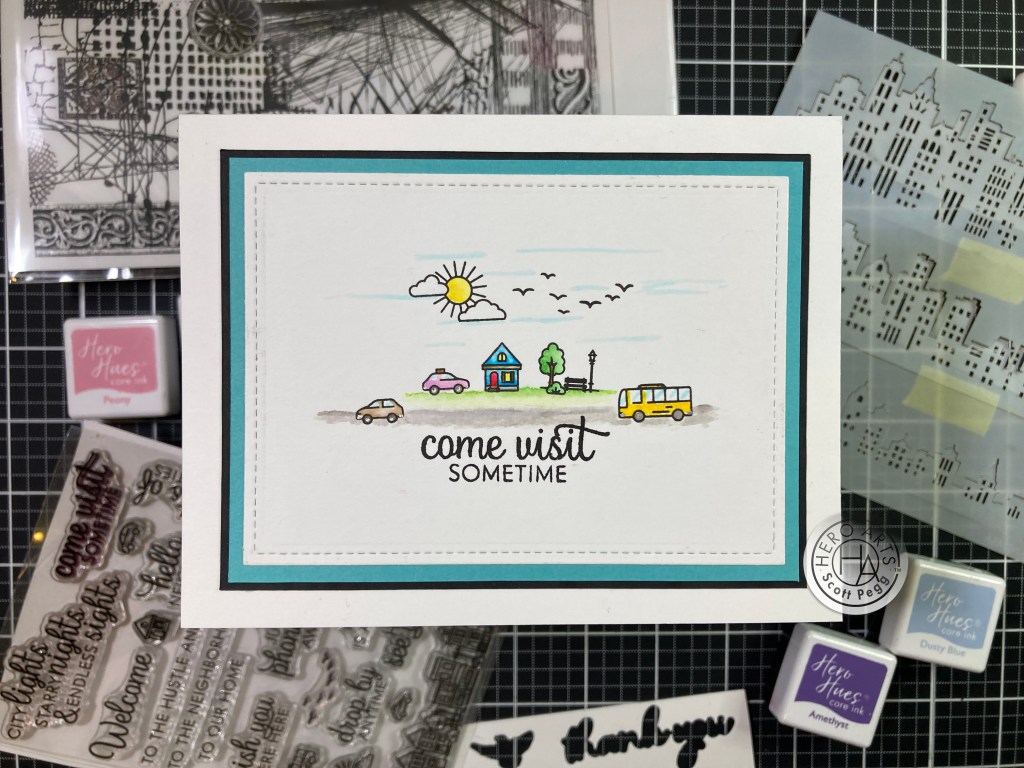
I arranged and stamped all the individual images using VersaFine ink on Bristol Smooth card stock and colored them all with my Zig Clean Color Real Brush markers. A pleasant little scene highlighted with some silver gel pen on the tires and bumpers of the vehicles. A simple suggestion of a road and lawn pulls the whole scene together. Those are some TINY images to color… makes me a little wary of the big stamp with 6 buildings !
I die-cut the water colored panel with a Lawn Fawn Stitched Rectangle die (4.5″ x 3.25″) added a blue mat (4.75″ x 3.5″) and a thin black mat (4 7/8″ x 3 5/8″) and glued those to a White card base. Lastly, I stamped the sentiment with Pitch Black ink. This uses all seven of the small individual stamps in this set and I love the bucolic scene this suggests!
That was a nice break, but I started thinking about using the stencils for an actual Black silhouette of a city skyline.
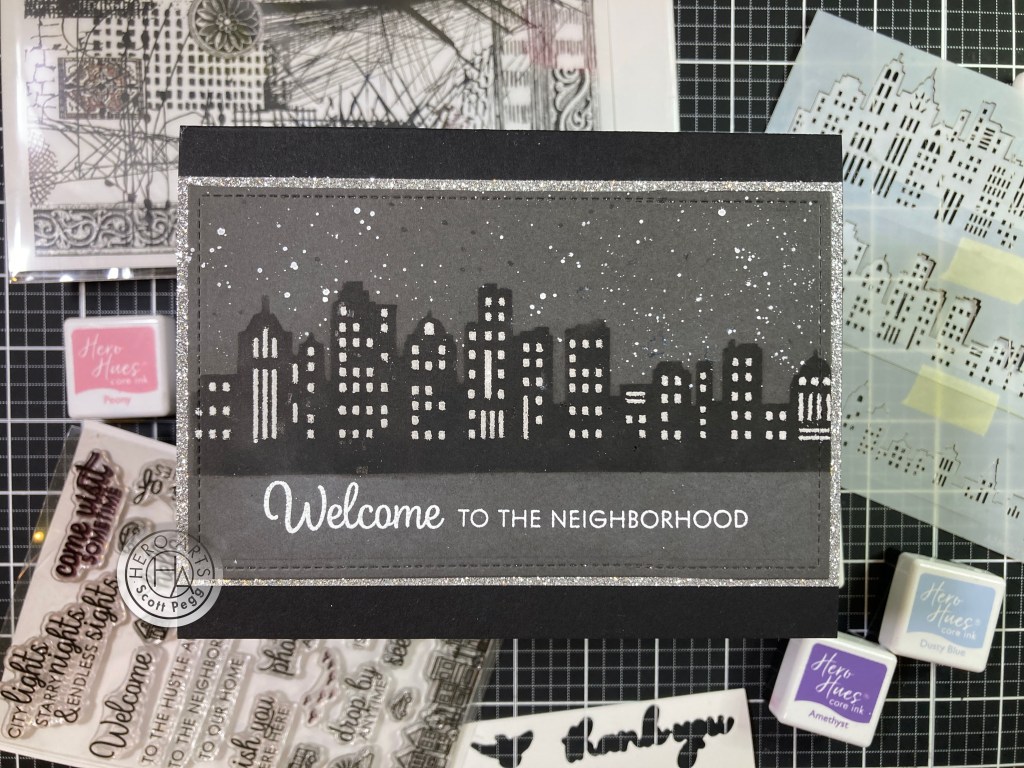
On a panel of Grey card stock I stenciled in the medium skyline using the Pitch Black ink – I reversed the stencil for a different look. When that was dry, I pounced VersaMark ink through the windows and embossed them with White embossing powder. After heat-setting I replaced the stencil and spattered some stars in the sky using some Doc Martin Bleed Proof White opaque watercolor.
I stamped the sentiment using Unicorn White ink and embossed that with White embossing powder. I used another LFSRdie and did some partial die-cutting to adjust the shape of the panel to 5.25″ x 3.25″. I was having a hard time figuring out how to use the metallic paper in this kit and figured that the Silver Glitter card stock might add a nice sparkle to this night-time card. I cut the glitter card stock to 5.5″ x 3.5″, glued it to the back of the die-cut panel and then down to an A2 Pitch Black card base (plenty of uses for THAT card stock!). I like this a lot – pretty simple to accomplish and I really like the black/white palette.
And then there’s the rub-on sheets – LOTS of Urban motifs there but I am a little thrown by the ships’ mast and rigging?? Regardless, the rub-ons will provide us with a perfect background for a multi-media card!

I cut out a card-sized panel of the rub-on sheet from the bottom right – that puts the ships’ mast on the mid-left of the card where I planned to put the telephone pole. I rubbed that onto an A2 panel of Ivory card stock. I used some texture paste through one of the stencils on the bottom right (you can see some window shapes down there, and when it was dry, I used some watered-down Distress Oxide Frayed Burlap ink to give the paste a little color, and added a little of that over the whole background for a little color variation – the rub-ons took the watercolor ink just fine!
I wanted a little more variation on the stencil, so I added some Gold Treasure Metallic Gilding Polish on the bottom right as well… adds some great shine to the grunge! When everything was dry, I die-cut the panel with a HA Rounded Rectangle Infinity die, and lightly sanded the edges for a little more distress. I stamped the pole on more Ivory card stock and extended the stamp to make the pole longer – it’s actually 5 1/8″ long (you can see the tiniest little jog on the pole where I added length). I die-cut the pole doing partial die-cutting to adjust for the added length.
I added some black bakers twine to the pole for the cables (keeping them hanging from the bottom no matter how wrong it is!) I attached the telephone pole to the card front with foam tape arranging the cables front and back. I glued the ends of the twine around the back edges of the panel and glued the panel down to a Kraft card base with the corners rounded. I stamped the birds on more Ivory card stock with VersaFine ink and embossed them with clear embossing powder before die-cutting them out. I picked two of the birds to add to the wire and foam taped them to the card front with spots of glue where they sit on the twine.
Finally I stamped the sentiment on more Ivory card stock and embossed it with clear embossing powder, then die-cut it with an old Spellbinders Deckle Edge die. I distressed that with more of the Frayed Burlap Distress Oxide ink and some Pitch Black ink and added it to the card front with more foam tape. Finally I added the “hello” stamp to the left side with VersaFine Onyx Black ink embossed with Clear embossing powder. Classic example of a multi-media card! I love the three-dimensional quality of the birds and telephone cables and the rub-ons worked perfectly!
I was thinking of ways to make those window stencils work, and thought an old ink-resist technique might work.

I wanted to use the clouds with the stencils this time, but I wanted the clouds to feel softer, so I stamped the first cloud stamp a few times using a blending brush to add Dusty Blue ink to the stamp. Nice and suggestive instead of hard stamped edges. I pounced VersaMark embossing ink through the two window stencils (lighter on the back buildings and more on the front buildings) and let that dry completely – the VersaMark ink should grab color differently than just the paper. I stenciled the buildings using Contour ink and Dove ink – sure enough the embossing ink grabbed more of the color and gave a really nice suggestion of the windows… all very soft.
I trimmed the panel with a Rounded Rectangle die and the mat with the next larger die, and glued those to a White card base. I stamped the sentiment with VersaFine ink and embossed it with clear embossing powder, and stamped the birds from the Neighborhood set with Pitch Black ink. Kind of a grey day in the city here, but I like the softer nature of everything – especially the light suggestion of clouds.
I guess it’s time I bit the bullet and tackled that Neighborhood stamp with six buildings…

Stamped on Bristol Smooth card stock with VersaFine Onyx Black ink and colored lovingly with my Zig markers. I do like the white house at the end of the block! Sentiment stamped and embossed. Panel cut with a LFSRdie and matted with black before gluing to an A2 card base. This stamp is terrific if you take the time to do some detailed coloring!
A couple puns occurred to me as I was working on these cards and I thought I’d see if I can make them work…

Another simple black and white card but I love the irony here… the lines are down so I haven’t called, but I thought snail mail might be a better way to communicate… makes me giggle. Very straight forward here – Pitch Black ink on Neenah White card stock, Printed sentiment using my Silhouette Software and the Smoothie Shoppe and the Bai Tamjuree fonts. Die cut with LFSRdie and some sparks drawn in with a Pigma Micro pen. Yes, my telephone lines are still hanging below but I figured once I went there, I should just keep going! Great card for checking in with a friend!
I combined a few techniques for this last card and also modified the stamp just enough to give me a pun!

Makes me laugh! I did the cloud stamp on a panel of Bristol Smooth card stock using a blending brush to add ink and then I stamped the street stamp in a curve to create our “hill”. A simple rainbow palette for the houses colored with my Zig markers. I printed the sentiment using the same fonts and added the single house below. The panel is trimmed to 3.75″ x 5″ and matted on Green and Black card stock and down to a White card base. That street stamp is 3.75″ long so curving it like this helps it fit on a portrait oriented card just fine! Again… I really like the soft clouds!
And that concludes my ten cards made with the first ever Hero Studio Card Kit of the Month! I am pleased to see this first round of subscription options with the new Hero Studio and am thrilled with this wide assortment of cards!
I am sorry this is coming to you so late in the month… I received my kit a little later than usual and I also spent a week in Kansas celebrating my Mother’s 90th Birthday! She is doing well and we had a whole week of celebrations!
This kit is still available at Hero Arts! If I’ve given you any inspiration on how many ways you can use this kit, you can still grab one for yourself! Please use my links below when you go shopping at Hero Arts – it doesn’t cost you anything extra and it really helps support this page and my YouTube channel. Thank you!
Hero Studio Card Kit of the Month June ’24: http://shrsl.com/4lcln
As always I am thrilled that you choose to spend a little time with me here, and I hope you enjoyed what I was able to come up with this month! Remember to click the “like” button at the top of this page, let me know what your favorite cards are, and be sure to share this on your FaceBook, Pinterest, and Instagram pages. Please, don’t run with scissors, and I send you and yours Love and Light and Happy Crafting!!
DISCLOSURE: This site contains some affiliate links to products. I may receive a commission for purchases made through these links (at no cost to you). Thank you!
