
Hello Folks! Scott here with a new batch of ten cards inspired by the My Monthly Hero November 2023 Kits! More holiday cheer is headed our way this month with jam-packed kits featuring mail art, rub-ons, stencils and more!
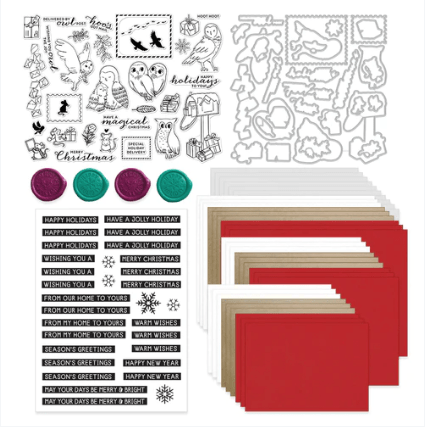
CLASSIC KIT INCLUDES:
• Mail Art Clear Stamp Set, 6″ x 8″
• 28 Coordinating Dies
• 2 Postage Stamp Frame Fancy Dies
• 1 Sheet of Message Hero Transfers, 6″ x 8″
• 27 Assorted Envelopes in Red, Kraft and White (A1, A2, A7 sizes)
• 10 Sheets of Blank Washi Sticker Paper, 6″ x 6″
• 4 Wax Seal Stickers
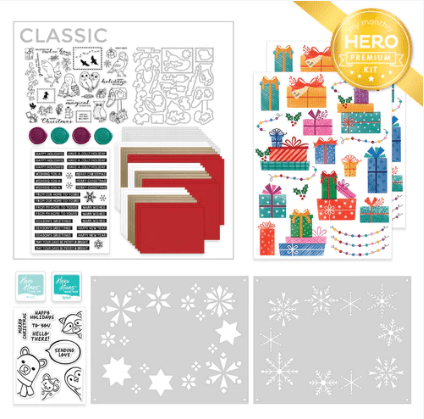
PREMIUM KIT INCLUDES:
• Everything in the Classic Kit AND…
• Peeking Critters Clear Stamp Set, 3″ x 4″•
• 2 Color Layering Snowflake Stencils, 5.25″ x 6.5″
• 2 Sheets of Gift Hero Transfers, 6″ x 8″
• 2 Ink Cubes (Pool Party Reactive Ink, Mist Core Ink)
As usual, I’ll make my first five cards using just the Classic Kit, and will bring in all the goodies for the rest. I don’t think I have ever seen blank sheets of Washi Tape before…! My first instinct was to stamp one of those sheets with a full pattern background stamp. This is a Love From Lizi Candystripe Background Stamp and the Hero Hues Crimson Core ink. You know, I can be very literal sometimes… and figured this could be cut into strips… like washi tape!

I was really looking forward to doing some coloring with this kit…! When I get a stamp set with lots of smaller images, sometimes my mind starts thinking of scenes… combining smaller images together for something a little bigger!

I thought this pair of owls fit on the mailbox perfectly, so I stamped them both with HA Intense Black ink (very simple straight line mask to disappear their tails) and colored them with my Spectrum Noir Alcohol markers.
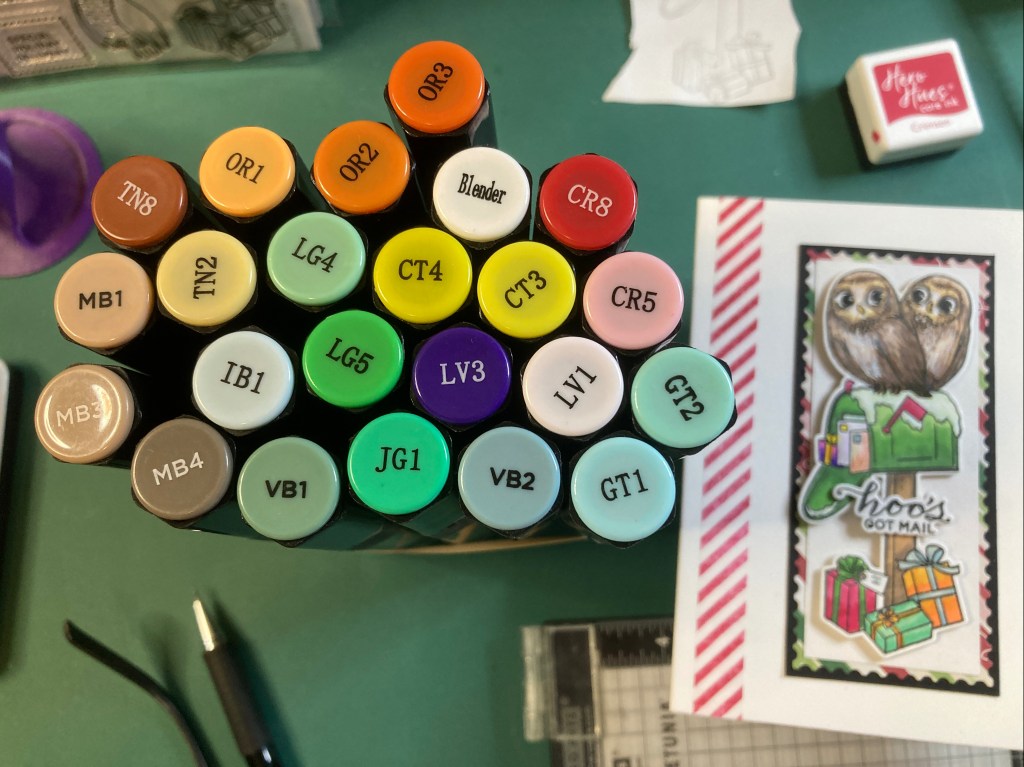
Here’s a quick shot of the colors I used… I did add some texture to the owls with a white gel pen, and used some colored pencils for the letters in the mailbox and some blending on the owls.
I did some partial die-cutting to keep the owls and mailbox together – there’s a pretty straight line where the stamps intersect so the die-cutting was pretty easy.
I cut a scrap of White card stock to 1.75″ x 4.25″ to go behind the mailbox and took the large stamp die in the kit and (partially die-cut) it twice with some striped pattern paper – giving me (appx) a 2″ x 4.5″ “mat” to go behind the white, then cut a 2 1/8″ x 4 5/8″ black mat to go behind it all. I attached the mailbox on top with foam tape and glued all to an A2 White card base.
I stamped the sentiment on a scrap of White card stock with Intense Black ink and embossed that with Clear embossing powder. I die-cut that with the matching die along with three more “blanks” and glued them all together for a nice chunky die-cut sentiment. I glued that to the mailbox post. Two half-inch strips of my stamped washi tape finish out the front of this card. That red-and-white diagonal stripe has echoes of “air mail” or “international” postage. Nice touch! This would be a fine Christmas card but could also be used for a (winter) birthday as well… I didn’t specify…!
I did think it was funny to have Owls and Mice in a stamp set together… talk about predator and prey!! I gamely resisted all my darker instincts, and vowed to keep the holidays cheerful and light and avoid any carnage!

More stamp combining here! I did do some careful masking for this group – I stamped the mouse w/heart first (Intense Black Ink on Bristol Smooth card stock) cut a mask for his bottom, feet and tail, and then stamped the package underneath him. I masked off the left side of the package (easy!) and stamped the mouse w/bow. Then I stamped the dashed-line box with HA Crimson ink – lining it up with the aid of the stamp die. I colored all with my Zig Clean Color Real Brush markers adding a bit of horizon and sky as well. Then I stamped and embossed the “Special Holiday Delivery” and die-cut the whole image with the square stamp die.
I stamped the sentiment in a scrap of White card stock and embossed it with Clear embossing powder. I die-cut the sentiment and three more “blanks” and glued them all together. I love this piece of pattern paper (3.5″ x 5.5″) from my stash, and I used a scalloped heart border punch on the two edges. I glued that down to the center of a White A2 card base, glued the sentiment flat to the card front and added the “stamp” with foam tape. Finally I took a little fimo clay heart and glued it over the stamped (black) heart above the mouse’s head. Adorable little scene!
Then, of course, there’s the Mom and baby owls… I couldn’t resist them and wanted to give them a bit of a perch…
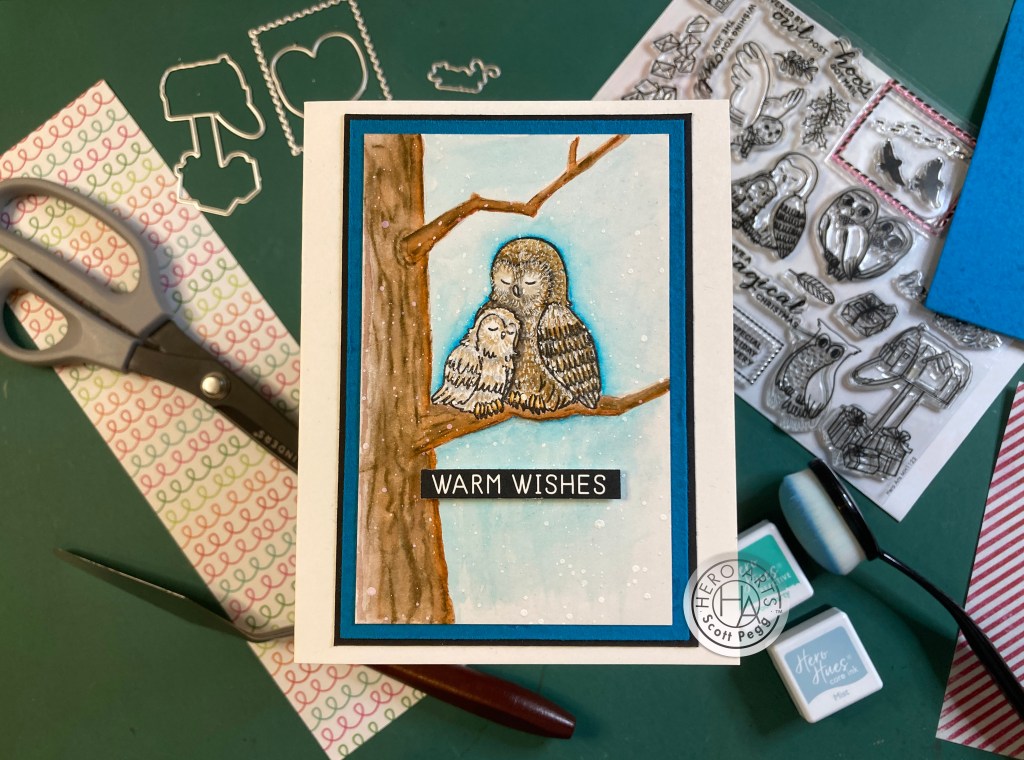
I stamped the pair (Intense Black ink) on some Bristol Smooth Card stock, and lightly sketched in a tree for them. I painted all with my Zig markers giving the owls a little blue “halo” for emphasis, and using a white gel pen for some texture and highlights. I lastly spattered some snow all around using last month’s Super Opaque White Acrylic spray. When everything was dry, I trimmed the painted panel to 3″ x 4.75″, added a blue mat (3.25″ x 5″) and a thinner black mat and glued them all down to a White A2 card base. The sentiment is rubbed-on to a scrap of White card stock and trimmed to size – attached to the card front with foam tape. Love this very painterly approach to these cuddly owls!
Instead of the natural Owls vs. Mice conflict, how about an expression of solidarity? Or maybe even love??

This tickles me! Again, both images are stamped with Intense Black ink on Bristol Smooth Card stock and colored with my Zig markers. I thought the “Wishing you OWL the joy” sentiment was a bit clunky… Wishing you all the BEST… yes… but I’ve never heard anyone wishing you all the Joy. So I excised the “owl” away from the rest of the sentiment and stamped that below our images. Then it was a simple matter of printing “my love” using my Silhouette Software and the Arial Rounded MT Bold font. (I got that slightly off-center… the glitter heart to the left helps!) and printing that on the colored panel before cutting.
I die-cut the image with a Tonic Studio Scalloped Square Layering Basics die, (2.5″ x2.5″) matted that on a piece of red dotted pattern paper (3 1/8″ x 3 1/8″) and a thin (3.25″ x 3.25″) black mat. I masked off an inch on each side of an A2 card front and blended the SSS Falling Hearts Stencil with Crimson ink down the center. I defined the edges of the stenciling with some Love From Lizi Red Glitter peel-offs. I attached the matted artwork at a jaunty angle using Foam tape, and added the two LFL Red Glitter hearts. The owl seems slightly embarrassed here… or he’s just resisting the urge to eat!!
The one big flying owl in the stamp set is wearing a scarf… seems everyone takes that to be a Gryffindor scarf and the owl to be Harry Potter’s Hedwig. Okay!

I stamped the Owl, the package, the feathers and the envelopes on some White card stock using HA Soft Granite ink. Since Hedwig is a White Owl, I colored everything very lightly with colored pencils – I added a lot of feather detail to Hedwig’s wings and, of course, colored the scarf in Red and Gold. I die-cut all the images using partial die-cutting to keep the owl and package together. (The trail of letters suggests the Weasley’s accident-prone Errol!) I cut a panel of Pitch Black card stock to 5.25″ x 4″ and spattered some stars on that panel using the Super Opaque White Acrylic spray from last month. I glued that down to a White A2 card base.
I grabbed the castle die from the MMH August 2019 Kit and die-cut that in some dark grey card stock – extending that to 5″ wide and adding some Ivory card behind the windows. The moon is created using the Tim Holtz – Stampers Anonymous Moon Mask Layering Stencil on light grey card stock inked with the Soft Granite ink and die-cut with a HA Nesting Circle Infinity die. I glued the moon and castle flat to the card front – adding the owl silhouette stamp over the moon. I stamped the sentiment with HA Unicorn White ink and embossed that with White embossing powder. Finally I added all the die cuts with foam tape. VERY Harry Potter! To keep this in the realm of a Holiday card, I did stamp the “Have a Magical Christmas” sentiment on the inside of the card. Perfect for ANY Potter-head!
That’s five cards using the Classic Kit… there are more stamps in this set, but I almost covered them all! Now we can dig into the Premium supplies! My eyes immediately went to the Layering Snowflake stencils.

I wanted to feature the entire stencil, so I cut a piece of Neenah Solar White card stock to 5.25′ x 6.5″ to match the stencil and used the Mist Ink for the first (open) layer and the Pool Party ink for the detail layer. I also ink blended the Mist ink around the edges of the panel. Quite simple stencils actually, but VERY pretty results (even though there IS an eight-pointed snowflake (sacrilege!) on the bottom left). I couldn’t bring myself to lose any of the snowflakes so I decided to make a 5″ x 7″ card with this. I trimmed an eight of an inch off the top and bottom to get it to 5″ and since I started with a 6.5″ piece of card stock, I decided to leave it at 5″ x 6.5″ – it fits the A7 envelopes just fine! I glued the inked panel to a 5′ x 6.5″ card base.
I don’t have a lot of large sentiment dies, so I went digging through my stash and found this old LFL Winter Wishes Die! I die-cut the sentiment from some Tim Holtz Metallic Jewels Kraft core card stock and glued it into place. For some sparkle I grabbed the Snowflake Sequins from the MMH November 2022 kit and glued those to the centers of the snow flakes and around the sentiment. These sequins are extra shiny and give this card some terrific sparkle!
I does appear that the folks at Hero Arts have gone a little “peeking critters” crazy this season… they are a big feature in the Christmas release catalog and this is the second month we’ve gotten “peeking” items in our kits!

And here’s a perfect way to use all those “peeking” stamps on one card! We do have A1 envelopes in our kit, so I decided to do a Thank You card sized at 3.5″ x 4 7/8″. This size card is most often used as an RSVP or reception card, so I thought a Thank You card was right in line with that. I cut a piece of Bristol Smooth card stock to 2.5″ square and stamped our four peeping toms around the edges. I colored all with my Zig markers again and used a white gel pen for some highlights and texture. I added a 2. 5/8″ mat of white behind the colored panel and a 2.75″ mat of black behind that.
The “Thanks” stamp is from the Lawn Fawn Big Scripty Words stamp set and the “from all of us” sentiment is from the MMH October 2021 Kit. I stamped those both on the card front using Intense Black ink and glued the painted and matted panels flat to the card front. A few Black gems adds a touch of sparkle to this fun Thank You card. From All Of Us!!
As if the rub-on sentiments in the Classic kit weren’t enough, we also get a big batch of rub-on presents with the Premium Kit! I feel another pun coming on…!

And a hearty giggle from me!! In order to carry out this big idea (without wasting any rub-ons!) I decided to run a copy of the rub-on sheet (just in black and white) and roughly cut-out all the presents to help me arrange them on the card front. The rub-ons give you lots of flexibility in arrangement – the second from the left stack of two presents on the bottom is actually two single presents stacked on top of each other – I just cut the bow off the bottom present! Once I decided on an arrangement I started rubbing-on the presents to an A2 card front – left-to-right, bottom-to-top. Really terrific, bright, cheerful, joyfully colored presents!
I printed the sentiment on a scrap of White card stock using my Silhouette Software and the Dream State font (22pt.) and die cut that with a Lawn Fawn Everyday Sentiment Banners die. I glued that to the card front and added two sprigs of rub-on holly to frame it out. 17 gifts seems like quite a haul! The colors are so fun I decided that no sparkle was required! I did stamp the “Happy Holidays to You!” sentiment on the inside to complete the card. LOVE this pun!
Now I’ve actually used a little bit of everything in this kit… but we still have two cards to go… in my never-ending quest to use every stamp in a stamp set, my eye stopped at the horned owl stamp – this stamp seems like it was drawn by a different person – the other owls seem like they are striving for a sense of realism, but the horned owl stamp seems a little cartoony. Let’s embrace that and see what we get…

A little reverse stamping, some unexpected colors and another Owl pun makes for a cheerful Valentine! Using a silicone mat, I reverse stamped the owl on the left on some Bristol Smooth Card stock and stamped her buddy (normal stamping) next to her. I colored both in some fun colors using my Zig markers and used a white gel pen for some texture. I thought it would be fun if they were standing on the sentiment banner, so I created the “owl you need is love” sentiment using the Owl stamp from the kit and printing the rest exactly like the “owl my love” card. I die-cut that with another LF Everyday Sentiment Banners die.
I fussy-cut the owls and trimmed out their talons and their wings so I could tuck the banner in behind them. When in place, I glued them together. I die-cut a panel of White card stock to 3.75″ x 5″ with a Lawn Fawn Stitched Rectangle die and dry-embossed that with an old Darice Diagonal Hearts embossing folder. I glued that to a 4″ x 5.25″ mat of Dotted Pink card stock and glued those to an A2 White card base. I die-cut a heart from the same Pink patter paper using a HA Nesting Hearts Infinity die, and glued that on the card front. I added the owls and banner with foam tape and sprinkled in a few heart shaped glitter pieces among the sentiment. Fun pun and a charming valentine!
I do like using Deco-foil (and Transfer Gel) with stencils, (FOILING!!) and I was interested in seeing how much of the snowflake stencil I could get on a normal A2 card.
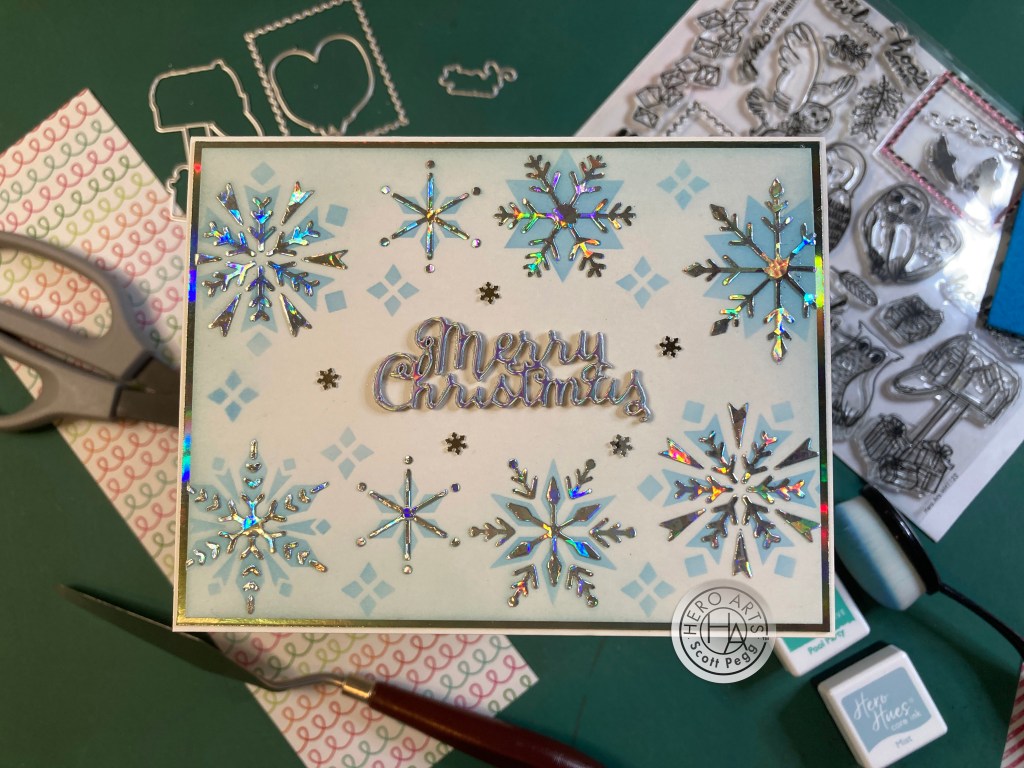
I simply used the two long sides of the stencil – masking off the center snowflakes on both of the short sides. I ink blended the Mist ink through the first (open) stencil, and then used Deco-foil Transfer Gel through the detail stencil. I did have to do one half of the card at a time – using a palette knife to spread the gel on the top snowflakes, letting that dry, and then doing the same on the bottom snowflakes and then letting them dry before sending the whole panel through my laminating machine with Silver Shattered Glass Deco Foil. Came out spectacularly! I did add a little ink blending around the edges with the Mist ink as well.
I found this die-cut sentiment in my stash and die cut it from a variety of mirrored and holographic card stocks. I finally settled on this holographic card stock because it made rainbows like the foil. Not wanting to waste anything, I glued all my trial die-cuts together and glued the chunky sentiment to the card front. I added a holographic mat behind the card front and glued all down to an A2 card base. A few more Snowflake sequins adds to the overall sparkle and shine! Sometimes I have to remind myself how truly glorious foiling can be!
Now I am not a big envelope decorator… I fear too many of my cards end up in the trash, so I figure the chances are even better that most envelopes end up in the trash! However, we did get a lot of envelopes in this kit and those did inspire me to make some out-of-the-ordinary card sizes this month… here’s some simple card decorationsI did for the three envelope sizes provided.

The A2 envelope sports the candy stripe washi tape on the flap like the first card… The A1 envelope has the peeking bear to go along with the A1 thank you card… the A7 envelope has some stenciled snowflakes like the Winter Wishes card. The teal Wax Seal sticker would work on this envelope! Cute, and certainly eye-catching, but I figure I’m doing well just to get the correct address and postage on an envelope!!
That wraps up my 10 cards suggested by the My Monthly Hero November 2023 Kits! Seems I really got into some watercoloring this month! and we even got some good puns here as well!
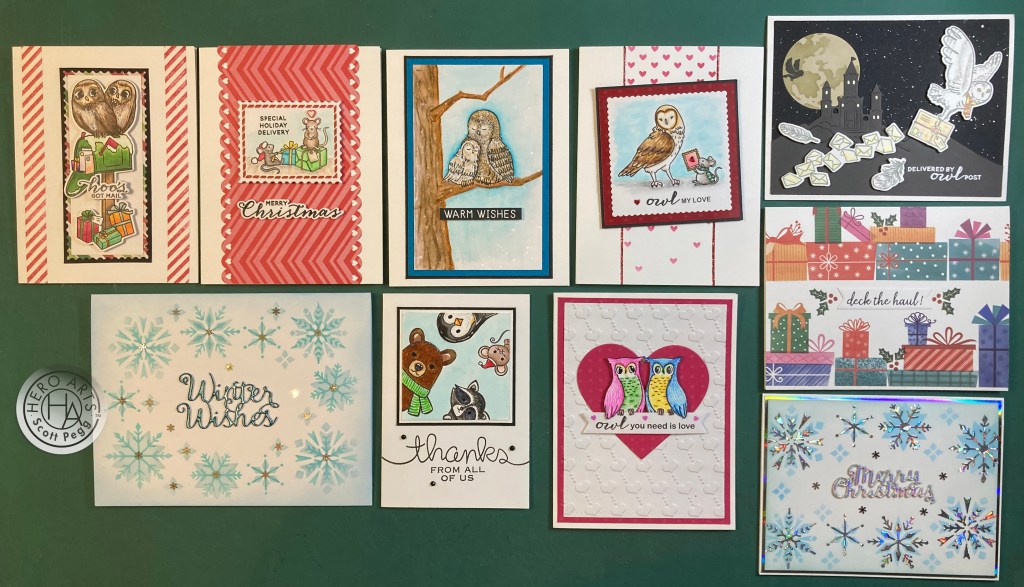
I almost used every stamp in our two sets… there are SO MANY stamps in this kit! I used some of the washi sheets and one of the postage stamp frame dies and one of the rub-on sentiments and some of the envelopes (all those envelopes will certainly get used!)… and the critters and the stencils and the transfers and the inks… Interesting Owl theme here… don’t think I have many owls in my stash…! I really like the snowflake stencils and all the rub-ons! We’ve got a good many holiday cards here and a couple of valentines and even a thank you card… nice variety for a holiday kit!
These kits are still available at Hero Arts… looks like the Premium Elements option has sold out but the kits are still available! If you like what I’ve done with this kit, or have ideas of your own, I would recommend grabbing a kit for yourself before they all sell out! Please use my link when you go shopping at Hero Arts… THANK YOU!!
My Monthly Hero November 2023 Classic Kit: http://shrsl.com/4b9ug
My Monthly Hero November 2023 Premium Kit: http://shrsl.com/4b9ui
My Monthly Hero November 2023 Full Collection: http://shrsl.com/4bad5
Thanks so much for sharing some time with me here today! Your encouragement and support means the world to me! Please take some time to Like me, List me, Pin me, Post me, Share me with all your friends (and enemies!!) remember… Don’t run with scissors…! and, as always, I send you and yours Love and Light and Happy Crafting!!
DISCLOSURE: This site contains some affiliate links to products. I may receive a commission for purchases made through these links (at no cost to you). As an Amazon Associate I earn from qualifying purchases. Thank you!

Hi Scott! Your cards are so different from each other, nice variety! I especially like the retro vibe of the “Owl you need is love” card. Other favorites include the snowflake cards and the “delivered by owl post” card. Very nice!
LikeLike