
Hello Folks! Scott here! Back from a lovely vacation to find the My Monthly Hero October kits waiting for me! This month, we start looking ahead to Christmas and a snowy night in the forest! Big window (and sentiment) dies, and fun stamps highlight this collection.

CLASSIC KIT INCLUDES:
• 3 Large Scene Fancy Dies
• 4 Fancy Word Dies
• Swirl Snow Clear Stamp Set, 3″ x 4″
• 4 Sheets of Pitch Black Cardstock, 5.5″ x 8.5″
• 4 Sheets each of White, Slate, Winter Blue & Frosted Blue Cardstock, 5.5″ x 8.5″
• White Acrylic Spray, 1 oz.
PREMIUM KIT INCLUDES:
• Everything in the Classic Kit AND…
• 3 Mini Peeking Fancy Dies
• Nordic Layering Clear Stamp Set, 4″ x 6″
• 20 Vellum Snowflakes

We get a huge stack of card stock in the Classic Kit, so I figured I’d dive right in and use the Large Scene Fancy Dies and the provided card stock for my first card this month. As usual, I’ll make my first five cards using only the Classic Kit!
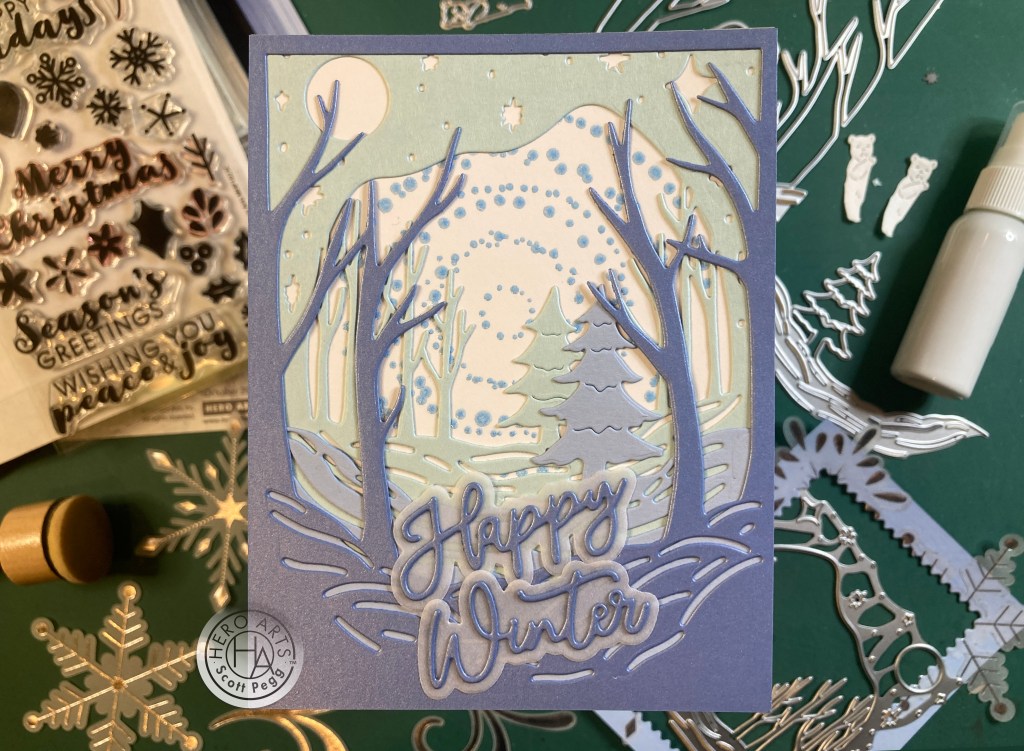
I cut a piece of the Frosted Blue card stock to 4.25″ x 5.5″and die-cut the largest fancy die (with the big trees) from that. I cut a piece of the Winter Blue card stock to 4.25″ x 5.5″ and die cut the second fancy die (just the tree and ground) from that. I did line up that die with the first die cut to make sure it was properly exposed, and that the card stock went to the bottom of the card – to provide color behind the “snow drifts” on the first die cut. Now, colors should get lighter the farther away they are, so I grabbed an A2 piece of Hero Hues Arctic card stock and die-cut the third fancy die (with trees and sky) from that – again making sure it was positioned correctly behind the other die cuts and went all the way to the bottom of the card front. Those three Fancy Dies work together wonderfully!
On a White A2 card base I stamped the Swirl Snow stamps with Embossing and Watermark ink and embossed those with Glacier Blue embossing powder (from the MMH Oct. 2020 kit!) (really good match to the Winter Blue card stock). I did add the stamp of the single line of snow to the right and left of the Swirl Snow stamps (curved to match) to fill in the background. I die-cut the sentiment from the Frosted Blue card stock and its shadows from some heavyweight vellum, and glued those together. I glued the big die cuts directly to the card front and added the die cut sentiment towards the bottom. I think it’s really interesting how the Swirl Snow stamps and the Fancy dies work together to really “draw you in” to this chilly winter scene.
I have to admit that the third Fancy die (trees and sky) gave me a little pause… there’s a window opening around the trees, but then there are the stars and moon die-cut into the top part of that window… so which part is actually the sky…!? I know… I know, I can be so literal sometimes…! I decided to dig through my stash hoping to find some White glitter card stock to piece into the moon and stars cut-out openings…

While digging through my stash, I came across this amazing Black Glitter card stock – this was from the Jan. 2021 MMH kit – that most popular “bee” kit! I thought it would work perfectly with that third fancy die. I cut that to 4.25″ x 5.5″ and glued it to an A2 card base. I cut a piece of the Slate card stock to 4.25″ x 5.5″ and die-cut the fancy die from that – positioning it so there would be plenty of room for the sentiment on the bottom.
The Fancy Word die is cut from the same glitter card stock, and I did some partial die-cutting on the two shadow dies to give me a single shadow for both words. I glued the glitter words to the vellum shadow and added that to the front of the card. For a final touch, I added some small red and blue crystals to the tree for a little touch of Christmas bling. This die is probably “the die most likely to be used alone” from this set, and I almost don’t mind the little sky confusion when it’s used this way!
Of course I decided I could simply cut away the faux “sky” on that die and only use the trees and the landscape!
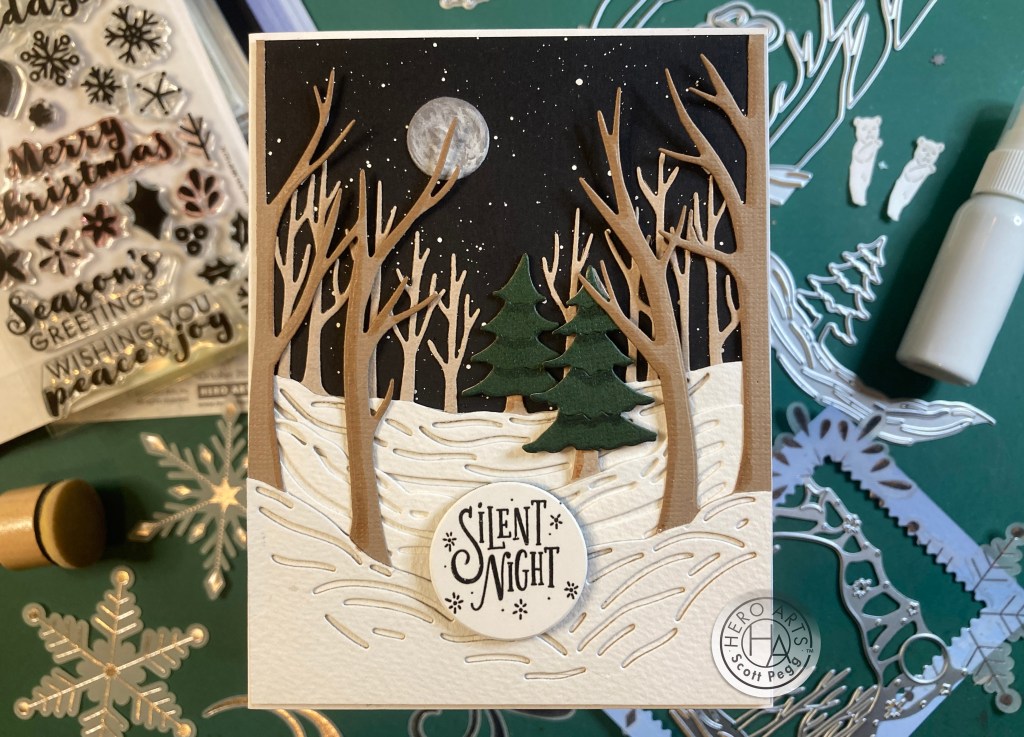
I die-cut the bottom (ground) part of all three dies from some multi-media card stock – again taking into account the spacing and providing color to the ground swirls. Then I paper-pieced all of the trees from some browns and green card stock in my stash – I did cut away all the white trees and glued the brown trees behind the multi-media white. I also used a little alcohol marker on the front trees and the evergreen trees to add a little dimension.
I trimmed the whole “sky” completely away from the third Fancy die… leaving just the trees, and then die cut (and fussy-cut) more of those trees and glued those behind the snow to add some fill to the forest! I spattered a 4 1/8″ x 5 3/8″ piece of Pitch Black card stock using the White Acrylic spray, and glued all the die cut layers on top (trimming where necessary). The moon is the Slate die cut from card #2 that I painted with more of the White Acrylic Spray – just put some on an acrylic block and painted from that. Really good opacity with that paint! Nice bright white! I glued the moon in place behind all the trees.
I found this sentiment in my stash (Love From Lizi Silent Night Stamp set from November of 2019 – still available!) and stamped that on a scrap of plain white card stock, die cut it with a HA Nesting Infinity Circle die, and added that to the card front with some foam tape. A snowy night in the forest indeed! Silent Night.. Snowy Night… I really like this!
You must know by now that if we have portrait orientation dies in our kit, then I am going to figure out how to use them in a landscape orientation!

Again, sticking to the old adage that things get lighter the farther away they are, I die-cut the Fancy Dies from Pitch Black, Slate (from the kit) Hero Hues Pebble, and the background is some plain Staples Grey card stock from my stash. Using 4.25″ x 5.5″ panels of all the colors, I die-cut the black piece using the top (straight) edge of the die as a guide, and lining up the tree trunks to be on the edge. That left me nothing along the bottom of the black die cut, so I trimmed a 1/4″ piece of card stock and glued that to the bottom of the left and right trees to make the lower part of the frame.
The Slate layer was die-cut with the single tree die – this one was easy to make wider as there was no definitive 4.25″ edge cut on that die – extended that die to the right. I did the same on the Pebble card stock layer (extending the die-cut to the right) and trimming all the trees away. I stamped the Swirl Snow stamps (and three of the single line of snow stamps curved around on the sides) on an A2 panel of Staples Grey card stock with Unicorn White ink and embossed those with HA White embossing Powder. I glued all the layers to a White A2 card base.
That left me with a fairly limited space to add a sentiment. I didn’t really want a die-cut sentiment, so I went with this simple “Love You” from the HA Many Everyday Messages stamp set. I stamped and embossed that the same as the Snow Swirls, and we have a nice wintery profession of love! A simple “Miss You” would work on this card as well!
Concentric circles of snow are terrifically interesting, but what if they were a true spiral? Any difference there?

Of course! I think that’s interesting enough to feature on a card by itself! I cut the three circle stamps at the places where there was a little extra space between the dots and arranged the three of them into a spiral on the lid of my MISTI and added the straight line of snow to the end to complete the spiral. I stamped this on a panel of the Winter Blue card stock with Unicorn White ink and embossed it with White embossing powder. I ink blended Splash and Blue Hawaii Reactive ink over the spiral and added the “star” stamp (embossed as well!) right in the center.
I die-cut the stamped panel with a Lawn Fawn Stitched Rectangle die, added a thin Black mat behind, and then a thicker mat of the Frosted Blue card stock behind the black. I glued those to a White A2 card base. I grabbed this sentiment from the MMH Dec. 2022 (space cadets) kit, stamped it with Intense Black ink and embossed that with Clear embossing powder. I think the “Swirl Snow” stamps work perfectly well as stars, and the spiral really draws you in!
That covers my five cards made with just the Classic Kit… Now we can dig in to the Premium Kit supplies!

The Mini Peeking Fancy dies are quite cute (“peeking” images seem to be a big theme at HA this season!) though these three dies are really small! I thought they were a bit silly used with the Fancy Tree dies (the deer would have to be behind a tree at the edge of a card because we have no deer butt!) and they don’t particularly seem to be the same scale… compared to the deer, the fox is huge, and the bear is minuscule… So I figured they could be used peeking out from behind a sentiment label!
I die-cut another panel of the Winter Blue card stock to 4.5″ x 3.25″ with a Lawn Fawn Stitched Rectangle die and embossed that with an old Darice snowflake embossing folder, did some ink blending around the edges with Blue Hawaii Reactive ink, and then added some Unicorn White onto the top of the embossing with a small ink brayer. I added a dark Blue mat behind the embossed panel and glued those to a White A2 card base.
I stamped the sentiment on a scrap of White card stock using Unicorn White ink and White embossing powder, trimmed that to 1.5″ x 3.125″ and ink blended Splash ink over the whole sentiment. I die-cut the fox from a scrap of Ivory card stock and the Deer from a scrap of White card stock and added some color to both with colored pencils… that deer appears to be a little surprised! I added a thin dark Blue mat behind the sentiment and attached the animals to the edges. The deer would make the sentiment way too wide if he was peeking out from the side, so a corner peek seemed appropriate for him.
I die-cut more of the trees from the first Fancy Scene die from some scraps of multi-media card stock, gave them matching stitched edges with the LFSRdie, and glued those to the card front. I added the sentiment panel with our peeking critters to the front with foam tape, and finished everything off with some clear crystals for a nice touch of sparkle. I like the deer’s antlers poking up above the panel and it looks like the fox is actually holding the panel up!
The vellum snowflakes included with the Premium kit are quite beautiful, but the foiled parts are so thin and detailed that I immediately ruled out popping them up with foam tape… what if we could just glue them directly to the card?

I began by stamping the sentiment on a panel of the Winter Blue card stock using Embossing and Watermark ink and embossed that with HA Silver Embossing powder. Using a Zyron Sticker maker, I covered the back of the four snowflakes with adhesive and glued them to the panel around the sentiment. There was a touch more room around the sentiment that I filled in with some of the snowflake stamps – embossing those in the Silver Embossing powder as well. I die-cut that panel with a SSS Modern Postage Stamp Rectangle die.
I die-cut some White card stock to 5″ x 3.75″ with another LFSRdie and added a thin grey mat behind. I ink blended a little shadow on the White panel with Hickory Smoke Distress Oxide ink and a matching Postage Stamp stencil. I glued everything together and down to an A2 White card base. The Silver embossing powder matches the silver foiling on the snowflakes quite nicely! Enough shine here that I felt no embellishments were required!
Nordic Layering Clear Stamp Set. Hm. Interesting… but other than the four Large sentiments, the stamps are fairly small.

I decide to soldier on with the sentiments in this set… you know I strive to use all the stamps in a set whenever I can…! Keeping with the Blue theme of this kit, I stamped the sentiment on the front of a Mini-Slimline card (3.25″x6.25″) using Splash and Blue Hawaii Reactive inks for a bit of an ombre effect, and embossed that with Clear embossing powder. Then I started building up the background stamping the four ornaments with the same inks. I stamped and embossed the ornament decorations with Silver embossing powder, and then stamped the holly and berries around the sentiment with the same blue inks.
More embossing was needed so I stamp the snowflakes with Embossing and Watermark ink and embossed them with the Silver embossing powder. I did the faintest bit of ink blending with Splash ink on the vertical sides of the card front and called it a night. Wow! This is actually, completely, and truly, a one layer card! Nice!
Most everything has been blue or grey up to this point, so I thought now would be a good time to introduce some color!

Merry Christmas was the only sentiment stamp left, so I went with red – Cherry Core ink from Hero Arts – a nice rich red perfect for pairing up with black! I stamped the sentiment on a panel of White card stock with the Cherry ink and used a small blending brush to add some Intense Black ink along the bottom edges of the text. I actually thought about cutting the words apart but there’s not enough room for that between the y and the m… a tiny blending bush worked well to give us a little ombre effect on the sentiment.
The rest of the stamps are arranged around the sentiment and stamped with the same inks. There’s actually quite a number of possibilities with how you can layer these stamps. I kept things pretty straightforward while staying true to the red and black palette. I die-cut the stamped panel with a LFSRdie, added a thin mat of Red and a thin mat of Black and glued that to a White card base. For a final embellishment, red and black gems highlight the flowers and dot the i!
The Mini Peeking Bear die initially seemed a little creepy to me… but I had a couple of them sitting on my desk and after playing with them a bit, they suggested this card to me.

Awwwww!!! I Die-cut the bears from 2 colors of the HA Colors of Earth card stock, added some muzzles and bellies with a simple white colored pencil, and glued them together. I did trim the belly on the front bear a little, giving it a bit of a curve under his arm. They are on a piece of Pitch Black card stock die-cut with a HA Tag Frame Infinity die.
I printed this sentiment on the front of a White A2 card base using my Silhouette Software and the American Typewriter font. I glued the tag to the printed card front and added the bears with foam tape. What a terrific card! “I’ve got your back” is an amazing sentiment and the bears really illustrate that with total charm! I am loving this!
And, just like that, we’re done with our 10 cards inspired by the My Monthly Hero October ’23 Classic and Premium Kits! What an interesting batch of cards this month… I first thought these all seem quite simple… why did they take me so much time…? Then I started writing about them here, and I realized there’s a lot more going on than what simply meets the eye! I think I would have to say that this is a deceptively simple – yet quite adaptable kit this month!

I do detect a theme here…!! The Large Scene Fancy dies are pretty spectacular and quite versatile as well! Large die-cut sentiments are always a great addition to your stash, and between the optical illusion of the Swirl Snow Stamps and the layering possibilities of the Nordic Layering Stamps, this is a useful collection of stamps as well! I did manage to use all of the Nordic stamps and almost all of the Swirl Snow stamps. The White Acrylic spray is terrifically opaque and the vellum snowflakes warrant another look… No puns this month but I think the snuggling bears make up for that! Let me know which cards are your favorites!
These kits are still available at Hero Arts! If you see something you like here, or if I’ve given you another, better idea, then please use my links below to grab a kit for yourself! Your support helps maintain this page and is always appreciated!
My Monthly Hero October 2023 Classic Kit: http://shrsl.com/4a742
My Monthly Hero October 2023 Premium Kit: http://shrsl.com/4a748
My Monthly Hero Premium Elements (nothing from the Classic Kit): http://shrsl.com/4a74d
Thank you so much for sharing some of your precious time with me here today. I am so appreciative and humbled by your attention. I’m sorry this post is so late this month, but my (when I say it was “much needed” I really mean it!) vacation really put me behind. I also forget how tiring traveling can be!! West Coast jet lag really got me this time! Please remember to Like me, List me, Pin me, Post me, Share me with all your friends (and enemies!)… have a safe and Happy Halloween.. Don’t run with scissors..! And as always, I send you and yours Love and Light and Happy Crafting!
DISCLOSURE: This site contains some affiliate links to products. I may receive a commission for purchases made through these links (at no cost to you). As an Amazon Associate I earn from qualifying purchases. Thank you!

Hi Scott! I love all the different ways you used the scenic dies – especially on the Happy Winter and Silent Night cards. And I really love the Reach for the Stars card, so pretty! Great variety of cards – well done!
LikeLike
Beautiful cards, Scotch TFS
LikeLike
I just love to see what’s your new Hero Arts kits creation because you always bring the best inspiration. I just wish that you can create some of the cards as tutorials, the full process. I am very thankful for your presentations.
LikeLike