
DISCLOSURE: This site contains some affiliate links to products. I may receive a commission for purchases made through these links (at no cost to you). As an Amazon Associate I earn from qualifying purchases. Thank you!
Hello folks! Scott here with my 10 Cards 1 Kit posting featuring the My Monthly Hero January 2020 Kit. This is a very unique kit from Hero Arts this month! And now for something completely different…! It seems that our “Fancy Dies” are taking the lead this month. Instead of our usual 6″ x 8″ stamp set, we get a 4″ x 6″ clear stamp set with a large assortment of useful sentiments, a small “newsprint” stamp and assorted postage icons. And ALL of our dies are Fancy this month! Nine flower and leaf dies, two butterflies, a small envelope die, a bouquet wrap die and a sentiment banner die. I have always enjoyed Hero Arts’ Fancy dies but this is the first kit I’ve received where the dies are the main event! I guess we’re going to be doing some flower arranging this month! We do get some terrific extras as well this month; eight 5.5″ x 8.5″ sheets of Card stock (Rose, Fireweed, Gold Breeze, Kraft), a half ounce pot of Pink Sparkle Embossing Powder, a vial of Aqua Glimmer Metallic Ink, and 2 yards of Pink Satin Ribbon. Lots of pink this month, but Valentine’s Day is right around the corner, so pink is certainly appropriate! This kit must have struck a chord with folks this month as it sold out almost instantaneously! Glad I’m a subscriber!
I do always challenge myself to use everything in a kit in the course of my ten cards… this stamp set has 13 sentiment stamps (not counting the “to:” and “from:”) so I figured I might have to double up some sentiments in an effort to use them all!
I decided a bouquet of roses seemed like the perfect way to kick off this new kit.

Here we have a dozen roses wrapped up in ‘newsprint’ and ready to give to your favorite valentine! I was a little intimidated by the thought of having to color 12 roses (and assorted greenery) so I dug out some “watercolor” pattern papers I had in my stash – the papers are from a huge Altenew freebie pack (Reflection Collection Paper and Sticker Sheet Bundle) I received in October of 2018 (and have never used!). I thought the watercolor nature of these pattern papers would make for some simple paper piecing – roses in the pinks and reds… stems and leaves from the green. That worked very well! I love the variety and shading the pattern paper gave to these roses… and I didn’t have to color a thing!
I die-cut a piece of the Rose card stock with a Lawn Fawn Stitched Rectangle die and embossed that with a Darice Dot Background embossing folder, matted that on a piece of the Fireweed card stock and glued those to a Neenah Solar White 110# card base. I thought I might have some newsprint paper in my stash but I couldn’t find any… but I DID find a decades old Mead Academie Sketch Pad that was showing its age quite nicely, so I decided to use that for my “newsprint” bouquet wrap. I die-cut the wrap and stamped the small text stamp using HA Soft Granite ink on all three pieces of the wrap – I didn’t realize I was going to lose the center back triangle – I folded on the score lines and glued the front flaps together, and then glued the whole wrap to the card front.
All of the roses do have green stems and sepals though they ended up mostly buried in this arrangement – it wasn’t easy to get 12 roses in there..! The roses are glued into the wrap and the buds are mounted with foam tape. I added some leaf die cuts among the buds (glued and foam taped) and used my Hero Arts Clear Lacquer Pen to add clear drops to the arrangement for a fresh, wet feel! I stamped the sentiments on the same sketch paper using HA Soft Granite ink, embossed those with clear embossing powder,  and die-cut them using the sentiment strip die. I glued the banner sentiments along the two sides of the bouquet and added a small double bow using the pink ribbon included in the kit. For a final touch I stamped the “LOVE MAIL” stamp on the inside using the same Soft Granite ink.
Well… that is certainly PINK… but it’s actually quite a lovely valentine! And no roses were harmed in the making of this bouquet. That rose bud may be my favorite die in this kit!
I toyed with the idea of using that Altenew watercolor pattern paper to die cut all the flowers this month, but my control freak asserted itself and I decided to try coloring some of the flowers.

I die-cut these flowers and greenery using Neenah Solar White 80# card stock and colored all with my Spectrum Noir alcohol markers and added then some white gel pen highlights in the centers. I die-cut a piece of my Kraft card stock (close match to the kit Kraft card stock) with a LFSRD, embossed that with an older Darice embossing folder and matted that to a thin white mat, then glued both to a card base made from the Kraft card stock in the kit.
I stamped the sentiments on white card stock using Walnut Stain Distress Oxide ink and clear embossed them both before die-cutting them with the sentiment die. I arranged the flowers, buds and leaves into a pleasant grouping, glued them together and to the card front, adding foam tape on the blooms and greenery at the top of the bouquet. I glued the top sentiment to the card front and foam taped the bottom sentiment over the flower stems. A few wood-dot embellishments (from the Love From Lizi Dec.’19 Card Kit) adds some rustic decoration and we have a cheerful yellow get well card! Some of these kit sentiments actually go together perfectly!
What will happen if we die cut some flowers from pattern paper but then did some coloring on top of that – highlights and shadows to enhance the patterns…

Paper pieced flowers from the Altenew pattern paper but touched up with some alcohol markers and a little white gel pen… I was going for “baby’s breath” with the background greenery, but I think it looks a little like broccoli! Isn’t that trendy? Using vegetables in your flower arrangements?? I didn’t realize this kit was going to be a crash course in flower arranging…! VERY interesting!
Here, I die cut the sentiment strip twice to make a 5.5″ banner and stamped the two sentiments on each end using VersaFine Onyx Black ink, and then folded the banner around the flower stems. I did add a little grey marker to the exposed back side of the banner (between the sentiments) to help it stand out before mounting it to the white card base with foam tape and glue. The flowers are glued and foam taped to the card front, and a few black heart sequins adds a modern touch of bling. I do like these flowers, though I can’t imagine going any darker with these blooms. Hey! 3 cards, 6 sentiments!
If you have followed me at all over the last few years you probably know that I am not a huge fan of butterflies… let me tell you, these could change my mind…!

I did a random Google search to see if anything would turn up looking for “blue butterflies” and lo and behold I found lots of blue butterflies  but this one is what caught my eye – it’s the same basic shape as our large butterfly die in this kit! And that Aqua Glimmer Metallic ink was just sitting there begging to be used. I die-cut the three butterflies from some HA Pitch Black card stock and painted them with the Aqua ink at full strength. WOW! Talk about bang-for-your-buck! These guys are gorgeous and have that light luminescence that real butterflies have! Groovy!
I die cut a piece of the Gold Breeze card stock with a LFSRD, matted that on a thin black mat, and glued that to another white card base. I stamped the sentiment using VersaFine Onyx Black ink and embossed that with some clear embossing powder. I mounted the butterflies to the card front with glue on their bodies and small foam squares behind their wings. Finally some blue bubbles (from the MMH March ’19 kit) for a little accent and here’s a butterfly card I would be proud to share!
It seems as if Hero Arts was trying to cover all our basic stamping needs with this stamp set and the wide variety of sentiments contained. Obviously this kit isn’t intended to be used strictly for valentines…

Perfect example of the power of white space. I LOVE this! Couldn’t be much simpler – 5 rosebuds die-cut from 80# Neenah, one colored with alcohol markers, then all 5 layers glued together. The sentiment is stamped with Hickory Smoke Distress Oxide ink and embossed with clear embossing powder. A light alcohol-marker shadow added to the card front and the layered bud glued on top of that. I think this might be my favorite sympathy card ever!
We have a “Happy Birthday” sentiment as well, but I just couldn’t do another bouquet…!

How ’bout a birthday cake? I cut a piece of my Kraft card stock to 4″ x 5.25″ and embossed that with a Darice filigree embossing folder and glued that to a white card base. I cut two cake “layers” from the Gold Breeze card stock, and the flowers and leaves from 80# Neenah, and colored all with my alcohol markers. I arranged the “frosting” flowers on the layers and wasn’t really happy with this card until I added the leaves – that gave us some contrast and helped ‘ground’ each layer. I stamped the sentiment on a scrap of White card stock using Walnut Stain Distress Oxide ink and clear-embossed that before die-cutting with the sentiment banner die.
The top flower and ‘layer’ is attached to the card front with foam tape and the bottom ‘layer’ is attached with a double layer of foam tape. The sentiment is mounted with more foam tape, and I tied a double bow with the twine from the MMH Dec.’19 kit and glued that to the left end of the sentiment. A few Darice Crystal sequins adds a little sparkle and here we have a uniquely decorated birthday cake card!
I’m not exactly sure what gave me this idea… I was playing with the envelope die and…

Maybe I was just itching for something bright and graphic!? I die cut six envelopes in rainbow colors from some thin (60# Reflections) card stock and assembled them all using scor-tape. I grabbed my HA Reactive inks in Fruit Punch, Creamsicle, Lemon Drop, Green Apple, Blue Hawaii and Thistle and stamped the two postage stamps across the top and bottom of a white card base, then arranged the envelopes together and glued those to the card front with a couple pieces of foam tape on the left edge of the red envelope.
 I turned to my Silhouette software to print this sentiment on a piece of my Mead sketch paper using the American Typewriter font. I trimmed that down and folded it over to add to the last envelope. I think this sentiment coupled with six envelopes really drives the point home! Very graphic and colorful yet not so thick that it couldn’t be mailed – that thinner card stock for the envelopes helps keep this card from requiring extra postage! That is a really nice, not too small, envelope die!
Lets have another go at those butterflies using more glimmer metallic ink – this time using the purple and red inks from the MMH August ’19 Kit!
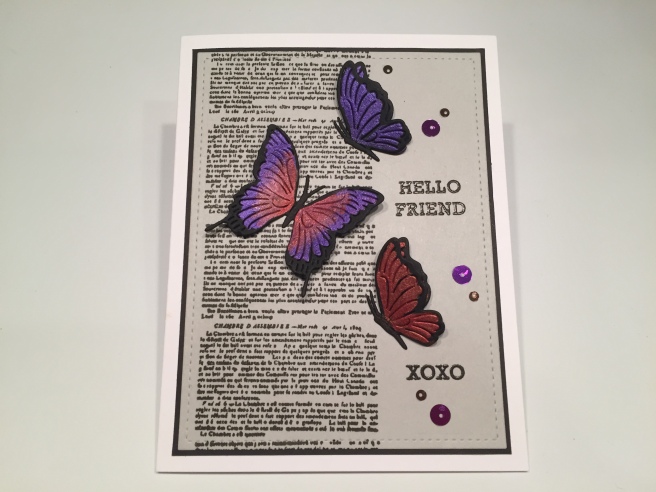
I stamped the small text stamp using VersaFine Onyx Black ink a couple times on some Grey card stock from my stash, die cut that with a LFSRD, matted that on a thin black mat and glued them down to a white card base. I die cut the butterflies from HA Pitch black card stock (four of the profile butterflies) and painted them with the Red and the Purple metallic inks. I stamped both sentiments with Onyx Black ink and clear embossed them and then assembled the butterflies. On the profile die cuts I just glued the bodies together beeping their ‘tails’ lined up and offsetting their ‘heads’ to create two antennae and separate their wings a little bit. Their bodies are glued to the card front and little pieces of foam tape give some dimension to their wings. Some purple sequins adds a little more sparkle and I have another butterfly card that doesn’t make me hate butterflies! I must remember how well the HA glimmer metallic inks work on black card stock! YEAH!
Let’s look at that envelope die again. I don’t feel like my rainbow card quite did it justice!

I’ve always wanted to make an interactive card like this, and our envelope die is the perfect size! Two envelopes die-cut from my sketch paper and assembled. I stamped the stamp stamp with Soft Granite ink on a scrap of Neenah card stock, colored that with alcohol markers, and fussy-cut it out. I stamped the sentiment and post mark using Onyx Black ink and added some little heart glitter pieces on the top left. I die-cut the Fireweed card stock with a LFSRD and added a thin mat of the Rose card Stock behind that.  The center of the Rose mat has been cut away with another LFSRD to start making a thin hollow chamber behind the card front. I cut a slot in the back of the top envelope just below the middle to feed our love note through, and copied and cut the same slot through the Fireweed card front as well. I did die-cut some scrap white card stock to make two more “frames” (using two LFSRDs) and glued them to the back of the card front for a little more wiggle room to hide the rest of our note. Using my Silhouette software,
  I printed this poem on a scrap of white card stock that measures 2.1/2″ wide by 4.3/8″ tall (the bottom 1/4″ is 3″ wide to provide a stopper so the note doesn’t pull all the way out). I dry-fit everything to make sure I had room for this whole poem, then glued the envelopes to the card front.
I stamped the sentiment on a scrap of white card stock using VersaMark ink and embossed that with the Pink Sparkle embossing powder included in our kit, and die-cut that with the banner die.
Finally, I slid the printed poem through the slot and glued the whole card front down to a white card base – only putting glue around the edges. I die-cut the little heart from the Rose card stock using one of my NEW HA Nesting Hearts Infinity dies (Merry Christmas!) and stamped the “open” using a MFT Interactive labels stamp and Onyx Black ink topped with clear embossing powder. A little removable glue dot holds the flap down, and not only is this a perfect (classic) Valentine poem, but I am a little amazed that I was able to get the entire poem on this magic reveal letter. When you start taking the letter out of the envelope, it just keeps going and going! A little touch of magic for you and your sweetheart!
One more sentiment to go, and I will have used a little bit of everything in this kit!

I am totally into these blue roses!! Not quite a wreath, but close! Flowers and greenery die-cut from Neenah 80# card stock and colored with alcohol markers (with some stardust glitter pen for the dots on the ‘bushy’ piece and a few white gel pen highlights). I die cut a piece of the Gold Breeze card stock with a LFSRD and added a mat behind that using some silver mirror card stock, and glued those to my card front. I used two of my NEW HA Nesting Oval Infinity dies (Merry Christmas!) to create this silver oval frame. I used the frame to lay out my sentiment and I stamped that on the card front using Faded Jeans Distress Oxide ink and embossed it with clear embossing powder. I glued the oval frame down to the card front and arranged the flowers and leaves on the two sides using glue and spots of foam tape. I tied a simple bow with some silver cord to add at the top and finished up this card with some Nuvo Sea Breeze Jewel Drops. LOVE this card!! 
You know I was trying to use all the stamps in our set, but that didn’t give me much of a chance to play with any puns this month… but I do like this bit of a pun on the inside. “Congratulations” “You rose to the challenge!” work perfectly together and if it doesn’t give you a giggle, I hope it at least gives you a groan!
 That wraps up my 10 cards for this sold out MMH January 2020 kit…! This is a very unique kit that can create a variety of cards – I managed only 2 Valentines but ended up with 8 different occasion cards. I can understand why this kit sold out so quickly – who doesn’t love flowers and butterflies? If you don’t want to miss out, I would suggest subscribing…! The six month plan lets you skip one month if you don’t happen to like the kit – not very many subscriptions let you do that! If you do go shopping at Hero Arts please use my links throughout this post and to go directly to Hero Arts click here: http://shrsl.com/1f7qx Thank you!
I did use every stamp in our set EXCEPT the “to:” and “from:” stamps, I used all of the dies, and actually a little bit of everything including the pink sparkle embossing powder! I did have a good time creating these cards… I LOVE that rosebud die and the envelope die and I’m starting to fall in love with those glimmer metallic inks! Thanks so much for sharing your time with me here… let me know which cards you like best, and remember to Like me, List me, Pin me, Post me, share me with all of your friends and remember… Don’t run barefoot through the roses! Happy Crafting!!

Once again I am amazed but not surprised at the creative
workings of Scott Pegg! I look forward to each new kit
and your original use of each part. And Elizabeth Barrett Browning was the cherry on top. Thank you for all your efforts and gorgeous results.
LikeLike
Thank YOU, Faith! So very much appreciate hearing from you! Spread the Cheer!
LikeLike
Thanks for these detailed emails on the kits. It really helps a lot! Also, so glad you use items from past kits. I still have the glimmer paint from the MMH August 19 kit and would not have thought of using it on my own!
I think the dozen roses was my favorite, though the sympathy card and butterfly cards were close seconds!
I really enjoy your videos!
LikeLike
Thanks so much Gael! Always a treat to hear from you! It thrills me to be able to share some fun ideas with you! Spread the Cheer!
LikeLike
Watching your MMH 10 card videos is a highlight of each month for me! I love your creativity and the tips you share. I’m not sure I would keep subscribing to the kits without your videos to guide me along the way. Thanks so much for all you do!
LikeLike
Thank YOU, Robin! It is folks like you who keep me inspired. Your support and encouragement mean the world to me! Spread the Cheer!
LikeLike
You are amazing AF. I have to say. I’m not a butterfly fan either – oh wait, till now. And the first two cards? Gorgeous. I never think to use embossing folders and it adds so much. Thanks!
LikeLike
Thank YOU so much, Kim! That means a lot to me! I have to remind myself to use those old supplies (embossing folders!) that are gathering dust on the shelves!! Always great to hear from you! Spread the Cheer!
LikeLike