
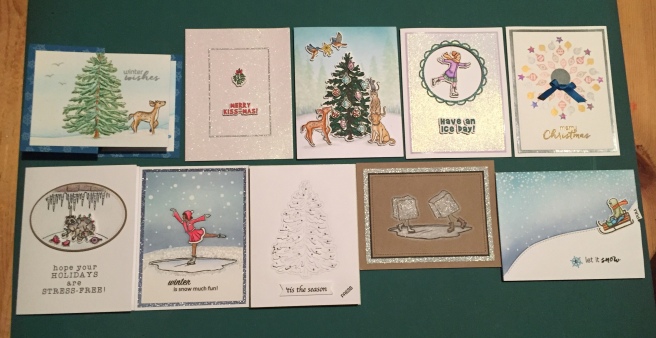
Hello Folks! Scott here with my 10 cards featuring the My Monthly Hero October 2018 kit. 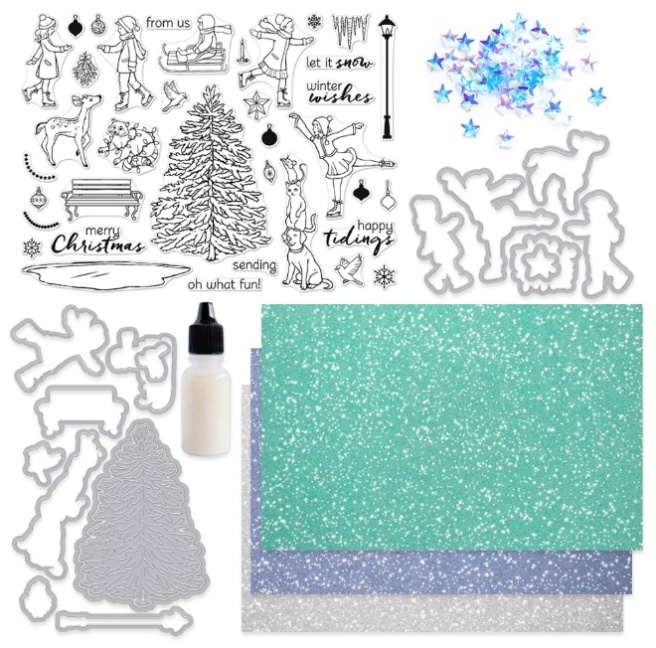 This is a Christmas / winter themed kit with a 6″ x 8″ stamp set highlighting four youthful ice skaters, a boy on a sled, some assorted animals, a frozen pond, park bench and lamp post, and a great big evergreen tree with some ornaments as well. Of course we get matching frame dies and an incredibly interesting Paper Layering Tree Die with Frame. I don’t think I have anything like this in my stash! Out kit is rounded out with six 5.5″ x 8.5″ sheets of Glitter Paper in Silver, Twilight, and Sea Glass – lovely super-smooth glitter stock – and a small package of Iridescent Star Embellishments and a .5 oz. container of Iridescent Ink (like a Wink of Stella shimmer pen). Looks like some good holiday/wintry fun this month!
Obviously, this kit seems to be all about creating scenes for our cards. A couple weeks ago I saw a Jennifer McGuire video showing off a “Double Z-fold” card and I thought I could adapt that idea into a BIG scene for my first card.
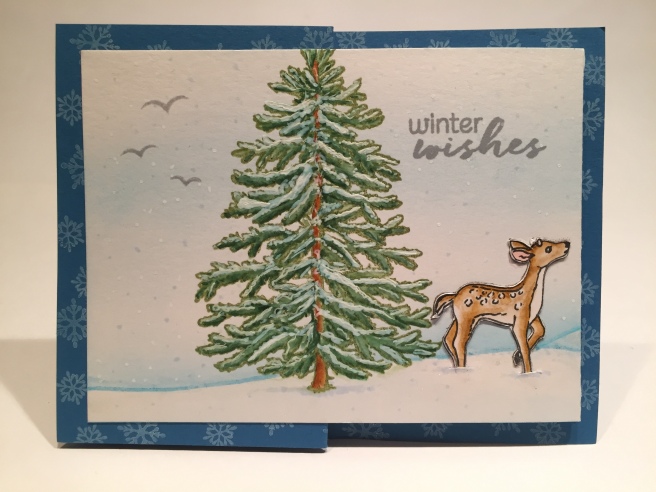
I wanted to do a landscape card, and wanted a little more space for my scene, so I increased the measurements for the stamped portion of the card from Jennifer’s 3.25″ x 10″ to 3.75″ x 10.5″. This leaves you a quarter-inch border of the card base showing and is still less than 11″, so it can be cut from a standard piece of card stock, and it gives us just a little bit more room for stamping. I did score this long piece exactly the same as Jennifer’s smaller one at 2.75″ and 5.5″.
I cut the front piece from my Bristol smooth card stock, and ink blended the sky with my Tim Holtz Distress Blending Brushes using Cracked China Distress Oxide ink over a hand-cut snow border(s) of post-it tape. I did keep the sky very light so I could stamp and color over it easily. I then stamped my scene using VersaMark Onyx Black ink for the figures, taking advantage of the snow masks and also masking off the legs of the skaters before stamping the pond. I used Hero Arts Summer Sky ink to stamp the pond, and Stampin’ Up Old Olive ink to stamp the tree. I was going for a one-layer scene here, but I miss-stamped the fawn and ultimately had to fussy-cut a new fawn to cover my mistake (you can see where I cut the snow bank to insert the fawn’s legs..!). This is still CLOSE to a one-layer card!! LOL!
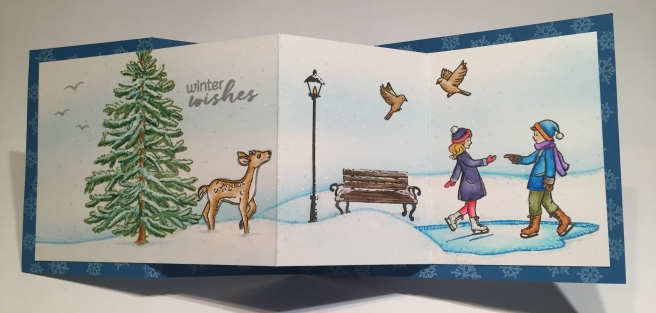
I used my Zigg Clean Color Real Brush Markers to color my scene, adding a bit of a highlight to the edges of the snow banks. I used my white gel pens to add some snow to the tree, bench and lamp post. I used Hero Arts Soft Granite ink for the sentiment and the distant birds (SSS July 2017 stamp set) and, since the sky was so light, used that same ink and my micro applicator brushes to add some dots of snow in the background. I did intersperse some dots of white gel pen as well, for a little variety in the snowfall. I cut my card base (4.25″ x 11″) from some blue card-stock in my stash, and stamped both of the snowflake stamps around the edges of the card base using Hero Arts Unicorn White ink. Finally, I scored the card base at 2.75″ and 5.5″ and glued the two pieces together using my Multi Medium Matte for a good strong bond. I really enjoy the apparent simplicity of the tree and the fawn on the front of the card, and then seeing the scene complete itself as you open the card. I think this wintry, pseudo-pop-up scene is worth having to write your message on the back of the card!
I felt like l kind of blew out my scene-building chops on that first card and wanted something a little simpler for my next card. I was puzzled by a couple of stamps in the stamp set that felt like filler to me – the mistletoe stamp being one of them. There doesn’t appear to be any stamps of kissing or even any stamps suggestively romantic in this set, so I figured we can just go ahead and feature the mistletoe on a card of it’s own!
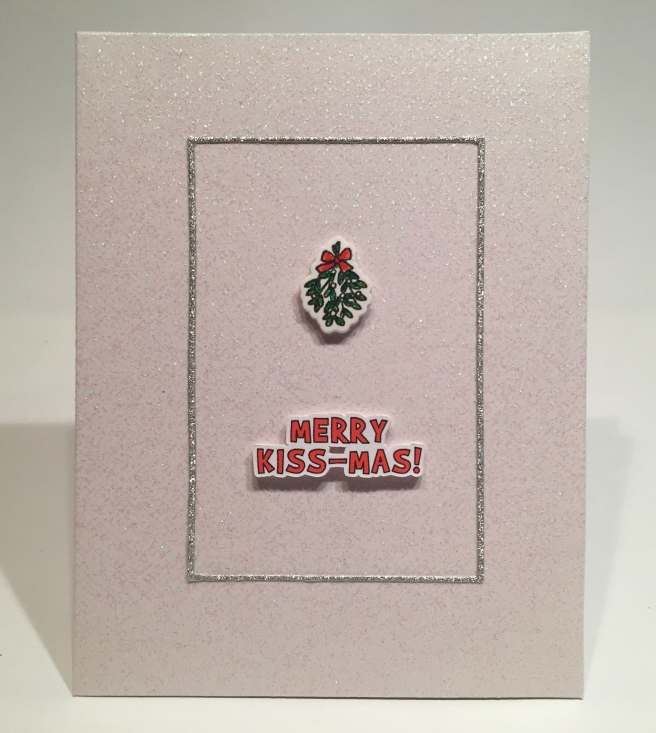
And we get our first pun this month! This makes me grin from ear-to-ear! I used an old pre-fab glitter card base for this card (David Tutera, maybe?) and stamped the mistletoe on a scrap of Bristol smooth card stock and colored it with my Zigg markers before die-cutting it. I turned to my Silhouette Portrait to print and cut this fun sentiment using the Brady Bunch Remastered font, on some plain white card stock. I did cut four layers of the sentiment and glued them all together, and die-cut two more blanks of the mistletoe to glue together, so both pieces are nice and chunky. I recently splurged on some of the new release items at Altenew, including the Fine Frames Cover Die, and sacrificed half of one of my silver glitter sheets to cut out some thin (1/16″) glitter frames. I glued the frame to my card base and added the cut-outs with foam tape. Simple and straight-forward, yet so very cute! And a perfectly appropriate pun!
Now back to some scene-building! Instead of trying to make another one-layer scene, lets use the dies included in the kit to build our scene featuring the animals.

On a smooth copic-friendly white card base, I reached for my Spectrum Noir alcohol markers to color the background for this scene. (I’ve been watching Sandy Allnock videos on YouTube!) I did reach for the Broken China Distress Oxide ink to blend in the top of the sky, and I’m rather proud of my first ‘hand-drawn’ background – softly suggestive! I stamped all the critters and ornaments in Onyx Black ink on Bristol Smooth card stock, and colored them all with my Zigg markers. I die-cut the animals, tree and star, then fussy-cut the ornaments before mounting all to my card.
 I arranged the ornaments on the tree and gave all of the animals an ornament of their own to add to the decorating. I love the birds carrying the star to the top of the tree, and even the fawn is pitching in! All of the images are foam taped to the card front, and I added little touches of my Sakura Stardust Glitter pen to all of the decorations for a tiny bit of sparkle. I added a sentiment from the stamp set on the inside of the card using Walnut Stain Distress Oxide ink and I think we can call this scene wrapped! I do feel like this is the card that this kit is just begging us to make! And using the dies keeps you from having to do bunches of masking all over the place!
With so many ice skaters in this stamp set I knew I had to do a spinner card this month! I chose this stamp because she had the longest vertical line from her skate to her head.
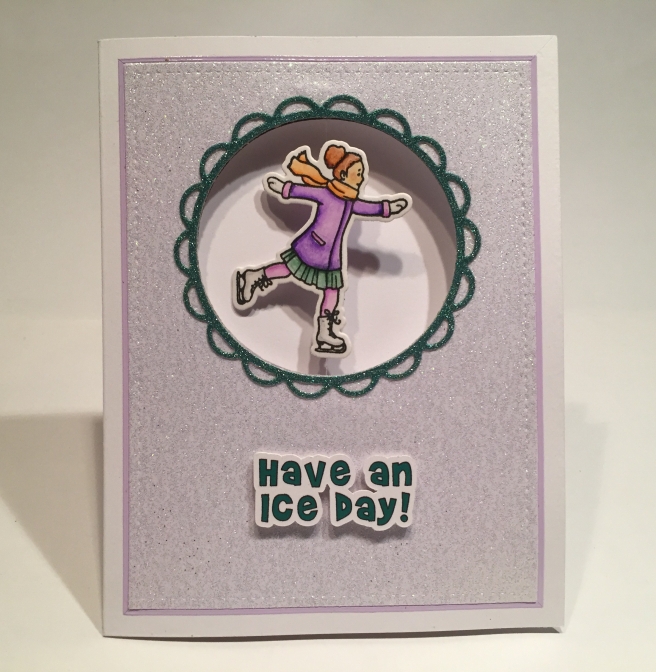
Other than the simple ordeal of trying to get a circle die-cut right in the middle of a white card base, I also had to create a ‘reverse stamp’ of this skater. I stamped her twice on some Bristol Smooth card stock, turned the card over on a light board and traced one of the stamps on to the back using an 02 Pigma Micron pen. Not too difficult, but upon close inspection, you can tell the difference! I die-cut a circle through a plain white card base and matched that up with a piece of white Glitter Silk card stock cut with a Lawn Fawn Stitched Rectangle die. I colored both the front and back stamps with my Zigg markers and created a die template for this stamp so I could get an accurate cut. Then I glued both pieces together with some invisible thread running from her bun to her skate. I did use scor-tape for a good strong bond with the thread.
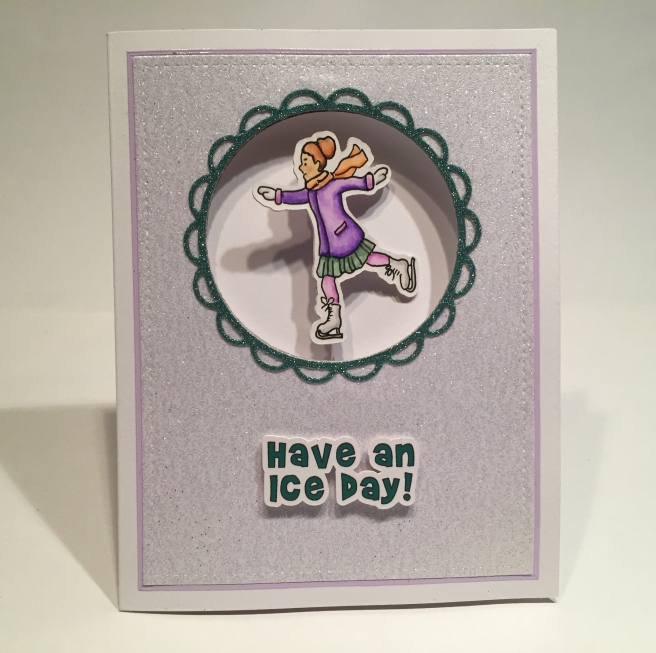
I attached the invisible thread to the card base using scor-tape and glued the glitter paper on the top sandwiching the thread between the card base and the card front. I was looking for a frame for this circle and came across these scallop circle dies I bought long ago and have never used. I had to pair the scallop die up with the original circle die to make an actual frame and cut this from the green glitter paper in the kit before gluing it to the card front. For a little finishing touch, I outlined the glitter card front with some Love From Lizi Lilac peel-offs. Those match that glitter paper perfectly!
I went back to my Silhouette Portrait to print and cut this pun-ny sentiment using the Brady Bunch Remastered font and I cut three layers to glue together before mounting to my card front with foam tape. I think the hardest part of this card was trying to make sure that my coloring matched on both the front and the back. Wind this skater up before you put the card in an envelope and she spins around when you open the card. Seems like an obvious choice to me! Give me some stamps that indicate movement and I am going to do my best to make them move!
We got a good assortment of ornament stamps in our stamp set, so I reached for my home-made wreath-builder template to see if the stamps would make a nice wreath.
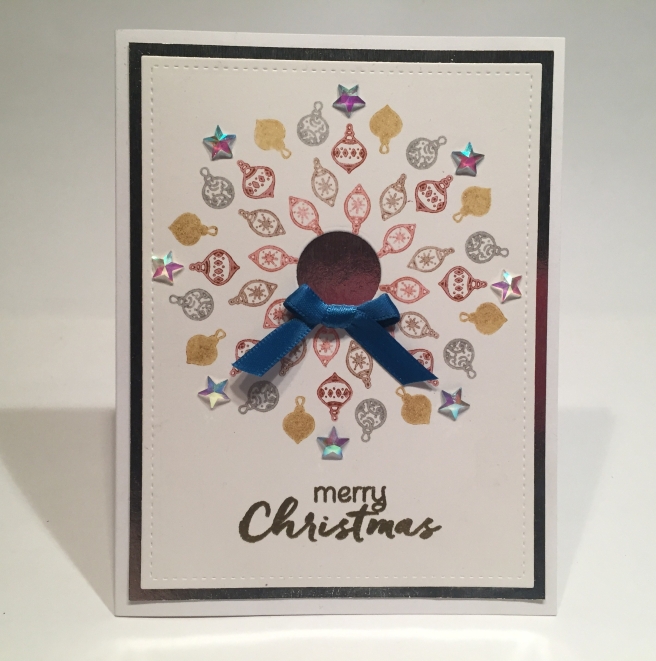
After practicing a couple of times, I arrived at this ornament wreath that I stamped on some plain white card stock with Delicata metallic pigment inks in Golden Glitz, Celestial Copper, Bronze Burst, Silver and Rose Gold. I die-cut the stamped panel with a LFSRD and also cut a hole in the center of the wreath with a circle die before matting that on a piece of silver mirror card stock. I thought it would be nice to see the silver through the center of the wreath. I finished out the wreath with some of the iridescent star crystals, and a small bow using the ribbon from the kit. I stamped the sentiment with VersaMark ink and embossed that with some gold embossing powder. I like all the metallic inks and think this is a fairly unique wreath perfect for a Christmas Greeting! Very shiny!
There were a couple of stamps in this set that felt like filler images to me – a candle, some icicles, (the mistletoe). And I admit I was a little thrown with the ‘raccoon all tangled up in lights’ stamp simply because we had no other light strings anywhere else. I do my best to try and use all the stamps included in the kit on my 10 cards, so that inspired me to create this fun card featuring our little raccoon and some of the other odd-stamps-out!
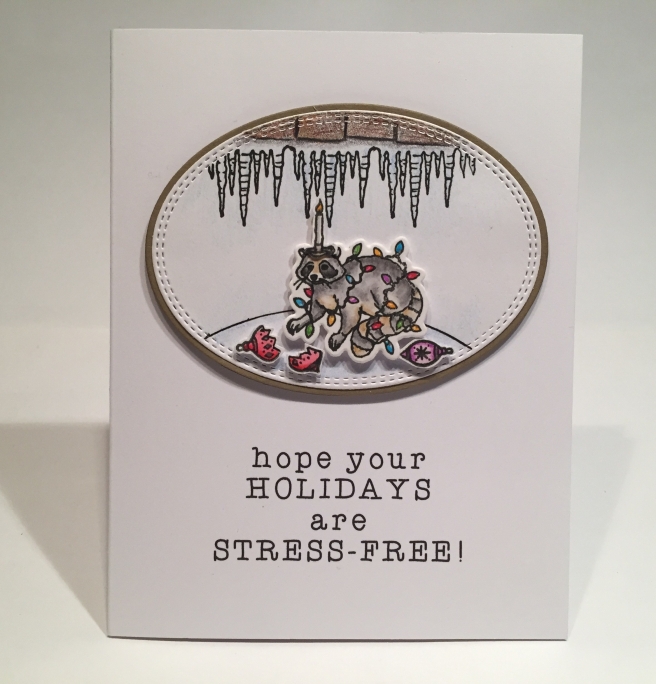
I couldn’t help but feel that this little raccoon was annoyed by that light string and thought we should make this scene as annoying as possible so as to really drive the sentiment home! Everything is stamped on Bristol smooth card stock with Onyx Black ink, colored with my Zigg brush markers, and die cut (or fussy-cut) as the case may be. Using my Silhouette Software I created this sentiment using the Typewriter Hand font and printed that directly on my card base. I used my Gina K Oval dies to cut the scene and the kraft mat and mounted those to the card front with foam tape. The images are foam taped on the oval and I even glued the candlestick on top of this poor fella’s head! I did sketch some ‘eaves’ at the top to anchor the icicles, and I love the broken ornament at his feet as well..! Heaven knows the holidays can certainly be stressful – maybe a card like this might bring a little smile to the over-taxed this year! LOL!!
I really like what I considered to be the “pro” (or at least competitive) skater in this set and thought she deserved a card all her own. Let’s try another single layer card!
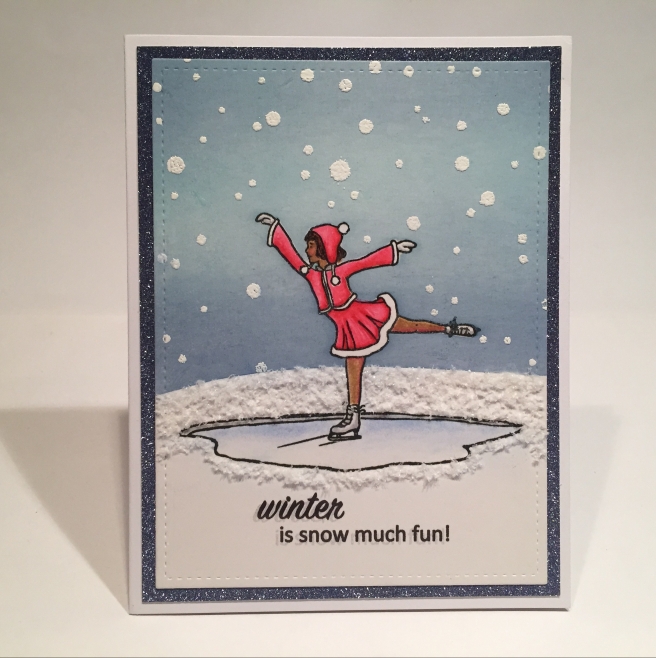
On Bristol smooth card stock I stamped the skater and the pond with Onyx Black ink (I did cut a full mask for the skater) and used my post-it tape hillside from my first card to mask off the ground. I ink blended the sky with Faded Jeans and Broken China Distress Oxide ink and printed the sentiment directly on the card base using the Sign Painter font for ‘winter’ and the Calibri font for the pun. I grabbed my Simon Says Stamp Falling Snow stencil to add the snow with VersaMark ink and Hero Arts White Puff Embossing powder. I did arrange the stencil so I wouldn’t get any big snowballs on my skater!
I colored the skater with my Zigg brush markers and tried to go a little more ethnic with this young lady. I die-cut the scene with a LFSRD, and matted that on a piece of the Twilight glitter paper and glued that straight down to a plain white card base. I had been digging around in my stash and came upon some Flower Soft Polar White from way back when and thought it would be fun to add some snowy texture to this card. (It IS a snow pun after all!!) I really like this card! The puff embossing powder and the Flower Soft work well together to add a lot of texture to this one-layer card. Does this still count as a one-layer card now? LOL! And of course, I love this simple pun!
So far, I’ve stamped that tree stamp and colored it. I stamped, colored and frame cut another tree. Now I need to use the layering tree die. I have to admit, when Hero Arts first did this kit reveal, I broke down and bought some Chibi Lights to do my first light-up card! I have been lusting after these little marvels for a long time, but they are a little expensive, and I hadn’t come across anything that screamed “Light Me”! So… I bought the cheapest Chibi Intro Kit that came with 3 LEDs, one battery and some foil circuit tape. Only $10! I figured that was worth the investment to see if I like this technique or not!
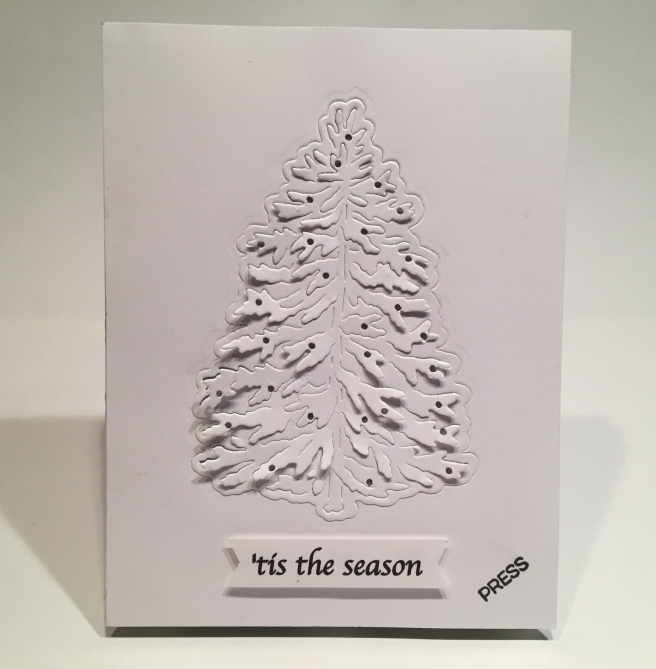
Before I even took the the layering die and the frame die apart, I cut out one tree on some plain 110# white card stock. I did cut a matching panel with the frame die and glued that to the front panel with a piece of vellum between. I thought the vellum would help spread the light around and the double surround would help keep the light from bleeding beyond the edges of the tree. I took a little 1/16″ hole punch to all the branches and punched out little holes on the branches – looks like little lights on the tree!
For the background / wiring layer, I grabbed a piece of card stock that I had sprayed with the Hero Arts Sea Foam Shimmer spray (MMH June 2018 kit) and laid out my circuit on that. I thought that shimmer spray card would add a little color to the lights reflecting behind the tree! You can really see that green in this pic! There are tons of ‘wiring how-to’ for the Chibi lights here on YouTube (and included with the Intro Kit) so I won’t go into that here, but I am proud to say I got the wiring correct on my first try. I did know that I wanted to put two lights behind this tree to try and get a more even spread throughout the die, and I had read somewhere that the lights each take 3 volts, so if I used two lights I could go up to 6 volts (2 batteries) for some extra bright shine!
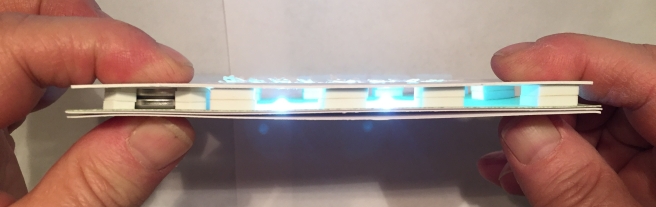
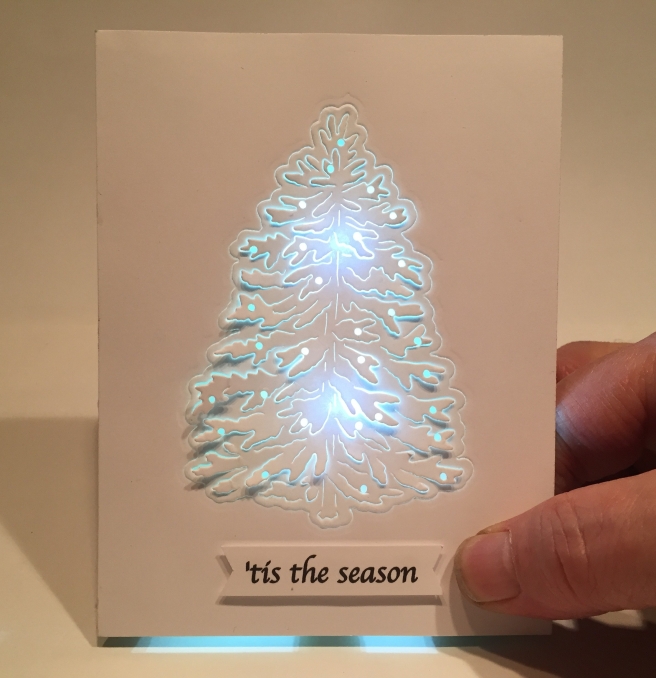
Never one to do things simply, I did go for the ‘double battery power pack’ and that ultimately necessitated some BIG space behind the card front. This actually worked to my advantage, as the more distance you have between the LEDs and the card front, the more the light will disperse! Here you can see my double battery stack on the left, the two lights in the center, and the double-height foam tape I used to attach the card front to the card base.
I did trim the card front down to 4.125″ x 5.375″ so we would get a tiny bit of the sea foam green showing around the edges  and attached everything down to a plain white card base. I printed the sentiments using my Silhouette software and the Apple Chancery font. I trimmed down the sentiment on the front into a little banner and attached that with some foam tape. For the pun on the inside, I printed it directly on the card base. Not only did I have a great time playing with these Chibi Lights, but I really, really love this card and adore the pun-ny sentiment on the inside! I think everything works together brilliantly! Pun intended!! LOL!!
I had this one pun running around my head and had to bring it into play with this kit.
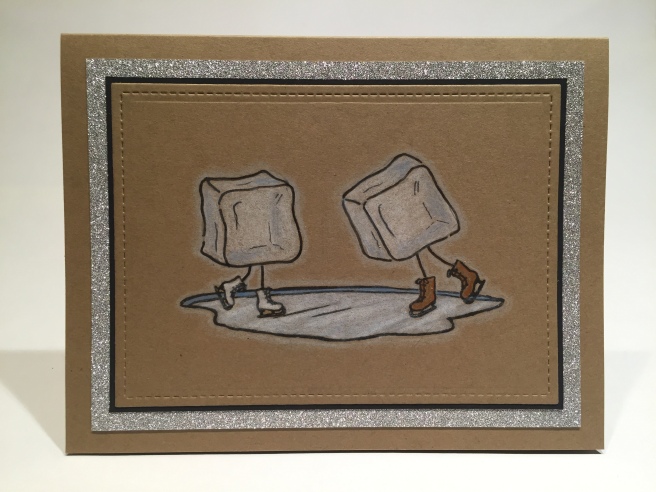
On a piece of Kraft card stock from my stash, I masked off the boy and girl skater and just stamped their skates with Onyx Black ink. I masked off the skates and stamped the pond in the same ink. I sketched in a couple of ice cubes and some stick legs going down to the skates using my 02 Pigma Micron pen. I reached for my colored pencils to add color to this vignette – I do love coloring on kraft card stock with colored pencils, and I used the kraft hoping to show a little translucency in the ice cubes – it worked very well – I wouldn’t have been able to get the same look on white card stock! I cut the kraft card with a LFSRD, matted that on a thin black mat, and matted both on a piece of the silver glitter card stock before attaching all down to a kraft card base.  Of course, I did add some sparkle to the ice cubes with the Iridescent watercolor ink. Now, I don’t want anyone to miss the (obvious) pun here, so I printed the sentiment on the inside of the card using my Silhouette software and the Sign Painter font. I love the vignette quality of this little scene and this picture-pun makes me giggle.
Now I haven’t used the sledding boy stamp yet, and there’s a couple of sentiments from the stamp set that I haven’t used yet either, so I decided to bring them all together for my last interactive card for this month.
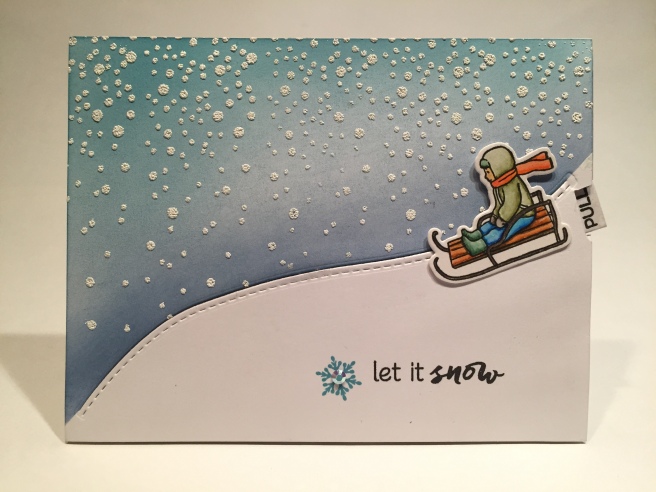
On a piece of Bristol smooth card stock, I took one of my stitched hillside dies and created this hillside without cutting through the edges of the card stock. I masked off the hillside and used my blending brushes and Oxide inks in Broken China and Faded Jeans to blend in the sky. I reached for my Simon Says Falling Backgrounds stamp to stamp the snow in the sky using VersaMark ink and embossing that with the Hero Arts White Puff embossing powder. This was the perfect size of snow for this scene! And I love the texture! I stamped the sentiment with onyx black ink and stamped the small snowflake with the Hero Arts Summer Sky ink. I stamped and colored and die-cut the boy in the same method I used for most all the images this month. And yes! There is a pull tab on the right side just behind the sled!
This card brings me so much joy I can hardly contain myself! This uses the Double Slider Surprise technique. Lawn Fawn came out with a die set for this technique just a month or so ago! I describe my technique in detail on my Double Slider Pull-Tab Card video and accompanying post. The big difference here is that the channel for the trash-bag conveyor belt is at an angle, and the boy is attached to the conveyor belt with a strip of acetate that is connected to his head and then down to the trash-bag conveyor belt. The track (the edge of the hill) is almost imperceptible here! I stamped the “oh what fun!” sentiment on the pull tab so it is revealed as our sledder goes down the hill. I think this is another interesting advancement with my interactive card explorations and this is a terrific way to wrap up this winter-time kit this month!
I came really close to using all the stamps in this stamp set but didn’t get to the “from us” sentiment, a few of the solid ornament stamps nor the short little ‘garland’ stamps, but I did manage to use 30 stamps with these 10 cards! Even though these cards do feel like a ‘set’ I think we have a pretty good variety here and I definitely developed some new skills and techniques putting these all together. I really love that tree stamp and layering die, and I have lots of that lovely glitter paper to add to my stash!
Thank you so so much for sharing your time with me here – I hope I was able to provide some grins and giggles and a little inspiration for you this month. Please share this post with anyone you believe might be interested, remember to Like me, List me, Pin me, Post me, don’t run with scissors, and, as always, Happy Crafting!!

Spectacular Scott! I think your new attempt at background trees, via Sandy Allnock videos, was great. She is amazing! This set of cards is truly delightful!! Thanks so much Scott! Hugssss
LikeLiked by 1 person
Thanks so much Katherine! I’m going to have to screw up my courage and do more alcohol marker backgrounds now…!!! Always good to hear from you!
Scott
LikeLike